

Easy Pretzels in Minutes Recipe with a Feel-Good Twist for Busy Moms
Imagine this: It’s a busy day, and you’ve got a million things to juggle. The kids are hungry, and you need to whip up something that not only satisfies but also feels good to eat. Sound familiar? We’ve all been there. That’s where my go-to pretzel recipe comes in to save the day—a recipe that’s as easy as it is delicious. This pretzel minutes recipe delivers the flavor you want with a lighter, feel-good twist. It’s perfect for quick lunches, snack boards, family dinners, or just those moments when comfort food is calling your name. Let’s dive in!
Finding the Right Balance
As parents, we often find ourselves torn between convenience and nutrition. We’ve got to keep our little ones happy while also making sure they’re eating something that fuels their growth and keeps them energized for play. This pretzel recipe hits that sweet spot!
It’s light, satisfying, and oh-so-delicious—how can you pass that up? You might think "homemade pretzels" sounds complicated, but I promise you, this recipe is simple enough for a weeknight dinner. Plus, it’s versatile. Depending on what your kids like, you can customize each batch!
The Magic of Pretzels
Before we get to the recipe, let’s chat about why pretzels are such a fantastic choice for kids (and parents!). They’re chewy, fun to shape, and come with endless dipping options. Seriously, what kid doesn’t love a good dip? The satisfaction of pulling apart a warm pretzel and dunking it into mustard, melted cheese, or even a sweet cinnamon sugar mix is a treat beyond compare.
This recipe allows your kids to get involved in the kitchen, too. Picture this: dough flying, laughter echoing—what a great way to spend time together! You can even teach them a bit about the science of baking, like what happens when you make the dough rise or how the baking soda bath creates that iconic pretzel crust.
So, are you ready to learn how to make these delightful snacks? Grab your apron, and let’s get started!
Ingredients You’ll Need
Here’s everything you’ll need for this easy pretzel recipe:
- 1 ½ cups warm water
- 1 packet instant yeast
- 2 tablespoons sugar
- 4 cups all-purpose flour (or whole wheat for a healthier touch)
- 1 teaspoon salt
- ⅓ cup baking soda
- Coarse sea salt, for topping
- Optional: melted butter or an egg wash for that golden finish
Quick Tips for Perfect Pretzels
- Warm Water: Make sure your water is warm, not hot—about 110°F is perfect. This helps activate the yeast!
- Fresh Yeast: Always check the expiration date on your yeast. Fresh yeast means better rise and texture.
- Dough Consistency: The dough should be soft but not too sticky. Adjust with a little extra flour if necessary.
Making the Pretzels
Now, let’s break down the steps. It’s easier than you think!
Step 1: Mixing the Dough
In a large mixing bowl, combine the warm water, sugar, and yeast. Stir gently and let it sit for about 5 minutes. You should see some bubbles forming—that’s the yeast springing to life!
Next, add in the flour and salt and mix until combined. The dough should start pulling away from the sides of the bowl. If it’s too sticky, sprinkle in a little more flour as you mix.
Step 2: Kneading the Dough
Flour a clean surface and turn the dough out of the bowl. Knead it for about 5-7 minutes until it becomes smooth and elastic. This is a great opportunity to involve your toddlers. Let them take turns kneading; it’s a fantastic way to build their motor skills!
Step 3: Letting it Rise
Once your dough is kneaded, place it in a greased bowl and cover it with a towel. Let it rise in a warm place for about 1 hour until it has doubled in size. Here’s a little pro tip—if you want to speed things up, you can turn your oven on low for a few minutes, then turn it off and place the dough inside.
Step 4: Shaping Pretzels
Once the dough has risen, it’s time for the fun part—shaping! Preheat your oven to 425°F. You’ll want to divide the dough into small balls, about the size of a golf ball. Roll each ball into a long snake shape, about 20 inches long. Then, twist it into a pretzel shape.
Set your shaped pretzels on parchment-lined baking sheets. They can be close together since they won’t spread much.
Step 5: The Baking Soda Bath
In a large pot, bring about 8 cups of water to a boil and carefully stir in the baking soda (it will bubble up!). Drop your pretzels into the boiling bath for about 30 seconds each. This step is crucial for getting that signature chewy pretzel crust.
After boiling, place them back on the baking sheet. Brush them with melted butter or an egg wash (which gives them that beautiful golden-brown color) and sprinkle with coarse sea salt.
Step 6: Baking
Bake them for 12-15 minutes until they are golden brown. Your kitchen will smell amazing, and I promise them finishing off quickly will be a matter of minutes. Kids and parents alike will be hovering around, waiting for that first bite.
Bonus Ideas for Serving
Now, before we wrap things up, let’s brainstorm some fun ways to enjoy your pretzels:
- Dipping Stations: Set up a little station with different dips—cheese sauce, mustard, or even hummus!
- Add Flavors: Want to mix it up? Try adding garlic powder or rosemary into the dough for flavored pretzels.
- Sweet Treats: After baking, dip them in melted chocolate or sprinkle them with cinnamon sugar for a dessert twist.
Mistakes to Avoid
- Skipping the Baking Soda Bath: Don’t skip this step! It’s what gives the pretzels that delightful crust.
- Too Much Flour: Be mindful of how much flour you add. Too much will make your pretzels dense and dry.
- Not Letting Dough Rise Enough: If you rush this step, your pretzels won’t be as fluffy and delicious.
Conclusion
There you have it—a delightful, feel-good pretzel recipe that’s bound to become a family favorite! It’s simple enough to make whenever you’re in the mood for something comforting, yet impressive enough to serve at a family gathering. Whether you’re preparing a quick lunch or a fun dinner, these pretzels are versatile and irresistible. So, why not save the recipe for your next baking adventure?
If you’re interested in exploring gluten-free options, you can check out these gluten-free soft pretzel twists. And for a different take on homemade pretzels, Sally’s Baking Addiction has a wonderful easy homemade soft pretzel recipe that’s worth trying out. Happy baking!
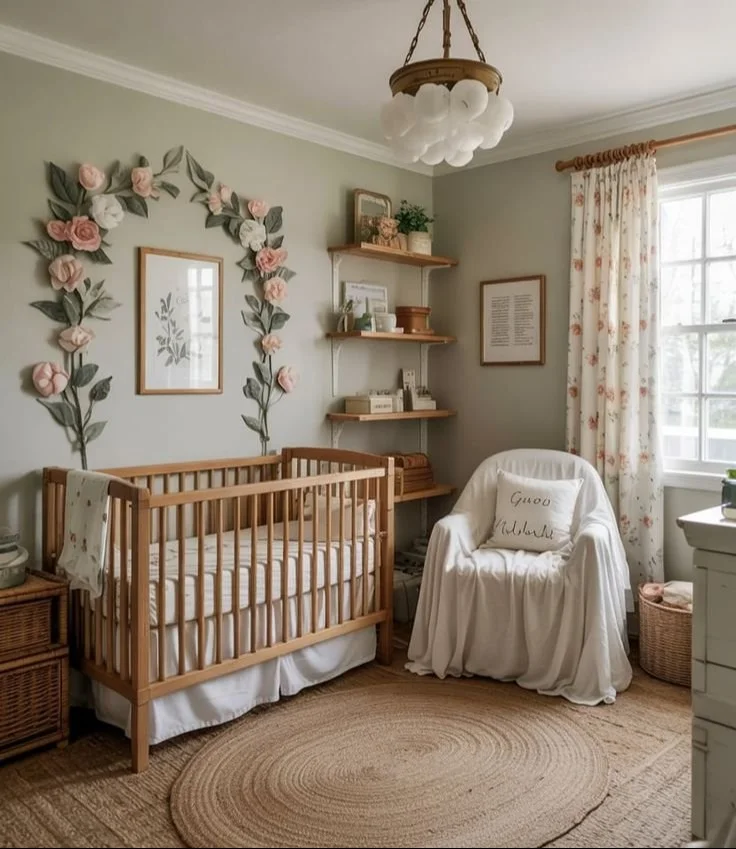
Botanical Bloom Boy Nursery 2025 Soft Green Walls and Floral Accents
Imagine this: It’s the middle of the night, and you’re tip-toeing into your little one’s nursery, your heart melting at the sight of peaceful slumber. The room is drenched in soft green hues, and the gentle rustle of floral curtains adds a touch of whimsy. Here’s the thing: designing a nursery doesn’t just involve selecting a crib and some toys; it’s about creating a sanctuary that fosters a calm atmosphere and reflects your family’s personality. If you’re considering setting up a nursery that pairs nature-inspired tranquility with delicate charm, you’re in for a treat!
Embracing Nature-Inspired Calm
When it comes to decorating your baby’s room, a nature-inspired calm can do wonders for both you and your child. Soft green walls can be such a soothing backdrop, almost like a fresh breath of air, reminiscent of blooming gardens and open meadows. Nature doesn’t just inform color choices; it brings life into the space. Picture this: every time you walk in, you’re reminded of the great outdoors, even if you’re indoors.
Choosing the Right Palette
You might be wondering what the perfect shades would be for a serene nursery. For that soft, nature-inspired vibe, think about going with pastel greens, gentle blues, or muted earth tones. These colors not only create a peaceful environment but also stimulate your child’s developing brain.
Quick Tip: Try incorporating varying shades of green along with some earthy elements like wooden furniture to keep things grounded.
The Heart of the Nursery
A crib is often considered the heart of a nursery, and picking the right one can make all the difference. We love the idea of a natural wood crib; it feels warm and inviting. It also complements your serene palette beautifully.
Adding Floral Details
Now, let’s talk wall decor. Over-sized floral wall art brings in that delicate charm we’re all craving. Think of vibrant flowers in soft palettes that evoke a sense of joy and whimsy. These pieces can be conversation starters, even as your little one grows into a curious toddler. Plus, they’re visually stimulating without being overwhelming.
Mistakes to Avoid: Ensure that any art you choose is well-anchored and out of reach from tiny hands. Safety is the priority, after all.
Grounding the Design
You’re not alone if you feel overwhelmed by the vast choices in nursery decor! One effective approach to creating balance is to incorporate natural textures. Woven baskets and a jute rug can ground the design and introduce elements that are tactile and visually striking. They offer a fit for everything, from toys to blankets, and they add warmth to a room that can sometimes feel stark.
The Power of Textures
What if I told you that adding different textures can help the room feel more inviting? Think of layering items like a cozy knitted blanket over the crib or choosing plush toys made from organic cotton. This invites gentle tactile exploration for your little one while keeping things stylish.
Personal Commentary: I still remember the way my son hugged his knitted blanket—it became his first friend!
Bringing the Outside In
To make the nursery feel like a peaceful garden, why not add some potted plants or greenery? They not only enhance the aesthetics but also purify the air, contributing to a healthier environment for your little bundle of joy. Just remember to choose non-toxic plants!
Floral Curtains for Softness
Here’s another lovely touch—floral curtains that float gently in the breeze. They can filter natural light beautifully and give the space that cozy, garden-like atmosphere. Fabric plays a key role in how a room feels, and floral patterns can add just the right amount of charm.
Create a Relaxing Routine
As you design your nursery, think about how the space will fit into your daily life. We’ve all been there—navigating the nighttime routines, often filled with sweet lullabies and soft lighting. Your design should promote relaxation. Think about incorporating a reading nook or a calming sound machine.
Making It Functional
While style is essential, functionality is equally important. You’ll need storage solutions that blend seamlessly into your aesthetic choices. What about floating shelves for books? They keep everything accessible while also contributing to the room’s overall charm.
Bonus Idea: Opt for multi-functional furniture, like a changing table that doubles as a dresser. We can save space and keep things practical without sacrificing style.
Incorporating Personal Touches
Now that you’ve got the basics down, it’s time to personalize! This might involve hanging up family photos or adding handmade crafts that represent your family. Incorporating these personal elements will bring deeper meaning to the space.
Seize the Opportunity for Creativity
Have you thought about a DIY project? Hand-painted canvases or a simple wall mural can add a creative touch. Crafting these pieces can be a beautiful bonding experience once your little one is old enough to participate.
Conclusion
Designing a nursery that pairs nature-inspired calm with delicate charm truly creates a serene environment where your child can thrive. From soft green walls and wooden furniture to whimsical floral decor and natural textures, you can create a peaceful, garden-inspired space that feels like a warm hug. If you’re looking for inspiration, consider exploring various options like green floral wallpaper or browse through stylish choices available at nursery wallpaper sites. Your baby deserves a sanctuary filled with love and creativity, and you’re on the right path to make that happen!
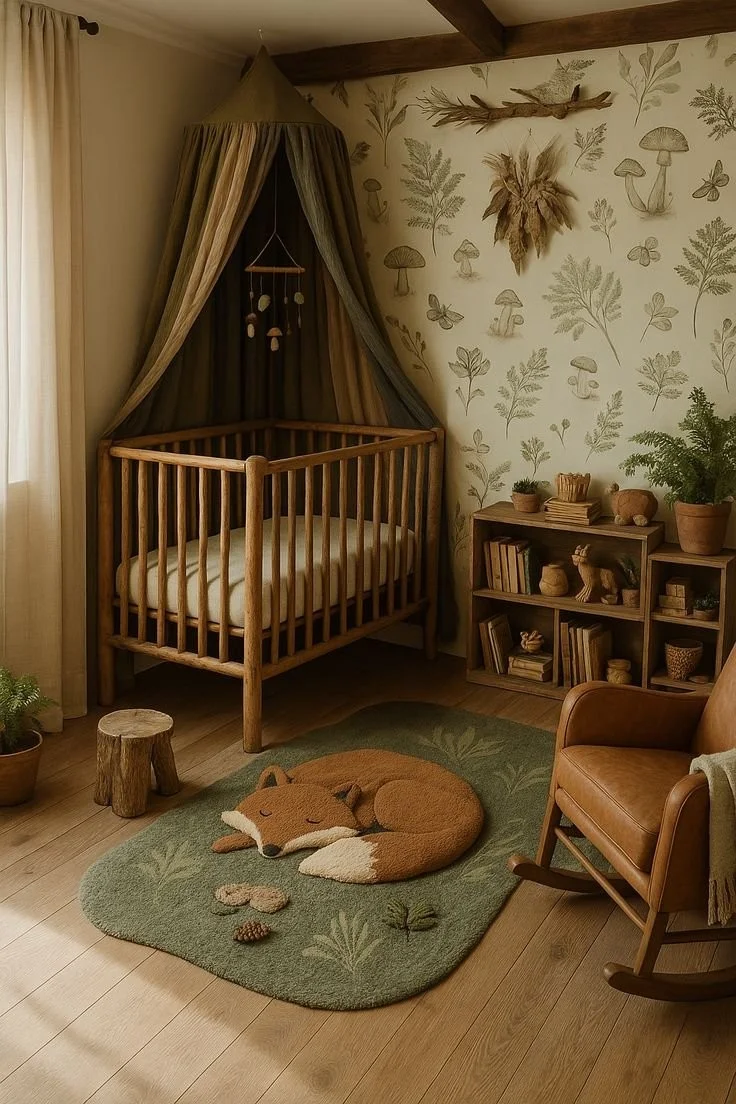
Woodland Nursery Setup Ideas You’ll Wish You Had Earlier!
Imagine this serene space
Picture this: you walk into a nursery that feels like a gentle hug, where soft hues of nature envelop you and every detail is thoughtfully crafted to bring warmth and calm. If you’re a parent anticipating your little one’s arrival, you know you want that special place to be more than just practical. You want it to be magical, right? Well, let me tell you about a woodland nursery that captures everything you might dream of for your child—a tranquil escape that feels like it was plucked straight from a bedtime story.
When I first laid eyes on the sleeping fox rug in this nursery, I was smitten. Seriously, it’s not just a decoration; it’s an invitation to a world where dreams roam free. But as I explored deeper, I discovered the essence of the woodland theme is much richer than just one enchanting piece. With every hand-illustrated wallpaper panel, forest-toned canopy, and earthy wooden texture, this nursery breathes a serene vibe that whispers calm, not chaos.
The allure of woodland nurseries
Woodland nurseries are gaining momentum, and it’s easy to see why. They celebrate nature and bring the outside in, creating a soothing environment perfect for your little one’s growth and development. If you’re on the hunt for nursery ideas that inspire a tranquil, earthy atmosphere, here’s a closer look at key elements that can transform your nursery into the comforting space we all yearn for.
Earthy tones and textures
Let’s talk about the color palette. Opting for forest-green hues, warm browns, and muted grays evokes the feeling of being wrapped in nature’s arms. These colors aren’t just pretty; they have an emotional impact, creating serenity and promoting relaxation—essential for both baby and parents.
In this woodland nursery, the wood crib stands out with its natural finish, perfectly complementing the earthy tones. The tactile experience of raw and organic textures, like a woven basket or reclaimed wood shelves, adds an inviting warmth. It’s amazing how these small details can make you feel right at home.
Magical wallpaper that sparks imagination
Remember when we were kids, and our imaginations ran wild? The hand-illustrated wallpaper in this woodland nursery encourages exactly that. Imagine your child’s delight as they gaze upon enchanting creatures and breathtaking trees brought to life in beautiful illustrations. It’s a canvas for dreams and storytelling, sparking curiosity and adventures every time they enter their room.
Not to mention, wallpapers can be an effective way of introducing patterns into your decor. Try pairing it with neutral nursery elements to balance everything out while maintaining the woodland theme. Trust me; it’s a game-changer for creating an inviting atmosphere.
Cozy canopies and playful touches
Speaking of canopies, let’s dive into how a well-placed forest-toned canopy can create an aura of coziness. Drape it over your crib or reading nook to encourage snuggles, storytime, and peaceful naps. It’s the perfect setup for those magical moments when they drift off to sleep, cushioned in a dreamy little bubble.
And don’t forget about the playful touches! Integrate soft stuffed animals or cute woodland-themed decor items like hedgehogs, deer, or birds scattered around the room. Every piece is part of the story you’re crafting, one that feeds your child’s imagination and nurtures a love for nature from an early age.
Quick tips to create your woodland nursery
Now that you’re likely feeling inspired, here are some actionable tips to help you bring that woodland dream to life:
Choose a Nature-Inspired Color Palette: Stick to earthy tones like sage green, warm browns, and gentle creams to create a calming environment.
Incorporate Natural Materials: Think wooden furniture, cotton fabrics, and handcrafted pieces that add warmth and texture to the room.
Utilize Wallpaper: Look for whimsical, child-friendly designs that resonate with the woodland theme and inspire imagination.
Create Cozy Nooks: Place a rocking chair or a comfy reading corner adorned with plush cushions to invite quiet moments together.
Add Green Life: Consider adding safe indoor plants or nature prints to enhance the organic vibe.
Mistakes to avoid when designing a woodland nursery
We’ve all been there: getting caught up in aesthetics while forgetting about practicality. Here’s a few common pitfalls to steer clear of:
Overdoing the Theme: While it’s tempting to cram every woodland creature into the decor, balance is key. A few well-placed items are more effective than overwhelming the space.
Ignoring Comfort: Your baby’s nursery should be cozy above all else. Ensure that furniture and textiles not only look good but are also comfortable and functional.
Neglecting Safety: Always keep safety in mind when choosing decor. Make sure everything is secured and free from hazards your little one could reach.
Bringing it all together
So what if you’re feeling hesitant about where to start? Don’t worry, you’re not alone in this! Many first-time parents can feel daunted by the idea of designing a nursery. Here’s the thing—take your time to explore your options and let your own sense of style and comfort reflect in your decisions.
As you embark on creating this special space, remember that every little detail counts. Your woodland nursery isn’t just about looks; it’s about crafting a nurturing atmosphere for your baby’s first memories. Whether it’s a baby boy nursery filled with playful charm or a tranquil baby girl nursery with pastel touches, the journey is as magical as the destination.
Conclusion
In the end, creating a woodland nursery is about embracing the beauty of nature while fostering a calm, imaginative space for your child. You have the power to design a room that isn’t just beautiful but also a sanctuary where your little one can thrive. If you’re considering starting your nursery journey, you might find helpful insights on starting a nursery business. Plus, if you’re curious about other ways to blend nature into your home, check out this article on whether to buy a big or small avocado tree. You’ve got this, parent friend! Trust your instincts and let your vision take flight.
Tips to Make Eating at a Restaurant with a Baby Less Stressful
Imagine this: you’ve finally carved out a little time for a family outing, and you’re excited to try that new restaurant everyone’s been raving about. It feels like a well-deserved treat, but as soon as you step through the door, your heart starts racing. You’ve got your baby in tow, and suddenly you’re wondering if you’ve made a huge mistake. Sound familiar?
I think we can all relate to that feeling of dread when it comes to dining out with little ones. But here’s the thing: going out to eat with a baby doesn’t have to be stressful. With a little prep and some handy tips, you can turn what might be a chaotic experience into a delightful outing for the whole family. Here are ten tips that can help ease the pressure, plus a handy Restaurant Kit you can keep in your car to make things even smoother.
Think Like a Baby
Before you even step foot in the restaurant, put yourself in your baby’s shoes (or little shoes, as the case usually is). Just think about all the new sights, sounds, and smells. It’s a lot to take in, right? Now, you might be wondering how to navigate this overwhelming experience. Here’s where a little bit of strategy comes into play.
Pick the Right Time
Dinnertime rush hour? Probably not the best time to be introducing your baby to the world of dining out. Opt for off-peak hours, like late afternoons or early evenings. Most restaurants tend to be quieter then, making it easier for your little one to adjust to the environment. Plus, there’s a better chance server attention won’t be split too thin, so your needs can be met quicker.
Choose the Right Place
This is so key! Seek out family-friendly restaurants—those that have high chairs, kid’s menus, and that warm, welcoming vibe. I can’t stress enough how much easier it is when the staff are used to handling little ones. As a bonus, many places offer play areas or activities to keep toddlers entertained while you wait for your meal.
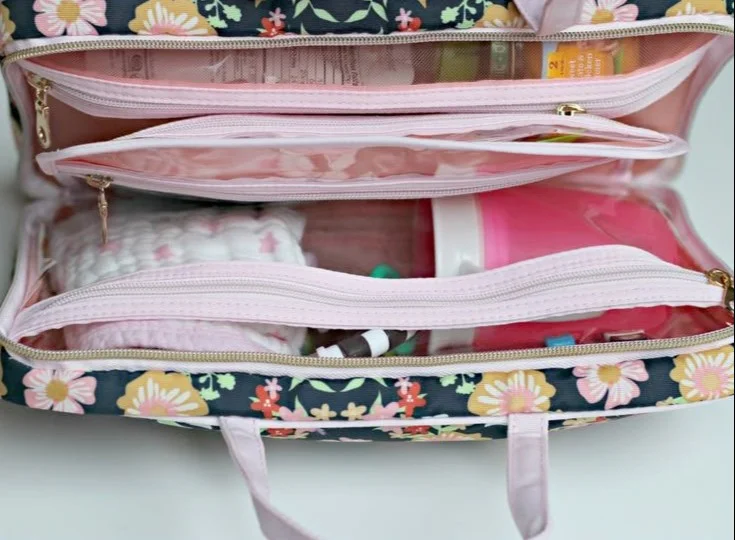
Bring a Restaurant Kit
Let’s be honest, being prepared is half the battle. Create a Restaurant Kit with all the essentials you might need (and trust me, you will). Keep it in your car, and you’ll always be ready to tackle dining out with the baby.
What Should You Include?
High Chair or Booster Seat: Not all restaurants have them, and some may be in bad condition. A travel high chair or booster can save the day.
Bib: A must-have to keep your baby’s outfit (and your sanity) intact.
Sippy Cup or Bottle: Depending on your baby’s age, have a sippy cup or bottle handy to avoid messes.
Snacks: Always good to have some emergency puffs or small snacks. It can help keep them occupied and stave off meltdowns.
Toys: A small plushie or some soft toys can be helpful when waiting for food. Just ensure they’re quiet and easy to clean!
Wipes and Napkins: Spills happen, and it’s always nice to be able to clean up quickly without borrowing from the restaurant.
Change of Clothes: You never know what might happen during mealtime, so it’s a good idea to have a spare outfit on hand.
Bonus Items for Toddlers
If your little one has reached the toddler stage, consider throwing in:
Coloring Books or Crayons: Keeps them entertained while you enjoy your meal.
Portable Activity Kits: Anything that can keep their busy minds and hands engaged!
Tablet with Pre-Downloaded Shows: A lifesaver if all else fails. Just keep it as a last resort!
Manage Expectations
Here’s the hard truth: dining out with a baby can be unpredictable. Maybe they’ll love their first bite of avocado, or maybe they’ll throw it across the table (yup, I’ve seen that happen). You’re not going to have a perfectly serene dinner, but that’s okay. Manage your expectations and remember, it’s all about making memories together, messy moments and all.
Keep It Simple
Once you’re at the restaurant, go for simple orders. Opt for one-dish meals or easy-to-eat appetizers. It cuts down on the waiting time and makes feeding your baby so much easier. Think finger foods—something they can gum or pick up on their own.
I’ve found that dishes like spaghetti or chopsticks for older babies can be a fun way to involve your baby in the experience (just maybe not the cleanest!).
Make the Most of Waiting Time
While you wait for your food, engage with your baby. Talk to them, make faces, and play simple games like peek-a-boo. It’s a great way to distract them and can turn waiting into a fun interaction. You might even end up getting some laughs (or eye rolls) from nearby diners!
Take Breaks When Needed
If your baby gets fussy (and when have we not been there?), it’s okay to step outside for a breather. Sometimes a little fresh air can work wonders. You can also use that moment to enjoy a bit of family time while soothing your baby.
Enjoy The Moment
Finally, remember to breathe. You’re out with your family, enjoying some good food. These moments are fleeting. Snap a quick picture, share a laugh, and don’t worry too much about how it all looks. This stage won’t last forever, and you’ll want to cherish these memories—even the messy ones.
Conclusion
Going out to eat with a baby doesn’t have to be another source of stress. With these ten tips and that well-stocked Restaurant Kit in your car, you can create a more enjoyable experience for yourself and your family. Dining out should be just as much about the food and atmosphere as it is about creating memories together.
For more helpful insights on navigating family outings, check out eight tips to make dining out with a baby less stressful. If you’re facing unique challenges, such as dining with a child who has autism, here’s an informative piece about eating out with a child that has autism that might assist you. Happy dining!

Best Hidden Veggie Recipes for Kids That Taste Amazingly Delicious
Imagine this: It’s 5 PM, and the dinner countdown has begun. You’ve planned a healthy meal featuring colorful vegetables, but as soon as your little one spots the broccoli on their plate, a chorus of “I don’t want that!” rings through the house. Sound familiar? You’re not alone in this, and if you’re like many parents, you might find yourself in a daily battle with a picky eater. The question surfaces: Is it time to start hiding those vegetables in their meals?
Hiding veggies in meals can feel like a blessing or a curse. On one hand, it seems like a savvy solution to ensure your child gets vital nutrients. On the other hand, there’s a concern that it might be undermining their relationship with food. Let’s dive in and explore this dilemma further.
Understanding Picky Eaters
We’ve all been there. You excitedly whip up a dish that showcases your culinary talents, only to have your toddler turn up their nose at it. But kids’ taste buds are finicky—what’s on their plate can come down to the texture, color, or even the shape of the food. It’s completely normal for children, especially those under five, to show preference towards certain foods and reject others.
So what do you do? Do you keep battling it out with steamed carrots or do you take a stealthier approach?
The Pros of Hiding Veggies
Here’s the thing—you might feel triumphant when you blend spinach into a smoothie or sneak cauliflower into mac and cheese. There are some real benefits to these hidden veggie recipes:
Nutritional Boost: Adding hidden veggies can up the fiber, vitamins, and minerals in your child’s diet without them even knowing. Sneaking in spinach or sweet potatoes can make their meals far more nutritious.
Experimentation: When veggies aren’t the main attraction, kids might be more open to trying new flavors and textures they’d normally shy away from.
Calm Dinner Times: If your child isn’t aware they’re eating veggies, it can make mealtime less stressful for both of you. No pleading, no arguments.
However, while the pros sound appealing, it’s crucial to balance this approach with your child’s developing relationship with food.
The Cons of Hiding Veggies
Now, let’s be honest—hiding veggies isn’t all sunshine and rainbows. There are some downsides to consider:
Trust Issues: If children find out you’ve been concealing their veggies, they might feel deceived. This could lead to a lack of trust when it comes to food. Engaging them honestly about their food can foster a better relationship.
Avoiding the Issue: Hiding veggies doesn’t address the core issue—teaching your child to accept and enjoy vegetables on their own. They might not learn to appreciate the taste and the benefits of these foods.
Eventual Resistance: If a child is regularly served hidden veggies, they may resist when exposed to them in their natural form. It can lead to more difficulties down the line when you want them to try a simple side of steamed green beans.
Finding a Balance: What to Try Instead
This is where the conversation takes an exciting turn. What if we could create meals that celebrate veggies rather than disguise them? Here are some ideas to help you get started:
1. Engage Them in the Process
Involve your little ones in cooking. Let them pick a veggie at the store or help you wash and cut vegetables. When kids feel a sense of ownership over their food, they’ll be more likely to try it.
2. Create Colorful Plates
Kids are visual eaters. A plate filled with a rainbow of vegetables is far more enticing. Try to mix vibrant colors and fun shapes—think carrot sticks, cherry tomatoes, and bell pepper slices arranged artistically.
3. Introduce Fun Dip
Offering a delicious dip can make veggies more appealing. Whether it’s hummus, yogurt-based ranch dressing, or a simple guacamole, kids may be more eager to munch on celery sticks when dipped in something tasty.
4. Roasting Magic
Roasting veggies can completely change their flavor and texture. Toss broccoli, carrots, or zucchini in olive oil, salt, and a pinch of parmesan cheese, then roast them until they’re crispy and caramelized.
5. Offer a “Veggie Bar”
Consider presenting a variety of veggie options on a platter during lunch or dinner. Let your child pick what they want to try. They might surprise you by going for items you didn’t think they’d like.
6. Make Meals Together
Put on a cooking apron and let your toddler measure, mix, or even sprinkle herb seasonings on the veggies. For example, try making healthy corn fritters together, and let them be in charge of seasoning!
Recipes to Consider
Let’s sprinkle in a few fun ideas for hidden veggie recipes that you can utilize now or adapt later:
Hidden Veggie Smoothies
- Spinach, banana, and coconut milk
- Carrot, mango, and yogurt
Veggie Muffins
- Carrot and zucchini muffin cups
- Sweet potato muffins with oats and cinnamon
Pasta Dishes
- Mac and cheese with blended butternut squash
- Spaghetti with finely chopped mushrooms or cauliflower
Snacks
- Veggie fritters that kids can dip (like the ones mentioned before!)
- Energy bites made with nuts, seeds, and a secret veg like pumpkin
Quick Tips to Make Mealtime Easier
- Don’t Give Up: Consistency is key. Just because they rejected spinach today doesn’t mean they’ll do the same tomorrow.
- Lead by Example: Show excitement when trying new veggies yourself. Kids are more likely to follow suit.
- Be Mindful of Portions: Small, manageable portions are less overwhelming for little ones. They can always ask for more!
Mistakes to Avoid
- Don’t focus solely on disguising vegetables; integrate them genuinely into meals.
- Avoid a negative tone when discussing or offering veggies.
- Try not to pressure them to eat—it often leads to resistance.
Conclusion
As we navigate the world of picky eaters, it’s crucial to strike a balance between helping our kids get the nutrients they need and nurturing a healthy relationship with food. Remember, it’s about the journey—finding ways to make veggies enticing and engaging rather than hidden and sneaky.
While you experiment with flavors, textures, and colors, don’t forget to lean on resources that can give you fresh ideas. For more interesting hidden veggie recipes, you might want to check out this compilation of hidden veggie recipes. If you’re looking for toddler-friendly options, 30 hidden veggie recipes for toddlers could be just the thing. And for some great meal ideas that kids will actually love, visit this list of hidden veggie recipes!
Keep trying, keep engaging, and remember: it’s all part of this beautiful parenting adventure we’re on. Happy cooking!

Practical Ways to Get Things Done with a Baby and Stay Calm
Imagine this: It’s a busy morning, and your baby just woke up. You’ve got a pile of laundry to tackle, emails to answer, and dinner to make… all while keeping your little one happy. Sound familiar? I’ve been there too, navigating life with not just one – but five kiddos! It can feel overwhelming, but trust me, you can be productive even with a baby in the mix. Here are 13 tips I’ve learned on this chaotic yet beautiful journey.
Prioritize Tasks Wisely
First things first, let’s talk about what really needs to get done. You might be tempted to write a mile-long to-do list, but let’s be honest – that’s a recipe for frustration. Instead, focus on 3 crucial tasks each day. This not only gives you a clear goal but also allows for a sense of accomplishment when you check them off.
Utilize Nap Time Effectively
Ah, nap time – the sacred hour. When your baby finally drifts off, it can feel like a race against time. Here’s the thing: use this precious time wisely. Tackle that laundry, answer emails, or even sneak in some self-care. If your to-do list includes something more relaxing, don’t hesitate to curl up with a book.
My personal favorite? Taking a quick power nap myself! It can work wonders for your energy levels.
Create a Flexible Routine
Consistency is great, but with a baby schedule, flexibility is key. Babies can be unpredictable, and what worked yesterday might not work today. Build a simple routine but adjust it as needed. For example, if your little one falls asleep later than usual, adapt your plans accordingly.
Make Use of Babywearing
Have you tried babywearing? If not, give it a shot! Wearing your baby allows you to have your hands free while still keeping them close. Whether you’re starting dinner or cleaning, it can empower you to get more done while having both hands available. Plus, babies usually love the warmth and closeness.
Involve Older Siblings
If you have older children, make them part of the solution. They can help with simple tasks like sorting laundry or setting the table. Not only does this take some load off your shoulders, but it also gives your older kids a chance to bond with their baby sibling. Talk about a win-win!
Organize Your Space
An organized space can make all the difference. Take a bit of time to set up your home for efficiency. Keep essentials for your baby close at hand. For example, have a designated spot for diapers, wipes, and change of clothes. This way, you won’t waste precious minutes searching for things when the need arises.
Opt for Quick Meals
Cooking can be time-consuming, especially with a baby in tow. Consider prepping meals in advance or choosing quick, easy recipes that take 30 minutes or less. You can also leverage slow cookers for delicious meals that will be waiting for you at the end of a hectic day.
And remember those frozen veggies – they’re a lifesaver!
Embrace Short Bursts of Productivity
When the baby’s awake, use short bursts of time to accomplish mini-tasks. Maybe you can unload the dishwasher during tummy time, or fold laundry while you’re keeping an eye on your little one. These short bursts can add up and help keep you productive throughout the day.
Build a Support Network
You’re not alone in this journey. Don’t hesitate to reach out to friends or family for help. Whether you need a break or simply someone to share your experiences with, having a support network can make a world of difference. Plus, it’s always nice to share a laugh or swap advice!
Take Advantage of Screen Time Wisely
Let’s be honest – screen time can be a useful parenting tool when used wisely. It’s okay to let your baby watch a bit of educational content sometimes while you take care of a few things. Just find a balance that works for you and your little one.
Delegate Tasks
If you have a partner or older kids, don’t hesitate to delegate tasks. It’s perfectly okay to ask for help – after all, parenting is a team sport! Share household responsibilities and make it known what you need help with. Communication is key!
Set Boundaries with Non-Essentials
While it’s important to stay connected with family and friends, social media and endless phone calls can eat into your productive time. Set boundaries around distractions. Maybe designate certain times of the day to check in rather than letting it interrupt your flow.
Celebrate Small Wins
Every little task you accomplish, whether big or small, is a step forward. Celebrate those small wins! Acknowledging your achievements, no matter how tiny they seem, can boost your motivation and keep your spirits high.
Don’t Forget Self-Care
It’s easy to forget about yourself when you’re busy parenting. However, self-care is a crucial part of productivity. Find tiny moments to breathe, relax, or do something that brings you joy. Whether it’s a 10-minute meditation or a quick walk around the block, taking care of yourself helps you care for your baby better.
Conclusion
Being a parent is one of life’s biggest challenges, but it can also be one of the most rewarding experiences. By following these 13 tips, you can navigate your responsibilities while cherishing those precious moments with your baby. It’s all about finding what works best for you and embracing the beautiful chaos.
For a deeper dive into personal growth and parenting, check out My Annual Birthday Check-In: 13 Lessons I Learned in the Last Year, or tune in to the insightful Culture Study Podcast. If you’re exploring fatherhood and the growth it brings, consider listening to Feel Your Way to Freedom: Growing Up Fatherless, Becoming a Father and Winning a Super Bowl Along the Way. You never know where inspiration might lead you!

40+ Easy Baby Activities You Can Do With Your Busy Toddler At Home
Imagine you’re home with your little one, and they’ve just spilled their snack all over the floor. You’re tempted to let out a sigh of exhaustion, but instead, you remember the magic of simple baby activities that can not only keep them entertained but also help them learn and grow. Here’s the thing: it doesn’t take much to create fun, engaging experiences for babies aged 6 to 15 months. You might feel overwhelmed when searching for ideas, but you’re definitely not alone in this. I’ve compiled a collection of over 40 easy baby activities that your little one will adore—and you might just enjoy them too.
Exploring the World Around Them
At this age, babies are naturally curious and eager to explore. Kickstart their journey with activities that stimulate their senses.
Textured Treasure Hunt
Gather a variety of fabrics, from soft velvet to rough burlap. Let your baby touch, feel, and explore. It’s a fantastic sensory experience, and you can talk about the textures to enhance their vocabulary.
Sensory Bins
Fill a shallow bin with safe items like rice, beans, or water beads. Add little toys or scoops for your baby to discover. Watching their little hands dig and sift through the materials is a joy! You might need to supervise closely since they love to taste everything.
Movement and Coordination
As babies begin to move, they crave activities that let them stretch and wiggle.
Crawling Course
Set up a mini obstacle course in your living room using cushions, pillows, and soft toys. Encourage your baby to crawl over and around the obstacles. It’s both a fun workout and a great way to develop motor skills.
Dance Party
Put on your favorite tunes and have a little dance party! Babies love movement, and the rhythm will have them giggling. What if you introduce a ribbon or scarf for them to wave around? Instant joy!
Creative Play
Letting your baby explore their creative side is essential too.
Finger Painting
Use edible finger paints (casually made from yogurt and food coloring) and let your baby go wild on a piece of paper. This is messy, yes, but isn’t that what makes it fun? Just make sure you spread some newspaper underneath for easier cleanup.
DIY Musical Instruments
Empty tissue boxes or plastic containers can become shakers when you fill them with rice or beads. Tape them securely and watch as your baby learns to shake, rattle, and roll!
Building Bonds through Interaction
Sometimes, the best activities are the ones that bring you closer.
Read-Aloud Sessions
Cuddle up with some board books and read aloud to your baby. Use different voices and facial expressions to make it engaging. This not only develops their listening skills but also strengthens your bond.
Peek-a-Boo Variations
Let’s be honest, who doesn’t love a classic game of peek-a-boo? But you can take it a step further. Use scarves or a small blanket to hide your baby’s face and watch their excitement when they discover you again.
Fine Motor Skills Fun
Helping your baby improve their fine motor skills is not just vital for their development; it can be rewarding for you to watch them progress.
Stacking Blocks
Grab some soft blocks and let your little one try stacking them. It’s a wonderful way to enhance hand-eye coordination. What if they topple them over? Enjoy the giggles as both of you engage in this simple yet entertaining activity.
Puff Balls and Tongs
Give your baby some colorful puff balls and a pair of tongs. Show them how to pick up puff balls and transfer them to a bowl. It’s surprisingly challenging for them and great for strengthening those tiny hand muscles!
Engaging with Nature
Don’t forget about the great outdoors!
Nature Scavenger Hunt
Take your baby on a walk and collect leaves, flowers, and sticks. Talk about what you find, and let them touch and explore. Nature is full of wonders, and your baby will be delighted to experience it with you.
Bubble Chasing
Bubbles are a magical way to get your baby moving. Blow bubbles in the backyard and giggle together as they try to catch them. It’s simple, but the delight in their eyes is priceless.
Simple Science Experiments
Even at a young age, you can introduce simple science concepts in a fun way.
Color Mixing
Pour a little water into clear containers and add food coloring. Show your baby how colors mix when you combine them! Use cups to create different shades and encourage exploration and experimentation.
Water Play
Fill a shallow basin or bathtub with water and let your baby splash around with cups, boats, or bath toys. Supervise closely; it’s a clean fun that can quickly turn into a soaking adventure!
Bonus Ideas for Endless Fun
Still looking for more? Here’s a quick list of bonus activities for your baby:
- Play with a mirror: Babies love looking at themselves and making faces.
- Button Art: Let them explore various buttons on a fabric swatch—great for tactile play.
- Sock Puppets: Create simple puppets with socks and put on a little show.
- Dance with Scarves: Twirling scarves to music can be an exhilarating sensory experience.
Quick Tips for Successful Activity Time
- Set a Routine: Babies thrive on routine, so try to schedule activity time regularly.
- Stay Calm and Relaxed: It’s okay if things don’t go perfectly. Just enjoy the moments.
- Be Present: Engage fully in whatever activity you choose; your baby will love every second of your attention.
Mistakes to Avoid
- Overwhelm: Don’t pack too many activities into one day. Less is often more.
- Forcing Engagement: If your baby seems disinterested, it’s okay to switch gears. Follow their lead.
- Neglecting Supervision: Always supervise activities, especially with small items they can put in their mouths.
Remember, every moment spent with your baby is a chance to learn and grow together. These activities won’t just keep them busy; they’ll help pave the way for their development in exciting ways.
Conclusion
I hope this collection of over 40 easy baby activities sparks your creativity and simplifies your playtime together. You’ll find these ideas not only keep your baby entertained but also help them learn. For more activities and resources, check out Tugging Lid for Baby Playtime, explore reading options in Babies & Infants at Edinburgh Libraries, or dive into sensory fun with the Baby Music Bin Sensory Fun. Here’s to happy days filled with joy, learning, and plenty of giggles!
Kid Friendly Watermelon Slush 5 Easy Steps for a Tasty Summer Treat
Imagine it’s a scorching summer day, and you’re outdoors with your little ones, trying to soak up every ounce of sunshine while keeping them cool. The kids are bouncing with energy, but you’re facing a familiar challenge: how to keep them hydrated and happy without resorting to sugary drinks that often come with a side of guilt. Sound familiar? If you’ve found yourself stuck between a rock and a hard place on warm days, I’ve got something refreshing to share—a delightful homemade Watermelon Slush that will knock their socks off!
This isn’t just any drink; it’s a kid-friendly treat that’s quick to prepare, healthy, and, dare I say, perfect for your little ones aged 0–5. Trust me, once you whip this up, you’ll wonder why you didn’t try it sooner.
The Magic of Watermelon
Watermelons are nature’s candy, packed full of vitamins A and C, and they’re over 90% water. Did you know that watermelons can help keep your kids hydrated during long play sessions? Beyond that, they’re low in calories and contain antioxidants that make for a nutritious snack. Plus, kids adore the sweet, juicy flavor!
Simple Ingredients You’ll Need
Here’s the thing—you won’t need a long grocery list to make this slush. Just grab a ripe watermelon and perhaps a few extras if you’re feeling adventurous. Here’s what you need:
- Fresh watermelon: About 4 cups, cubed and frozen
- Lime juice: Freshly squeezed from about 1 lime (trust me, this elevates the taste)
- Honey or agave syrup: Totally optional, but it can add extra sweetness if your watermelon isn’t perfectly ripe
- Ice: Only if you want extra chill
The prep work is as easy as it gets. Just cut the watermelon into cubes (it’s a great way to get your kiddos involved—let them help with washing and prepping!). Then pop the cubes in the freezer for at least three hours. Pro tip: You can prepare them in advance and store them in a freezer bag for those spontaneous snack times.
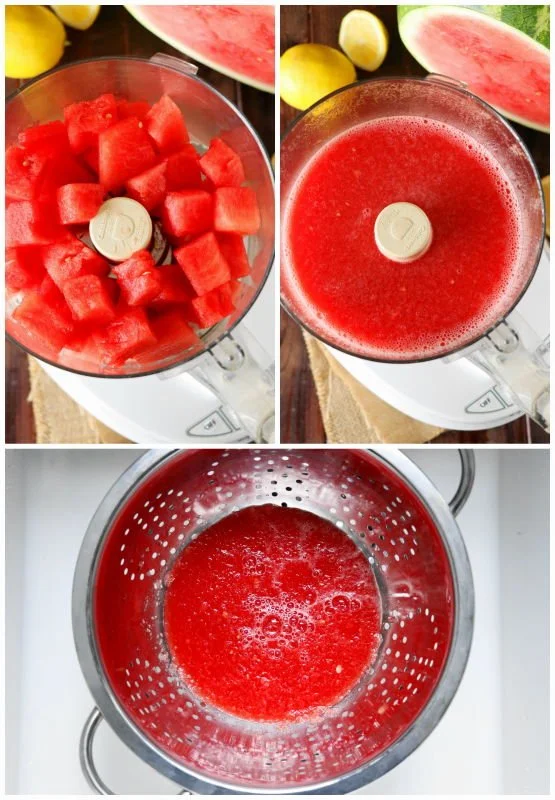
Whipping Up the Slush
When it comes to making the slush, you’ll feel like a culinary magician.
- Blend it up: Toss the frozen watermelon into a blender or food processor.
- Add the lime: Squeeze in your lime juice. This isn’t just for show; the acidity from the lime balances the sweetness of the watermelon, making it taste like a treat right out of a fancy café.
- Sweeten it (optional): If you think it needs a little extra zing, add honey or agave syrup. Remember, start with a small amount and taste as you go. You can always add more, but you can’t take it out!
- Pulse away: Blend until those cubes transform into a beautiful slushy consistency. If it’s too thick, add a touch of water or ice; if it’s too thin, you might want to throw in more frozen watermelon.
Presentation is Key
We eat with our eyes, right? Make this slush even more enticing by serving it in fun cups or mason jars. Add colorful straws or even little umbrellas—your kids will feel like they’re on a tropical holiday, right at home. You could also sprinkle some fresh mint leaves on top for a vibrant touch that screams summer fun!
Tips for Serving
Now, let’s be honest. Kids can be a bit picky, and you want to create a positive experience around this fresh treat.
- Invite the Little Chefs: Involve your kids in the preparation. They’ll be more excited to try it if they help make it!
- Experiment: If they’re a bit wary of watermelon, consider mixing in other fruits like strawberries or pineapples for an added layer of flavor. You might even stumble upon a new family favorite!
- Temperature Matters: Kids love things that can be eaten with their hands. You might want to consider pouring some of the slush into fun molds and freezing them for easy popsicles they can grab when they’re cooling down from outdoor play.
What If They Don’t Like Watermelon?
You’re not alone in this. Many parents have kids who aren’t fans of certain fruits. But what if your child is among them?
- Consider trying this slush with a combination of fruits. Other melons, like cantaloupe or honeydew, can also work beautifully, or you could switch things up with berries or peaches.
- Keep the same slushy base and let them choose their favorite fruit. This provides the opportunity for them to be involved in the decision-making process, which can make them a bit more inclined to enjoy it.
Mistakes to Avoid
There are a few common pitfalls other parents have experienced when making this slush:
- Using overly ripe watermelon: While it may seem like a good idea, overly ripe fruit can lead to a mushy slush that’s not as refreshing. Aim for firm, juicy watermelon.
- Too much sugar: Remember, watermelon is naturally sweet. Adding too much honey can overpower the deliciousness of the actual fruit.
- Not blending long enough: You want that smooth, slushy texture. If you see chunks, give it another blitz.
Conclusion
As we navigate the joys and challenges of parenting, let’s agree that it’s little moments like these that make our lives a bit sweeter. Whipping up a kid-friendly Watermelon Slush isn’t just about hydration; it’s about creating memories that your little ones will cherish—like the time you all gathered in the kitchen to make a delicious, refreshing treat together.
To explore more fun ideas, consider checking out our favorite strawberry recipes for kids, or you might enjoy this delightful Watermelon-Lime Slushies recipe from Nourishing Meals. If you’re seeking other easy treats, take a look at the Watermelon Slushie recipe featured on From My Bowl. I can’t wait for you to give this slush a try and watch your kids enjoy every spoonful!
Easy Toddler Meal Ideas to Win Over Picky Eaters and Healthy Habits
Struggling with a picky eater
Imagine this: it’s dinner time, and you’ve just spent the last hour prepping what you thought would be a toddler culinary masterpiece. You present the dish with a flourish, only to have your little one push the plate away with a dramatic flair or, worse, refuse to even take a bite. Sound familiar?
You’re not alone in this. Many parents struggle with picky eaters, and it can make mealtime feel like a battleground. The good news is, there are meals out there that actually get eaten—ones that are easy to prepare, healthy, and won’t leave your kitchen looking like a disaster zone. So, let’s dive into some toddler meal ideas that your picky eaters are more likely to love!
Toddler meal ideas that work
When it comes to feeding toddlers, simplicity is key. It’s all about flavors, colors, and presentations that appeal to their little imaginations. Here are some tasty and easy toddler meals you’ll want to keep on hand.
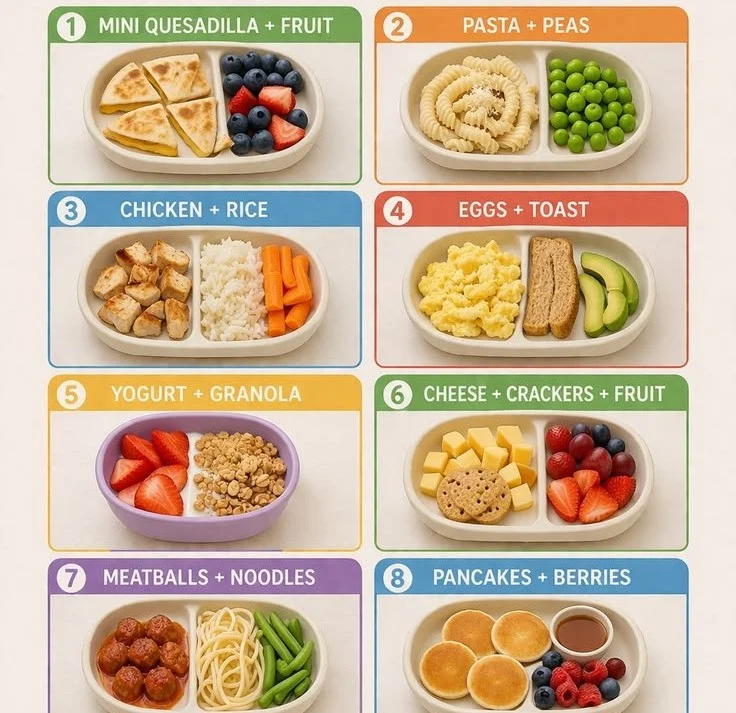
Quick and Easy Breakfast Ideas
Fruit and Yogurt Parfait: Layer yogurt with your toddler’s favorite fruits and a sprinkle of granola. It’s colorful, delicious, and can be made in under five minutes.
Mini Pancake Sandwiches: Use whole-grain pancakes as the bread and add peanut butter or cream cheese with banana slices in between. They’ll love the fun shape and you’ll love the nutrition.
Nutritious Lunch Options
Veggie Dippers with Hummus or Ranch: Cut up cucumbers, carrots, and bell peppers into easy-to-hold sticks. Pair them with hummus or ranch dressing for a tasty dip. This is a great way to sneak in some vegetables without the mess.
Quesadillas: Simply fill a whole-wheat tortilla with cheese and your choice of veggies, fold, and grill until warm. You can even add beans for an extra protein punch.
Simple Dinner Ideas
Baked Chicken Tenders: Coat chicken strips in yogurt, then dip in crushed whole-grain cereal for a healthy twist on a favorite. Bake them until golden and serve with ketchup for dipping.
Pasta with Hidden Veggie Sauce: Blend some cooked carrots or spinach into tomato sauce before serving it over whole-grain pasta. It’s a sneaky way to get those greens in without a struggle.
DIY Mini Pizzas: Allow your toddler to build their pizzas using whole-grain English muffins, tomato sauce, cheese, and toppings of their choice. It’s interactive and fun!
Snacks That Pack a Punch
Cheese and Crackers: This classic combo is always a hit. Pair whole grain crackers with slices of cheese, and throw in a few grape halves for sweetness.
Ants on a Log: Spread peanut butter on celery sticks and top them with raisins. This playful snack is full of nutrients and keeps little hands busy.
Tips to Encourage Healthy Eating
Let’s be honest, getting your toddler to try new foods can feel like a Herculean task. Here are some strategies that can help:
Be Patient: It’s completely normal for toddlers to reject new foods several times before deciding to try them. Keep presenting the options without pressure.
Make It Fun: Let your toddler pick their plates or arrange their food in a fun way. Foods shaped like animals or faces can spark their curiosity and appetite.
Lead by Example: Show your little one how much you enjoy healthy foods. Your enthusiasm can be contagious!
Low-Mess Meal Ideas for Busy Moms
If there’s one thing we know as parents, it’s that mess can feel overwhelming. Here are some meals that keep the chaos to a minimum.
One-Pan Meals: Try a tray of roasted veggies and chicken. Just chop everything up, toss it in some olive oil and seasoning, and let the oven do the work. Less cooking time equals less mess!
Soup in a Cup: For a cozy meal, serve a simple vegetable soup in a cup. Your child can drink it, and you won’t have to worry about spills as much.
Wraps: Fill whole-wheat wraps with a variety of ingredients and then slice them into bite-sized pieces for easy hand-held eating. You can pack everything in and keep it tidy.
Resources for More Ideas
When meals start to feel repetitive (and you need some fresh inspiration), don’t hesitate to explore online resources. There are plenty of websites dedicated to easy and tasty meals for picky toddlers. For instance, you can take a look at Top Dinner Recipes for Picky Eaters or 35 Easy Toddler Dinner Ideas for Picky Eaters. They can offer a treasure trove of meal ideas that might just do the trick for your little ones.
Conclusion
Struggling with a picky eater can feel isolating and frustrating, but you’re definitely not alone. With a bit of creativity and the right meals, you can turn mealtimes from battlefields into enjoyable experiences. Keep those plates colorful, flavorful, and fun. And remember, it’s perfectly okay to keep experimenting—because you never know what tasty surprise might become your picky eater’s next favorite.
For even more ideas, you can check out this comprehensive guide on toddler meals for picky eaters. Don’t lose hope—mealtime magic is just around the corner!
DIY Baby Shower Craft Table Ideas for a Cute, Interactive Party
Imagine this: You’re knee-deep in baby shower preparations. There’s pastel-colored decorations sprouting up everywhere, but something feels a tad… missing. You want your gathering to be memorable, something that stands out from the usual cookie-cutter events. Here’s the thing—setting up a craft table can be that spark you’re looking for. Picture guests getting creative, crafting precious keepsakes for the little one on the way. Sounds fun, right?
Creating a craft table isn’t just a clever diversion; it’s a way to bond, create memories, and provide heartfelt tokens of love for the baby. In this article, I’ll share how to set up a craft table that’ll keep your guests engaged and guarantee they leave with something special. Let’s dive in!
Why a Craft Table is a Great Idea
You might be wondering, “Why should I add a craft table to my baby shower?” Well, think about it. Not only does it keep guests entertained, but it also gives them a unique way to express their creativity. Remember that moment when you saw your kiddo’s tiny footprints for the first time? That feeling of overwhelming love? Now imagine creating something special for the baby that can be cherished forever.
A craft table can cater to all ages. From your oldest family member to the tiniest toddler, everyone can participate. It encourages interaction and laughter, something every gathering could use. Plus, it’s the perfect alternative to traditional baby shower games that can sometimes fall flat (trust me, we’ve all been there).
Setting Up Your Craft Table
Choose a Location
First and foremost, select a prime spot for your craft table. You want it visible and accessible but also not in the middle of the action (so no one ends up with glue in their hair!). A well-lit area with some slightly away from the food will reduce spills. Maybe that corner of the room by the window? Perfect!
Gather Supplies
Now, here’s where the fun begins. Gather an assortment of craft supplies, ensuring you have enough for everyone. Here’s a basic starter list:
- Paper and Cardstock: Bright and fun colors for making cards or scrapbooks.
- Markers and Colored Pencils: Always a hit for doodling and adding personal touches.
- Adhesives: Glue sticks, tape, and maybe even some washi tape.
- Stickers and Stamps: Add extra pizzazz to whatever they decide to create.
- Scissors: Safety scissors are a must for the little hands.
- Fabric and Ribbons: Perfect for adding textures to their crafts.
Don’t forget to set out aprons or old t-shirts for protection! You’ll thank yourself later when the inevitable mess happens (and it will!).
Display Inspiration
Sometimes, guests need a little nudge in the right creative direction. Clearly display some examples of what they can make. Maybe a scrapbook page with pictures of the parents-to-be or a card for the baby. You can also print off some cute ideas from platforms dedicated to craft projects. Showing a few examples ensures everyone feels comfortable and inspired to dive in.
Organize the Space
Let’s be honest—no one wants to craft in chaos. Organize your table neatly. Use trays or bins to keep supplies sorted, making it easy for guests to find what they need. Maybe you can set up a “creator’s corner” for anyone looking to share their masterpieces or get help with an idea.
Set Up a Keepsake System
One important thing to think about is how these crafts will be preserved. Set up a display area for completed projects (try to reserve a spot on the mantle), or create a scrapbook where everyone can contribute their creations. This way, the parents-to-be have a tangible memory filled with love and creativity from their friends and family.
Craft Ideas That Your Guests Will Love
Now that the table is set, what exactly can guests create? Here’s a list of some ideas to get the creative juices flowing:
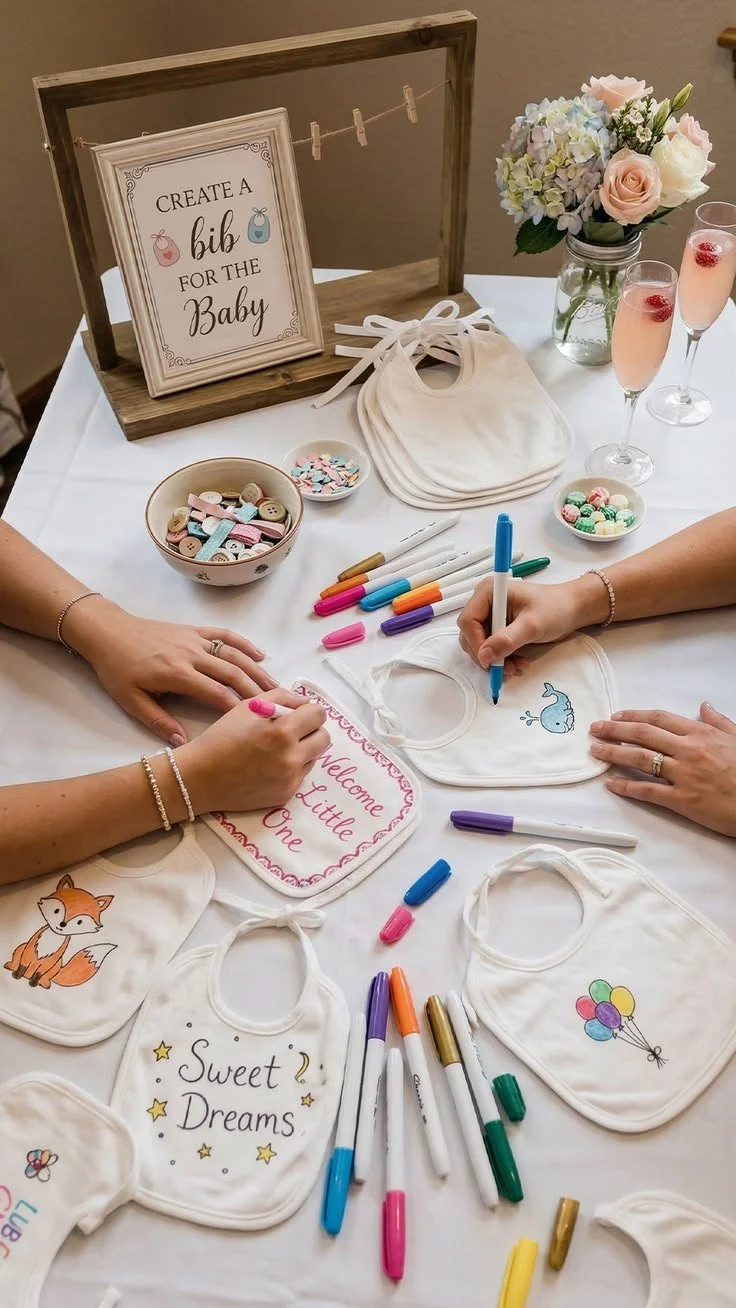
- Onesie Decorating: Provide plain onesies and fabric pens for personal touches.
- Handprint Keepsakes: Guests can paint their hands to create beautiful prints on a canvas.
- Baby Wishes Cards: Guests write advice or wishes for the baby, creating a heartfelt collection.
- Storybook Creations: Provide blank pages for crafting unique storybooks.
- Colorful Garland: Have guests create fun garlands that can decorate the baby’s room.
What if you included a memory-related craft? Imagine all those little tokens of love tied together in a scrapbook. Every piece tells a story—what a treasure!
Quick Tips for Making It a Hit
- Set a Time Limit: Give guests about 30 to 45 minutes for crafting. It keeps the energy up and allows for plenty of mingling.
- Provide Nametags: Especially if guests don’t know each other well, it creates connections and sparks conversations.
- Be Available: Offer your help if someone is struggling with an idea or needs assistance. You’re not just the host; you’re also the cheerleader of creativity!
Mistakes to Avoid
We’ve all made mistakes in planning parties before, so here are a few common mishaps to steer clear from:
- Underestimating Supply Needs: Always overestimate; running out of supplies is never fun!
- Overcomplicating Projects: Keep it simple. Fun and easy projects work best, especially if unexpected guests show up.
- Neglecting Clean Up: Make sure to have wet wipes and trash bags on hand. You don’t want to be left with a sticky mess!
FAQs About Craft Table Setup
Can kids join in? Absolutely! Just ensure safe supplies are accessible for them, like washable markers and paper.
What if my guests aren’t crafty? That’s okay! Share examples and offer gentle encouragement. Crafting is about having fun, not perfection!
How can I remember all these creations? Consider keeping a guest scrapbook with photos of the crafts and their creators or a digital space to store memories.
Conclusion
Setting up a craft table at your baby shower is more than just an activity; it’s a beautiful way to celebrate new life and create lasting memories. By gathering your loved ones around a table filled with creative potential, you’re offering them the chance to leave behind tokens of their love for the newest addition to your family. It fosters connection, laughter, and goodwill, ensuring everyone leaves with a smile (even if their clothes are a little gluey).
For some additional DIY inspiration, check out Seeds of Inspiration: DIY Seed Gift Envelopes, or perhaps consider unique project ideas from Vintage Windows – DIY Project Inspiration. And if you’re looking for creative uses of table runners, check out Wedding Stationery Inspiration: DIY Table Runners. Your baby shower is set to be a heartfelt event filled with joy, laughter, and loads of creativity!
