
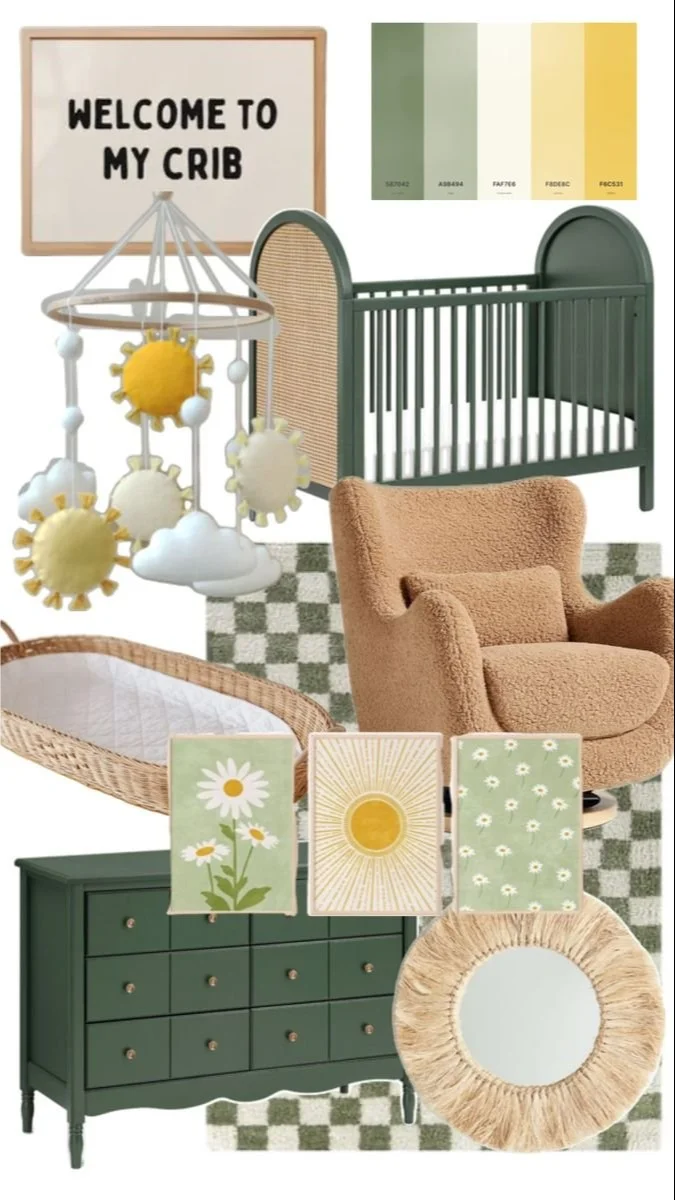
Inspiring Ideas for a Yellow and Green Gender Neutral Nursery
Imagine walking into the serene space of your little one’s nursery, suffused with the gentle light of a sunny morning. The soft yellow walls and fresh green accents create a perfect haven for your baby or toddler. You take in the carefully curated decor—sweet animal prints, cozy blankets, and a crib that looks like a dreamy cloud. Honestly, it feels like you just stepped into a Pinterest board, right?
Creating a gender-neutral nursery with shades of yellow and green can wrap your little one in warmth and joy, all while helping your space feel open and inviting. If you’re expecting a new addition to your family or planning a toddler room makeover, let’s dive into some design ideas and inspiration that’ll make the process easier and more enjoyable.
Embracing the Perfect Color Palette
When it comes to choosing a color scheme, you might feel overwhelmed by the endless options. Here’s the thing: yellow and green together form a bright yet calming atmosphere, perfect for stimulating creativity and promoting a peaceful ambiance—a win-win!
Choosing the Right Shades: Soft, pastel yellows combined with minty greens can evoke feelings of tranquility. On the flip side, if you’re looking for something a bit bolder, consider brighter shades like lemon yellow paired with a vibrant lime green. Picture how these colors could play off each other throughout the nursery.
Consider Accent Colors: To break up your main color scheme, add touches of white or soft grays. These shades can help balance the brightness, providing a fresh and airy feel. You can even throw in some natural wood accents, which can warm up the space.
Designing the Layout
Alright, let’s talk about the practical side of things—how to arrange your nursery layout effectively. We’ve all been there: trying to fit all the essentials into a small space can feel like solving a puzzle, but it doesn’t have to be stressful.
Focus on Functionality: Aim to have the crib, changing pad, and storage easily accessible. You might find it best to position the crib against a wall, leaving space for a cozy rocking chair in the corner. If you’re short on space, a changing pad on top of a dresser can save room while keeping your essentials nearby.
Flow Matters: Make sure you can comfortably navigate around the room, especially during those late-night feedings. You want to avoid tripping over things or knocking into furniture while half-asleep. Keeping the layout simple will help you maintain sanity.
Picking Out Nursery Decor
The decor is where you can really let your creativity shine! Since you’re focusing on a gender-neutral nursery, this is your moment to shine with whimsical and fun elements.
Art and Prints: Think about adding art that features playful animals or nature scenes. You could do a lovely nursery mural or just frame some cute prints in the yellow and green color scheme. I’ve found that adding soft wall decals can also be a playful touch that doesn’t overwhelm the space.
Textiles: When it comes to bedding, curtains, and rugs, you’ve got plenty of options! Look for soft, easy-to-wash materials that tie back to your color scheme. A cozy rug can anchor the space, while bright curtains can let in the light without being too harsh.
Personal Touches: Don’t hesitate to throw in some of your family’s personality. Whether it’s a framed family photo or a knit blanket from Grandma, these elements help create a sense of belonging and love in the nursery.
Optimizing Storage Solutions
Storage can be a puzzle all on its own, but it’s crucial for keeping a nursery organized. Here are a few tips to ensure you have systems in place to keep clutter at bay.
Utilize Vertical Space: Install shelves or opt for bookcases that stretch up instead of out. This encourages organization without eating up valuable floor space.
Baskets and Bins: Consider using colorful bins or baskets in your yellow and green colors. They can hold toys, clothes, or blankets and can be a charming part of your decor rather than a hidden mess.
Changing Stations: If you’re using a changing pad, look for a dresser in a complementary color. This way, you’re knocking out two birds with one stone and increasing storage options while adding an aesthetically pleasing element.
Tips for a Toddler Room Transition
Transitioning a nursery into a toddler room can be an exciting (yet daunting) task. You’re not alone in feeling like you need a strategy for this shift.
Incorporate Functionality: As your baby becomes a toddler, you’ll want to think about furniture that grows with them. A crib that transitions into a toddler bed can be a big savings in the long run.
Personalize Their Space: Allow your toddler to have a say in the decor. Whether it’s picking out their favorite stuffed animals or choosing the color of their bedspread, personal touches will create a sense of ownership and excitement about their new space.
Maintain Safety: With growing mobility, ensure that furniture is safe. Consider securing dressers to walls and covering electrical sockets. Safety should always come first, no matter how beautiful the room looks.
Add Playful Features: Install a small easel for art, a comfy reading nook filled with pillows, or soft play areas that invite them to be creative. These items can tie back to your color scheme and add fun, playful elements to your design.
Quick Tips for Your Nursery Makeover
Here are some quick, actionable tips to get your nursery decor just right:
- Don’t overstuff: Less is often more. Focus on what really speaks to you and your baby.
- Mix patterns wisely: If you choose patterned curtains, try to balance with solid bedding—or vice versa.
- Gallery wall: Create a mini-gallery of art to tie your colors together while adding a personal touch.
- Seasonal rotations: Change ribbons, small details, or toys seasonally to refresh the room.
Conclusion
Designing a yellow and green gender-neutral nursery can be an exciting adventure filled with creativity and personal expression. Whether you’re embracing soft pastels or vibrant hues, this color combination can transform your space into a cheerful and harmonious environment for your baby or toddler. Remember to balance functionality with style and let your family’s personality shine through in the decor choices you make.
For more gender-neutral inspiration, check out these amazing ideas for baby showers and nursery planning. You can also find great tips on decorating for any gender. Whatever choices you make, always cherish this special time, for these early years are fleeting yet so precious!
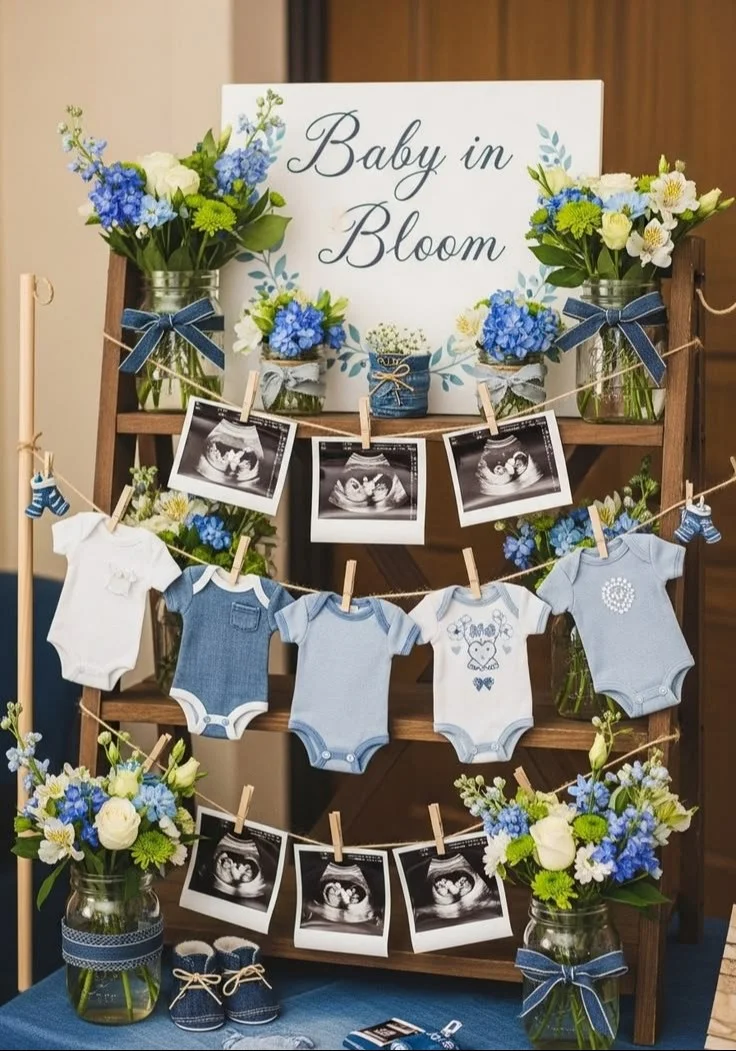
Blue Jean Baby Shower Themes with DIY Ideas for Cozy Celebrations
Imagine this: you’re sitting in a cozy living room, surrounded by friends and loved ones, sipping on fresh lemonade while discussing baby names and future adventures. Everyone is wearing denim—some in cute baby overalls and others in casual jeans that make this baby shower feel oh-so-relaxed. This scenario is an ideal way to celebrate a new life incoming without the fuss!
A blue jean baby shower theme is not only trendy, but it’s also wonderfully versatile and budget-friendly, perfect for creating a memorable gathering. We’ve all been there, feeling the pressure to throw the perfect party, but let me tell you, you don’t have to break the bank to do it. Let’s dive into 30 creative blue jean baby shower themes, complete with DIY tips for invitations, cakes, games, and decor that will leave your guests wowed and the mom-to-be feeling celebrated.
Invitations that Set the Scene
Inviting your guests is the first step, and they’ll love the creativity you put behind it. Here are some ideas:
Denim Pocket Invitations: Use denim fabric or paper to create invitations that resemble pockets. Add a cute onesie graphic or a little note to “pocket” the date and details.
Patchwork Cards: Combine different fabric swatches in denim tones to create patchwork designs. Simply glue small pieces to a cardstock base and roll with it!
Stamp It Out: Use denim ink stamps or wash-your-own printables to make unique cards. Include a personal message that resonates with your baby shower theme.
Digital Invitations: If you’re tech-savvy, consider designing electronic invitations featuring denim textures. This can save trees and money all at once!
Creative Cakes to Wow the Guests
Now, onto the most delicious part of the celebration—the cake! You want something that ties into your blue jean theme, and here are some ideas that aren’t just lovely but also tackle that DIY aspect:
Denim Fondant Cake: Cover a simple cake with blue fondant, and use a toothpick or a knife to create stitch lines. Top it with tiny fabric patches for extra flair!
Ombre Blue Layer Cake: Bake a classic layer cake with different shades of blue frosting to resemble denim. It’ll look gorgeous when sliced!
Cute Baby Onesie Cookies: Don’t shy away from cookies! Decorate gingerbread or sugar cookies in the shape of baby onesies, using blue or denim-inspired icing.
Cupcake Toppers: Simple cupcakes can be dressed up with denim-themed toppers. Use stickers or printables that match your overall theme!
Games for Giggles and Fun
Nothing breaks the ice at a baby shower like fun games! When it comes to blue jean baby showers, think of games that incorporate the theme yet keep it light-hearted:
Denim Bingo: Create bingo cards with baby-related items instead of numbers—think "diapers," "wipes," and "onsies." Every time someone mentions a gift or baby item, mark it down!
Guess the Baby Food: Place various baby food jars in brown paper bags. Guests dip into their blind taste tests and guess each flavor written on their paper.
Denim Relay Race: This is a hilarious option! Guests must race to put on and take off denim pieces—a vest, jeans, and a hat—all while balancing an egg on a spoon. Loser buys dessert!
Baby Predictions: Pass around cards for guests to predict the baby’s birth date, weight, and name. These become sweet keepsakes for the parents!
Decor That Dazzles
Creating a denim-inspired ambiance can be both fun and easy. Here’s how you can transform your space without spending a fortune:
Denim Table Runners: Cut strips from old jeans to create a rustic table runner or use denim fabric for a more polished look.
Mason Jar Centerpieces: Utilize mason jars filled with wildflowers and wrapped in denim or burlap fabric for the table centerpieces.
Denim Garland: Cut out shapes or triangles from old denim and string them together to create a fun garland draped across walls or tables.
Photo Booth Fun: Set up a photo booth area with a denim backdrop. Provide props like cowboy hats, bandanas, and funny signs that match your theme.
Chair Decorations: Tie ribbons or strips of denim around chairs for a cohesive look that ties into your decor.
Denim Balloons: Inflate blue and denim-patterned balloons to hang around the party space. They’ll float above while adding to the ambiance.
Party Favors to Remember
As the celebration winds down, send your guests home with sweet mementos! Here are some unique ideas:
Denim Gift Bags: Fill small burlap bags with goodies like candies, soaps, or tiny plants.
Personalized Coasters: Create coasters using denim circles with the baby shower date stamped on them.
Mini Denim Bottles: Fill small glass bottles with goodies like bubble bath or candies, and wrap waistbands around them for that denim touch.
Thank You Cards: Attach mini thank-you notes to your guests alongside their favors, expressing your gratitude for celebrating this special day.
Quick Tips and Mom Hacks
Planning and executing a smooth baby shower can seem like a daunting task. But hey, being prepared can help. Here are some hacks to remember:
Delegate Tasks: Don’t hesitate to ask close friends or family for help. Designate small tasks so everyone can pitch in.
Keep It Simple: Not everything needs to follow a fancy theme. A few denim accents here and there mixed with soft colors can work wonders.
Plan Ahead: Consider creating a timeline for when to send invitations, set up decorations, and start baking.
Have a Backup Plan: Always have a ‘what if it rains’ option—such as having an indoor setting ready!
Take Breaks: It’s easy to get caught up in the rush. Pause, sip that lemonade, and enjoy the moment—you deserve it!
Now, you might be thinking, where do I even begin? You’re not alone in feeling a bit overwhelmed by the details. Just remember, the most important part of the baby shower is bringing people together to celebrate the upcoming baby. Keep it light, fun, and heartfelt!
Conclusion
Throwing a blue jean baby shower is not only a fantastic theme to work with, but it’s also an opportunity to come together, celebrate, and create lasting memories. You’ll have plenty of fun incorporating unique DIY ideas for your invitations, cakes, games, and decor. Keep it light, and most importantly, enjoy the company of your friends and family during this special time. As you plan your next baby shower, check out more ideas like this here or see how others have hosted their unforgettable denim baby showers here. After all, it’s all about celebrating the love and joy of a new baby arriving soon!
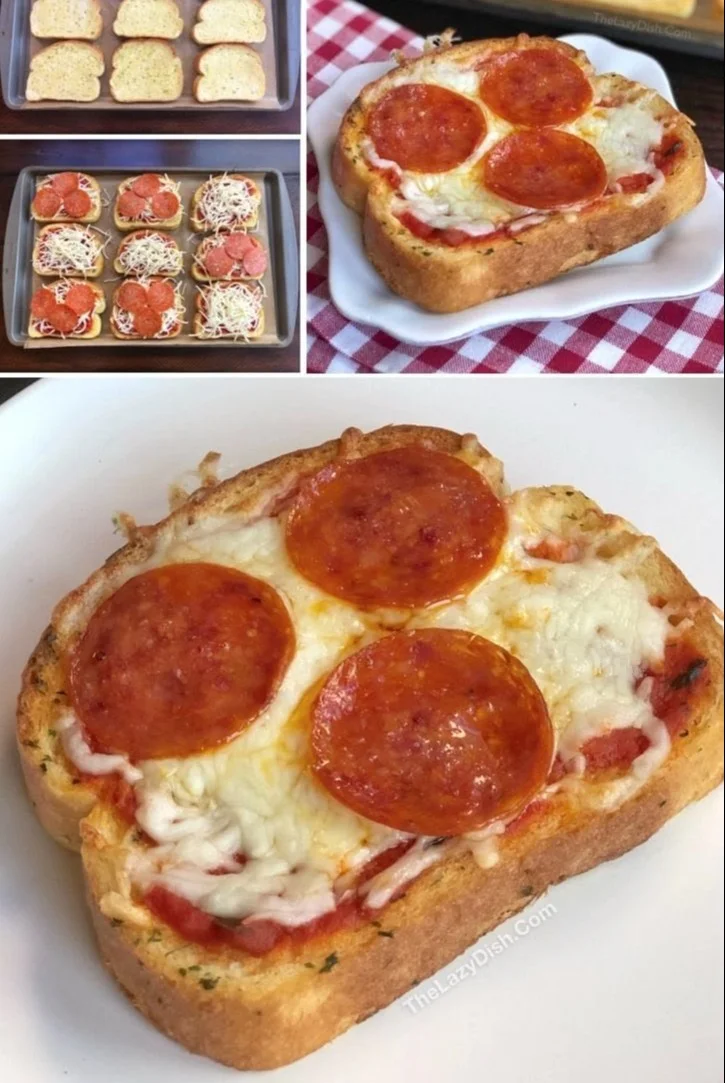
Quick Garlic Toast Pizzas Your Kids Will Gobble Up Tonight
Easy Dinner Recipes for Families That Kids Can Help Make
Imagine it’s a busy weeknight, and the clock is ticking. You’ve just picked up the kids from school, their bellies are growling, and you’ve got about 30 minutes to whip up dinner. Sound familiar? If you’ve ever found yourself in that situation, you know the challenge of getting a nutritious, family-friendly meal on the table without losing your sanity.
Here’s the thing: There are easy and cheap dinner recipes that not only save time but are also perfect for involving the kids in the kitchen. One of my go-to recipes is these simple garlic toast pizzas. With just three ingredients plus toppings of your choice, it’s a breeze and delightful enough to satisfy any family member, from toddlers to teens.
Why Garlic Toast Pizzas?
So, why am I so in love with garlic toast pizzas? Well, they check several boxes.
- Quick to Prepare: They take minimal time to prepare, making them ideal for those hectic evenings.
- Budget-friendly: Not only are they easy to make, but they also won’t break the bank. You can create several variations with what you already have at home.
- Customizable: Your kids can pick their favorite toppings, which means they’re more likely to eat their dinner.
- Encourages Independence: Older kids can make these themselves (with some supervision, of course). It’s a great way for them to dabble in the kitchen—something I love as a parent!
Now that you’re sold on the idea, let’s dive into how to make these delicious garlic toast pizzas and some creative toppings you can use.
What You Need: The Basics
Let’s break it down with the essentials:
- Garlic Toast: You can use store-bought garlic bread or make your own using regular bread.
- Tomato Sauce: A simple marinara or pizza sauce works wonders.
- Cheese: Most kids universally love cheese, so go with mozzarella or whatever your family prefers.
Cooking Steps
- Preheat the Oven: Set your oven to 400°F (200°C) so it’s hot and ready for deliciousness.
- Prepare the Garlic Toast: If you’re using store-bought, place the garlic toast on a baking tray. If you’re using regular bread, spread some butter and garlic powder first.
- Add Sauce and Cheese: Spread a bit of tomato sauce over each piece of toast and sprinkle with cheese.
- Customize Your Toppings: This is where your kids can get creative! Offer them a selection of toppings like pepperoni, olives, bell peppers, or spinach. Let them choose their favorites.
- Bake: Pop the tray in the oven for about 10-12 minutes or until the cheese is nice and bubbly.
- Cool Down: Let them cool a bit before serving. I’ve definitely burned my tongue once or twice in my excitement!
Topping Ideas to Get Creative
Here are some fun combinations to spice things up. Trust me; kids love getting involved in choosing toppings!
- Classic Cheese: Just mozzarella, always a hit!
- Veggie Delight: Spinach, mushrooms, tomatoes, and olives.
- Hawaiian Style: Pineapple and ham for a sweet twist.
- Tex-Mex: Black beans, corn, and diced jalapeños with cheese.
- Breakfast Pizza: Scrambled eggs, cheese, and bacon bits.
Beyond Dinner: Perfect After School Snack
Now, these garlic toast pizzas aren’t just for dinner. They double as an awesome after-school snack that can keep your teenagers satisfied until dinner. Picture this: your teenager trudges in after a long day at school and heads straight for the kitchen. Instead of another sugary treat, offer them these delightful mini pizzas to refuel their energy.
Cooking as a Family
I want to touch on something really important—cooking together as a family can create precious memories. Plus, it teaches children valuable life skills. Whether it’s measuring ingredients or learning to spread sauce, you’re helping them develop a sense of independence.
Let’s be honest, cooking with kids can sometimes get messy. But the joy, laughter, and accidental ‘oops’ moments are all part of the experience. We’ve all been there when flour goes flying all over the kitchen, and it’s perfectly imperfect!
Mistakes to Avoid
As any parent will know, cooking with kids can come with its own set of challenges. Here are a couple of common pitfalls to watch out for:
- Not Preparing: Make sure you have all ingredients ready before you start. This speeds things up and reduces the chance for chaos.
- Choosing Complicated Recipes: Stick with simple recipes like garlic toast pizzas and avoid anything too intricate. This keeps the kids engaged but not overwhelmed.
Quick Tips for Busy Parents
- Prep Ahead: If you know life is going to be hectic, you can prep the garlic toast in advance and keep it in the fridge.
- Make It a Game: Turn choosing toppings into a fun game or a mini competition. Who can create the wildest pizza? You might find some surprising combinations!
- Incorporate Leftovers: Got leftover veggies? Throw them on top!
FAQs
Can my toddler help? Absolutely! Toddlers may enjoy adding toppings, but it’s best for you to handle the hot oven.
What if we don’t have garlic toast? No problem! Just use regular bread and add some butter and garlic powder.
Can I make these ahead? Yes! You can prep them in advance and just bake when ready.
Conclusion
As a busy parent, finding meals that are quick, affordable, and enjoyable for the whole family can be quite the juggling act. These garlic toast pizzas hit the right chords—they’re easy to prepare, customizable, and even make for great after-school snacks. Plus, involving the kids in the meal-making process builds their confidence and creates lasting memories. So, gather your little chefs and try out this simple recipe together. For more dinner inspiration, check out these creative pizza cupcakes or find additional ideas in this list of easy toddler dinner recipes. Happy cooking!
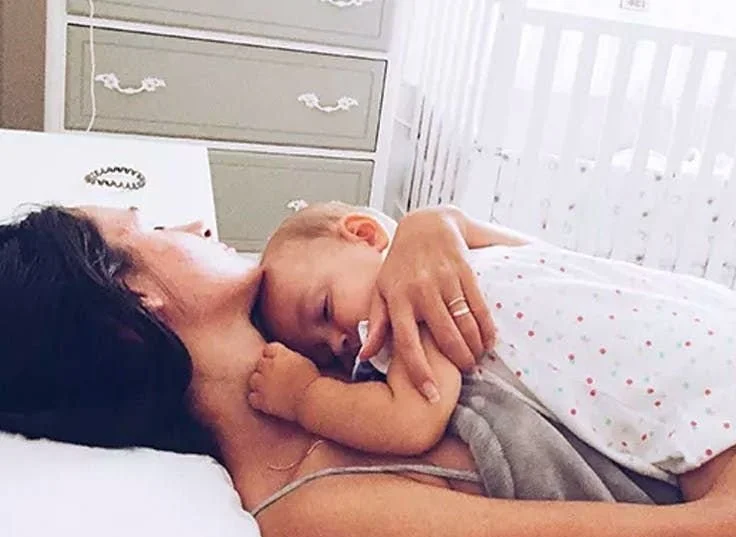
Smart Ways to Make the Most of Your Maternity Leave for Baby Time
Imagine this: you’ve just welcomed your little one into the world. The joy, excitement, and, let’s be honest, the sleepless nights are all part of the adventure. When I was on maternity leave, I found myself lost in waves of emotion, trying to figure out how to balance the need to bond with my new baby while also indulging in some much-needed self-care. If you’re feeling that blend of joy and overwhelm, you’re definitely not alone.
Now, here’s the thing—you’ve got this precious time that can feel both fleeting and timeless. Maternity leave is a golden opportunity to not just cherish those early days with your new baby, but to grow as a parent, refresh your spirit, and even carve out a bit of “you” time amidst the joyous chaos. Let’s explore some practical ways you can make the most of your maternity leave, blending joy and productivity in this beautiful journey.
Embrace the Chaos but Make Plans
As new parents, we learn quickly that baby plans often shift unexpectedly—like when you finally set a schedule, and then your little one has other ideas. Here’s the trick: accept the chaos! Yet, at the same time, it’s helpful to have a loose plan. Setting aside times for feeding, napping, and even a few relaxing activities helps create a semblance of routine.
- Quick Tip: Use a planner or an app to jot down your day-to-day plans. You’ll get a better grasp of how to allocate time for bonding, self-care, and household responsibilities.
Prioritize Bonding Time
After all, this is the period to build that unbreakable bond with your baby. Spend time skin-on-skin, gaze into those tiny eyes, or simply talk to them about your day. These interactions are foundational for their emotional development, and you’ll cherish these moments forever.
- Take turns with your partner to engage in activities with the baby—like going for strolls or reading bedtime stories. It’s a great way to make quality memories together!
Discover New Passions or Revive Old Ones
What better time to explore the things you love or even try something new? Whether it’s reading books you’ve been dying to dive into, picking up that unfinished knitting project, or attempting those healthy recipes you’ve saved, use this time wisely.
Picture this: you’re feeding your baby one hand while the other hand scribbles in your journal or flips through a cookbook. Yes, multitasking is your friend, and it’ll make you feel accomplished.
- If you’re looking for inspiration, consider easy and fun recipes! For example, check out these easy ways to make chicken nuggets that you can prepare during nap time.
Snap Away!
Trust me, you’ll want to capture every precious smile and silly moment. Use your phone or camera to create a visual diary of your time together. These photos will help you remember the sleepy days and joyful milestones.
But don’t stop there—consider creating a scrapbook or digital album. You’ll enjoy looking back at your journey when your child reaches milestones like their first birthday or first words.
Set Aside Time for Self-Care
You’ve been through the whirlwind of childbirth, and trust me when I say that you deserve some "me time." Picture yourself soaking in a warm bath, sipping your favorite tea, or catching up on a show while the baby snoozes. Don’t feel guilty about this—you’re a better parent when you take care of yourself!
- Make it a point to regularly indulge in things that rejuvenate your soul, whether it’s yoga, meditation, or simply catching up with a friend over coffee.
Get Out of the House!
After weeks cooped up indoors with just you and baby, it’s refreshing to get outside. A walk in the park, a trip to the local farmer’s market, or simply visiting a friend can work wonders for your mood. Fresh air can be invigorating—it does wonders for clearing that new parent fog!
- Plus, if you’re feeling social, it can be rewarding to connect with other parents. Maybe there’s a local mom’s group you could join. Building a supportive community is crucial.
Take Advantage of Technology
Don’t overlook the resources available at your fingertips. Online parenting groups and forums can be invaluable for support and information. Whether you’re looking for reviews on baby products or advice on sleep training, you’ll find a wealth of information.
Remember, the internet is your friend! There are countless blogs and podcasts where you can gain insights. These resources can make you feel more connected to other parents and less isolated.
- You might even find useful articles on parenting techniques shared by fellow parents. For instance, explore different baby shower themes and ideas to prepare for future celebrations; you might find inspiration from fall baby shower themes and ideas to copy this year.
Reflect on Your Journey
Taking time to reflect on your journey can be therapeutic. Journaling about your experiences, thoughts, and feelings can help clarify your parenting styles and goals. This is an opportunity to think about what you want to achieve as a parent—your dreams for your little one and your hopes for them to thrive.
Let’s be honest: parenting is a journey, not a race. There’s no roadmap, but taking a moment to chart your feelings is empowering and can clear your mind for what’s next.
Conclusion
As you navigate this incredible period of your life, know that making the most of your maternity leave is about more than just baby milestones. It’s about refreshing your spirit, creating beautiful memories, and nurturing not just your baby but yourself too. You’re not alone in this, and the feelings you have are completely normal. Embrace every moment—the good, the messy, and the absolutely wonderful.
For more guidance on taking leave for the arrival of your little one, the Department of Labor has some helpful resources. And if you’re curious about bonding during your Protected Leave, check out this bonding guide to ensure you get the most out of your time to connect with your newborn. Enjoy every moment—you are doing great!
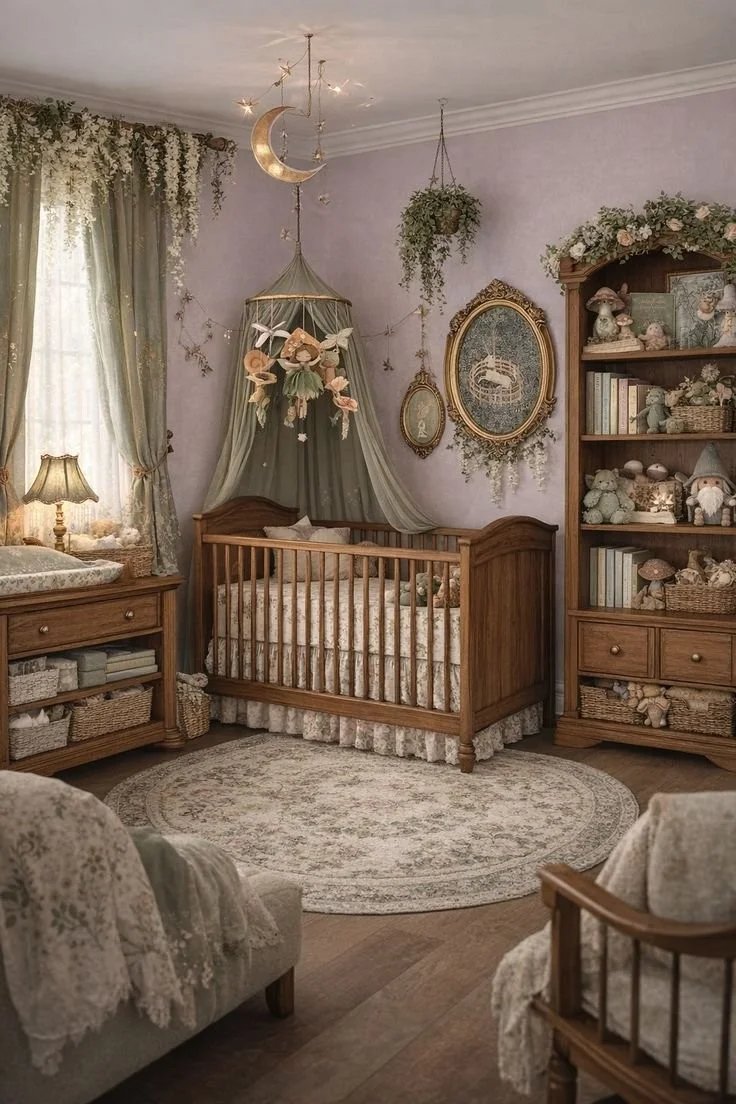
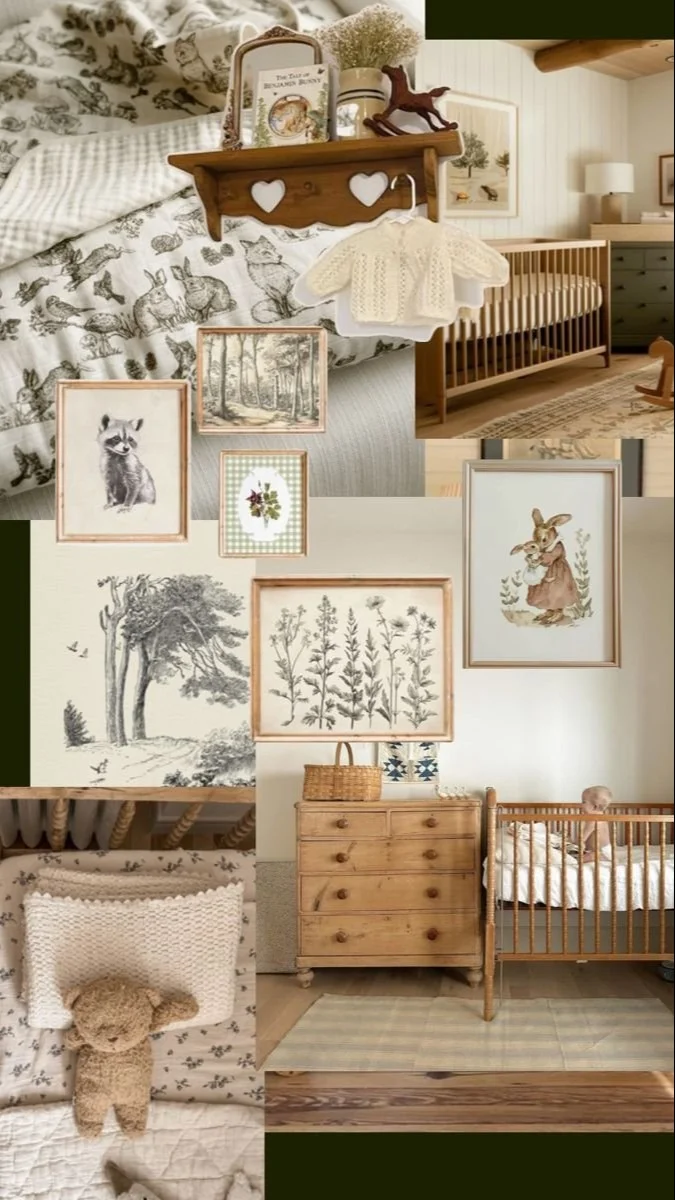
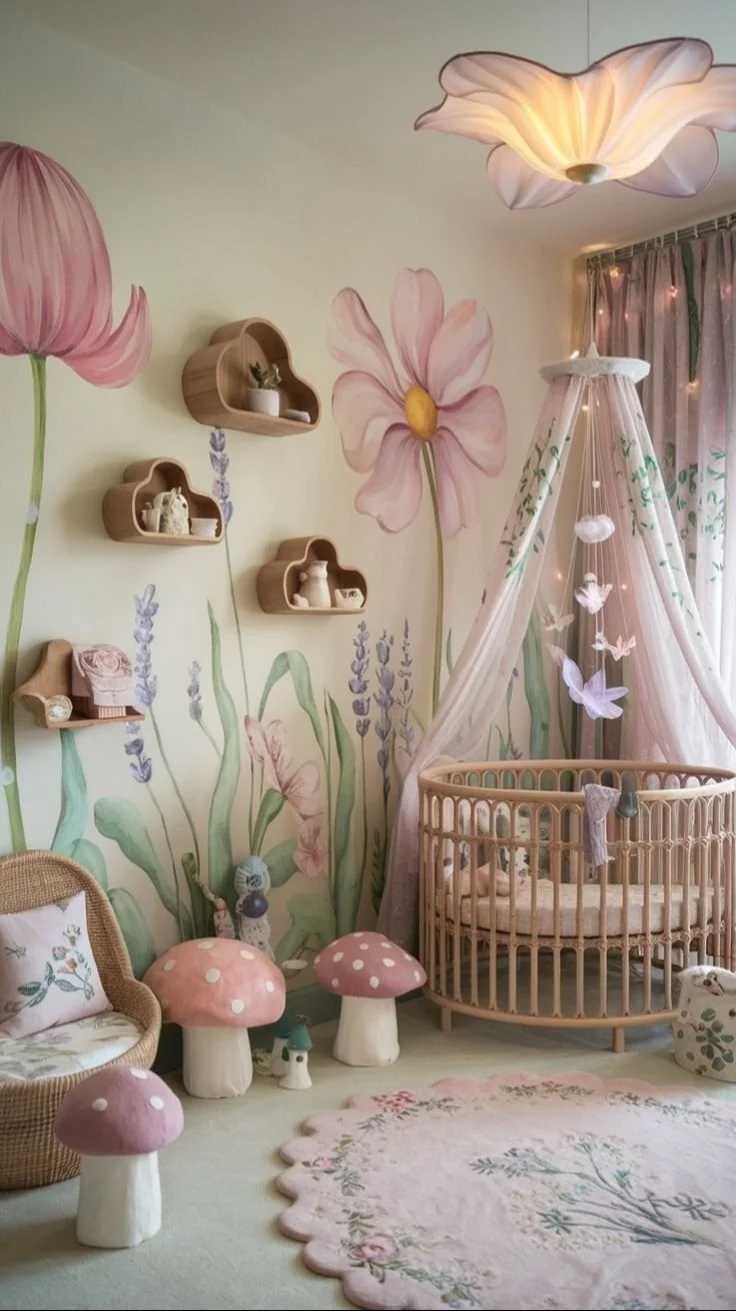
Magical Ideas for an Enchanted Forest Nursery Theme Moms Will Love
Imagine this: It’s a crisp Saturday morning, the sun is streaming through the windows, and your little one is bouncing around, full of energy. You glance at the clock and realize you have a few hours of free time ahead. What do you do? Maybe you think about organizing the toy room or catching up on laundry. But let’s be honest—there’s something way more magical about spending quality time with your child.
Picture this: You and your toddler are cozied up on the floor, a blanket spread out, a variety of colorful toys scattered around. Envision that joy! If you’re anything like me, you probably find that the best memories come from those simple, spontaneous moments. So, how can we create more of those enchanting experiences? Let’s dive into some fun activities and ideas that foster connections, promote development, and most importantly, allow you to enjoy this beautiful journey of parenthood together.
Creative Playtime Ideas
When it comes to playtime, the sky’s the limit. The great thing is, you don’t need fancy toys or gadgets to create special moments with your little one. Here are a few ideas to spark creativity and imagination:
Sensory Bins
Here’s the thing: Sensory bins are a wonderful way to engage all your toddler’s senses. Fill a container with rice, sand, or beans, and add in some scoops, containers, and little toys. Watch their eyes light up as they explore different textures! This can be as simple as pouring some rice into a bowl and hiding a few toy animals for a mini treasure hunt.
Art Projects
Now, you might be wondering how to manage the mess that comes with art projects. Trust me, it’s worth it. Grab some washable paint, paper, and brushes, and let your child create their masterpiece. You could also try finger painting or using sponges and stamps. The key here is to let their creativity flow without worrying about the cleanup. If it gets messy, remember—you’re making memories!
Outdoor Adventures
When the weather is nice, getting outside can change the entire mood of your day. Whether it’s a trip to the park or a nature walk, being outdoors has countless benefits. Let your child collect leaves or rocks, watch birds, or even have a picnic. Every moment spent outside nurtures their curiosity and love for nature. They may ask a million questions, and you might not have all the answers, but you can explore those questions together!
Story Time
We’ve all been there—reading the same book over and over again. But here’s the twist: you can make it interactive. Instead of just reading the words, act out the story. Use different voices for characters, and encourage your child to join in. After all, who doesn’t love playing pretend?
Home Science Experiments
What if you transform your kitchen into a mini-laboratory? Simple science experiments can be so engaging. Mix baking soda and vinegar for a fizzy volcano, or create a rainbow with a glass of water and a flashlight. They’ll be fascinated, and you’ll feel like a superhero!
Developing Skills Through Play
Activities aren’t just to fill time; they provide essential opportunities for your child to learn and grow. Here are some benefits that playful activities can provide:
Fine Motor Skills
Activities like painting, building with blocks, and even threading beads help develop fine motor skills. These little movements are integral as your child grows and learns to write and manipulate objects.
Language Development
Engaging in conversation during play allows your child to expand their vocabulary. Asking open-ended questions helps them articulate their thoughts and feelings.
Social Skills
Playing with others teaches important social skills like sharing and turn-taking. Organizing playdates, when possible, can facilitate these interactions.
Emotional Growth
Play can be a great outlet for your child’s emotions. It helps them process feelings and fosters emotional intelligence. Don’t be surprised if they act out scenarios from their everyday life during play; it’s all part of their learning process.
Quick Tips to Enhance Playtime
Follow Their Lead: Don’t impose structured activities. Let your child choose what they want to play and guide the activity.
Rotate Toys: If you feel like they’ve lost interest, try rotating toys in and out of play. Sometimes, presenting "new" toys can reignite their curiosity.
Be Present: Put down your phone and engage fully. Jump in, get silly, and just be there in the moment with them.
Celebrate Mistakes: When things don’t go as planned (and they often won’t), celebrate the unexpected. Instead of getting frustrated, laugh it off and try again.
Limit Screen Time: Set boundaries around screen time to cultivate more face-to-face interaction and active play.
Mistakes to Avoid
You might think that as long as your child is busy, they’re having fun. But here are some mistakes we’ve all accidentally made:
Overscheduling: Filling the day with too many activities can overwhelm both you and your child. Instead, enjoy the quieter moments too.
Comparing to Others: Remember, every child develops at their own pace. Don’t let social media or other parents define what’s normal or important.
Forgetting Self-Care: Taking care of yourself isn’t selfish; it’s necessary. When you’re feeling your best, you can be fully present for your little one.
FAQs About Toddler Activities
What are some activities for my 3-year-old?
Three-year-olds love imaginative play! Engage them in dress-up games, puppet shows, and simple crafts. They thrive on storytelling, so incorporating books they’re into can also spark interest.
How long should play sessions last?
Attention spans vary greatly, especially at this age. Keep sessions flexible—shorter sessions of 15-30 minutes may be more suitable, allowing transitions into new activities comfortably.
Can I incorporate learning into play?
Absolutely! Use playtime to introduce concepts like numbers, shapes, or letters. Activities like counting toys while playing or identifying colors in a sensory bin make learning natural and fun.
Bonus Ideas for Enriching Play
- Create a “busy box” filled with various materials that your child can explore independently.
- Try musical activities like singing or dancing, which can be great for physical and emotional development.
- Start a garden together; it’s fantastic for outdoor play and teaches about nature.
Conclusion
In this whirlwind of parenthood, we often search for ways to keep our little ones entertained, but the best experiences come from those simple, heartfelt moments shared between us. So, next time you find a free hour, consider a creative playtime adventure instead of chores. Embrace the messiness, the giggles, and the exploration. It’s in these small efforts that we build the foundation for lasting connections.
For some beautiful inspiration in decorating those precious spaces for your little one, check out the charming options available at Enchanted Forest Nursery Decor – Amazon.com or browse delightful designs on Enchanted Forest Nursery – Etsy. You’ve got this, and remember—you’re not alone in this beautiful chaos of parenting!
Baby nursery
Imagine this: it’s 3 AM, and you’re standing in the neon glow of your baby’s nursery, cradling a little one who just won’t settle. You’ve tried everything—nursing, rocking, even singing your go-to lullabies—and yet, here you are trying to figure out the secret code to family sleep. Sound familiar? You’re not alone in this. Many parents find themselves navigating the wild, unpredictable world of sleep with young children.
As parents of children aged 0 to 5, we want what’s best for our kiddos. We want them to feel safe, loved, and of course, well-rested. So, let’s talk about sleep: how to create a peaceful environment, tips to encourage your child to settle down quickly, and perhaps some surprising insights into your own sleep habits, too. Here’s what I’ve gathered from my own experiences and conversations with friends who’ve been in the same boat.
Understanding Sleep Needs for Young Children
One of the first things to remember is that sleep needs vary by age. Infants and toddlers typically need more sleep than older kids. Here’s a quick breakdown:
- Newborns (0-3 months): 14 to 17 hours of sleep per day, including naps.
- Infants (4-11 months): Around 12 to 15 hours. This includes longer nighttime sleep and two daytime naps.
- Toddlers (1-3 years): About 11 to 14 hours, often divided into nighttime sleep and one or two naps.
- Preschoolers (3-5 years): 10 to 13 hours, usually in the form of a solid nighttime sleep with maybe a nap.
Now, you might be saying, "This is great, but my child doesn’t sleep nearly that much!" We’ve all been there, haven’t we? Understanding these benchmarks can give you a clearer picture of your child’s needs, but don’t stress if they deviate slightly—every child is different.
Creating the Perfect Sleep Environment
Let’s be honest: sleep is influenced heavily by the environment. Here are some ways to transform your child’s bedroom into a serene sleep sanctuary:
Keep it Dark
A dark room helps signal to your child’s body that it’s time to wind down. Blackout curtains can be a game changer! If you’re not ready to make the investment yet, even a sheet tacked up over the window can help.
Control the Temperature
Just like we don’t sleep well in a sauna, kids need a comfortable environment to fall asleep. Aim for a room temperature around 68-72°F (20-22°C) to keep everyone cozy without overheating.
Limit Noise
Think of your child’s room as a quiet retreat. If you’re in a noisy house (sound familiar?), consider white noise machines or a gentle fan to help drown out any disruptive sounds.
Cozy Bedding
Snuggling into a comfortable bed makes a world of difference. Choose soft, breathable sheets and a comforting blanket. Involve your kiddos in selecting their bedding—trust me, they’ll take more pride in sleeping in a bed they helped choose!
Establishing a Bedtime Routine
One of the best things you can do for your child’s sleep is to establish a consistent bedtime routine. Picture this: every night at 7 PM, the lights go down, a warm bath is followed by storytime, and then a couple of cuddles before tucking them in. This routine signals to your child that it’s time to wind down. Here are some ideas:
- Bath Time: A warm bath can be soothing and release tension.
- Reading Together: Choose books that are calming and kind. Personal tip: I love books that rhyme; they lull both my child and me!
- Gentle Music: Soft lullabies or ambient tunes can help calm those little minds before bed.
Gentle Sleep Training Methods
When it comes to encouraging your child to settle down on their own, gentle sleep training can be incredibly beneficial. You might be wondering, “Will this break their spirit?” Absolutely not! The goal isn’t to let them cry it out but rather to guide them softly.
Gradual Withdrawal
Start by staying in the room with them until they fall asleep. Each night, gradually decrease your involvement until they can drift off independently. This method can take a few weeks, but it’s worth the patience.
The Ferber Method
Although some parents shy away from this method, it’s simply a structured way to gradually teach your child to self-soothe. You’ll check in on them at increasing intervals, letting them know you’re nearby while encouraging independence.
No Tears Method
As the name suggests, this method focuses on comforting your child without leaving them alone to cry. You gently soothe them back to sleep when they wake up, allowing them to learn that it’s safe to fall asleep on their own.
Tips for Those Sleepless Nights
Even with the best setup and routine, life happens. There will be nights when your little one won’t sleep no matter what you do. Here are some strategies that have helped me and might help you get through those tough nights:
- Offer a Comfort Object: A soft toy or blanket can provide emotional comfort.
- Stay Calm: It’s easy to become frustrated when they won’t sleep. Take deep breaths and remember, they won’t be little forever.
- Limit Screen Time: Trying to get your child to sleep after an hour of screen time? Good luck! The blue light can interfere with sleep hormones.
Mistakes to Avoid
As we navigate this parenting journey, it can be easy to slip into habits that hinder our children’s sleep. Here are some common pitfalls to watch for:
- Inconsistency: Kids thrive on routine. If bedtime changes from night to night, their bodies may be confused.
- Overstimulation Before Bed: Avoid any high-energy activities close to bedtime. This isn’t the time for dance parties or thrilling games!
- Ignoring Your Own Sleep Needs: Let’s be real—parenting is exhausting. Make sure you’re also carving out time to rest.
Conclusion
In the grand adventure of parenting, sleepless nights can sometimes feel overwhelming, but remember, you’re not alone in this journey. By understanding your child’s sleep needs, creating a serene environment, and establishing a comforting bedtime routine, you can guide your little one toward a peaceful night’s rest. If you’re looking for some practical nursery design ideas to complement your sleep strategy, check out these beautiful yellow nursery ideas for baby’s room or get inspired by these neutral nursery inspirations. Parenting is filled with rewards, and trust me, someday you’ll miss those tiny moments when a simple bedtime routine was the highlight of your day.
In the meantime, hang in there, take it one night at a time, and remember, every sleepless hour is just another story waiting to be told.
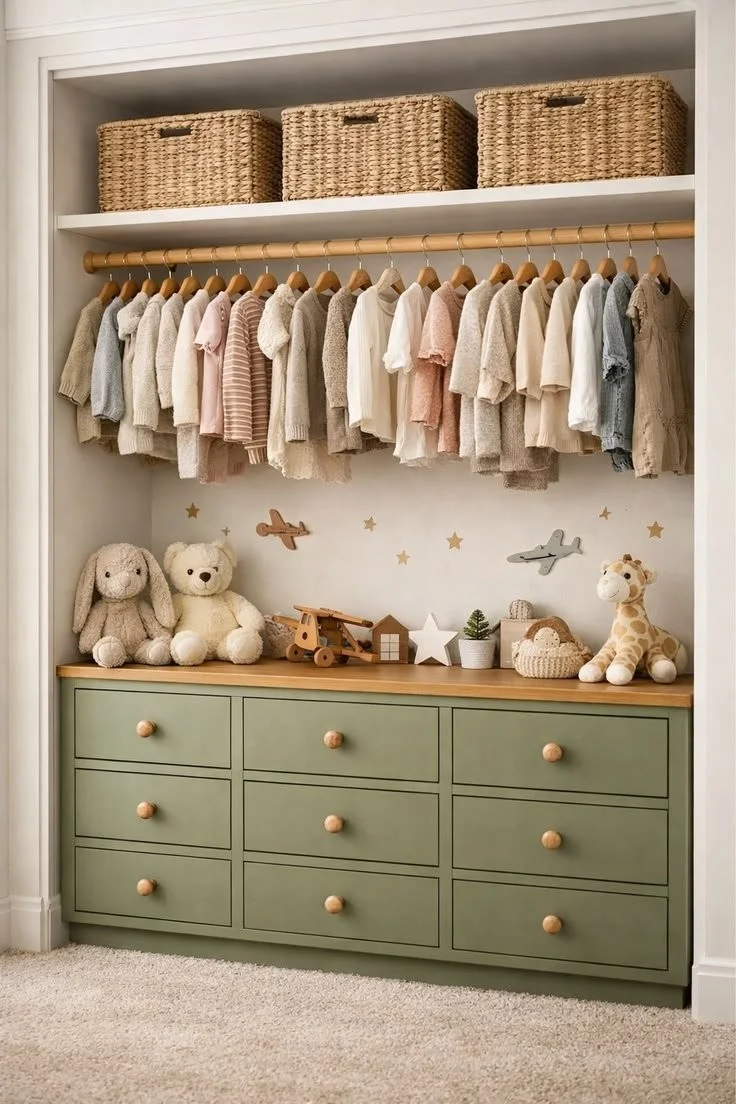
Clever Kids Closet Organization Ideas for Nursery Storage and Toys
Imagine this: you’ve just settled in for a quiet afternoon with your little one, surrounded by softly arranged toys and carefully folded clothes. The nursery, once a chaotic blend of colors and clutter, is now a serene space where everything has a home. Sound familiar? If you’re nodding along, you’re definitely not alone in your quest for a clean and cozy nursery. Organizing your kid’s closet might feel overwhelming at first, but with a little creativity and some smart solutions, you can transform that space into a minimalist haven.
Embrace Minimalist Design for a Serene Nursery
When we talk about minimalist kids’ room organization, we’re not suggesting you go bare-bones. Instead, think calm, soft tones, and functional designs that allow you to keep your space tidy while still being beautiful. Let’s be honest: we all want those incredible Instagram nursery photos, but the reality is that kids come with a LOT of stuff! Here’s where a well-organized nursery closet comes into play.
Clear Out and Start Fresh
Before diving into the organization, the first step is a good old-fashioned declutter. You might be wondering, how do I even begin? Here’s a helpful tip: set aside a solid 30 minutes to an hour. Grab a few bins and label them:
- Donate: Clothes your child has outgrown.
- Keep: Items you’re still using.
- Repurpose: Things you might be able to use for a different purpose or in a new way.
Once you’ve separated these items, you’ll feel lighter and ready to tackle the next steps.
Smart Nursery Storage for Baby Clothes and Beyond
The goal here is to create a space that’s not just easy to navigate but also fun to explore. Here are some smart nursery storage ideas that combine function with aesthetics.
Baskets, Bins, and Boxes
Baskets are your best friends in the world of organization. They add texture, work in any type of decor, and are perfect for tossing in toys or extra blankets. You want to keep it simple.
Labeling is Key: Use cute labels for each basket so that older siblings can help with clean-up too. (You might end up with a few misplaced toys in the wrong basket, but that’s part of the fun, right?)
Mix and Match: Consider varying the sizes and shapes of the baskets to add visual interest to the nursery. This creates a welcoming vibe while keeping your little one’s toys tidy.
Shelving Solutions
Wall shelves not only make good use of vertical space, but they can also display your baby’s favorite books or toys beautifully. When it comes to nursery dresser styling, maybe lay a few of those books on the dresser itself with a small plant or art piece nearby.
- Floating Shelves: These can be installed high and out of reach of the wandering hands. Plus, they can showcase adorable framed photos or decorative pieces that brighten the space.
Kids Wardrobe Organization Techniques
Moving on to that wardrobe—how do we keep it neat?
Wooden Hangers
Investing in sturdy, attractive wooden hangers can make a world of difference. They’re not just functional; they also add a touch of warmth and natural charm to your closet.
Categorize and Color Code: Group clothing by type (e.g., onesies, dresses, pants) and color if you’re feeling fancy. This makes it easier for you to grab what you need in a hurry.
Seasonal Rotation: Keep the current season’s clothes front and center while storing off-season clothing in bins above or behind.
Closet Rods and Dividers
If space allows, using a second rod low in the closet can help younger kids reach their clothes. This might mean less frustration for you when they’re trying to dress themselves (and believe me, those moments are more common than you’d like to admit).
- Adjustable Dividers: These help organize clothes effortlessly and give kids a little independence to choose what they want to wear.
Beautiful Toy Storage Decor
Toys can become overwhelming very quickly. Ask any parent! But there are creative ways to manage them without cluttering up every inch of your nursery.
Multi-purpose Furniture
Invest in ottomans or benches that double as storage. This not only adds seating but hides toys away, giving you some extra living space.
- Decorative Baskets/Pedicure Bins: Think about those fun, patterned bins that match with your nursery’s theme. They can be stylish and practical.
Play Area Organization
Creating a designated play area can help compartmentalize your storage solutions. Use colorful rugs to define this area and make it fun. Arrange the toy storage nearby so cleanup can be quick and easy.
Bonus Storage Tips
- Use Vertical Space: Think tall, not wide. High shelves can store bins and baskets.
- Clear Containers: Use transparent bins for easy viewing. You’ll know exactly where that favorite toy is hiding!
- Regular Check-ins: As your child grows, make it a habit to go through the closet every few months. This not only keeps things organized but teaches your child about responsibility.
Conclusion
Creating a well-organized space doesn’t just make your life easier; it also nurtures your child’s sense of independence and responsibility. Remember, we all have our moments of chaos, and it’s completely normal to feel overwhelmed. But by implementing some of these practical tips for kids closet organization, you’ll not only enjoy a cleaner space but also a cozy nursery that reflects your family’s style.
For more storage inspiration, check out options from IKEA’s kids storage and organization or browse products that can enhance your nursery setup at Amazon. Your dreamy, peaceful nursery awaits!
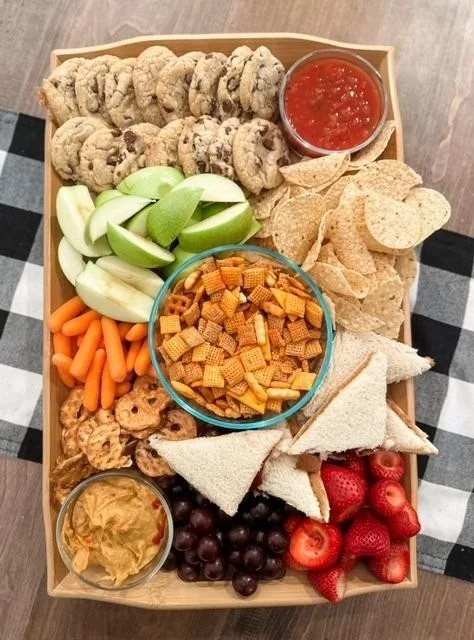
After School Snack Board Ideas for a Fun First Day Tradition
Imagine this: your child bounds through the door after their first day of school, eyes sparkling with excitement and perhaps a hint of nervousness. They’re bursting to share stories of new friends and fun activities. But there’s also that unmistakable hint of hunger — the kind that only an after-school snack can satisfy. This is where our wonderful tradition of an After School Snack Board comes into play. Not just a tasty treat, but a special way to wind down and connect after a busy day.
Crafting Your After School Snack Board
So, let’s talk about how you can make this After School Snack Board a vibrant part of your family’s back-to-school tradition. It’s all about fun, variety, and making those after-school moments memorable.
Gather Your Ingredients
First things first: what goes onto this snack board? Here’s a list to get you started:
Fruits: Colorful, fresh fruits can be the stars of the board. Think grapes, apple slices, berries, or banana chunks. Not only are they nutritious, but they also add a splash of color.
Veggies: Baby carrots, cucumber slices, and bell pepper strips paired with a tasty dip like hummus or ranch can make veggies fun and appealing.
Proteins: Include protein-packed options like cheese cubes, yogurt, or even deli meat rolled up with a slice of cheese.
Whole Grains: Think about adding whole grain crackers or mini rice cakes. These can provide that satisfying crunch kids love.
Sweet Treats: Let’s be honest; a little sweetness goes a long way. Add some dark chocolate chips or a few mini cookies to the mix.
Now you might be asking, how do I present this to make it exciting? Here’s the thing: the presentation is key! Use a large wooden or bamboo cutting board, or even a colorful platter. Arrange your snacks in sections, with fruits and veggies on one side, proteins in the center, and sweet treats on the opposite end. This not only makes it visually pleasing but also encourages your child to explore different tastes.
Personal Touches to Your Snack Board
Want to elevate your After School Snack Board even further? Here are a few personal touches that have worked wonders for my family:
Theme Days: Why not have a “Tropical Tuesday” with pineapple, coconut flakes, and fruit drinks? Or a “Colorful Friday” where you try to include a snack for each color of the rainbow? This adds an element of excitement each week.
Involve Your Kids: Depending on your child’s age, let them have a hand in creating the board. They can help select the snacks or even arrange them. This fosters independence and creativity.
Message of Encouragement: Sometimes, a little note goes a long way. Slip a small card with an encouraging message or a joke under the snacks for your little one to discover. It’s those tiny gestures that build emotional connections.
Making it Nutritional
As parents, we know that providing nutritious options is crucial. Sneaking in nutrition without making it feel forced can be tricky. Here’s how I handle it:
Make Colorful Choices: The more color on the plate, the better. It not only makes the snack board vibrant but ensures a variety of nutrients.
Go for Whole Grains: Choosing whole grain options helps keep the kids satisfied longer. You can talk to them about why whole grains are important for their growing bodies.
Control Portions: Use muffin tins or cupcake liners to portion things out. This can help encourage them to taste a variety of snacks without overwhelming them.
Ideas to Keep it Fresh
You might be wondering how to keep your After School Snack Board from becoming repetitive. Here are some fresh ideas to rotate through the weeks:
Bento Box Style: On particularly busy days, a bento box filled with mini sandwiches, fruits, and tiny bites can do the trick.
Snack Kabobs: Help your little one create kabobs with mini skewers, adding fruits, cheeses, and veggies. They’ll love munching on these fun bites.
DIY Dips: Kids often love to dip! Try to whip up a homemade yogurt dip or peanut butter for an exciting twist.
Mistakes to Avoid
In the rush of back-to-school season, it’s easy to overlook some details that can make or break your tradition. Here are a few common pitfalls I’ve encountered along the way:
Not Preparing Ahead: Try to prep some of the ingredients on the weekend. Wash and cut fruits and veggies so they’re ready to go. This can save precious time during the week.
Forgetting Variety: We all have our go-to snacks, but if you find you’re always reaching for the same things, mix it up! Ask your child what they might like to add each week.
Ignoring Dietary Needs: If your child has any allergies or dietary preferences, be sure to accommodate those in your plans.
Conclusion
Starting an After School Snack Board tradition can turn those first days back into something truly special. It’s more than just about snacks; it’s about fostering connections and making memories that your family will cherish. By involving your children in the creation process, experimenting with different snacks, and making modifications each week, you’ll have them looking forward to this opportunity for bonding.
You’re not alone in wanting to make back-to-school as exciting and nurturing as possible. It’s a big transition for both you and your little ones, but with traditions like the After School Snack Board, it can be a cherished family ritual.
For more ideas on healthy snacks, check out my go-to resources such as this collection of healthy lunch and snack ideas that fit perfectly for your little ones. Also, see what experts say on whether students ordering food delivery is becoming a trend to keep in mind. Enjoy those after school moments; you’re doing a fantastic job!
Realistic Toddler Routines for SAHMs 7 Practical Daily Wins That Work
Imagine waking up to the sound of tiny feet pitter-pattering down the hallway, your sleepy three-year-old, bright-eyed and ready for the day. That’s a moment filled with joy, right? But let’s be honest, some mornings feel like an uphill battle. You’re juggling a million tasks while keeping that little tornado entertained and happy. Sound familiar?
Being a stay-at-home mom can be both a beautiful journey and an exhausting challenge. It’s completely normal to feel overwhelmed as you navigate through the daily ups and downs. Here’s the thing: creating a simple structured daily routine for you and your toddler can not only make life easier but also make it more enjoyable. With a few thoughtful adjustments, you’ll find yourself less stressed and more present for those precious moments together.
Why a Daily Routine is Important
Before diving into the daily routine itself, let’s take a moment to appreciate why having a schedule is key. A structured day can provide consistency for your little one, making them feel secure and understood. Kids thrive on predictability. It helps them know what to expect, which can lead to fewer tantrums and meltdowns. Plus, having a plan can give you a much-needed sense of control over your day.
A Simple Daily Routine for You and Your Toddler
Let’s outline a straightforward daily schedule that can be adapted to fit your lifestyle, keeping in mind that flexibility is crucial. Here’s a typical day broken down into bite-sized pieces:
Morning Routine
Wake Up (7:00 AM)
Try to wake up slightly before your toddler. This will give you a yummy moment of peace with a cup of coffee (or tea, if that’s more your style) before they stir. When they do wake up, bring them into your morning with a warm greeting.Breakfast (7:30 AM)
This is when you can dive into some healthy and quick meals. Smoothie bowls or oatmeal can be great options. You might also consider trying out some of these breakfast ideas for variety.Get Dressed (8:00 AM)
Let’s face it, getting dressed can feel like a monumental task some days. You can make this fun by turning on a favorite song and having a mini dance party while getting ready.Quiet Playtime (8:30 AM)
Switch things up with some quiet play—building blocks, puzzles, or reading together. This engages their minds and gives you a little breather too.
Mid-Morning Adventure
Outdoor Play (9:00 AM)
Whether it’s a walk around the neighborhood, playing at the park, or riding bikes, outdoor time is essential. Nature is a wonderful teacher for toddlers! Plus, fresh air is a game-changer for everyone’s mood.Snack Time (10:00 AM)
A little fuel to keep the fun going! Grab some fruit or yogurt—something easy.Creative Time (10:30 AM)
Embrace creativity through coloring, painting, or even some simple crafts. You’ll be amazed at what their little minds can create!
Lunch Routine
Lunch (12:00 PM)
Keep it simple but nutritious. Think about including a mix of proteins, carbs, and healthy fats. If you’re looking for easy ideas, check out some of the genius snack ideas we’ve rounded up on snacks for toddlers.Nap Time (12:30 PM)
This part of the day can be pure bliss. While your toddler catches some Z’s, take this precious time for yourself. Whether it’s catching up on a show, reading, or enjoying a quiet moment, it’s vital for your wellbeing.
Afternoon Adventures
Free Play (2:00 PM)
Let them choose what they want to play without too much guidance. This encourages independence and creativity.Learning Activity (3:00 PM)
Incorporate a little bit of learning. Simple matching games, counting activities, or storytime can be perfect for this.Outdoor Play (4:00 PM)
Another dose of nature—toddler-approved! Also, it’s a great way to drain their energy before dinner!
Evening Routine
Dinner Prep (5:00 PM)
Involve your little one by letting them help with simple tasks, like washing veggies. Kids love to feel like they’re part of something!Family Dinner (5:30 PM)
Family meals are a wonderful opportunity for bonding. Keep the atmosphere relaxed, and encourage conversation.Wind Down (6:30 PM)
This could involve a bath, some calm music, or an evening story routine. Establishing a calm ambiance can signal it’s almost bedtime.Bedtime (7:30 PM)
Stick to this routine because it makes a world of difference. Kids thrive when they know what’s happening next, both day and night!
Quick Tips for Success
Be Flexible and Adapt
No two days will look the same, and that’s perfectly okay! If something doesn’t go according to plan, adjust and keep moving forward. Also, don’t hesitate to swap activities based on your child’s mood.Involve Your Toddler
Giving your child a say in the day’s activities can work wonders. Maybe they want to have a tea party or build a fort. Give them options and let them lead.Take Care of Yourself
Remember that your well-being matters. When you care for yourself, you’re better equipped to care for your little one.
Mistakes to Avoid
Over-scheduling
Be cautious not to cram too much into your day. Less can truly be more, so allow for downtime.Ignoring Emotional Needs
Some days might feel heavy for your toddler, and that’s completely normal. Acknowledge their feelings and be there to support them, rather than pushing through a set routine.
Conclusion
Creating a simple, structured daily routine can transform your stay-at-home mom life into something more joyful and fulfilling. A little bit of planning goes a long way. It’s all about finding a rhythm that works for both you and your three-year-old while allowing for flexibility and spontaneity.
So, the next time you wake up and feel overwhelmed, just remember you’re not alone in this journey. Every day presents a new opportunity to connect, learn, and grow together. You’ve got this!
If you’re looking for more tips, check out this helpful guide on scheduling or explore easy morning routines for stay-at-home moms.
Inspiring Nursery and Kids Room Furniture Ideas for Cozy Spaces
Imagine this: It’s 2 a.m., you’re bleary-eyed, and your little one is wide awake, bouncing in their crib like it’s party time. You look at that sweet face and feel that overwhelming mix of love and exhaustion. We’ve all been there, haven’t we? The early years of parenting can be a whirlwind, and as you navigate this precious but challenging time, there’s one thing that becomes crystal clear — understanding your toddler’s development plays a crucial role in enjoying your parenting journey.
Understanding Toddler Development
Here’s the thing about those toddler years, ages 1 to 4 specifically; they’re a time of dramatic growth and change. From the moment they learn to walk, it feels like the pace picks up. Suddenly, you have a miniature human exploring, testing boundaries, and soaking up the world like a sponge. But what exactly does your toddler need from you during this period?
Basic Milestones to Watch For
The road of development is paved with milestones, and sometimes we can feel overwhelmed trying to keep track. You might worry about whether your little one is hitting their markers at the right time. Here are some typical milestones you can expect:
- Social Skills: They’ll start to engage more with peers, even if it’s just to play side by side.
- Language Development: You’ll hear that sweet voice start babbling, forming words, and eventually stringing together simple sentences.
- Motor Skills: Watch them as they master running, jumping, and climbing — activities that’ll make you break a sweat just by watching.
- Cognitive Skills: Your toddler will start showing curiosity through questioning. “Why, Mommy?” might become the soundtrack to your day.
Now, you might be wondering how you can support this vital development. Don’t worry; it doesn’t have to be complicated!
Activities to Support Development
Every day can be a fresh chance to nurture skills. Whether you’re big on arts and crafts or enjoy outdoor adventures, there’s something here for everyone.
Creative Play
Let’s be honest; toddlers love to explore, and one of the best ways to do this is through creative play. Providing them with art supplies can lead to glorious messes with crayons and paint. It sparks imagination and fine motor skills simultaneously.
If you’re feeling particularly adventurous, try set up a “Little Artist” corner with various accessible materials. Who knows, you might have the next Picasso on your hands!
Story Time Adventures
Reading to your toddler is so much more than just a calming routine before bed. The benefits are practically endless! Choose books with bright pictures and simple, engaging stories. They’ll love hearing your voice and seeing your expressions. Plus, you’ll be paving the way for language development and literacy skills.
Consider making story time more interactive. Ask questions about the pictures and characters. Perhaps you can act out parts or let them predict what happens next. These simple interactions make the story come alive!
Outdoor Exploration
Nothing beats the great outdoors for a toddler full of energy. Whether it’s a park or your backyard, let them roam and explore. Think of it as a mini adventure! Simple things like picking flowers, watching ants, or searching for colorful leaves can ignite curiosity.
If you’re looking for something structured, consider taking short nature walks. You can collect leaves and rocks, which can later turn into another art project at home.
Nutrition for Growing Toddlers
When you think about toddler development, nutrition is just as crucial as any skill-building activity. After all, healthy food fuels all that energy! Our picky eaters can sometimes turn meal times into battles, but you’re not alone in this.
Tips to Make Nutrition Fun
Involve Them in Cooking: Kids love to get their hands dirty. Let them sprinkle cheese on their pasta or mix ingredients in a bowl. It’s a great way to introduce new foods!
Create Fun Names for Meals: Turn a simple oatmeal breakfast into “Monkey Oatmeal” with bananas. It’s amazing how a quirky name can make them want to eat.
Visible Choices: Present a colorful plate. They might be more inclined to try a bite of something new if it looks appealing!
If you’re unsure where to start, check out this article on easy baby food purees for some great ideas that’ll make meal prep easier for you.
Engaging with Emotions
Let’s take a moment to chat about something we often overlook in the whirlwind of growth and development: emotions. As your toddler experiences new feelings, they’ll have their share of tantrums and meltdowns, and guess what? This is completely normal.
When they struggle with emotions, it can be tough to manage as a parent. Here are a few tips to help guide them:
Label Their Feelings: Help them identify what they’re feeling. “I can see you’re angry because your toy is stuck.” This simple phrase validates their emotions and helps them learn to communicate better.
Model Calm Responses: Kids tend to imitate us. If you react calmly, they’ll learn to handle their frustrations similarly. Take a deep breath together!
Practice Deep Breaths: Introducing calming techniques early on can be a game-changer. Make it a fun game to take deep breaths together, inhaling like they’re smelling flowers and exhaling like they’re blowing out birthday candles.
Mistakes to Avoid
Let’s not sugarcoat it; we’re all learning here. Recognizing some common pitfalls can help make our parenting journey smoother.
Comparing to Others: Every child develops at their own pace. Celebrating your child’s unique growth can be far more rewarding.
Over-scheduling: It’s tempting to fill your days with activities, but downtime is just as essential. Simple playtime is often when the best connections happen.
Neglecting Yourself: You can’t pour from an empty cup. Make sure you’re taking time for self-care. When you feel good, you can support your little one better.
FAQs About Toddler Development
You might still have a few questions rattling around in your brain, and that’s entirely normal. Here are some quick answers to common concerns:
What if my toddler doesn’t speak clearly?
Every child develops speech differently. If you’re concerned, don’t hesitate to reach out to your pediatrician for guidance.Is it normal for toddlers to have tantrums?
Yes! Tantrums often happen as they learn to manage strong feelings. It’s a part of their emotional development.
Bonus Ideas for Learning
Interactive Learning Apps: There are many apps now geared toward toddlers that mix education and fun.
Playdates: Social interactions with peers offer invaluable lessons in sharing and cooperation.
Conclusion
As we wrap this up, remember that parenting during these early years is a journey filled with both challenges and immense joy. By supporting your toddler’s development, you’re helping shape a confident, curious, and resilient little person. If you’re feeling overwhelmed, just take it one day at a time. You’ve got this! Don’t forget to lean on resources out there, like great parenting articles and expert advice, which can provide clarity along your journey. And don’t forget the importance of keeping things light-hearted. After all, childhood is fleeting, but the memories are forever.
