

Stuck at Home 35 Fun Ways to Cook with Kids and Spark Mealtime Joy
Stuck at home with nothing to do? Try baking or cooking with your kids!
Imagine this: it’s a rainy afternoon, everyone’s starting to feel fidgety, and the kids are bouncing off the walls. We’ve all been there, right? You need an activity that not only keeps them occupied but also sparks their creativity. Here’s the thing: cooking and baking can be the perfect solution! Not only does it keep little hands busy, but it also teaches them essential life skills. Plus, you get to enjoy some delicious treats at the end!
Why Cooking with Kids is a Great Idea
Cooking with kids isn’t just about making food; it’s about bonding, learning, and having a blast in the process! Here are a few reasons to consider it:
- Learning Opportunities: While measuring ingredients, your child can practice counting and learn about fractions.
- Creativity: Let them pick toppings or flavors; this encourages their imaginations.
- Life Skills: Teaching your kids how to cook at a young age builds their confidence and independence.
And if you need some inspiration for family-friendly fun right now, check out this list of things to do in Oahu with kids.
Simple Recipes for Kids
You don’t need fancy ingredients or elaborate recipes to get started. Here are 35 fabulous recipes that require five or fewer ingredients—perfect for little hands and quick fun!
Peanut Butter Cookies
Just mix peanut butter, sugar, and an egg. Roll into balls and bake!Fruit Pizza
Use sugar cookie dough as the base, spread cream cheese frosting, and top with sliced fruits.Cheesy Quesadillas
Place cheese between two tortillas and grill until melted. Cut into triangles.Rainbow Smoothies
Blend yogurt with various fruits to create layers of color in a glass.Chocolate-Dipped Bananas
Melt chocolate chips, dip banana slices, and freeze for a sweet treat.
No-Bake Recipes to Try
For those afternoons when you just can’t deal with an oven, no-bake recipes are a lifesaver. What if you could whip up something scrumptious without the heat?
No-Bake Cheesecake
Combine cream cheese, sugar, and whipped cream in a pre-made crust.Energy Bites
Mix oats, peanut butter, honey, and your choice of add-ins like chocolate chips or nuts.Pudding Cups
Make instant pudding, layer with Cool Whip and crushed graham crackers in cups.Fruit and Yogurt Parfaits
Layer yogurt, fruits, and granola for a nutritious snack.Cereal Bars
Melt marshmallows and butter, combine with your favorite cereal, press into a pan to set.
Turning Cooking into a Learning Experience
Cooking doesn’t just have to be about the end result—turn it into a learning moment. Engage your kids by discussing:
- Where Ingredients Come From: Talk about how fruits grow or where flour gets milled.
- Nutrition: Highlight which ingredients are healthy and why.
- Measurements and Conversions: It’s a great way to introduce math concepts in a fun way.
Tips for Success in the Kitchen
Now, let’s be honest: cooking with kids can get messy. Here are some tips to help you along the way:
- Set Up Ahead of Time: Pre-measure ingredients to keep things moving smoothly.
- Embrace the Mess: It’s a part of the fun! Trust me; the memories you create will be worth it.
- Be Patient: Cooking is a process, and it’s okay if things don’t turn out perfect.
Clean Up Together
You’ve cooked up a storm, and now it’s time to tackle the aftermath. Involve your kids in the cleanup process! It can be as simple as:
- Sorting Utensils: Have them help put forks, spoons, and cups away.
- Wiping Surfaces: Assign them a cloth to wipe down tables or counters.
- Rinsing Dishes: Set up a rinsing station where they can rinse their own plates.
Kids learn responsibility and teamwork through these tasks, and you can take charge of organizing the rest of your cooking supplies by checking out some clever organization ideas for your kids’ storage and toys.
Increase Engagement with Cooking Challenges
Creating cooking challenges can amp up the excitement. For example:
- Mystery Box Challenge: Have a set of random ingredients, and challenge kids to create a dish with what they find.
- Theme Nights: Choose a theme (like Italian night!) and let the kids suggest dishes that fit.
These activities aren’t just about food; they build excitement and creativity. You’ll see your child get giddy just thinking about the culinary adventures ahead!
Conclusion
Cooking with kids at home can be such a rewarding experience. By incorporating fun recipes, you’ll not only keep them engaged but also provide them with invaluable skills and cherished memories. Whether you decide to bake cookies or whip up no-bake treats, each moment spent together in the kitchen is an opportunity to share laughter, lessons, and love.
If you’re looking for additional ideas to keep things fresh and entertaining at home, check out this handy article or explore how to balance family life with inspiration from this insightful piece. Happy cooking!
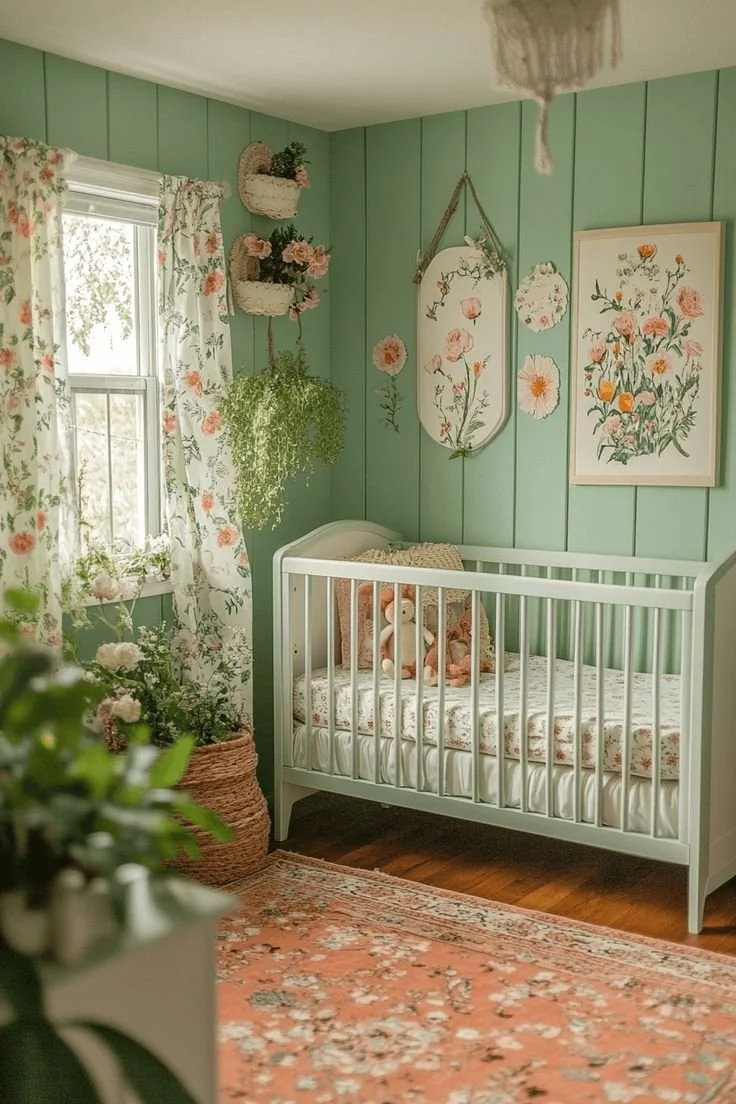
Trendy Cottagecore Baby Room Ideas That Inspire Calm Spaces
Flourish in the Garden Charm Nursery
Picture this: your little one cooing contentedly in a nursery that feels like a whimsical garden. When I first thought about designing a space for my baby, I wanted it to be playful yet calming—a sanctuary that reflects the beauty of nature. The Garden Charm Nursery offers just that. With its vibrant green prints, floral garlands, and rustic accents, this theme is all about bringing the outside in, creating a cozy haven without breaking the bank.
Here’s the thing—I know many of us parents are on a budget and want to create a beautiful atmosphere for our babies. This design approach provides an inviting and serene environment that can inspire joy and creativity as they grow. It’s not just a room; it’s a blooming escape where curious minds can thrive and explore.
Choosing the Right Colors
When you think of a garden, what colors come to mind? Rich greens, soft pinks, and splashes of yellow all dance in an ideal palette. Using these colors in your nursery will create a fresh and cheerful ambiance.
Start with a soothing base color for the walls—perhaps a soft mint or pale beige. From there, you can incorporate deeper greens through furniture, like a crib or shelving units. The addition of vibrant floral patterns can be seamlessly integrated through curtains and bedding. If you’re looking for some inspiration, check out these charming cottagecore nursery ideas that really showcase how you can mix and match colors to create a dreamlike space.
Textures and Fabrics
Now, let’s talk about textures. Another key to achieving the Garden Charm aesthetic is the use of natural materials. Think about adding in soft cotton linens and woolen throws for an inviting feel. You can drape floral garlands around the room or hang them from the crib to add a touch of whimsy.
Layering different textures helps keep the nursery engaging; you can use cotton for bedding, a soft wool rug on the floor, and woven baskets for storage. Not only do these elements create visual interest, but they also provide sensory experiences for your baby.
Creative Decor Ideas
What if I told you that you can create a beautiful Garden Charm Nursery with just a few DIY touches? Let’s be honest; you don’t need to spend a fortune to get the look you love. You can easily craft floral wall art with some inexpensive canvases and faux flowers.
Consider making a mobile with hanging flowers or butterflies—an eye-catching feature that can entertain as well as inspire your baby. Use wood accents, like plant stands or even small shelving, to create a rustic vibe. And remember, don’t shy away from incorporating some potted plants! They not only add to the garden feel but also help purify the air.
For more practical nursery inspiration, don’t miss these fresh baby room ideas that will help pave the way for cozy decor.
Budget-Friendly Tips
We’ve all been there, wanting the best for our little ones while juggling finances. The good news is that crafting a charming nursery doesn’t have to cost a lot. Scout out local thrift stores or online marketplaces for gently used furniture. You’d be surprised at what you can find!
If painting walls isn’t in your plans, consider peel-and-stick wallpaper for a pop of color and ease of removal later on. Additionally, handmade items can be meaningful and beautiful. Friends and family would likely love to contribute personalized touches, like knitted blankets or handcrafted toys.
Conclusion
Creating a Garden Charm Nursery isn’t just about the aesthetic; it’s about nurturing a space where your baby can flourish in a safe and stimulating environment. By incorporating natural elements, vibrant colors, and DIY projects, you can construct a beautiful space that sparks joy for both you and your child.
For more guidance on nursery designs, I encourage you to explore this detailed guide for nursery design that showcases various styles and tips. And if you’re interested in furniture that balances beauty and functionality, check out this lovely piece on tufted sofas which can seamlessly fit into your nursery decor.
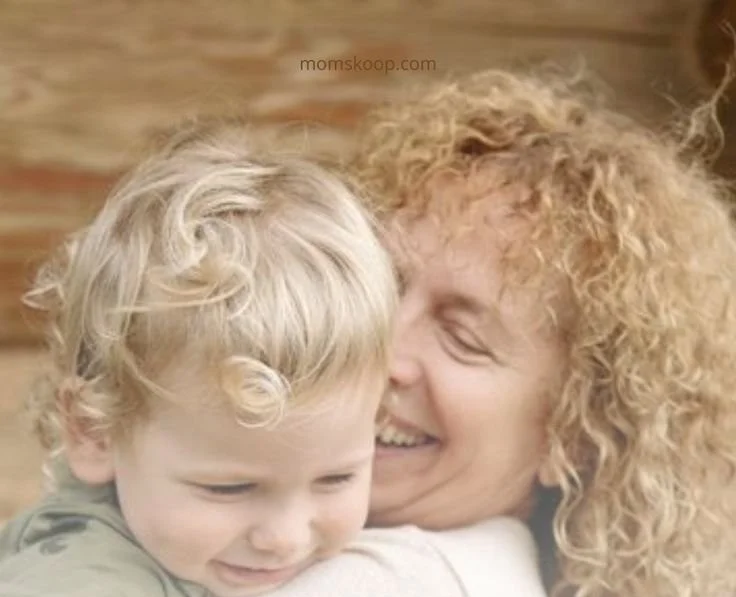
Things Grandkids Secretly Love Hearing from Their Grandparents
Imagine this: your child is sitting on the floor, engaged in their latest creative endeavor, perhaps crafting an elaborate Lego castle or putting together a lively drawing. Suddenly, in the midst of this joyful chaos, a familiar voice—grandma’s or grandpa’s—echoes from the kitchen, uttering a phrase that lights up your child’s face. That moment is not just delightful; it’s impactful. These simple phrases might seem like mere words, but they carry enormous weight and meaning, creating memories that last a lifetime.
As parents, we often witness the special bond between our kids and their grandparents evolving in heartwarming ways. Grandparents have a unique ability to express love, wisdom, and encouragement, making their words resonate deeply with their grandkids. In fact, some phrases can become treasured mantras, shaping how children view the world. Here are twelve things that grandkids secretly cherish hearing from their beloved grandmas and grandpas.
I’m so proud of you
First on this list might be an obvious one, but it’s crucial. Hearing, "I’m so proud of you," from their grandparents can boost a child’s confidence immensely. The legacy of love that grandparents offer helps children feel seen and valued. When your child encounters challenges, this affirmation can serve as a reminder that they have unwavering support right by their side.
You’re so special to me
Another phrase that resonates is, "You’re so special to me." Kids need to feel valued, and knowing they hold a special place in their grandparents’ hearts can offer profound reassurance. It’s a sentimental reminder that they belong and are loved unconditionally, even during the inevitable ups and downs of life.
I remember when…
Picture this: your child is performing a school play, and in the crowd, their grandparents are reminiscing about a similar event they went through as children. Hearing, "I remember when…" can create a beautiful connection across generations. It encourages empathy and understanding, enriching their relationship. When grandparents share their stories, they weave a bond filled with shared experiences and laughter.
You can always talk to me
In a world where communication can sometimes falter, the assurance that, "You can always talk to me," helps grandparents create safe spaces for their grandkids. Grandchildren cherish knowing they have a loving ear to listen without judgment, and it empowers them to express their feelings honestly. After all, kids often go through challenging phases, and having that reliable support is priceless.
Let’s have some fun together
If there’s one thing kids love, it’s fun! Grandparents have a knack for bridging the gap between childlike wonder and adult wisdom. Hearing, "Let’s have some fun together," signals grandkids that it’s time for an adventure—whether it’s baking cookies, playing a game, or watching a classic movie together. Speaking of movies, you might consider sharing some of the awesome children’s movies from the 80s with them for a dose of nostalgia and bonding.
You’ve grown so much
With every visit, grandkids grow—and so does the pride that comes with it! It’s always uplifting to hear grandpa or grandma say, “You’ve grown so much.” This acknowledgment helps children realize their progress and boosts their self-esteem. It also signifies that their milestones don’t go unnoticed, creating deeper emotional ties.
I love your ideas
Encouraging creativity and expression is crucial for childhood development. When grandparents affirm that they love their grandkids’ ideas, it boosts their imagination and innovation. They learn that their thoughts are valued and that they can take risks in a nurturing environment. Encouragement from grandparents can be pivotal in allowing kids to explore and express themselves freely.
You make me happy
The simple declaration, "You make me happy," conveys warmth and love. It’s a cherished affirmation that reassures children that their very presence brings joy. This mirrors the shared laughter and activities they experience together and will forever stay in their hearts.
You have a bright future ahead
Everyone needs a loving reminder that they are capable of greatness. Hearing their grandparents say, "You have a bright future ahead," provides children with hope and motivation. This can encourage them to reach for the stars when it comes to their aspirations, instilling a sense of responsibility to work towards those dreams.
Keep trying your best
We’ve all been there, anxious to succeed but sometimes struggling to press on. Grandparents can alleviate this by instilling resilience in their grandchildren with phrases like, "Keep trying your best." This simple encouragement helps children understand that excellence does not always equate to perfection, and the effort is what truly matters. When they hear this, they understand that they won’t face their challenges alone.
I believe in you
Perhaps nothing is more powerful than a grandparent’s belief in their grandchild. "I believe in you," is a mantra that empowers kids to chase their dreams and overcome hurdles. This unwavering faith fuels their ambitions and builds their self-confidence, reminding them they’re capable of achieving anything.
Let me tell you a secret
Toying with mystery and excitement, when grandparents say, "Let me tell you a secret," it little sparks joy. Kids love the idea of being “in the know,” and secrets enhance their bond with their grandparents through shared trust and connection. It keeps those moments special, filling them with laughter, stories, and maybe a smidgen of mischief.
You’ll always have my support
The reassurance of support is invaluable. When grandparents convey that they’re always there for their grandchildren, it cultivates an undeniable bond rooted in love. This promise can mean everything during tough times, reminding grandkids they aren’t alone in their journey.
A Final Word for Grandparents
Grandparents have an extraordinary opportunity to nurture their grandkids through simple yet powerful phrases. The words shared in playful tones or earnest little discussions are the ones that will resonate in children’s hearts long after the moment has passed. It may sound cliché, but these small moments indeed create a lasting impression, shaping a child’s perspective and memories.
So, as a parent, how can you encourage these heartwarming dialogues between your child and their grandparents? You might also find creative cooking activities like making banana oat baked donuts to be a lovely way to foster this connection. The experiences they create together are memories that your child will cherish forever!
Conclusion
Understanding the importance of the relationship between grandparents and grandchildren can enrich family dynamics significantly. Grandparents can provide comfort and wisdom through simple phrases that grandchildren hold dear. For more insights on the impact grandparents have, check out 10 things grandchildren need to hear. Additionally, learn more about fostering effective communication with your teenage grandkids by visiting Talking to Your Teenage Grandchildren.
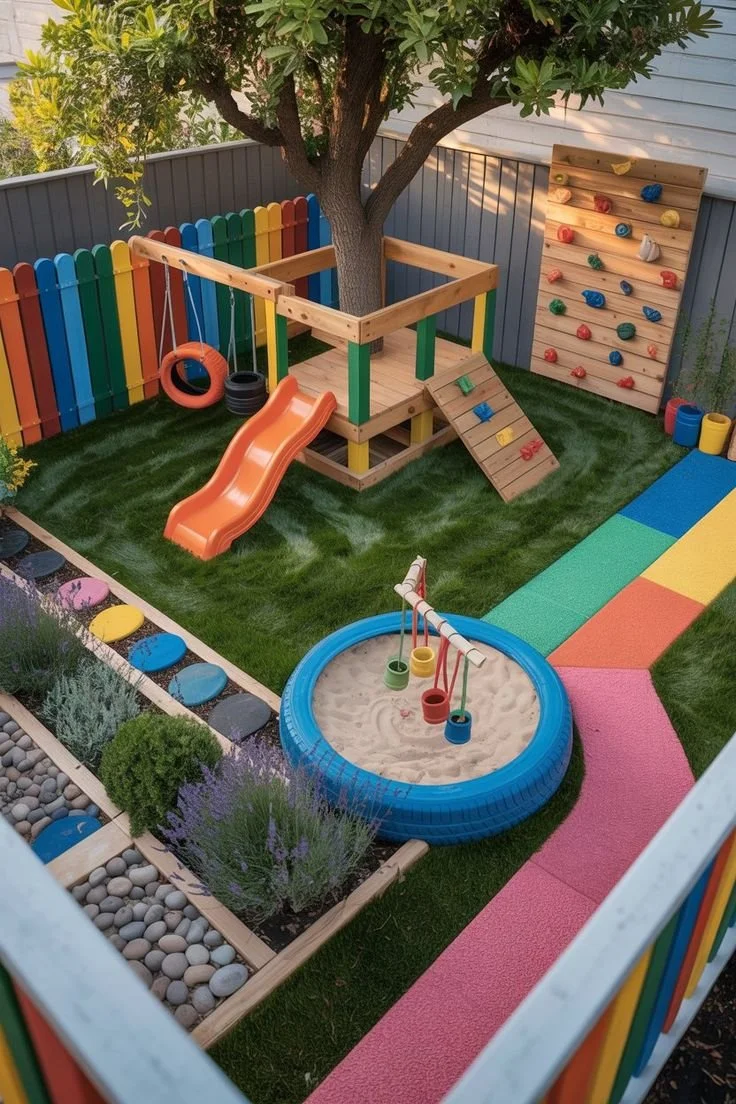
Creative Playground Ideas for Small Backyards That Spark Endless Fun
Imagine you’re staring out into your backyard, which looks more like a blank canvas than a child’s playground. It can be daunting to envision how to transform a small outdoor area into a playful haven for your little ones. But here’s the thing: you don’t need a sprawling estate or a huge yard to create an engaging play zone. With creativity and clever ideas, you can make even the most compact spaces come to life with fun and adventure. You may also find 10 Breakfast Ideas For Toddlers Babies Freezer Friendly useful.
As a parent, I know how essential it is to have a safe place for kids to run, jump, and play. Outdoor spaces are critical for their physical and emotional development, and they can serve as a fantastic backdrop for your little ones’ imaginations. So, let’s dive into some fun and space-smart backyard playground ideas that will turn your outdoor area into an exciting play zone for kids.
Choosing the Right Equipment
When you’re working with a small space, the key is to choose equipment that is multifunctional and safe. Consider items that can provide various play opportunities and won’t overwhelm your yard.
Swing Sets with Extras
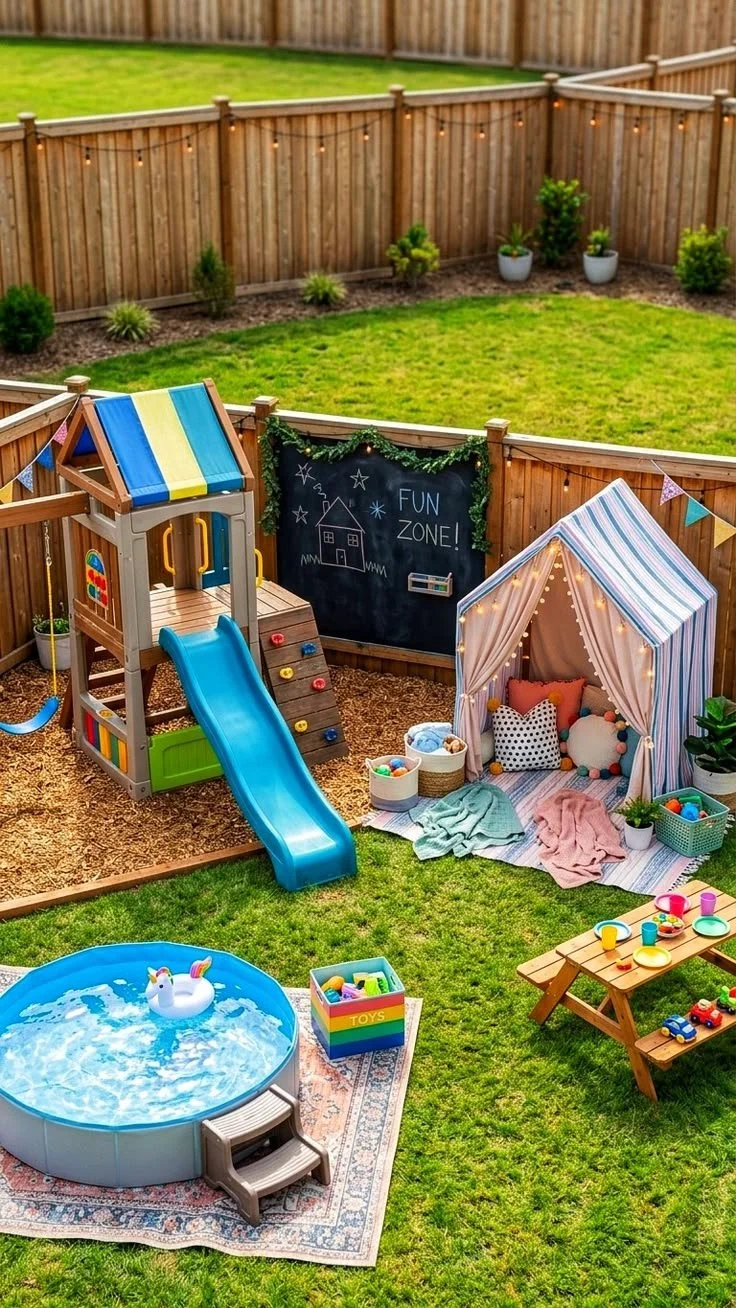
Swing sets are a classic for a reason! They’re fun, versatile, and you can find designs that combine swings, slides, and climbing elements in one compact unit. If you’re short on space, opt for a swing set that’s designed to only require the area of a small rectangle. Some even come with a built-in fort at the top for additional play options!
Playhouses
A small playhouse can be the perfect retreat for imaginative play. You might think they take up a lot of space, but many designs are quite compact. Choose one with a slide or a connected sandbox to maximize entertainment while minimizing the footprint. Plus, you can decorate it inside with some comfy cushions and fairy lights to turn it into a magical hideaway.
Climbing Structures
Why not introduce some climbing equipment? Small climbing walls or obstacle courses are fantastic for developing motor skills. These can often be installed against a fence to save ground space, allowing for vertical climbing fun.
Creative Ground Options
Now that we’ve considered equipment, let’s talk about the ground itself. What you put underfoot can significantly affect playtime enjoyment.
Sandbox Zones
Every kid loves a sandbox. Even a small, raised sandbox can ignite so much creativity. It’s also an excellent tool for sensory play! You can drop some fun toys in there and watch your child’s imagination take over. You can choose a corner in your yard or even get a large tub if you’re really tight on space.
Natural Play Areas
If you’re looking to get away from synthetic materials, think about natural play areas. You can create zones with grass, rocks, and logs. Kids can climb, jump, and explore a more natural environment. It’s a perfect way to incorporate nature right into their play.
Multi-use Play Panels
Another fantastic idea for a space-smart yard is to incorporate play panels. These panels can have games like tic-tac-toe, chalkboards for drawing, or even climbing grips, and they take up very little space. Attach them to a fence or wall, and voilà — you’re set!
Engaging Decor Ideas
Now let’s talk about decorations and enhancements that can elevate your backyard, making it an enticing outdoor playground.
Garden Play Areas
Incorporating gardens not only beautifies the space but also serves as a play zone. You can plant flowers with plenty of colors, but also think about having a small vegetable or herb garden. Kids love getting their hands dirty, and you can elevate their play by integrating a mini garden where they can learn about nature and nurture plants.
Themed Areas
What if you transformed a corner of your backyard into a themed area? Think pirate ship made from wooden pallets, a fairy garden, or a dinosaur dig site. This not only adds to their imaginative play but allows you to personalize your yard to best fit your child’s interests.
Practical Tips for Safety and Comfort
Before you install any play equipment, safety must be your top priority!
Soft Landing Zones
Make sure that any area around swings or climbing equipment has a soft landing. Consider rubber mulch, grass mats, or even foam padding to ensure safe play. If that seems too grand, even gardening foam tiles can be a lifesaver (and feet-saver!) for little ones who take tumbles.
Shade and Comfort
Don’t forget about shade. Kids can get sunburned quickly if they’re out playing for too long. Planting trees, setting up a shade sail, or using a large umbrella over the play area can help create a comfortable space.
Next Level Fun with Outdoor Foods
Outdoor play is even better with a picnic! You could set up a little picnic area where you can bring some snacks or lunches. For fun new ideas about what to pack, you might want to check out these amazing picnic food ideas for kids. They’ll love the surprise of munching outside after an adventure-filled day.
Expanding Activities and Experiences
Once you’ve set up the fundamental elements of your backyard playground, incorporate different activities to keep the excitement alive.
Scavenger Hunts
Scavenger hunts are a great way to keep them engaged! Create lists of items that can be found in your yard or neighborhood. This activity combines exploration with problem-solving, and it’s fun for parents to participate too.
Nature Crafts
Consider setting up a craft station outdoors. Kids can collect leaves, flowers, or twigs, and then get creative making nature collages. It encourages both outdoor play and artistic expression, transforming your space into a multifaceted experience.
Play Dates and Team Games
Don’t forget to invite friends over! Playdates can turn a good day into a great one as kids share toys and games, boosting social skills. Organizing mini team games like sack races or treasure hunts can also lead to some great experiences.
Conclusion
So, there you have it! With a sprinkle of imagination and a dash of creativity, your backyard can become a little slice of heaven for your children. Just remember that the most important thing is that your kids have a space to enjoy, explore, and learn while being active.
For even more backyard ideas, you can check out this resource for inspiration on playground designs that will transform your space, and if you’re seeking additional outdoor play activities, you might find great ideas in this article on outdoor play areas. Happy playing!

Foods That Melt Belly Fat for Busy Moms Quick and Easy Wins
Looking for Simple and Effective Healthy Recipes
Imagine it’s a busy evening. You’ve just finished a long day of work (maybe the kids ran wild at home), and you’re standing in front of the fridge, feeling overwhelmed by choices. You want to whip up something healthy, but the temptation to reach for that takeout menu is real. Sound familiar? If you’ve ever been in this scenario, you’re not alone. Many parents face the daily challenge of preparing nutritious meals that are quick, easy, and still pleasing to picky little palates.
Here’s the thing: simple and effective healthy recipes can make life a lot easier when juggling meal prep and family time. Not only do they help with weight loss and clean eating goals, but these meals are usually high in protein, making them perfect for growing toddlers and busy lifestyles. Today, let’s explore some of the best options to keep you on track while navigating the whirlwind of parenting.
High-Protein Breakfast Ideas
Breakfast is often heralded as the most important meal of the day, especially when you’re fueling little ones. High-protein breakfasts lay a strong foundation to keep energy levels steady until lunchtime. Here are a few ideas:
- Greek Yogurt Parfait: Layer Greek yogurt with fresh fruits and sprinkle some granola on top. This not only adds crunch but also makes it a fun activity for toddlers to assemble their own parfaits.
- Smoothie Bowls: Blend a banana, a scoop of protein powder, spinach, and almond milk. Pour it into a bowl and let the kids top it with their favorite fruits and seeds. It’s colorful, nutritious, and surprisingly filling!
You might find that the kids actually enjoy participating in breakfast preparation. When they have a hand in making their meals, it increases the likelihood they’ll eat what’s served. For additional meal prep ideas, check out these easy activities that can help keep them entertained while you cook.
Wholesome Lunch Solutions
Lunch can sometimes feel like an “afterthought” meal? Well, it doesn’t have to be! Quick and healthy lunch recipes can be both nutritious and delightful, making it easier for you to enjoy meal times together.
- Quinoa Salad: Quinoa is not just a trendy grain; it’s a complete protein and super easy to make. Mix cooked quinoa with diced veggies like bell peppers, cucumbers, and tomatoes. Toss it with olive oil and lemon juice for dressing. You can even involve your kids in this process, letting them choose their favorite vegetables to mix in.
- Veggie Wraps: Use whole-grain tortillas and fill them with hummus, shredded carrots, cucumbers, and spinach. It’s compact for little hands and can be a great on-the-go meal.
If you’re feeling adventurous, summertime is perfect for incorporating some fun water play into your routine. For some creative ideas, you can explore these water table activities that double as outdoor lunch ideas.
Delicious Dinner Options
Dinner can be chaotic, especially if you have toddlers running around, so it’s crucial to have a few reliable recipes in your back pocket. Here are some flavorful, family-friendly recipes:
- Sheet Pan Chicken and Vegetables: Toss chicken breasts with your choice of vegetables—think broccoli, bell peppers, and sweet potatoes—with a simple seasoning of olive oil, garlic powder, salt, and pepper. Bake it quickly, and you have a full meal in under 30 minutes. Plus, cleanup is a breeze!
- Pasta Primavera: Whole grain pasta loaded with seasonal vegetables and a light garlic-oil sauce can be a beautiful way to get those veggies in. Don’t forget to sprinkle it with some grated cheese for that extra touch.
Quick Tips for Busy Parents
Even with the best intentions, cooking every single night can be daunting. So, here are a few quick tips to streamline your meal prep:
- Batch Cooking: Dedicate one day a week to make larger quantities of meals. You can freeze them for quick lunches or dinners later.
- Involve the Kids: Let the children help with preparation, whether it’s washing veggies or measuring ingredients. It can be a fun activity and also teaches them about healthy eating.
Mistakes to Avoid
It’s easy to get caught up in the moment and make decisions that don’t align with your healthy eating goals. Here’s what to watch out for:
- Skipping Meals: When you’re too busy, it’s tempting to skip meals altogether; don’t do that. Even a small snack is better than nothing.
- Overly Complicated Recipes: If a recipe has too many ingredients or steps, you’re less likely to make it. Stick to simple, tried-and-true recipes that require minimal prep.
Conclusion
Maintaining a healthy diet amidst a busy lifestyle is challenging but achievable. By incorporating high-protein meals that are easy to prepare, you’re already on the right track. Consider exploring the Mediterranean Fatty Liver Diet Cookbook for Busy Women Over 50 to find more nutritious recipes or use the Lose Weight for Women at Home app for additional support and meal ideas. You’ll not only take care of your family’s nutrition but also set a positive example for your children in their lifelong health journey. Keep pushing forward with those healthy choices; you’ve got this!
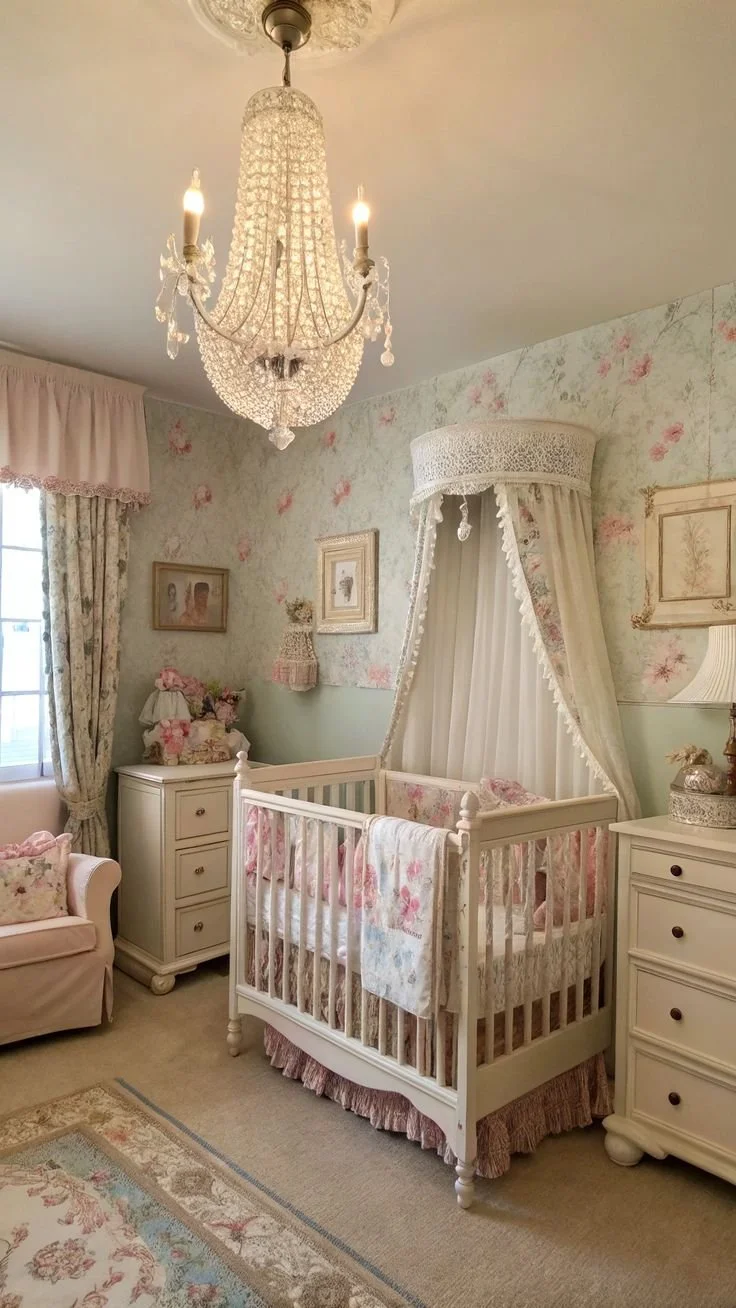
Small Space Cottagecore Nursery Designs with 10 Cozy Ideas for Parents
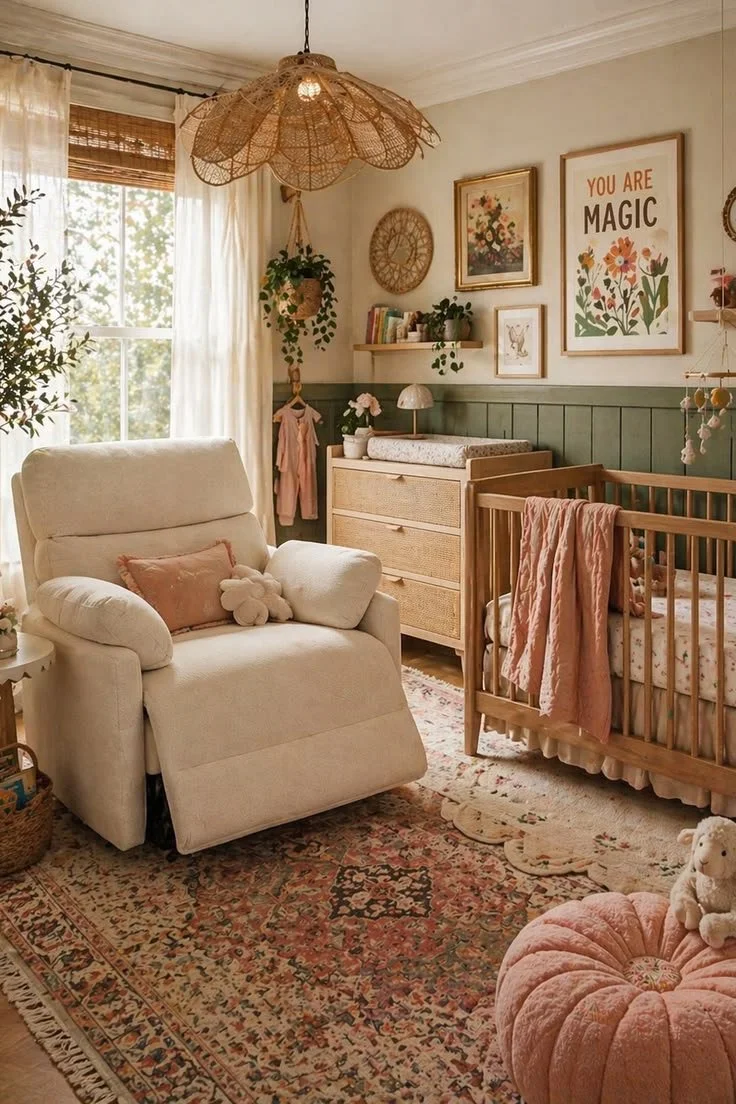
Imagine this: you walk into your baby’s nursery, and instead of a typical sterile setup, you’re greeted with a room that exudes warmth, charm, and a touch of nostalgia. This is the promise of a cottagecore nursery, a delightful space designed to blend rustic elements with soft elegance. Picture distressed furniture paired with floral motifs and pastel colors, creating an inviting and stylish sanctuary. As parents, we want our babies to feel secure and happy, and what better way to achieve that than by surrounding them with beauty and comfort?
The Essence of Cottagecore Style
Cottagecore is not just about aesthetics; it encapsulates a lifestyle that celebrates simple pleasures, comfort, and natural beauty. It’s all about creating a nook that feels timeless and serene, a haven where both your child and you can unwind. In a cottagecore nursery, you’ll often see distressed wooden furniture, soft textiles like quilts and cashmere blankets, and sweet adornments such as floral patterns and vintage-inspired decor. These elements work together to create an atmosphere that’s both cozy and enchanting.
Let’s be honest, as new parents, we’re often overwhelmed by the choices we need to make. This style, however, offers a straightforward path to create a space that’s as functional as it is beautiful. For some inspiration, you might find it helpful to explore adorable nursery ideas that blend whimsy and practicality.
Choosing the Right Color Palette
When choosing a color palette, the goal is to evoke calmness and charm. Soft pastels like blush pink, mint green, and light lilac are perfect for a cottagecore nursery. These colors not only soothe but also add a cheerful vibe. You can choose to paint the walls in these shades, or even consider wallpaper with floral prints—a beloved hallmark of cottagecore decor.
You might be wondering about how to tie everything together. Think about opting for furniture that complements your color scheme. A vintage-style crib or a distressed oak dresser can enhance the room’s charm while providing essential storage. Don’t forget about the power of accessories—add pillows, rugs, and artwork that echo your chosen hues.
Furniture Selection: Balancing Aesthetics and Functionality
Selecting the right furniture is crucial. Look for pieces that are both functional and whimsical. A comfortable rocking chair is a lovely addition to your baby’s room, making those late-night feedings a bit more bearable. You might even find a second-hand chair at a vintage store that can be reupholstered to match your nursery theme.
Using budget-friendly ideas can help you make intentional choices without breaking the bank. Embracing thrift store finds or family hand-me-downs adds a layer of personal history and warmth, creating a uniquely special space for your little one.
Textures that Comfort
Soft textiles are essential in achieving the cozy atmosphere characteristic of a cottagecore nursery. Layering different textures creates visual interest and enhances comfort. Perhaps consider quilts or knitted blankets draped over the crib, fluffy rugs for playtime, and soft curtains that filter in gentle light.
Incorporating a variety of textiles can also help with sound absorption—of course, we all want to minimize noise when the baby is finally asleep! Don’t be afraid to mix and match patterns, such as floral prints with stripes, to really lean into that charming, curated look.
Personal Touches and Decor
This is where you can truly let your personality shine. Vintage-inspired decor, like framed prints of wildflowers or pastoral scenes, can make the nursery feel uniquely yours. Consider handmade items like crochet mobiles or wooden toys that pair beautifully with the overall theme.
You might also want to include some personal items, like family photos or heirloom pieces that can be cherished for generations. This not only tells a story in your nursery but helps foster a sense of warmth and continuity that every parent desires.
Creating a Safe and Functional Space
While aesthetics are essential, safety and functionality cannot be overlooked. Ensure that heavy furniture is securely anchored to the wall, and padding is used in areas where babies might explore. Always keep safety in mind when selecting decor and placement, especially as your little one grows and starts to crawl and walk.
Lighting is another vital aspect. Soft, adjustable lighting can create a calming environment for both playtime and sleep. You may want to install a dimmer switch or opt for warm-toned bulbs to create a soothing ambiance throughout the day and night.
Common Mistakes to Avoid
As you embark on creating this quaint sanctuary, it’s easy to make a few common mistakes. One of the biggest pitfalls is over-decorating. Remember that simplicity can often achieve more than an overload of decor. Focus on a few cherished pieces that bring joy and meaningful stories instead of trying to fill every inch of the room.
Another mistake is overlooking storage solutions. In a nursery, you’ll accumulate plenty of things—clothes, toys, books, and more. Ensure you have adequate storage that matches your style yet remains functional for easy access.
Bonus Ideas for a Cottagecore Nursery
Natural Elements: Add plants that are safe for children. A few potted flowers or hanging planters can introduce life into the space while reinforcing the natural vibe.
Artisan Touches: Look for locally made or artisan crafts to uniquely decorate your nursery. Handmade items can add character and support local creators.
Seasonal Adjustments: If you’re feeling creative, switch out decor based on the season. This keeps the room feeling fresh while maintaining the charm of the cottagecore theme.
Conclusion
Creating a cottagecore nursery combines rustic charm with soft elegance to welcome your little one into a warm, inviting environment. Decor and furniture choices play a major role in achieving this look, with an emphasis on comfort and personal touches. For further inspiration, you can check out a variety of options available on platforms like Amazon or explore unique finds on Etsy to bring your vision to life. Enjoy the journey of creating a space where memories will flourish!
Dino Dig Activities for Backyard Sensory Play Sparks Curiosity
Imagine this: it’s a sunny afternoon, and your little ones are bouncing off the walls, full of energy and curiosity. You look outside at the garden, and while it’s a lovely sight, you can’t help but wonder how to engage them in some hands-on outdoor fun. Sound familiar? We’ve all been there, juggling wanting to keep our kids entertained while also nurturing their development. The great news is you don’t need to look far to provide your toddlers with exciting and educational activities right in your backyard! You may also find Easy Diy Sensory Activities For Toddlers useful.
The Joy of Outdoor Play You may also find 21 Sensory Bins For Toddlers To Boost Play Focus Fun useful.
Getting your kids outdoors is not just about providing them with activities to occupy their time; it’s about fostering their growth and curiosity. Studies show that outdoor play enhances cognitive skills, social interactions, and motor skills in young children. Think of all those endless giggles and the endless discoveries waiting to be made among the flowers, dirt, and even bugs! You can create memorable experiences that boost not only their play skills but also their curiosity about the world around them.
Whether you have a small balcony or a sprawling backyard, there are plenty of engaging activities that can be tailored to your space. Here are a few easy backyard garden ideas and themed activities to get you started!
Hands-On Garden Activities
Create a Sensory Garden
One of the best ways to engage young children is through their senses. The idea of a sensory garden is simple: utilize different plants, textures, and smells to create a garden that kids can explore with their hands, noses, and eyes. For instance, you might plant some fragrant herbs like mint, basil, and lavender that they can touch and smell.
Another option is to include colorful flowers and textured plants, like lamb’s ear, which has soft, fuzzy leaves. Adding a few small pathways made from stones or wood can create special places for little feet to tread as they wander through your sensory delight. This type of garden can leave children eager to explore time and again.
If you’re looking for more activities to do with little ones to keep them engaged, you might want to explore some easy DIY sensory activities. They’re great for pulling in your kids’ attention and enhancing their play experience.
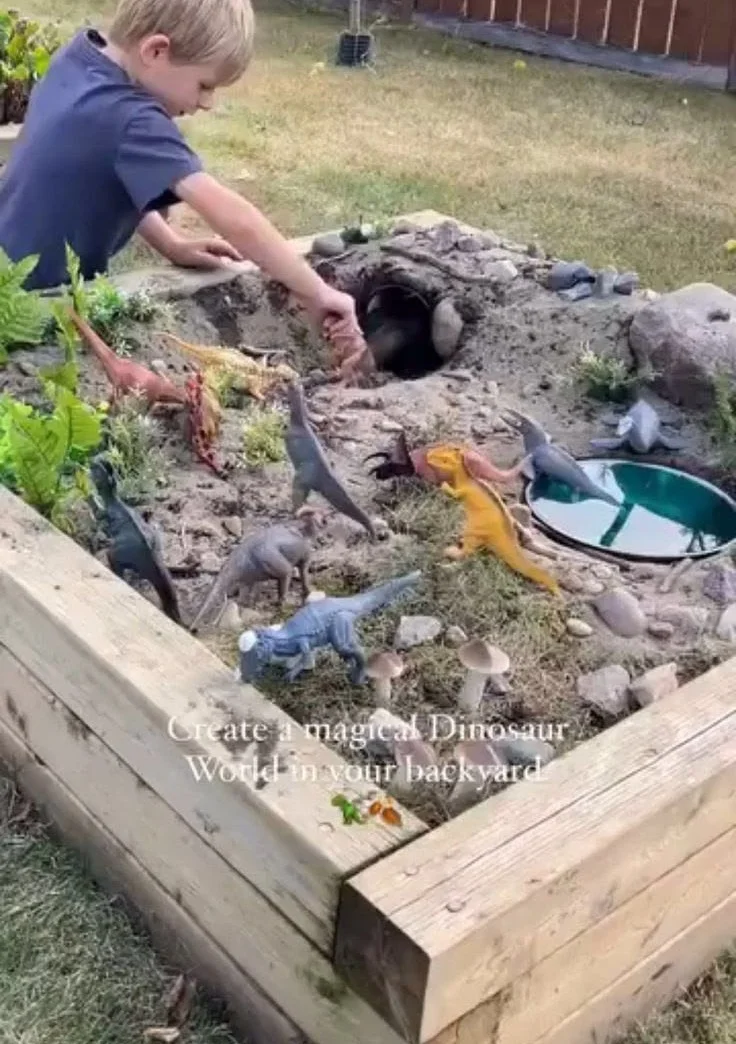
Themed Outdoor Fun: Dinosaur Dig
What kid doesn’t love dinosaurs? This is where themed activities come into play. Consider setting up a "dinosaur dig" in a designated area of your garden. Fill a small sandbox or a shallow kiddie pool with sand and hide toy dinosaurs amongst it. Hand your little archaeologists some shovels, brushes, and buckets to dig and discover these prehistoric creatures.
Not only is this a thrilling game for toddlers, but it also helps to develop their fine motor skills as they dig and sift through the sand. You can even incorporate some learning by discussing different types of dinosaurs as they find each one! This thematic play is sure to spark their imagination and nurture a love for exploration.
Exploring Nature with Scavenger Hunts
Another simple yet effective way to immerse your kiddos in outdoor fun is by setting up a scavenger hunt. Create a list of items they can find in your backyard, such as different leaves, rocks, or flowers. Hand them a bag or a basket and watch as they excitedly search for each item.
This activity not only keeps them engaged but also teaches them about the environment. As they collect their treasures, ask them questions about what they’ve found. For instance, “What color is this leaf?” or “Can you find something rough?”
If you’re looking for further inspiration and ideas, check out a variety of sensory bins that can help encourage focus, play, and fun. They can be an excellent resource for continuing the excitement both indoors and outdoors.
Crafting with Natural Materials
Who says crafts need to happen indoors? Gather some natural materials from your backyard, like twigs, leaves, or stones, and encourage your kids to create fun crafts. They can make leaf rubbings with crayons, build small sculptures using sticks, or even paint rocks with bright colors.
This not only encourages creativity but also solidifies their connection with nature. Plus, arts and crafts lead to open-ended play, allowing their imaginations to run wild. You might even be amazed at what they come up with!
Water Play: The Ultimate Favorite
As the weather warms, water play becomes an ultimate favorite for many kids. All you need is a bucket of water, a few cups, spoons, and some toys. Let your children splash, pour, and measure in your outdoor space.
For added fun, you could freeze small toys in ice cubes and have them work on excavating their treasures as the ice melts. This tactile experience can be both calming and thrilling for little hands. Plus, it’s an excellent way to practice sharing and teamwork if they’re playing together.
Incorporating Movement and Balance
Physical activity is critical for young children, and what better way to keep them moving than through outdoor games? You could set up a small obstacle course using cushions, hula hoops, or ropes. Have them jump, crawl, and navigate through the course while working on their gross motor skills.
Sometimes, a simple game like “Simon Says” or “Follow the Leader” can encourage them to run, hop, and skip while having a fabulous time. These activities promote coordination and balance, crucial skills as they grow.
Conclusion
Embracing hands-on outdoor fun doesn’t have to be complicated. With just a few tools and a little creativity, you can create an environment that encourages exploration, learning, and active play. Playtime in the garden can lead to wonderful discoveries and unforgettable memories for your children.
For more interactive and engaging experiences, consider checking out resources like the Creativity for Kids Sensory Bin. Alternatively, if you like thematic ideas, you might want to explore the Outdoor Dinosaur Sensory Bin with Free Printables to set up a truly unforgettable playtime. Embrace those adventures and watch your kids thrive while they play!

Healthy Breastfeeding Snacks You’ll Crave Daily When Exhausted
Feeding a baby is hard work
Imagine this: it’s 2 a.m., you’re in the middle of a feeding, and your baby’s tiny hands all but demand you hold them while you juggle with your other hand to grab something to eat. Sound familiar? This is the reality for many breastfeeding moms who understand that feeding a baby is a full-time job. And here’s the thing: you shouldn’t have to sacrifice yourself or your energy levels in the process. Your snacks should work just as hard for you as you are for your little one. You may also find Wickedly Healthy Breastfeeding Snacks useful.
Finding snacks that not only satisfy your hunger but also nourish your body and support milk production is essential. It’s important to choose options that pack a nutritional punch, providing you with steady energy and aiding your postpartum recovery. Let’s dive into some fantastic ideas that can fuel your busy days and help you thrive during this beautiful yet challenging phase of motherhood.
Nutrient-Packed Snack Ideas
Greek Yogurt with Berries
Greek yogurt is a powerhouse of protein, which is essential for milk production. Top it off with berries for an added boost of antioxidants and fiber. You can even throw in some granola for a satisfying crunch. This combo is not only delicious but super easy to eat with one hand.Nut and Seed Mix
Mix your favorite nuts and seeds for a quick energy boost. Almonds, walnuts, and sunflower seeds are rich in healthy fats and vitamin E, which can support your overall health. They’re perfect for munching on while you feed your baby!Smoothies
When you really can’t spare a moment, throwing together a smoothie can be a lifesaver. Blend spinach, banana, yogurt, and some nut butter for a nutrient-rich drink that will help fuel your body. Not to mention, you can hold it in one hand while you cradle your little one in the other. This is where wickedly healthy breastfeeding snacks come into play, offering not just taste but benefits for both you and your baby.Avocado Toast
Toast a slice of whole grain bread and top it with smashed avocado. Sprinkle on some salt, pepper, or even chili flakes for an extra kick. Avocados are loaded with healthy fats and can provide sustained energy to get you through your day.Hummus and Veggies
Hummus is a fantastic source of protein and fiber. Pair it with baby carrots, cucumbers, or bell peppers for a refreshing crunch. This snack is nutritious and can be prepped in advance, making it easy to grab when you’re hungry.
Late Night Snack Solutions
You might find that late-night feedings often come with cravings for something quick and easy. That’s where creative solutions come into play. If you’re often reaching for chips or sugary snacks in those quiet, still hours, consider keeping a stash of wholesome options within arm’s reach.
A fantastic resource for late-night cravings can be found in this list of breastfeeding snacks designed for late-night grab-and-go. These snacks can be nutritious and satisfying, helping you stay energized while tending to your little one’s needs.
Food for Milk Production
Ensuring that your diet supports milk production is key! Here are some fantastic options to consider:
Oatmeal: A warm bowl of oatmeal is packed with fiber and can help increase milk supply. Add some banana, honey, or almond milk for flavor.
Salmon: Rich in omega-3 fatty acids, salmon not only helps with your overall recovery but is also fantastic for your milk quality.
Leafy Greens: Spinach, kale, and other leafy greens are essential. Toss them in a salad or add to smoothies for a nutrient boost.
Lastly, don’t forget your hydration! Water is vital for milk production, so always keep a water bottle on hand while you snack.
Healthy Snacks On-the-Go
As mothers, getting out with your baby can sometimes feel like a mini military operation. Preparing healthy snacks to take with you is a great way to ensure you don’t have to resort to vending machine options. Here are some ideas:
Energy Balls: You can make these with oats, nut butter, honey, and some dark chocolate chips. They’re portable, delicious, and easy to make in batches.
String Cheese and Whole Grain Crackers: This combo is great for satisfying those cravings. Plus, it’s an easy one to throw in your bag.
Apple Slices with Peanut Butter: Cut up some apples and pair with a small container of peanut butter. You’ll have an energy-boosting snack that’s easy to munch on while you’re out.
Final Thoughts on Snacking Smart
Now, you might be feeling overwhelmed by the idea of planning all these meals and snacks, but it doesn’t have to be complicated. Stock your pantry with a few essential items and experiment to see what works for you. Make sure you carve out time to prepare these snacks ahead of time, even if that’s just once a week. You’ll thank yourself during those busy days and late nights. Remember, you’re not alone in this journey, and understanding what nourishes you while caring for your baby is vital.
Keep in mind the importance of self-care during this season of life. Nourishment doesn’t just come from the foods you eat but from how you care for yourself during this time. As you explore and enjoy these healthy options, allow them to serve as a reminder that you’re putting in just as much effort into your care as you do into your baby’s.
Conclusion
Breastfeeding can be an exhausting yet rewarding journey, and your nutrition plays a significant role in how you feel each day. From on-the-go snacks to ensuring you’re getting the right nutrients to promote milk production, it all ties back to self-care. For more insights on managing your nutrition while breastfeeding, consider reading about how to lose weight while breastfeeding, and check out the health tips for pregnant women that can help guide your journey. Remember, you’re doing a fantastic job, and every effort counts towards both your health and your little one’s well-being.
Boho Ideas for an Eclectic Baby Nursery with a Mochi Recliner
Create a Warm, Whimsical Eclectic Baby Nursery
Imagine this: It’s the middle of the night, and you’ve just settled in for yet another late-night cuddle session with your little one. You find yourself sinking into a beautifully cozy recliner—the kind that invites you to stay just a little longer, to rock and sway with your baby in a gentle embrace. That’s the magic of a well-designed nursery, especially when it incorporates a piece like the extra-wide, ultra-comfy Mochi recliner, perfect for those intimate moments that create lasting memories.
In today’s fast-paced world, creating a space that feels like a warm hug is essential. You want an eclectic baby nursery that not only meets your aesthetic dreams but also makes those late-night feedings and diaper changes feel a little less daunting. We’ve all been there, scrambling to make the nursery feel cozy, playful, and personal!
The Importance of Comfort in Design
Here’s the thing: During those sleepless nights, comfort becomes a priority. Whether you’re nursing, bottle-feeding, or simply rocking your baby back to sleep, a plush recliner like the Mochi can be your best friend. Its spacious design allows you to sit comfortably with your child in your arms, letting you soak in those fleeting moments. This is where your design decisions matter the most, as they’ll affect not just the room’s look but your nighttime experience.
If you’re still pondering how to make your nursery feel dreamy and welcoming, you might want to consider exploring some budget-friendly nursery ideas. Creating a warm atmosphere doesn’t have to break the bank!
Creating the Eclectic Look
When it comes to designing an eclectic nursery, think beyond the cookie-cutter styles often seen in baby catalogs. An eclectic approach means mixing various elements—think vintage finds, soft textiles, and vibrant colors that speak to your personality. Here are some effective strategies to achieve that whimsical feel while maintaining functionality:
Color and Textiles
Choosing a color palette can set the tone for the nursery. You could opt for soft pastels for a calming effect or bold colors to spark joy and creativity. Whichever path you choose, incorporate different textiles to add warmth. For instance:
- Layered Textiles: Use various fabrics for drapes, rugs, and bedding to create a cozy layered look.
- Playful Patterns: Don’t shy away from fun prints! They can truly make the space feel vibrant and alive.
Unique Decor
Personal touches bring an eclectic nursery to life. Consider adding unique decor elements that reflect your family’s journey or your interests. Perhaps you have a handmade quilt from Grandma or a mural that tells your family’s story?
To amp up the coziness, think about integrating fairy lights or soft sconces for those nighttime feedings. The right lighting can change the entire feel of the room.
Functional Furniture Choices
While aesthetics are crucial, functionality should never be overlooked. The extra-wide Mochi recliner you choose should not only be comfortable but also complement the nursery’s overall look. Here are a few features to consider:
- Storage Options: Look for furniture that provides extra storage. Ottomans that open for storage or bookshelves can keep essentials at your fingertips without clutters.
- Durability: Babies have a knack for making messes, so durable materials are a must. Consider fabrics that can withstand spills and wear.
Pinterest-Worthy Nursery
If you need more inspiration, check out how other parents have crafted cozy, enchanting spaces. For example, a cottage garden nursery can bring that romantic charm into your home, blending nature and whimsy perfectly.
Adding Personal Touches
Your baby’s nursery should feel like a reflection of your family. Want to make it truly special? Here are a few ideas:
- Artwork: Hang framed prints, family photos, or your own artwork to create a gallery wall. It acts as a great conversation starter, too.
- Interactive Elements: Consider incorporating elements that allow you to interact with your child, like a reading nook filled with their favorite books or a soft play area.
Encourage Creativity and Play
It’s essential to create a space that’s not just for sleeping but also for play and creativity. Adding a soft toy corner or an arts-and-crafts section will encourage those early explorations.
Comfort and Care in Every Aspect
Let’s be honest; parenting can be overwhelming at times. That’s why creating a tranquil nursery space where you feel relaxed and at peace is so valuable. Take a breather in that comfy Mochi recliner while your baby drifts off to sleep. Enjoy those precious moments of stillness.
Conclusion
As you design your dream nursery, remember that it should be a sanctuary for both you and your baby. Focus on comfy and whimsical furnishings, select inviting colors, and embellish the space with personal touches. For some fun ideas, check out this fabulous design for an ootd corner in my room that can also inspire your nursery’s look. And, if you’re hunting for more stylish pieces, the incredible sofa furniture options will surely add charm and functionality. Embrace this journey with love, style, and a touch of whimsy!
Creative Ways to Create a Fun & Colorful Kids Zone at Home
Imagine this: your children are laughing and playing in a vibrant, colorful outdoor play area. They’re climbing, swinging, and exploring, while you enjoy a nice cup of coffee in the shade. It’s a perfect scene that not only keeps your energetic little ones entertained but also enhances the overall aesthetic of your home. Creating a bright and engaging outdoor play area is not just a dream; it can be your reality with a little thought and creativity.
Choosing the Right Space
First things first, you’ll want to identify the ideal spot for your outdoor play area. Does your backyard have a sunny area that’s safe and free from harsh obstacles? Make sure it’s easily accessible from your home. Think about proximity to windows or doors so you can keep an eye on your kids while they play. A flat surface is essential too; if you have uneven terrain, consider leveling it out or bringing in sand or mulch to create a soft landing space. Trust me, you don’t want to deal with scrapes and bumps!
Colorful Equipment
When picturing an outdoor play area, vibrant colors come to mind, right? Colorful equipment can spark joy and excitement! There are lots of options available that you can choose from. You might find a fun climbing structure or a slide that comes in bright yellows, blues, or reds. If you’re looking to save a bit but still want a splash of color, consider adding some DIY painted items. For example, you could paint an old swing set or wooden bench with non-toxic, weather-resistant paint. This simple touch can transform something outdated into a bright focal point in the outdoor space.
In addition to play structures, you could incorporate colorful outdoor furniture or shade solutions like umbrellas. Imagine a vibrant picnic table set where your kids can have their snacks in between play sessions. And don’t overlook the flooring! Bright, protective floor tiles can make an entire area pop. You could even motivate your little ones to clean up with fun tiles that make tidying up feel like a game. If you’re looking for ideas on how to transform your kids’ bathroom with fun tile designs, check out these colorful ideas for inspiration.
Interactive Elements
Kids love interactive play areas. Consider incorporating features that stimulate their minds and bodies. How about a mini-garden patch where they can plant flowers or vegetables? Not only does this teach them about nature, but it also offers hands-on learning opportunities. You can also set up chalkboards or magnetic boards where kids can express their creativity. These components turn the space into a learning environment, seamlessly blending play with education.
Speaking of creativity, nothing beats a good old-fashioned chalk drawing on the patio. It’s messy, but it’s also tons of fun! If you don’t want your walls or floors to get stained, set up designated spots with large, movable chalkboards. This way, they can channel their inner Picasso without worrying about the mess.
Incorporating Nature
Let’s be honest, kids thrive outdoors, and nature offers a playground like no other. Utilize natural elements to enrich their play experience. You can weave in logs or tree stumps for climbing and balancing activities. These can be an excellent way for kids to test their physical skills while also letting them engage with nature.
Another idea is to plant flowering shrubs or butterfly gardens around the play area. They not only provide shade but also attract local pollinators that your children will delight in observing. It’s like a natural science lesson right in your backyard. Don’t forget about sandboxes, which can also serve as a creative outlet. Fill them with colorful toys, and watch your little ones dig and create intricate sand castles, all while developing their motor skills.
Safety and Comfort
As much as we focus on fun, safety is every parent’s priority. Ensure that all play equipment is age-appropriate and well-maintained. Regularly check for wear and tear, especially on swings or slides. Adding soft mats or grass can prevent injuries, should any unexpected tumbles occur.
Comfort is crucial as well. Provide shaded areas where children can take a breather from the sun. A covered patio or a few strategically placed trees can help. Including some plush outdoor cushions or blankets can make it inviting to relax after a busy day of play.
Bringing It All Together
Now, let’s talk about combining all these elements. Perhaps create themed play areas—like a pirate ship in one section and a fairy garden in another. The more imaginative the layout, the more likely your kids will be engaged. You can even host playdates where kids can enjoy a variety of activities without needing a school or playground! If you’re running out of ideas for indoor activities, consider these fun games that can work during the rainy days.
On a practical note, consider how you want to manage the area. A storage shed can keep toys and equipment organized and out of sight when they’re not in use. Plus, it’s an easy solution for keeping everything tidy.
Boosting Social Interaction
Encouraging your children to invite friends over can enhance their outdoor play experience. Think about creating sociable elements like a small stage for performances or an arts and crafts corner where collaborative projects can take place. These facets can foster friendship and teamwork while enriching their imaginative play.
Finally, don’t underestimate the power of your involvement! Simple things like joining in on the fun, teaching them games from your childhood, or starting a family sports day can make memories that will last a lifetime.
Conclusion
Creating a bright, fun outdoor play area is absolutely possible with a little creativity and planning. By focusing on colorful equipment, interactive elements, and integrating nature safely, you’ll build a space that fosters both play and learning. If you’re looking for some terrific decor ideas to jazz up the space, check out these playroom wall decals that can add a lively atmosphere. To give the children a cozy area to sit and relax, consider exploring colorful kids’ rugs. With these tips, your backyard can transform into an oasis of joy, imaginative play, and cherished family moments!
