
Cozy Backyard Play Space for Toddlers 12 Quick Setup Ideas to Try
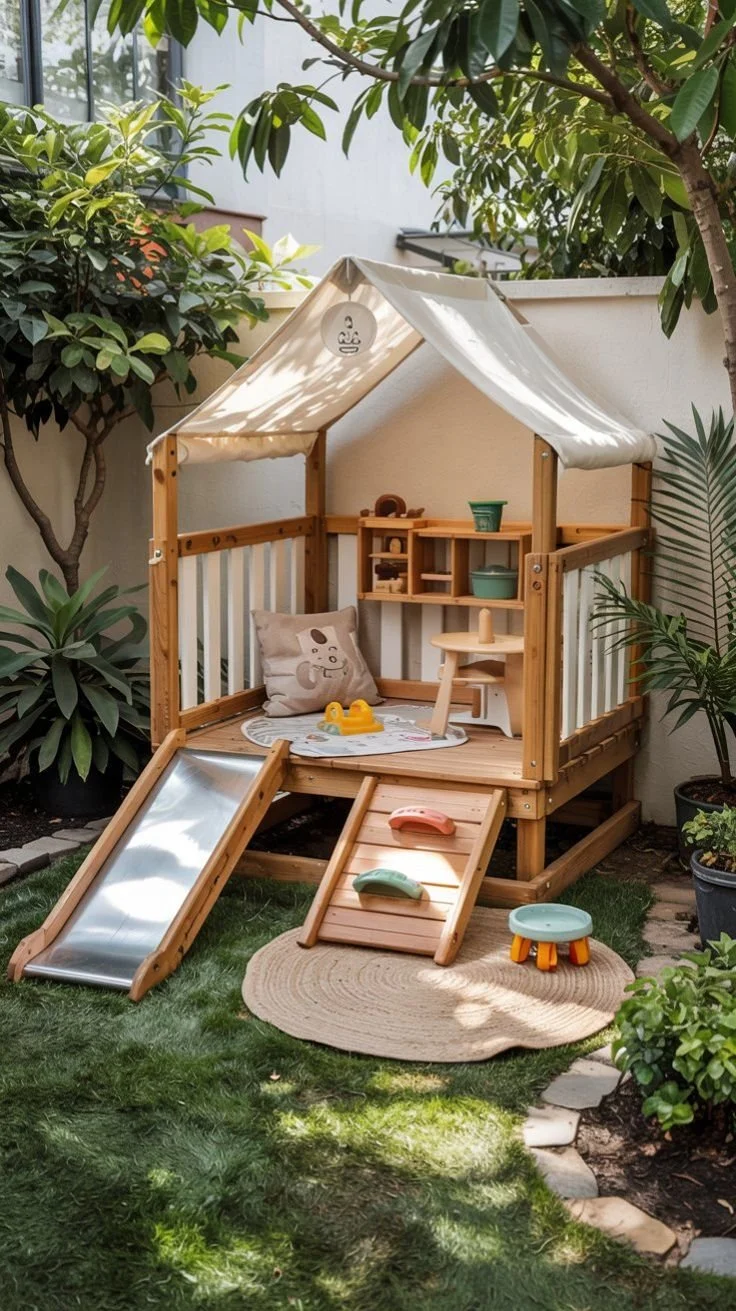
Creating a Cozy Elevated Play Area for Your Toddler
Imagine this: It’s a sunny afternoon, your toddler is playing happily outside, surrounded by soft rugs, colorful sensory toys, and gentle shaded garden backdrops. You’ve created a delightful little oasis right in your backyard—one that’s safe, inviting, and perfect for boosting their playtime joy. If you’re looking to transform a small outdoor space into an elevated play area, you’re not alone. Many parents want to make the most of their backyards, ensuring their little ones have a safe and fun environment to explore and learn.
Designing Your Elevated Play Area
First off, let’s talk about what you need. The essentials for your toddler’s play area start with the right location. Finding a shaded spot is crucial. Have you noticed that kids tend to gravitate towards sunny areas for their play, often forgetting about the dangers of too much sun exposure? A shaded garden backdrop can protect your little one while offering a cozy vibe. You could plant some flowers or set up a portable shade tent. If you have space, consider using an umbrella or a large tree to provide natural cover.
Selecting Soft Rugs
When it comes to flooring, safety is key. Choosing soft rugs can prevent scrapes and provide cushion for those inevitable tumbles. Plus, who doesn’t love the feel of soft fabric under their feet? Look for indoor-outdoor rugs that are durable and easy to clean. Something vibrant and colorful will not only catch the eye but also invite your toddler to engage more in play. If you’re unsure where to start, you might find inspiration in some cozy spaces online that showcase practical rug options.
Incorporating Safe Railings
If your elevated area includes steps or platforms, safe railings are a must. Picture watching your child fearlessly navigating their little play haven, while you’re at peace knowing they’re secured. Opt for railings that are sturdy but low enough for them to grasp easily. Vegetation can soften the edges; maybe consider planting small bushes or using decorative fences to keep your child from wandering off.
Sensory Toys for Engagement
Let’s not forget about sensory toys—they’re a game-changer in elevating your toddler’s playtime! Sensory bins, for instance, can engage little hands for hours. Think about filling a large bin with rice, sand, or even water beads. Each material offers a different tactile experience that sparks curiosity and promotes learning. And if you’re looking for great ideas for sensory play, check out this resource that highlights awesome sensory bins for toddlers.
Creating a Creative Garden Backdrop
To enhance the aesthetic of your play area, think about planting colorful flowers or even starting a small vegetable garden. Not only does this add beauty, but it also educates your toddler about nature. Involve your child in choosing seedlings or flowers—it can be a wonderful bonding experience! You’ll be amazed at how much joy a few vibrant plants can bring to your outdoor space.
Adapting to Your Space
Now, you might be wondering, what if your backyard is on the smaller side? Don’t worry! You can still make it work. Consider vertical garden ideas or using wall-mounted sensory boards that can be both functional and an engaging visual delight. These adaptations allow you to create an interactive environment without needing a vast space.
Inviting Friends Over
Remember, toddlers thrive in social settings! If you have friends or neighbors with young children, why not invite them over for playdates? You can create fun activity stations or games that bring everyone together. A small, elevated play area can host multiple kids, enhancing their social skills while letting them have fun in a safe environment.
Keep Things Organized
An organized play area is essential for safety and enjoyment. Use bins or baskets to store toys neatly when playtime is over. This not only makes it easy for kids to clean up but also teaches them responsibility from a young age. Add labels with pictures for fun visual reminders—this can be a fantastic learning opportunity!
Engaging Outdoor Activities
Incorporating outdoor games can enhance your toddler’s physical development. Think classic games like tag or a baby-safe version of hopscotch. Using foam balls is another way to encourage outdoor exercise while keeping safety in mind. Remember that active play is critical for your child’s growth and well-being.
Conclusion
Creating an elevated toddler play area in your backyard doesn’t need to be daunting. With thoughtful planning and engagement, you can foster an inviting space packed with sensory experiences. If you’re looking for more inspiration, check out these ideas for children’s outdoor play areas and activities that showcase various setups. You might also find some excellent tips on how to create a backyard play space for preschoolers. Remember, this space isn’t just about play, it’s about learning, exploring, and creating cherished memories with your child. Let’s embrace the beautiful mess that comes along with parenting and watch our little ones thrive!

Healthy Southern Corn Fritters with Hidden Veggies for Kids for Lunch
Sweet Corn Fritters: A Picky Eater’s Delight
Imagine this: it’s mealtime, and you’ve just put a plate of grilled chicken and steamed broccoli in front of your little one. You watch with hopeful anticipation — only to have them push it away and declare they’d rather eat nothing at all. If this sounds familiar, you’re not alone. We’ve all been there, stuck in the dilemma of dealing with picky eaters.
Now, here’s the thing: we need to be clever with our meal choices. One fun and nutritious option that’s become a hit at our dinner table is homemade sweet corn fritters. These little delights are crispy on the outside and sweet on the inside. Not only do they appeal to toddlers, but they also satisfy picky adults. You’ll love adding these to your rotation of easy meals for picky eaters!
Why Sweet Corn Fritters?
When it comes to cooking for toddlers, the challenge often lies in finding meals that are both nutritious and appealing. Corn fritters are super versatile: they can be served as a snack, a side dish, or even the main event. Plus, they’re incredibly easy to whip up! You can even involve your kids in the cooking process, letting them mix ingredients or shape the fritters — which can spark their interest in trying what they’ve helped create.
You may also want to consider pairing these fritters with a healthy dip. Think of yogurt-based dips or guacamole, which not only enhances taste but also adds nutritional value. If you’re looking for more fun recipes, check out these easy healthy blueberry fritters for toddlers—another hit that is perfect for breakfast or a midday snack!
The Ingredients for Your Sweet Corn Fritters
Making these fritters doesn’t require a long list of ingredients, which is what makes them even more appealing. Here’s a quick rundown of what you’ll need:
- Fresh or frozen corn kernels
- Flour (you can use all-purpose or whole wheat)
- Eggs
- Baking powder
- Salt and pepper
- Optional: Chopped herbs or cheese for added flavor
Pro Tip: Using fresh corn when it’s in season can elevate the taste of the fritters significantly, but frozen corn works just as well and is always handy to have.
Easy Steps to Make Corn Fritters
Here’s where the fun begins! Let’s get cooking:
Mix the Ingredients: In a bowl, combine corn kernels, flour, eggs, baking powder, salt, and pepper until mixed. Don’t be afraid to add herbs or cheese if your kids are a bit more adventurous!
Heat the Pan: Pour some oil into a skillet over medium heat. Wait until it’s hot but not smoking.
Form Your Fritters: Spoon the corn mixture into the pan, flattening them slightly so they resemble small pancakes.
Cook to Perfection: Fry until golden brown, about 3-4 minutes on each side.
Serve Warm: Let them cool slightly before serving, and consider pairing with that yogurt dip or homemade guacamole.
A Little Variation Goes a Long Way
The best part about this recipe is its adaptability. What if your toddler isn’t a fan of corn? You can substitute it with different vegetables like zucchini or mashed sweet potatoes. Try mixing in some finely chopped spinach or carrots for an extra boost of nutrition.
For those looking for a DIY project to engage their little ones, you could even create a simple DIY robotic hand that can be used to lift and enjoy the fritters, adding a sensory experience to mealtime.
Why They’re a Good Choice for Healthy Eating
Not only are sweet corn fritters delicious, but they also contain several benefits. Corn is a whole grain, rich in fiber, which means these fritters can help support digestion. Plus, using whole-grain flour instead of white flour can increase the nutritional content significantly, providing more vitamins and minerals.
Involving your kids in the process of making their meals can also lead them to appreciate healthy eating more. By creating a fun cooking experience at home, you’re setting the stage for them to develop a positive relationship with food.
Conclusion
Incorporating sweet corn fritters into your picky eater’s diet might be just the change you need. They’re simple to make, fun to eat, and nutritious—all good things when you’re juggling the challenges of toddler food preferences. If you’re looking to expand your cooking repertoire, be sure to check out these fantastic recipes: vegetable fritters and Cheesy 10-Minute Zucchini & Corn Fritters! With a little creativity and the right ingredients, mealtime can transform from a battlefield into a joyful adventure. Happy cooking!
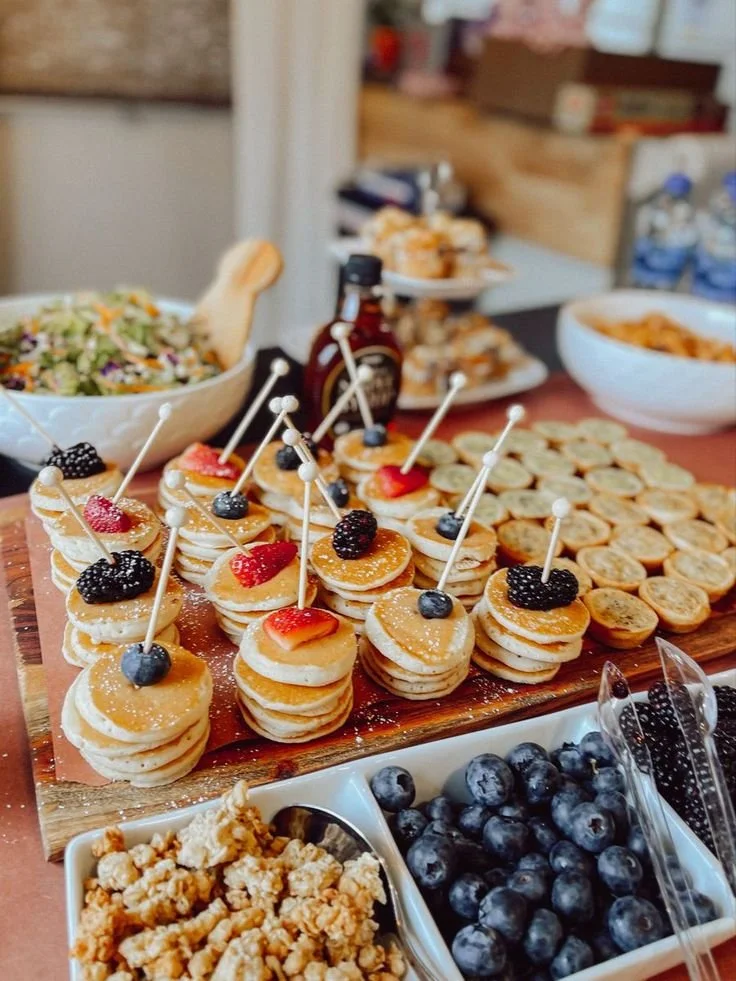
Irresistible Mini Pancakes Ideas for a Baby Shower Brunch
Planning a Baby Shower Brunch
Imagine you’re in the midst of planning a baby shower brunch, filled with excitement and maybe a bit of anxiety. You want to throw a delightful gathering that celebrates the upcoming arrival of a little bundle of joy without breaking the bank. Here’s the thing: it’s completely possible to create a memorable event with easy recipes and creative ideas that your guests will love. So, let’s dive into some practical, budget-friendly baby shower brunch ideas that are sure to impress everyone!
Start with a Theme
Before you begin planning your menu, it might help to establish a theme. A cohesive theme not only makes the planning process smoother but can also add a special touch to the atmosphere. Picture this: pastel colors for a girl, earthy tones for a boy, or a fun unisex theme featuring animals or stars. Themes can guide your food choices, decorations, and even activities.
For more inspiration on crowd-pleasing brunch options, you can explore our resource for additional baby shower brunch ideas to complement your theme!
Menu Staples for Your Brunch
Once you have your theme in mind, it’s time to think about the food—arguably the most enjoyable aspect of any gathering! Here are some popular and easy ideas that won’t stretch your budget:
Breakfast Classics with a Twist
Mini Pancakes: Who doesn’t love pancakes? They’re flexible for any theme and easy to personalize. Consider providing toppings like berries, whipped cream, or chocolate chips for guests to build their own pancake stacks. For a fun twist, you could try recipes that mix in flavors like banana or pumpkin.
Egg Muffins: These can be prepared in advance and served warm or at room temperature. You can add vegetables, cheese, or even leftover meats to make them hearty.
Yogurt Parfaits: Layer yogurt with granola and fresh fruit for a refreshing and healthy option. It’s simple to set up a DIY station where guests can customize their parfaits.
Flavorful Additions
You might want to consider some unique dishes to elevate your traditional spread. Here are a couple of ideas that are sure to impress:
Breakfast Tacos: Offer small tortillas with scrambled eggs, avocado, salsa, and cheese. Guests can mix and match fillings as they please.
Savory Muffins: Think cheddar and chive or sun-dried tomato and basil. These can be made a day ahead and serve as a delightful finger food.
Creative Drinks to Serve
No brunch is complete without refreshing drinks! Here are a few crowd-pleasers that cater to all tastes:
Mimosas: A classic brunch staple, mimosas are easy to prepare. You can set up a mimosa bar with different juices like orange, peach, and cranberry.
Fruit-Infused Water: For a non-alcoholic option, offer infused waters with fresh fruits like lemon, cucumber, or berries. It’s hydrating and visually appealing to guests.
Coffee and Tea Station: Always a must-have, make sure to have a variety of coffees and tea options available, possibly along with some flavored creamers and sweeteners.
Fun and Interactive Ideas
Let’s be honest—activities can add a spark of excitement to your gathering. Here are a couple of suggestions to engage your guests:
DIY Food Stations: Setting up a build-your-own pancake or waffle station can be both interactive and fun! Guests can choose their toppings and create something uniquely theirs.
Games: Light-hearted games related to parenting or baby trivia can break the ice and provide entertainment. Simple bingo cards with baby items can also get guests interacting.
Budget-Friendly Decor Tips
Now that we have the food sorted, let’s not forget about the ambiance. Creating a lovely atmosphere doesn’t have to be expensive. Here are some simple ideas:
DIY Centerpieces: Use mason jars filled with flowers or colorful candies as table decor. It’s personal and adds a lovely touch.
Balloon Arches or Garlands: These can be made easily at home and can fit any theme. You can find plenty of tutorials online.
Printable Decorations: There are tons of free printables available online for baby shower themes. Use them for banners, games, or even table settings.
Wrapping It Up
As you’re gearing up for this special event, remember that the key is to keep things simple and enjoyable. With thoughtful planning, you can create a memorable baby shower brunch that’s fun, inviting, and budget-friendly. Don’t forget to try out those mini pancakes; they’re a hit at any gathering! If you need more easy pancake ideas, check out this fantastic resource on thoughtful brunch menu options: easy mini pancakes ideas for baby shower brunch.
Conclusion
Planning a baby shower brunch doesn’t have to be a burdensome task. By focusing on budget-friendly recipes and engaging activities, you can create an event that’s enjoyable for both you and your guests. Don’t forget to check out delightful recipes like S’mores Pancakes, as well as other options like Mini Pancakes to elevate your menu. Happy planning!
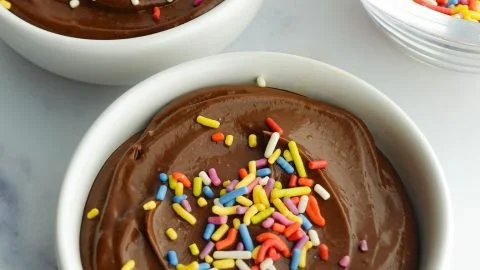
Easy Avocado Chocolate Pudding Recipes for Busy Moms that kids love
A Treat That’s Good for Kids and Fun to Make
Imagine this: it’s a rainy afternoon, and the kids are bouncing off the walls, asking for something sweet. You want to give them a treat they’ll enjoy, but it’s got to be healthy too. Sound familiar? Here’s the thing—Avocado Chocolate Pudding is a fantastic option for you as a parent. Not only is it delightfully rich and creamy, but it’s also packed with nutrients that your little ones need for healthy growth. You may also find Avocado Egg Salad Recipe For Babies useful.
I remember the first time I decided to make this sumptuous pudding. I was skeptical but curious, thinking, “Will my kids really eat this?” What I discovered was a total game changer—a dessert that satisfies their sweet tooth while sneaking in healthy fats and vitamins. If you’re looking for a way to make snacks more nutrient-dense, this treat could be the perfect addition to your child’s diet. You may also find Best Milk Prepackaged For Kids Chocolate useful.
The Benefits of Avocado in Their Diet
Avocados are often touted as a superfood, and for good reason. They’re loaded with heart-healthy fats, fiber, and essential vitamins such as K, E, and B. Plus, they can be an excellent introduction to new flavors and textures for your little ones. Everyone wants to ensure their kids are getting the right nutrients without the constant battles over vegetables. Incorporating avocado into meals can help make this journey smoother.
There are countless ways to use avocados in your child’s diet. For instance, you might want to consider introducing them to avocado egg salad as a nutritious snack or meal option. This type of creamy salad is a great way to add some wholesome ingredients into their lunchboxes and allows them to explore the delightful taste of avocados.
Perfecting the Avocado Chocolate Pudding Recipe
What if I told you that making this pudding takes less than 10 minutes? Yep, it’s that easy! Here’s a simple recipe that you can whip up in your blender.
Ingredients You’ll Need
- 2 ripe avocados
- 1/4 cup of unsweetened cocoa powder
- 1/4 cup of honey or maple syrup
- 1 teaspoon of vanilla extract
- 1/4 cup of milk (or a non-dairy alternative)
Instructions
- Prepare the Avocados: Cut the avocados in half, remove the pits, and scoop the flesh into the blender.
- Blend It Up: Add cocoa powder, honey or maple syrup, vanilla extract, and milk. Blend until the mixture is smooth and creamy.
- Taste Test: Here’s the fun part! Give it a taste and adjust the sweetness if you like. If it feels too thick, just add a bit more milk until you reach your desired consistency.
- Chill & Serve: Spoon your pudding into bowls and refrigerate for about 30 minutes. This step allows it to set up nicely.
You can add toppings like fresh berries, sliced bananas, or even a sprinkling of nuts for some crunch. The beauty of avocado pudding is its versatility. It’s not just about the flavor but about making those textures more appealing for your kiddos.
When you serve it, you might hear, “This is chocolate?!”—and you can smile, knowing you’ve made a nutritious choice.
Making It Fun for Your Kids
Sometimes, the way a dish looks can make it even more appealing. What if you let your kids help in the kitchen? They could scoop the avocado or decide which toppings to add. Engaging them in the food preparation process can lead to more adventurous eating. Plus, it’s a great way to sneak in a bit of learning about healthy ingredients.
You can create a fun little snack bar with the avocado chocolate pudding as the star, allowing your kids to decorate their desserts with toppings. They might enjoy making their unique creations while learning about different fruits, flavors, and textures.
Storing Your Leftovers
If you end up with any pudding left over (which is unlikely!), store it in an airtight container. It will stay fresh for a couple of days, though, fair warning! The smooth topping may darken slightly due to oxidation, but it doesn’t affect the flavor. Just give it a stir before serving and enjoy that deliciousness all over again.
Speaking of delicious combinations, if your kids love chocolate milk, you might want to check out some of the best prepackaged options. There are many delicious and nutritious choices available that can complement the avocado pudding.
Conclusion
Offering your kids nutritious options doesn’t have to be a daunting task. Avocado Chocolate Pudding not only satisfies their taste buds but also provides a healthy snack alternative that you can feel good about serving. Remember, incorporating treats like this can foster a positive relationship with food and healthy eating habits.
For more inventive ideas, consider exploring a few recipes such as this easy chocolate avocado pudding. Also, if you’re looking for some delicious prepackaged chocolate milk options, take a look at this chocolate avocado pudding recipe to expand your dessert repertoire. Parenting is all about finding balance and having fun along the way!
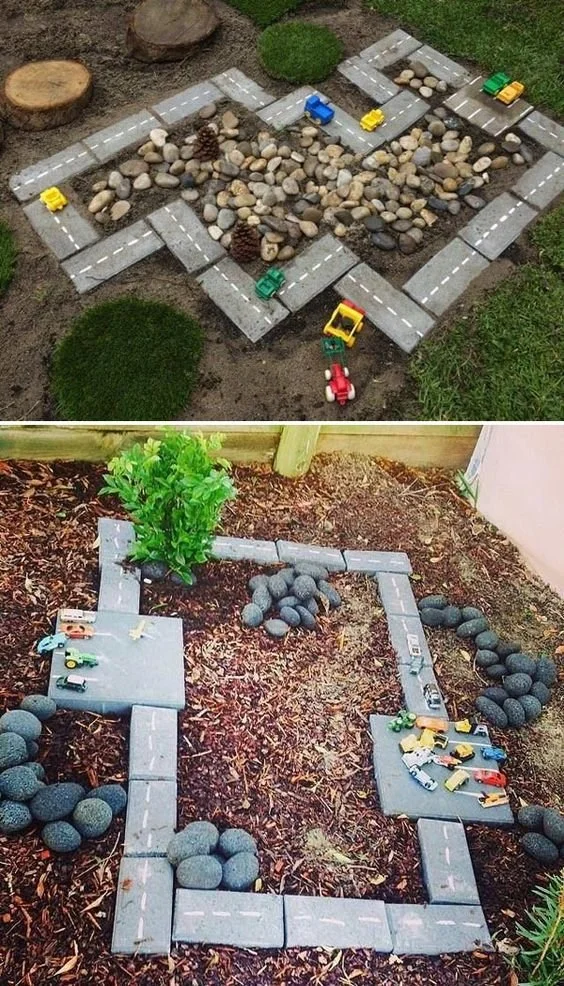
Mindblowingly Simple Backyard DIYs for Busy Moms and Kids
Exploring Paver Roads for Kids Outdoor Play
Imagine this: your children are outside, laughing and racing along a pathway you created just for them. They’re not just playing; they’re exploring, learning, and developing their motor skills in the process. With thoughtfully laid out paver roads, you can transform your backyard into a magical place for outdoor play that stimulates creativity and encourages physical activity.
Incorporating paver roads into your children’s play area is not just about aesthetics; it provides a structured space for various activities. It offers the perfect backdrop for vehicles, tricycles, and even a mini-scooter rally. Plus, creating a fun and engaging outdoor environment doesn’t have to break the bank. Many parents have found creative ways to build or modify their outdoor play areas, which can be just as exciting as the playground.
The Benefits of Paver Roads
Now, you might be wondering, what exactly are the benefits? Here are a few key reasons to consider adding paver roads to your kids’ outdoor play zone:
- Safety First: Pavers provide a firm, stable surface that’s much safer than grass or mud. With fewer chances of falls and scrapes, you can sit back and relax while your little ones zoom around.
- Encouraging Imagination: A dedicated play road invites imaginative scenarios. Your children can pretend to be race car drivers, delivery folks, or even construction workers on a busy site. It opens doors for role-playing activities.
- Movement and Coordination: Riding bikes or running on a defined path helps kids improve their balance, coordination, and fine motor skills. With time, they develop confidence as they navigate different paver patterns.
Planning Your Paver Road Design
Planning is key when adding paver roads to your backyard. Here’s how to get started:
- Assess the Space: Take a good look at your yard. Where could you put a road that would be safe and enjoyable for your children?
- Choose the Right Pavers: There are so many options out there! From traditional bricks to artistic stone designs, you can plan something that matches your family’s style. Have fun choosing!
- Involve Your Kids in the Process: Let them help with picking colors or designs. They’ll appreciate the investment in their fun space and get a sense of ownership.
What if your backyard is smaller? No worries! Even a short path can lead to a world of adventure. Try incorporating fun elements like curves or intersections to keep things interesting.
Creating Play Areas Around the Paver Roads
Once you’ve installed your paver roads, it’s time to think about the surrounding play areas. Incorporate elements that complement the roads and provide more options for play:
- Play Structures: Adding a slide or climbing frame can create a hub of fun nearby. Imagine the giggles as they climb up and slide down after racing their friends.
- Natural Elements: Introduce some plants or a small garden nearby. Kids can learn about nature while enjoying the fresh air.
- Seating Areas for Parents: A spot to sit while watching your kids can be very beneficial. You could even create a cozy corner with a couple of chairs and some shade, perfect for those warm afternoons.
While you’re at it, don’t forget the importance of organization. Having a designated area for toys, bikes, or scooters can help maintain cleanliness and safety in your outdoor environment.
Engaging Your Kids with Activities
Paver roads can serve as the foundation for fun activities beyond just racing. Here are some ideas to keep things fresh and engaging:
- Obstacle Courses: Use cones or other markers to set up an obstacle course along the path. Kids can practice navigating tricky turns or stopping at designated points.
- Mini Games: Consider outdoor games like “Red Light, Green Light” or mini road hockey. Children can create their rules and scenarios, fostering teamwork and cooperation.
And if you’re looking for additional bonding experiences, why not set up a themed outdoor event? Maybe a DIY baby shower using the newly built paver roads for a lovely setup to celebrate special moments! Check out these budget-friendly ideas to inspire your event planning.
Essential Maintenance Tips
Creating beautiful paver roads is just the beginning. To keep your outdoor play area in tip-top shape, regular maintenance is necessary:
- Regular Cleaning: Sweep or wash the pavers to keep them clear of dirt and debris. This ensures a clean surface for play.
- Check for Cracks: If you notice any cracks forming, be proactive about filling them in to avoid bigger issues down the line.
- Weed Control: Make sure to regularly remove any weeds that may pop up between the pavers. This not only looks better but also maintains the integrity of the design.
Making it Family-Friendly
To further enhance your outdoor space, think about what would make it enjoyable for the entire family. You can include:
- Seating Areas for Family Gatherings: A picnic bench or outdoor dining set can create a lovely space for snacks, meals, or just hanging out as a family.
- Playdates and Gatherings: Invite other families over for playdates. A well-designed play space encourages social interactions, making lasting memories for your kiddos.
Now, let’s take a moment to think beyond the current generation. Outdoor play is necessary not just for your children but also for their friends. You might be surprised at how much laughter and joy can come from a simple paver road when everyone gets involved!
Embracing Outdoor Play as a Lifestyle
Ultimately, building paver roads for your kids isn’t just a project; it’s about nurturing a lifestyle. Outdoor play fosters creativity, discovery, and social skills. Plus, it’s a wonderful way to make use of your backyard.
By encouraging your children to spend time outside, you’re instilling a love for nature and physical activity that can last a lifetime. It’s these simple moments—running around, shouting in joy, and just being kids—that form the foundation of happy memories.
Let’s not forget about the timeless classics to enjoy during family movie nights afterwards! If you’re in need of a fun movie suggestion for those cozy evenings, consider checking out awesome children’s movies that are sure to entertain.
With paver roads as your canvas, you have the opportunity to paint a beautiful picture of outdoor adventure for your children. So grab those pavers, roll up your sleeves, and create a magical space where they can thrive!

Mother’s Day Brunch Ideas Moms Will Love and Share with Family
Celebrate Mom with these Mother’s Day brunch ideas she’ll love
Imagine this: it’s Mother’s Day morning, and you sneak into the kitchen, determined to whip up something special for the amazing mom in your life. The aroma of fresh coffee wafts through the air, and sunlight spills through the window as it casts a warm glow over the table that’s just begging for a feast. Now, let’s be honest: we all know how busy life can get, especially with little ones running around. But that doesn’t mean we can’t create a delightful brunch that Mom will cherish. I’ve put together some easy yet scrumptious recipes that are perfect for celebrating her on this special day.
Breakfast Casserole That’s a Game-Changer
First up, let’s talk about a breakfast casserole. It’s a lifesaver, truly! You can prepare it the night before, pop it in the oven the next morning, and fill your kitchen with an inviting aroma while you coax your little ones out of bed. A classic egg and cheese breakfast casserole can be made to suit anyone’s tastes. Toss in some veggies, or if she’s a meat lover, some crumbled sausage or bacon can elevate this dish even further.
Why not add a twist? Incorporate some spinach and feta for a Mediterranean touch or go for the traditional hashbrown base with cheddar cheese. Either way, this dish can be customized to suit her preferences, ensuring it’s a hit. Plus, if you need quick ideas for her room decor, check out these enchanted forest nursery ideas for some inspiration.
Fresh Fruit and Yogurt Parfait
Next on the list is the all-time favorite fresh fruit and yogurt parfait. Not only is it visually appealing, but it’s also nutritious! Layer Greek yogurt with an assortment of berries, bananas, and a sprinkle of granola. Your kids can help assemble these, and it’s a fantastic way to get them involved in the kitchen.
This might sound familiar: you know how kids can be about their fruits; presenting them in a fun, colorful way can spark their interest. You could even let them pick the fruits, giving them ownership of the dish. For an extra special touch, drizzle some honey or agave syrup over the top. It’s a simple yet effective way to pamper her taste buds!
Ultimate Strawberry Salsa
Looking for something a little different? Try making an ultimate strawberry salsa. You’d be surprised how refreshing and vibrant this salsa can be, especially during spring. Dice up some fresh strawberries, mix in a little bit of lime juice, and a hint of mint or cilantro (if she likes it). Serve this on top of crispy tortilla chips, and watch it disappear. It’s a perfect appetizer for the brunch as it pairs beautifully with either sweet or savory dishes.
For a family-friendly option that packs a punch, consider adding a unique twist by fetching ideas from these quick strawberry salsa ideas that can amp up your brunch experience.
Fluffy Pancakes with a Twist
No Mother’s Day brunch is complete without pancakes! Instead of the usual flat pancakes, why not make them fluffy and delightful? Incorporate some blueberries, chocolate chips, or, for a fun spin, caramelized banana slices into the batter. Serve them with a homemade syrup or a dollop of whipped cream for that extra indulgence.
Imagine her delight when she sees a stack of golden pancakes drizzled with maple syrup, perhaps garnished with fresh fruits. It’s a simple thing that can truly brighten her day. And while cooking, remember to enjoy the moment—let the kids get messy with the batter (it’s okay, really!).
Savory Quiche to Impress
Another fantastic option is a savory quiche. This dish can be packed with whatever ingredients your mom loves—think spinach, mushrooms, or a blend of cheeses. You can make a simple crust or go crustless if you want to keep it lighter. Quiche can be served warm but is also delicious at room temperature, making it versatile for any time of day.
And if you want to make it even more special, pair the quiche with a refreshing salad. Incorporating greens and a vinaigrette dressing can balance the meal beautifully.
Beverages to Complement the Feast
Let’s not forget the drinks! Mimosas are a staple for brunch, but for a fun twist, consider making a strawberry lemonade. Blend fresh strawberries with lemonade for a sweet and tangy treat that everyone can enjoy, including the kids. If you’re feeling adventurous, you could also try cold brew coffee with a splash of vanilla syrup—a sure way to kick-start her day.
Decoration Ideas
To elevate the ambiance, pay attention to your dining setup. A simple bouquet of flowers can do wonders. Maybe set the table with her favorite colors or use some fun, themed plates. It’s details like these that show you care and are putting in the effort to make this day memorable.
Wrapping Up the Celebration
Now, you might be feeling a bit overwhelmed with all these ideas, but remember, it doesn’t have to be perfect. The most important part is that you’re creating meaningful moments with your loved ones. Celebrating Mom with a unique brunch, filled with dishes that represent her taste and love, will undoubtedly create lasting memories.
Each dish tells a story, just like every mother has her own unique journey. Whether it’s the laughter shared over pancakes or the joy of putting together a colorful fruit platter, each moment counts. As the day winds down, take a moment to sit back and enjoy the fruits of your labor together, celebrating all that she means to you.
Conclusion
Mother’s Day brunch can be a beautiful time to show appreciation and love. If you’re looking for more inspiration, you can explore 25 healthy brunch recipes or check out 33 vegan options that are perfect for celebrating this special day. After all, it’s all about making her feel cherished and adored!

Kid Approved Easy Dinners for Busy Nights That Make Mealtime Smooth
Imagine this
You’re coming home after a long day, and the clock is ticking. Dinner needs to happen, but your kids are already tired, cranky, and maybe even a little hangry. You’ve probably found yourself in this scenario more times than you’d like to admit, wondering what on earth to cook that your little ones will actually eat. This is where having a handful of go-to meals can make all the difference. Let’s explore 21 kid-approved easy dinners that will take the stress out of mealtime on those busy nights.
Quick and Easy Dinner Ideas
1. Cheesy Quesadillas
Who can resist a cheesy quesadilla? You simply heat up a tortilla, sprinkle cheese on one half, fold it over, and cook until golden. Serve it with salsa or guacamole for a fun dip. Plus, you can sneak in a few veggies like spinach or peppers without making it a big deal.
2. Pasta with Butter and Peas
A classic that never fails! Boil some pasta, toss it with butter, and add frozen peas right at the end. It’s simple, quick, and absolutely delightful for the little ones. You can even serve it in fun bowls to make it feel special.
3. Chicken Nuggets
Yes, homemade chicken nuggets! You can cut chicken breasts into bite-sized pieces, dip them in egg, roll in breadcrumbs, and bake or fry them until crispy. Serve with a side of sweet potato fries for a healthier twist. This meal is sure to be a hit, especially when served with a dipping sauce they love.
4. Breakfast for Dinner
Don’t discount breakfast foods! Whip up some scrambled eggs, pancakes, or even good old-fashioned oatmeal. Kids love it, and it’s such a change from the usual dinner fare. Toss in some fruit, and you’ve got a balanced meal.
5. Homemade Pizza
Pizza night is where it’s at! Grab some pre-made dough or pita bread, let the kids add their toppings, and watch as they have fun creating their own masterpieces. It’s interactive, and you can control the toppings to make it healthier.
6. Veggie Fried Rice
Got leftover rice? Perfect. Sauté some veggies, add the rice, and toss in a couple of eggs for protein. It’s a delicious way to use up what you have while sneaking in some nutrients.
More Quick Fixes for Your Busy Week
7. Mini Burgers
These little bites are perfect for tiny hands. You can use turkey or beef and serve them with tiny buns. Lettuce, tomato, and a slice of cheese make it complete. And if you’re feeling adventurous, you can even add a slice of avocado for some creamy goodness.
8. Macaroni and Cheese
Let’s be honest, this dish is a beloved favorite. You can make it from scratch or opt for the boxed version when you’re in a real rush. To boost the nutrition, add some steamed broccoli or peas right into the pot.
9. Chicken Stir-Fry
Throw together a quick stir-fry with chicken, snow peas, carrots, and bell peppers. Serve it with brown rice or noodles. It’s colorful, tasty, and packed with nutrients. Plus, it’s a great way to use up any veggies you have!
10. Tacos
Taco night can be as simple or fancy as you want! Season up some ground beef or turkey, let everyone build their own tacos, and you’ll have a dinner that everybody loves. It can be a lot of fun to see what creative combinations your kids come up with.
Time-Saving Dinner Strategies
When you’re balancing busy schedules, these meal ideas can truly save the day. Consider preparing a few things ahead of time. For example, roasting a batch of vegetables or cooking some grains on the weekend can simplify your weeknight meals. If you’re interested, check out some more quick dinner ideas that can be thrown together in no time.
11. Meatball Subs
Who can say no to meatballs? You can make them ahead of time, freeze them, and pop them in the microwave to reheat. Serve in a sub roll with marinara sauce and mozzarella cheese, and your kids will be more than happy to dig in.
12. Shrimp Tacos
These are super quick to prepare. Just sauté shrimp with a little lime and taco seasoning, and serve them in corn tortillas. Kids will love the flavors, and you can top them with whatever toppings you like.
13. Vegetable Soup
A warm bowl of soup can be oh-so-comforting. Make a big batch and store it for later. You can even get your kids involved in adding their favorite vegetables or stirring the pot (with supervision, of course).
14. Sloppy Joes
This is a messy meal that’s guaranteed to be fun. Use ground turkey or beef with your favorite BBQ sauce, and serve it on hamburger buns. Add a side of carrot sticks for some crunch, and you’re all set!
15. Baked Potatoes
These may take a little longer to cook, but they’re super easy. Bake some potatoes and let the kids top them with whatever they like—cheese, broccoli, or even a scoop of chili. It’s a customizable meal that feels like a treat.
16. Fajitas
Slice up some bell peppers and onions, sauté with chicken or steak strips, and serve with warm tortillas. It’s a fun meal where everyone can build their own, plus it’s colorful and nutritious.
Encourage Healthy Choices
We’ve all been there, spending more time than we’d like trying to prepare nutritious meals for our kiddos, only to see them turn their noses up at the plate. It can be disheartening, but remember that being a parent is a journey. If you’re looking for even more meal inspirations that are easy and kid-approved, check out these fantastic meal ideas for toddlers that will help you keep those little taste buds happy.
17. Stuffed Bell Peppers
Chop the tops off some bell peppers and fill them with a mixture of rice, beans, and cheese. Bake until everything is heated through, and you’ve got a colorful and enjoyable meal.
18. Taco Salad
Layer ground beef, lettuce, cheese, and salsa in a bowl for a fresh take on tacos. It feels a little more refined while still being a hit with the kids.
19. Pancake Wraps
Spread your pancakes with peanut butter or cream cheese, roll them up with a banana inside, and slice. It’s like a breakfast burrito, but it sneaks in some nutritious fruit!
20. Sweet Potato Tots
If your kids love tater tots, why not make them from sweet potatoes? They’re healthier and just as easy to prepare. Simply grate, form into tots, and bake until crispy.
21. Barbecue Chicken Drumsticks
Marinate chicken drumsticks in your favorite BBQ sauce and bake. They are finger-licking good and easy for little hands to hold. Serve with corn on the cob for a complete summer vibe.
Conclusion
Navigating dinnertime with kids can certainly feel overwhelming at times. But with these quick, easy, and kid-approved meals, you can step into your kitchen with more confidence. Plus, don’t forget to check out these discussions on cooking while managing a busy schedule for more tips. Also, if you’re looking for ways to stock your freezer with meals that your kids will actually enjoy, consider these freezable meal ideas that will make those hectic days a bit easier. Remember, you’re not alone in this parenting journey, and every small win at the dinner table counts!
DIY Outdoor Fairy Garden Ideas for Busy Moms That Spark Wonder
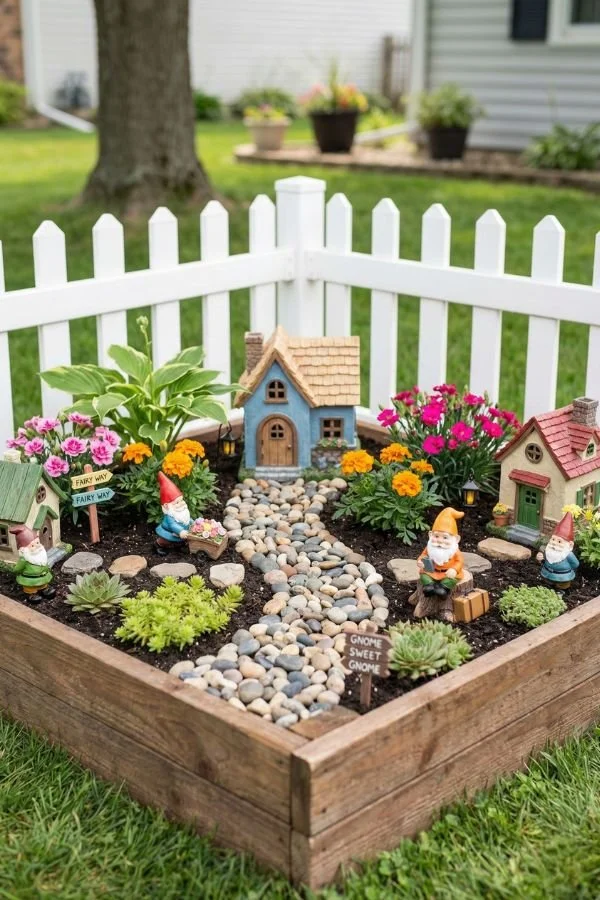
Transforming Ordinary Planters into Enchanting Fairy Gardens
Imagine this: you’re in your backyard, and your little one is exploring tiny realms of imagination. Every toy is a character, and the garden becomes a world of magic and adventure. What if I told you that you could enhance this experience with fairy gardens right in your planters? These whimsical spaces not only provide an imaginative escape but also beautify your outdoor space—and they can be downright easy to create.
Creating a fairy garden can be the perfect family activity that sparks creativity. You might be wondering how to transform simple pots into magical hubs. Well, let’s dive into creative fairy garden ideas that will have your little ones dreaming up enchanting stories as they play!
Start with the Right Planters
For fairy gardens, you don’t need to splurge on fancy planters. What you do need is to ensure they have adequate drainage. Repurposing old pots can add character and charm. Consider using broken pots gathered from the garage or even clay pots that have been lying around. These can give your fairy garden a rustic touch.
If you’re feeling adventurous, you might even want to build a tiered display using stacked pots. Think of it as a multi-level fairyland! Each level can showcase different elements: maybe some miniature houses on one tier and a quaint bridge on another. This layered approach allows for creative storytelling opportunities and captures your child’s imagination.
Choosing the Right Plants
Now, here’s the thing: not all plants are created equal when it comes to fairy gardens. You’ll want to select small plants that look delightful and thrive in containers. Succulents, dwarf conifers, and small ferns are incredible choices. When you plant these, think about how they’ll enhance the enchanted vibe you’re going for.
Don’t hesitate to check out ideas that fit your decor! For cozy, inviting nurseries, consider incorporating elements from a cottage garden nursery, where soft colors and whimsical touches create the perfect inviting atmosphere.
Adding Miniature Accessories
As you set up your fairy garden, don’t forget to think small—literally! Use mini accessories to create a captivating scene. You can easily find tiny fairies, miniature furniture, or even small animal figurines. For a personal touch, craft some yourself!
What if you set up a tiny swing made from twine and a stick? Your little ones will love playing with the intricacies of their miniature world. Plus, it’s a fun way to spark conversations about the importance of imagination.
Include Natural Elements
Integrating natural materials not only emphasizes the magic of the garden but also provides a tactile experience for kids. Incorporate stones, wood chips, or even moss. These elements can serve as pathways or borders and will blend seamlessly with plants.
I’m sure you’ve seen how children love digging in the dirt. So why not tap into that? Using beach sand or small pebbles can create a sensory-rich environment that invites your kids to play and explore. It’s a way for them to connect with nature while they engage in imaginative play.
Seasonal Touches
Every fairy garden can change with the seasons, which is a great strategy to keep things fresh and exciting. For instance, you can use autumn leaves or mini pumpkins during fall, or delicate snowflakes and tiny sleds in winter. These seasonal adjustments can help your little ones appreciate the changing world around them — feeling the cycles of nature through their magical garden.
By frequently updating your fairy garden, you’ll keep your child engaged and turning the soil to create new adventures. Remember, it’s all about the journey together!
Involve Your Child
You’re probably familiar with how much fun it can be to let your child take the lead on projects. Give them some autonomy in choosing the plants and accessories. This way, they feel ownership over their enchanting creation. Ask them what they envision, and lay out the materials. You’ll be amazed at what they come up with!
It’s completely normal to feel a bit overwhelmed at first, especially if you’re tackling garden projects and keeping an eye on your little ones. But remember, you’re not alone in this. Other parents have found joy and success in these projects, turning gardening into a cherished family activity.
Documenting the Journey
As you create and evolve your fairy garden, you’ll want to capture these moments. Take photos regularly and create a scrapbook together. This will not only document the growth of the plants but also the growth of your child’s imagination.
Consider crafting a storybook filled with the adventures your fairies have had throughout the seasons. Each visit can spark new ideas, adventures, and fond memories.
Encouraging Growth Beyond the Garden
Creating fairy gardens can be a segue to many learning opportunities. Discuss plant growth, ecosystems, and even the importance of nurturing living things. As you search for decorations and plants, have conversations about nature’s roles in our lives and the environment. It’s a beautiful way to bond and learn together.
If you’re looking for more ways to make family nights easier, check out these easy family dinner ideas that can free up time for your fairy garden adventures!
Conclusion
Involving your children in the creation of a fairy garden can foster their creativity and spark joy in both playtime and gardening. Plus, who doesn’t love a dash of whimsy in their lives? You’ll find countless possibilities as you experiment with different planters, plants, and accessories. To explore more artistic inspiration, check out this DIY fairy garden guide that provides fun project ideas. For outdoor inspirations, consider visiting this page on creative outdoor fairy gardens that might just fuel the creative flames!
Plus Creative Backyard Fort Ideas for Endless Family Fun!
Backyard Fort Ideas to Spark Imagination and Adventure
Picture this: the sun is shining, and you hear the sweet giggles of your little ones playing in the backyard. They’re off on some adventure, perhaps battling imaginary dragons or seeking hidden treasures. Now, don’t we all want to enhance that experience for them? Building a backyard fort can transform ordinary play into extraordinary escapades. It’s a wonderful way to encourage creativity and provide a safe space for exploration. So, let’s dive into some delightful backyard fort ideas that will make your little ones feel like true adventurers! You may also find Transform Kids Bathroom Fun Tile Floor Colorful Ideas useful.
Simple Tarp and Rope Fort
The beauty of a backyard fort is that it doesn’t need to be complicated. For a quick project, grab a large tarp and some sturdy rope. Tie one end of the tarp to a tree branch and the other end to a nearby fence post or another tree. You can create a shading effect by placing sticks under the tarp to lift it up slightly, giving it that tent-like feel. This simple approach requires minimal setup and is perfect on warm summer days.
If you want to make the space cozier, throw in some pillows and blankets for your kids to lounge on. You can also set up a little snack station with fun foods. Check out our article on amazing picnic food ideas to make their fort experience even sweeter.
Rustic Wood Pallet Fort
Now, if you’re up for a little DIY challenge, why not consider building a fort using repurposed wood pallets? Not only does this option provide a fun and rustic appeal, but it also gives your kids a chance to learn about teamwork as they help you build it. Here’s how you can create one:
- Gather Materials: Look for sturdy wooden pallets. You can often find these at local stores or on Craigslist.
- Design the Structure: Lay two pallets side by side for the base and stack another on top to form the walls. You can create a small window by not placing one pallet completely.
- Secure the Fort: Use nails or screws to keep everything sturdy. Make sure there are no sharp edges exposed.
- Decorate Inside: Once your fort is secure, let your kids decorate the inside with their favorite blankets, fairy lights, or even some artwork.
Having a rustic fort like this can incite creativity and imaginative play as children can easily change the story they are in just by changing the decor inside!
Secret Garden Nook
If your backyard has a little space among flowers or bushes, you might want to create a secluded secret garden nook. The beauty of this idea is that it naturally blends with the environment, making it a hidden gem for your children to discover.
Start by selecting a compact area surrounded by plants. You can either drape some lightweight fabric over an existing shrub or build a small structure with twigs and sticks to create a frame. Decorate the area with some flower pots or hanging planters to make the nook lively.
Add a whimsical touch by placing a small table and chairs inside, where kids can have pretend tea parties or read books together. This magical spot might become their favorite escape, enriching their playtime and offering a peaceful retreat.
Enchanted Tree Fort
If you’re lucky enough to have a tree in your backyard that lends itself well to a fort, consider transforming it into an enchanted tree fort. This option takes a bit more effort but can provide endless hours of fun.
- Assess the Tree: Make sure you choose a sturdy tree with a strong trunk and thick branches.
- Add a Platform: You can either build a platform from wood or use large, flat branches.
- Create a Ladder: Barely create a simple ladder with more wood or even a rope ladder for added excitement.
- Decorate: Let your kids personalize it with colorful bunting, magical paint, or fairy lights.
Imagine siblings spending afternoons weaving stories and adventuring in their own treehouse. Being in nature while having a private space to play can truly enhance their outdoor experience.
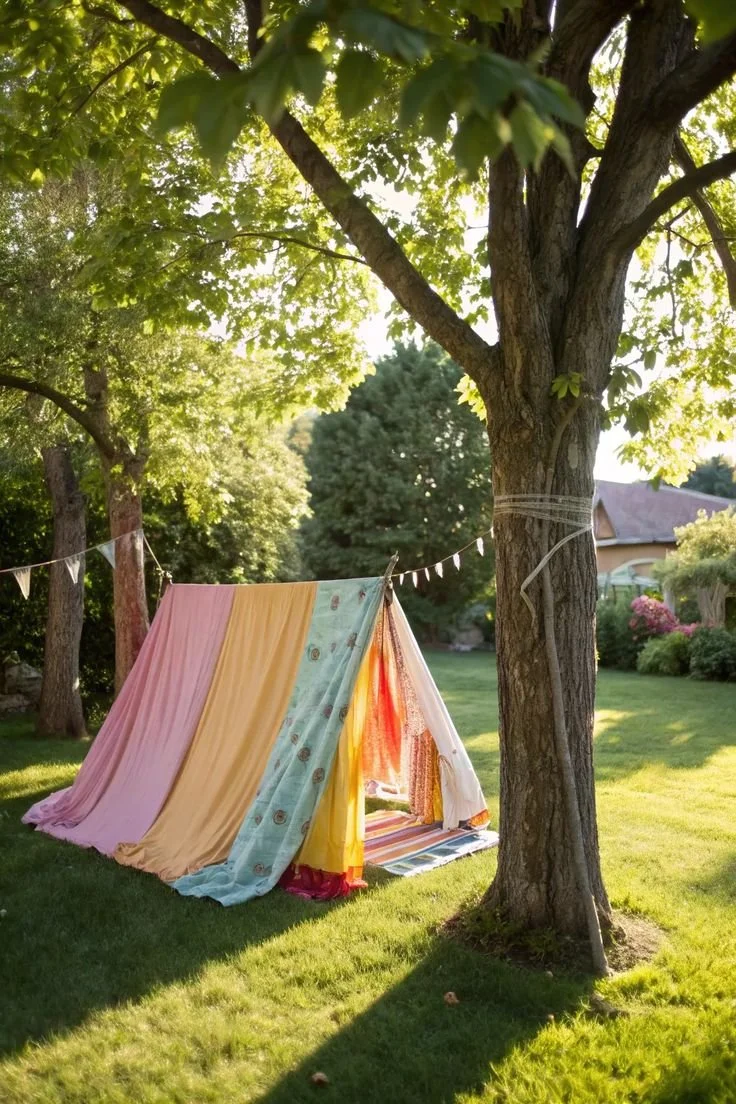
Fabric Forts
Here’s the thing about building forts: they don’t always have to be permanent structures! You can create adorable fabric forts. All you need are a few chairs, a couple of sheets, and some creativity.
Start by placing chairs in a circle or square shape and draping the sheets over them. This kind of fort is easy to assemble and take down, making it a perfect weekend project. Inside, provide soft cushions and some of their favorite toys, and you’ve got the perfect hideaway.
Plus, these fabric forts can change with the weather! On rainy days, you can bring the fun indoors using the same method. Kids will adore having cozy places to huddle with their stuffed animals or dive into a good book.
Conclusion
Building forts in your backyard is more than just a fun activity; it’s a way to ignite your children’s imagination and foster a sense of adventure. Whether you’re creating a simple tarp setup, a rustic wood pallet fort, or even a magical treehouse, these projects can build lasting memories. Don’t forget to stock up on some fun snacks for them to enjoy while they play! You might be interested to check out the offerings at Radio Flyer for some outdoor toys to enhance those adventures. Also, if you’re looking for great family outings, consider discovering some fun activities in Gulf Shores! Enjoy building those forts and happy adventuring!
Under the Sea Birthday Party Food Ideas to Wow Guests and Save Time
Imagine this: your child’s birthday is coming up, and you want to throw a memorable party. You’ve got the cake, the decorations, and probably a list of guests. But what you really need is a theme that will make your little one’s day unforgettable. Themed parties are all the rage, and they can transform an ordinary celebration into something extraordinary.
One popular direction these days is the ocean theme. Who doesn’t love the beauty of the sea and all the playful creatures that live beneath the waves? With an ocean-themed party, you can create a magical underwater world right in your backyard or living room. From mermaids to fish and everything in between, this theme allows for endless creativity.
Selecting Your Ocean Theme
When it comes to planning a birthday party, choosing a cohesive theme is essential. An ocean-themed party is not only visually stunning but is also a hit with kids. Think of vibrant colors like blue and green, together with accents of coral orange and sunny yellow. You could decorate with fish nets, seashells, and decor that represents ocean life.
Now, you might be wondering how to incorporate specific elements into each part of the party. Here’s the thing: let your imagination run wild. You can use inflatable sea creatures, and beach balls to accent your home or venue. Plus, you could easily create beautiful invitations featuring underwater scenes that can excite your little guest’s imagination before the big day!
Activities to Keep Everyone Engaged
To keep your guests entertained, you might want to think about activities that fit the ocean vibe. How about a DIY craft station where kids can create their own sea creature puppets? Just imagine the excitement on their faces as they engage in something crafty while learning a bit about ocean life. This might even spark some delightful conversations about their favorite ocean animals!
Games are also a must! Consider a treasure hunt where kids can search for goodies hidden under "the sand," perhaps made from sandbox materials to mimic a beach environment. And speaking of treasure, you could have candy bars and marine-themed trinkets as prizes for the little adventurers.
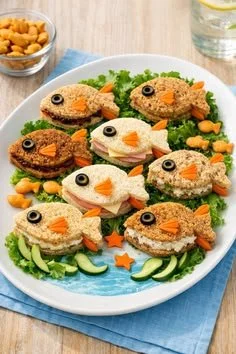
Tasty Treats and Ocean-inspired Snacks
Of course, no party is complete without delicious food! For an ocean-themed birthday, your menu could include fish-shaped sandwiches, blue Jell-O with gummy fish, and a cake that looks like an underwater scene. There are so many creative ways to tie into the theme!
You could also offer snacks that mimic ocean life. For instance, using pretzels and candy to create a mini version of the ocean floor with boats and fish swimming about. The best part? You can get creative with these ideas, but keeping it simple is key—you’re a busy parent after all.
Thoughtful Party Favors
Let’s not forget the importance of sending your guests home with memories. A thoughtful party favor will not only remind them of the fun they had, but it will also keep the spirit of your ocean theme alive. You could consider small reusable water bottles decorated with seashell stickers or little bags filled with sand and tiny treasures.
If you’re looking for more festival options related to birthdays, feel free to check out these 10th birthday party ideas.
Capturing the Moments
During the party, taking lots of photos is a must! You could set up a backdrop that represents an ocean scene, making for perfect snapshots. Kids love to dress up, so perhaps invite them to come in their favorite ocean-themed costumes. This not only adds to the excitement but creates a wonderful photo opportunity. And who doesn’t love to scroll through beautiful pictures long after the festivities are over?
Planning the Perfect Ocean-themed Décor
When it comes to décor, think about how you can enhance the underwater experience. Streamers in shades of blue can mimic ocean waves, while balloons shaped like fish and seashells can add a playful touch. You might want to incorporate starfish and small boats to draw in that nautical vibe.
As you work on getting everything together, remember that you can always look for additional resources that can aid in the planning. You might want to explore 5th birthday party ideas for inspiration that can complement your ocean theme.
Conclusion
Planning a themed birthday party for your child can be incredibly rewarding. With a sprinkle of creativity, an ocean-themed party offers many opportunities for fun, learning, and delightful memories. Don’t forget to check out some fantastic party inspiration like Zarie’s Under the Sea Party for additional ideas, and make sure to read about how you can encourage creativity in your child’s day with an Ocean-Themed Birthday Party Theme. Happy planning!
