
How to Cut Kiwi
How to Cut Kiwi for Your Little Ones
Imagine this: You’re prepping a healthy snack for your toddler. You reach for a juicy kiwi, but then you think, “How on earth do I cut this thing?” We’ve all been there—picking up a fruit, excited about its nutrition, but stumped by how to prepare it. If you’re a parent of little ones, kiwi is a fantastic fruit to add to your child’s diet. It’s packed with vitamin C, fiber, and antioxidants. Plus, it adds a fun splash of color to any snack plate. So, let’s dive into how to cut kiwi safely and easily for your kids! You may also find Adorable Kids Haircuts October 2026 useful.

Why Kiwi Is a Great Choice for Kids
Before we get into the cutting techniques, let’s talk about why kiwi deserves a spot on your grocery list. This fuzzy fruit is not just tasty; it’s a nutritional powerhouse. The vitamin C content in kiwi is amazing—just one fruit can provide more than your child’s daily requirement. Plus, the fiber is great for digestion, which can be a concern for some young kids. In fact, I often find that including different fruits in snacks, like in these baby shower ideas, helps expand my child’s palate.
What You Need
To get started, you’ll need a few things:
- A ripe kiwi (look for one that yields slightly to gentle pressure)
- A sharp knife (this is important—safety first, so always do the cutting)
- A cutting board
- A small bowl or plate to catch the slices
How you slice up the kiwi will depend on whether you plan to serve it directly to your little one or use it as a topping for yogurt, oatmeal, or even pancakes!
Step-by-Step Guide to Cutting Kiwi
Step 1: Wash the Kiwi
First and foremost, give your kiwi a good wash under running water. You don’t want any dirt or pesticides on the skin, even if you’re not eating it. This simple step protects both you and your child.
Step 2: Cut Off Both Ends
After washing, place the kiwi on the cutting board. With your sharp knife, slice off both ends of the kiwi. This creates a stable base for your next cuts.
Step 3: Peel the Kiwi
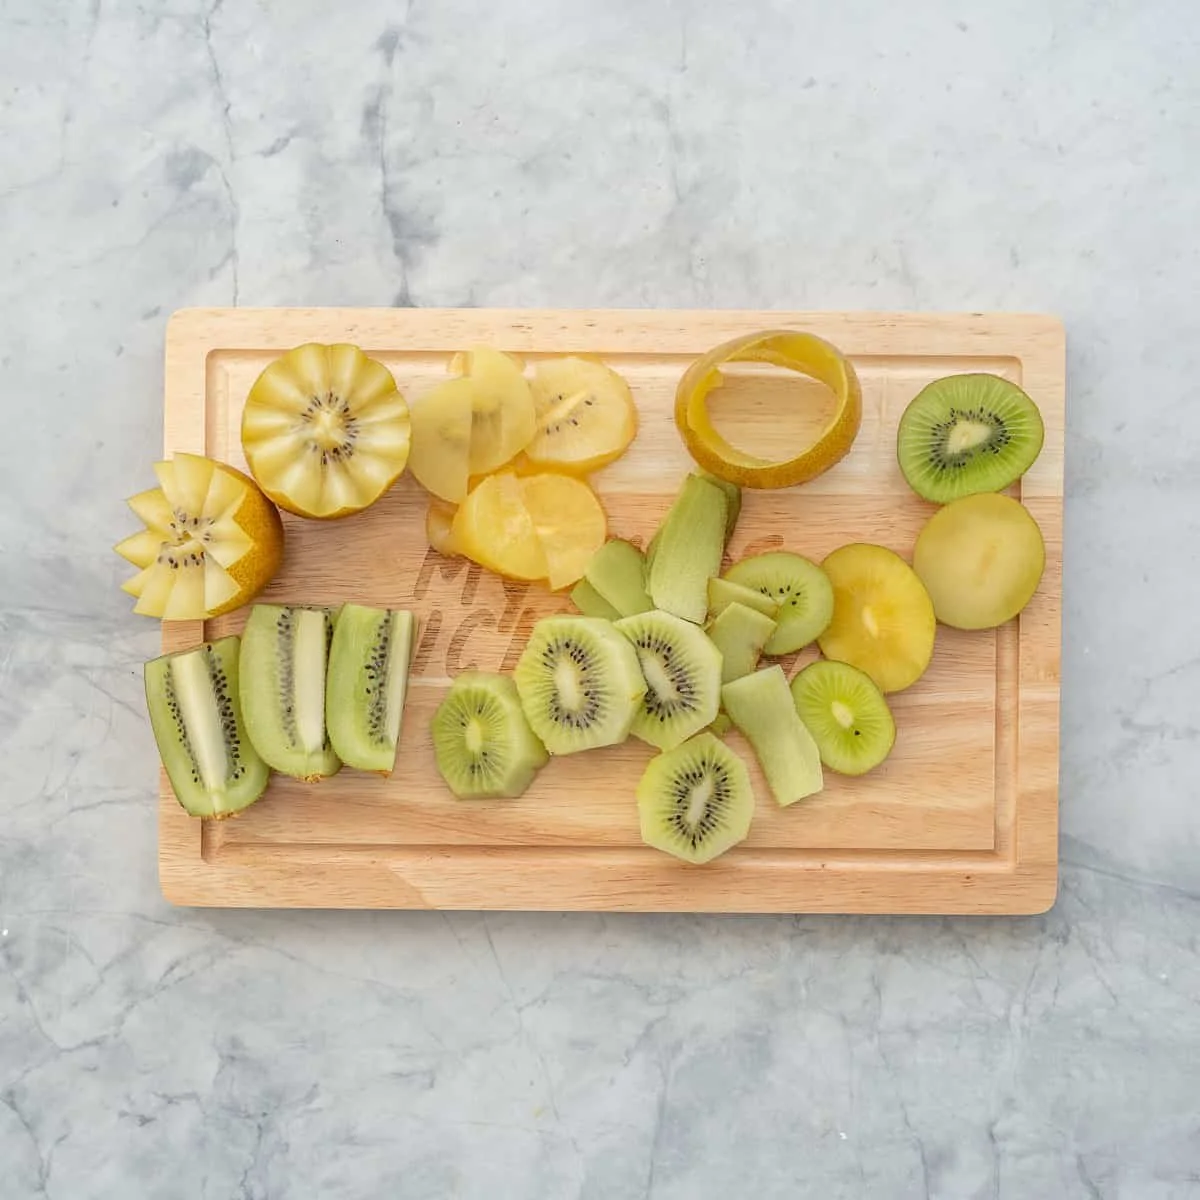
You can peel the kiwi using a knife or a vegetable peeler. If using a knife, hold the kiwi upright on one of the flat ends you just cut. Carefully run the knife along the outside to remove the fuzzy skin in a circular motion. If using a peeler, simply peel away the skin, being careful to avoid removing too much of the flesh.
Step 4: Slice the Kiwi
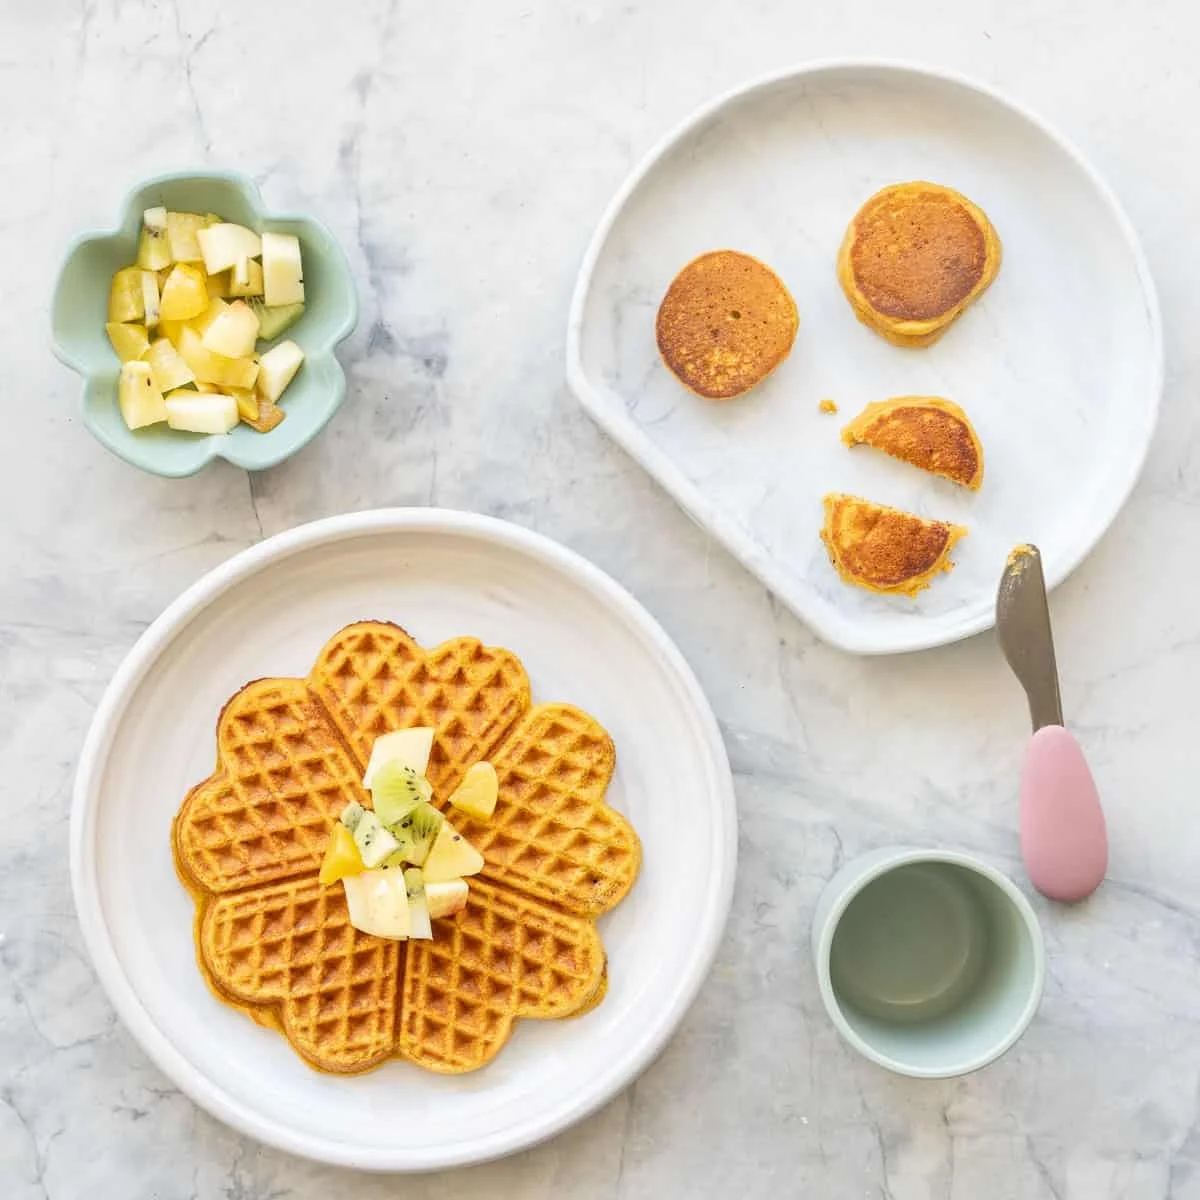
Now comes the fun part—slicing! You can slice the kiwi into rounds, half-moons, or even quarters based on your child’s readiness for different shapes. For little ones, I find that thinner slices are easier to manage and eat. Just place the peeled kiwi flat-side down on the board and slice to your desired thickness.
Step 5: Serve and Enjoy
Place the slices in a small bowl or directly on a plate for serving. I love pairing kiwi slices with other fruits like bananas or strawberries for a colorful fruit salad.
Tips for Working with Kiwi
- Storage: If you cut extra kiwi, store it in an airtight container in the refrigerator. It typically lasts for a day or two, but use it quickly for the best flavor!
- Partnerships: Adding kiwi to other meals can sometimes be a great intro to new flavors. Consider topping off a pancake or even mixing it in with your child’s favorite yogurt. Believe me, the combinations can be endless and delightful!
Mistakes to Avoid
Overripe Kiwi: Ensure that your kiwi is ripe but not overly soft; mushy kiwis can be hard to cut and may not be enjoyable for little ones to eat.
Skin Left On: Kiwi skin is edible but can be tough and fuzzy, which most kids won’t enjoy. Peeling it properly can make all the difference.
Too Thick: Cutting the slices too thick can make them hard for young children to chew. Aim for about a quarter-inch thickness.
Not Washing: Skipping the wash can expose your child to dirt, so always give those fruits a rinse, even if they’ll just be peeled.
Getting Creative with Kiwi
What if your kids are hesitant about trying new fruits? Not uncommon at all! Try involving them in the slicing process—while they can’t be fully responsible, they can certainly help with tossing the slices into a bowl. Making it a fun family activity can really get them excited about eating healthy. You could even turn it into a game of color recognition or simple counting by encouraging your children to count the slices as they add them to the bowl.
Fun Presentation Ideas
Let’s be honest: kids eat with their eyes first. If you’re looking to wow your little ones with kiwi, here are a couple of presentation ideas:
- Fruit Skewers: Alternating kiwi slices with strawberries and melon on skewers makes for a fun and colorful treat.
- Kiwi Flowers: Slice the kiwi into thin rounds, lay them in a flower shape on a plate, and pop a blueberry in the center for the ‘flower’ center!
By making the food interactive and visually appealing, it encourages children to try new things without the pressure.
Conclusion
Cutting kiwi doesn’t have to be a daunting task. With the right approach, you can safely prepare this delicious fruit for your kids, ensuring they enjoy something both nutritious and tasty. If you’re looking for further inspiration on fruity snacks, you might find helpful tips in this guide on how to peel and cut a kiwi or learn more techniques from this easy method. Keep trying different fruits, and before you know it, your kids will be experimenting with flavors and textures in no time!
Easy Ways to Make Blueberry Chia Jam for Busy Moms and Toddlers
The Joy of Making Blueberry Chia Jam
Picture this: you wake up one sunny morning, and your little one is asking for something special on their toast. You’ve got a stash of blueberries in the fridge, and you remember that lovely jam you once had. But then, the thought of sugar-laden jams fills your mind, and you think, “what if I could whip up something healthy and delicious instead?” That’s where blueberry chia jam comes into play, and trust me, it’s a game changer for both you and your toddler!

Making your own jam not only gives you control over the ingredients but also opens up a fun cooking opportunity with your kids. Chia seeds? You’d be amazed at how they turn into a delightful, jelly-like texture just by soaking. It’s simple, quick, and oh-so-satisfying!
What Makes Blueberry Chia Jam Special?
Jam has a way of bringing back memories of childhood breakfasts. But let’s face it, those store-bought options are often packed with preservatives and sugars. Instead, consider this homemade blueberry chia jam, which is packed with nutrients. Here’s the thing: chia seeds are full of protein, fiber, and omega-3 fatty acids—making them a fantastic addition to your child’s diet.
Blueberries, on the other hand, are jam-packed with antioxidants. They can help boost your child’s immune system—a definite win for all those little cold and flu season battles we face. So, when you’re spreading this homemade jam, not only are you treating your child, but you’re also giving them a healthy start.
Ready to roll up your sleeves and get started? Let’s break down the simple process.
Easy Recipe for Blueberry Chia Jam
Here’s a straightforward way to make blueberry chia jam:
Ingredients:
- 2 cups fresh (or frozen) blueberries
- 2 tablespoons chia seeds
- 2 tablespoons maple syrup or honey (adjust to taste)
- 1 tablespoon lemon juice (freshly squeezed adds a nice zing)
Instructions:
Prepare the Berries: If you’re using fresh blueberries, rinse them under cool water. If you have frozen ones, there’s no need to thaw them; they’ll cook well from frozen.
Cook the Blueberries: In a medium saucepan over medium heat, combine the blueberries, maple syrup or honey, and lemon juice. Cook until the blueberries have released their juices, and start to break down—about 5 to 7 minutes.
Mash it Up: Using a fork or potato masher, gently mash the mixture to your desired consistency. You want it a bit chunky for that homemade feel!
Add Chia Seeds: Stir in the chia seeds and lower the heat. Let the jam simmer for another 5-10 minutes, stirring occasionally. You should notice it thickening as it cooks.
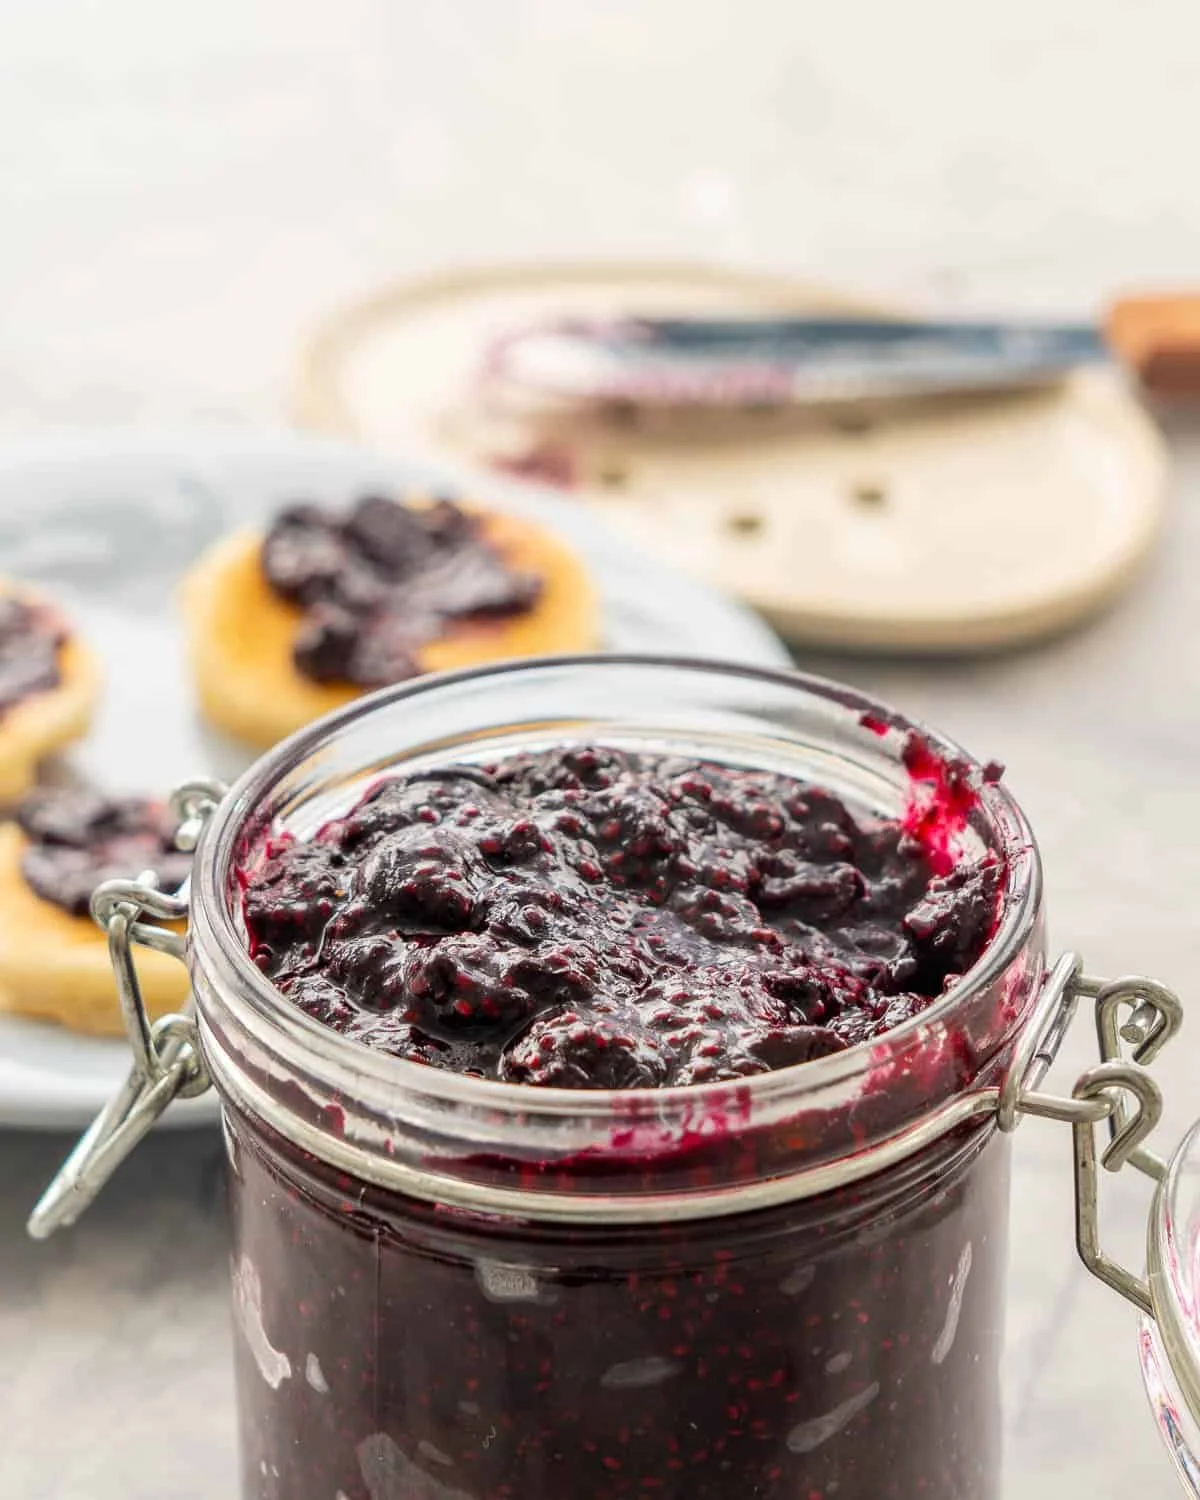
Cool and Store: Once it’s thickened to your liking, remove it from the heat and let it cool. Transfer it to a clean, airtight jar and refrigerate. It’ll last for about two weeks.
Now, your morning routine just got a whole lot better! Your toddlers will love it, and you can enjoy it guilt-free. If you’re looking for more ideas to use blueberries, check out these blueberry avocado mini muffins, which are both nutritious and delicious.
Tips for Making the Perfect Blueberry Chia Jam
Don’t Skip the Lemon Juice: Adding a splash of lemon juice not only brightens the flavor but also helps preserve the jam. It’s a simple trick that can make a world of difference.
Adjust Sweetness: Every child’s palate is different. Taste as you go and remember that you can always add a little more sweetness if needed. Just keep in mind that it doesn’t have to be overly sweet to be delicious!
Experiment with Variations: Once you get the hang of this basic recipe, feel free to experiment! Mix in some mashed banana for sweetness or even a touch of cinnamon for flavor. The world of jams is your oyster!
How to Use Blueberry Chia Jam
Now that you have this delightful jam ready to go, you might be wondering how best to use it. Here are some scrumptious ideas:
- Spread on Toast: It’s a classic for a reason! Spread this jam on whole-grain toast for a wholesome breakfast.
- Yogurt Topping: Twist your toddler’s usual yogurt routine by adding a dollop of blueberry chia jam for flavor and fun.
- Pancake Filling: Your Sunday pancake breakfast just got an upgrade! Use the jam as a filling or topping for pancakes and waffles.
- Mix into Oatmeal: It can take a regular bowl of oatmeal from bland to grand in seconds.
Benefits of Making Your Own Jam
We’ve all been there—standing in the grocery aisle, staring at what feels like a million options for jams and spreads. It can be overwhelming! Making your own jam is not just healthier; it’s also an empowering experience.
Control Over Ingredients: You’re in charge of what goes in, ensuring there are no hidden ingredients or excess sugars.
Quality Time Together: Cooking with your child fosters creativity and learning. They’ll love helping you measure ingredients, stir, and, of course, taste!
Fun Flavor Combinations: You can play around with different fruits and flavors! Ever thought of peach-chia or strawberry-banana? The possibilities are truly endless!
Cost-Effective: Buying fresh fruits can be more economical than those store-bought fancy jams, especially when you’re feeding a family!
Remember, it’s completely normal to have days when you don’t feel like cooking. On those days, you can fall back on store-bought options, but I promise you, once you get the hang of making your own jam, you’ll wonder why you ever relied on anything else.
Additional Recipes to Try
As you dive deeper into healthy cooking, why not look out for some other kid-friendly recipes? For example, if your toddler enjoys a portable snack, you might want to check out these easy healthy blueberry fritters for toddlers. They’re a delicious way to sneak in some nutrition on the go!
Conclusion
Incorporating homemade blueberry chia jam into your routines can truly transform breakfast or snack time. The simplicity of the recipe combined with the health benefits makes it a win for both parents and kids. If you’re looking for further inspiration, check out this healthy blueberry chia jam recipe for some variations. Alternatively, another fantastic option is to explore the 3-Ingredient Blueberry Chia Seed Jam, which is equally delightful! Happy cooking!
Hand Roll Sushi
The Joy of Making Hand Roll Sushi with Your Little Ones
Imagine this: It’s a sunny Saturday afternoon, and you’ve just finished a fun morning filled with giggles and laughter at the park with your little ones. As you settle in at home, you’re faced with the delightful dilemma of what to do next. You could prepare yet another sandwich, but here’s a thought: what if you could introduce your kids to the fun of making their own food? Hand roll sushi might just be the perfect choice!

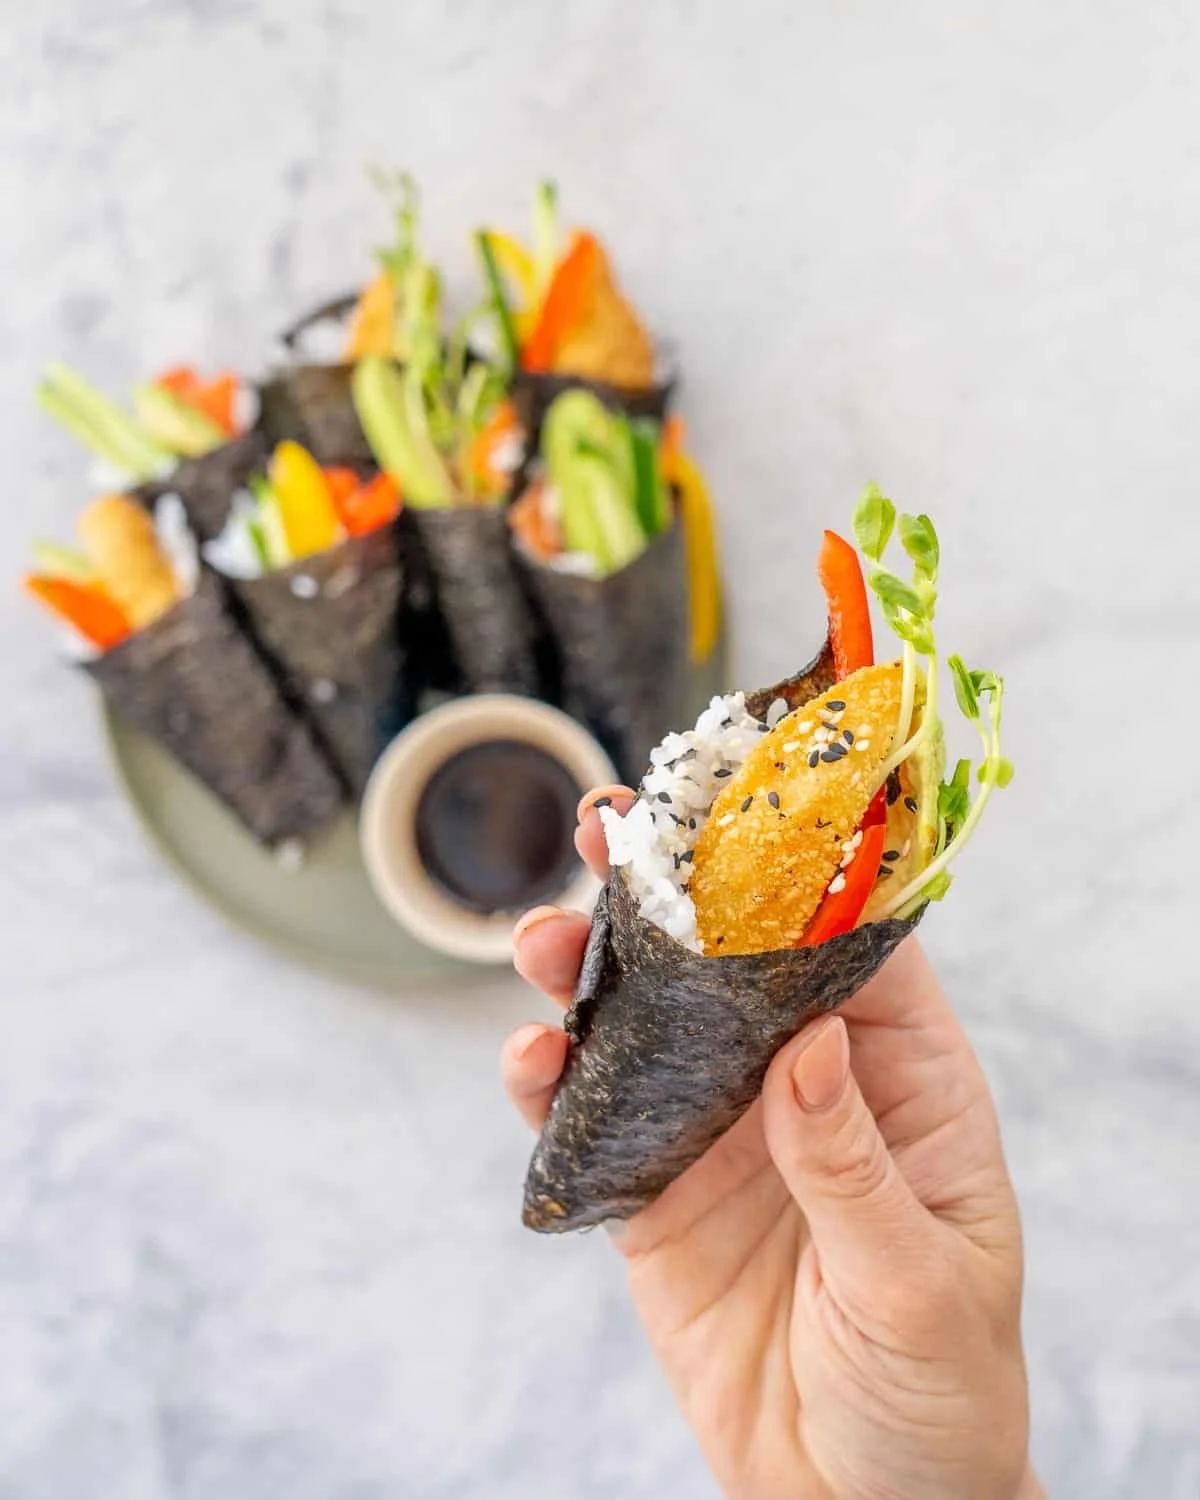
Now, you might be wondering, what exactly is hand roll sushi, and how can it be a hit with your tiny chefs? Hand roll sushi, or temaki, is a fun Japanese dish that allows for creativity and exploration. It’s basically a cone-shaped sushi filled with different ingredients your family loves. Plus, it’s easy to make and can be a delightful bonding experience in the kitchen.
Why Hand Roll Sushi?
Let’s be honest: kids love to play with their food. Creating their own hand rolls allows them the freedom to choose their favorite ingredients. With a variety of vegetables, seafood, and sauces, the options feel endless! In fact, introducing sushi-making into your family meals can lead to wonderful new dining experiences and broaden your children’s palate. You’ll definitely want to include some of their favorite vegetables (my kids are crazy about cucumbers and carrots), and maybe they’ll even try something new in the process.
Making hand roll sushi at home doesn’t just nourish your belly; it also teaches valuable skills. As your kids start rolling, they engage in fine motor skills practice. If you’re curious about more fun activities that promote developmental skills for little ones, check out this article on baby rolling milestones.
Ingredients to Gather
To create your sushi masterpiece, here are some ingredients you’ll need:
- Nori (seaweed sheets)
- Sushi rice (cooked and seasoned)
- Fillings: This is where it gets exciting! You can use cooked shrimp, crab sticks, avocado slices, carrots, cucumbers, and even fruits like mango for a twist.
- Dipping sauce: Soy sauce is traditional, but a little sesame oil can add depth.
Quick Tip: Prep Together
Before diving in, maybe try a little prep time with your children. Have a mini assembly line on your kitchen counter. Place bowls of various fillings together and let your kids pick what they want to include in their rolls. It’s all about making it fun and interactive—a true family affair!
Rolling Techniques
You might be asking, how do we roll this sushi? Here’s a simple step-by-step:
Start with a sheet of nori: Place it shiny side down on a clean cutting board or a bamboo roller.
Spread the sushi rice: Wet your hands to keep the rice from sticking, then take a handful of sushi rice and spread it over the nori, leaving a little space at the top.
Layer your fillings: Encourage your kids to be adventurous! Let them add the fillings they love in a line close to the bottom edge of the nori.
Roll it up: Here’s the magic part! Starting from the edge where the fillings are, carefully roll the nori towards the empty space, pressing gently as you go. Believe me, this is where they’ll giggle, especially when their rolls go slightly askew.
Seal the edge: A little water will help to seal the nori and keep the hand roll intact.
Creative Additions
Want to take it up a notch? How about creating themed rolls? For example, a “Rainbow Roll” can incorporate lots of colorful veggies, while a “Surf & Turf” can have a layer of shrimp and avocado.
Hands-On Safety
Of course, when cooking with little ones, a few words on safety are in order. While you’re introducing your kids to new culinary skills, make sure they’re aware of knife safety, especially when handling vegetables. Opt for kid-friendly knives or safer alternatives (think plastic knives) if they’re cutting their own ingredients. You’ve got to keep it fun and safe!
A Snack to Celebrate
No sushi night is complete without creating a little celebration around it! Set the table with some fun decorations, play some upbeat music, and enjoy a family taste test. Encourage everyone to share their rolls and possibly even vote on their favorites. It’s these little moments that create lasting memories.
Bonus Ideas
If your kids become sushi enthusiasts, there’s a world of sushi-themed crafts you can explore. Why not make cute crafts like handprint bunnies, which can serve as a fun precursor to your sushi night? You can incorporate this into your family routine with fun activities clearly detailed in this article about adorable crafts for Easter.
Wrapping Up the Fun
Taking the time to prepare hand roll sushi creates not just a meal but a blend of art and celebration. Watching your kids dive into the experience, experimenting with flavors and textures, will be rewarding. You’ll create a space for conversation, laughter, and mouthfuls of deliciousness that everyone can savor.
When the kitchen is buzzing with activity and the laughter flows as your little ones experience the joy of creating something unique, you’ll know the effort was worth it. So let’s roll up our sleeves and get started on this culinary adventure!
Conclusion
Involving your children in cooking can be a transformative experience, turning mealtime into a fun-filled activity. If you’re looking for additional ways to enhance your sushi-making skills, consider checking out recipes like this hand roll recipe. For those interested in visual learning, videos on crafting hand rolls, such as this tutorial, can also be beneficial. Enjoy the culinary journey with your little ones!
Quick Tips for Easy Avocado Pasta Your Family Will Love for Dinner
Imagine this
You’ve just come home from a long day, and the last thing you want to do is spend an hour in the kitchen. You glance at your toddler playing with their toys, and you think, what can I make that’s quick, healthy, and something they’ll actually eat? Sound familiar? If you’re like most parents, you want to provide nutritious meals without the hassle. Enter, the delightful and simple easy avocado pasta! You may also find 10 Best Baby Shower Games Fun Easy Guests useful.

Avocado pasta isn’t just a trendy dish; it’s a perfect meal for kids and adults alike. Creamy, delicious, and packed with healthy fats, it’s a win-win for every hectic parenting moment. Plus, it’s an excellent way to incorporate this nutrient-rich fruit into your little one’s diet. Let’s dive into this easy recipe sure to please even the pickiest eaters!
Why Choose Avocado Pasta?
Here’s the thing—you may be wondering why we’re talking about avocado in a pasta dish. Avocados are full of healthy monounsaturated fats, which are vital for growing toddlers. They also provide essential vitamins and minerals like potassium, vitamin K, and folate. By making a quick avocado pasta, you’re not only saving time but also introducing wholesome food options that support your child’s development.
Plus, if you’re ever in a pinch, there are many toppings and variations to jazz up your avocado pasta. For example, you might consider throwing in some shredded chicken or mixing in cooked veggies. To inspire you even further, check out this helpful resource on easy chicken baby food recipes that can pair perfectly with pasta.
The Basic Avocado Pasta Recipe
This avocado pasta is straightforward and easy to whip up. Here’s what you’ll need:
Ingredients:
- 2 ripe avocados
- 2 cloves garlic
- Juice of 1 lemon
- Salt to taste
- Fresh pasta (spaghetti or any preferred type)
- Optional: cherry tomatoes, spinach, or herbs for garnish
Instructions:
Cook the Pasta: Start by boiling your pasta according to the package instructions. Make sure it’s al dente, as it will continue to cook slightly when mixed with the sauce.
Prepare the Sauce: While the pasta is cooking, mash your avocados in a bowl. Add minced garlic, lemon juice, and salt. Mix until you have a smooth and creamy texture.
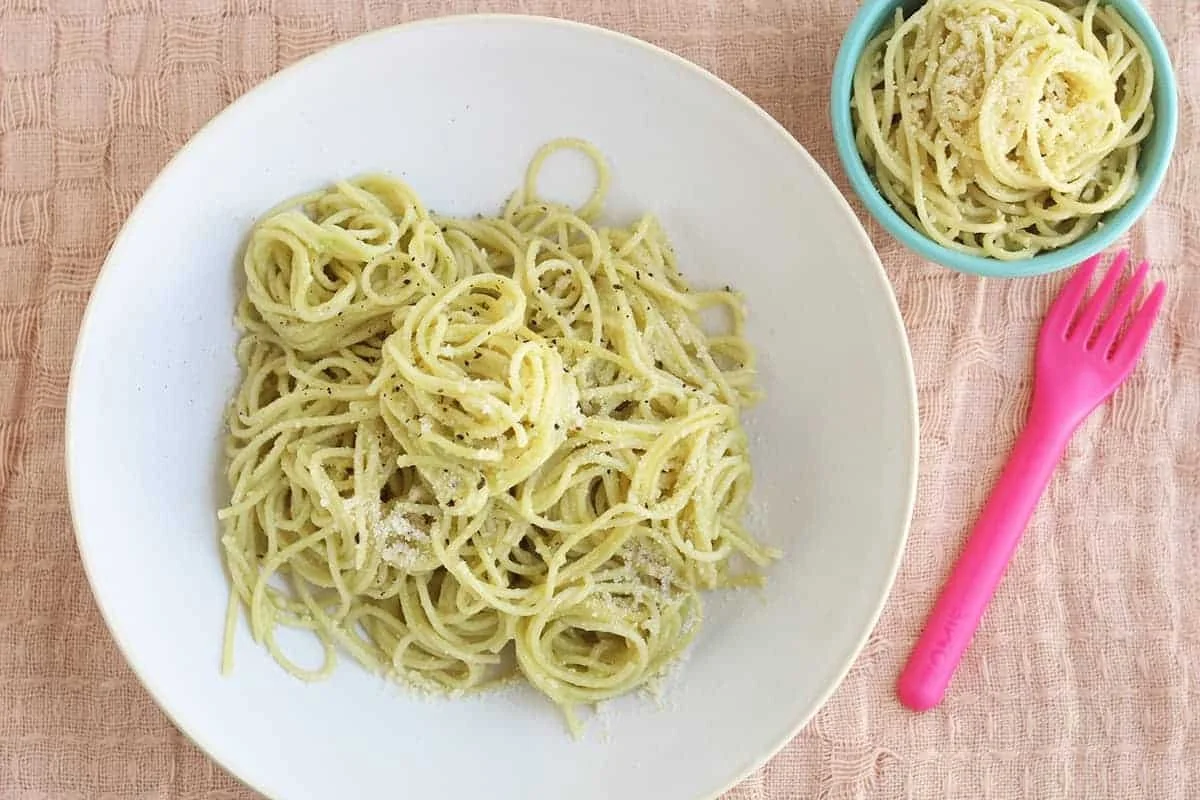
Combine: Once the pasta is ready, drain it and add it to the bowl with your avocado sauce. Toss everything together until the pasta is evenly coated.
Garnish: Serve it up with any of your favorite toppings! If you’re feeling adventurous, sliced cherry tomatoes or a sprinkle of fresh herbs can enhance the dish beautifully.
Simple Variations to Try
Now, you might not want to serve the same dish every night, right? Here are a couple of variations to keep things interesting:
Creamy Spinach Avocado Pasta: Blend in some cooked spinach for an added dose of iron and vitamins. This not only adds nutrients but also gives a vibrant green color that kids often find intriguing.
Tomato Basil Delight: Mix in diced tomatoes and fresh basil for a classic Italian twist. The combination of flavors is not only fresh but also enticing enough to make your little ones ask for more!
Tips to Make it Kid-Friendly
Let’s be honest, cooking for kids can sometimes feel like a juggling act. Here are some tips that might just make your life a little easier:
Get Them Involved: Allow your kids to mash the avocado or toss the pasta. They’ll enjoy helping out and are more likely to eat what they’ve prepared.
Experiment with Texture: If your child prefers smoother textures, blend the avocado sauce until completely smooth. For a little crunch, keep it slightly chunky.
Offer Dipping Options: Serve the avocado pasta alongside bite-sized pieces of chicken or veggies for dipping. Sometimes, it’s all about presentation.
Nutritional Benefits of Avocados
You’re probably already aware that avocados are nutritious, but let’s break down some of the key benefits:
Heart Health: The healthy fats in avocados not only aid in nutrient absorption but support heart health, which is crucial for everyone, especially children.
Weight Management: Surprisingly, avocados can help manage weight due to their satiating properties. Kids feel full and satisfied without overeating.
Great for Digestion: With their high fiber content, avocados are excellent for maintaining a healthy digestive system, a concern for many parents when introducing solid foods.
How to Store Leftovers
If you find yourself with leftover avocado pasta (which is pretty rare in our household!), you can store it in an airtight container in the fridge. However, keep in mind that the avocado may start to brown. A trick to prolonging freshness is to add a little lemon juice on top before sealing the container.
What If They Don’t Like It?
We’ve all been there; you spend the time preparing a lovely meal only for it to be met with scrunched-up faces. Remember, it’s completely normal! Sometimes, it takes a few tries before enjoying new foods. Keep offering them the dish without pressure, and they might surprise you on the next attempt. You might also like introducing avocado to their diets using fun snacks that hide the taste, such as smoothies.
Conclusion
Incorporating easy avocado pasta into your family’s meals can lead to pleasant dining experiences. By applying these tips, you’ll not only make mealtime less stressful but also expose your kids to healthy ingredients.
If you’re looking for more engaging meal ideas, consider exploring this easy avocado pasta recipe or maybe a quick dish like the 15-minute creamy avocado pasta. Celebrating the joys of cooking for your family can be just as fulfilling as sharing the meals around the table. Enjoy those family moments!
Cozy Pumpkin Pancakes Ideas for Faster Mornings and Happier Kids
Imagine this: it’s a chilly autumn morning, and your little one is still snuggled up in bed. You know the moment they wake up, they’ll want something delicious to kickstart their day. What if I told you that you can whip up a cozy batch of pumpkin pancakes that’s not only easy to make but also packed with nutrition? Yes, those soft, fluffy circles of happiness can make mornings feel a little brighter.

Pumpkin pancakes are a fantastic way to introduce your baby or toddler to seasonal flavors while ensuring they get vital nutrients. If your family is anything like mine, busy mornings can sometimes turn into frantic ones—so I’ve got your back. Let’s explore how to make these delightful pancakes, some tips for perfecting them, and a couple of variations to keep things interesting.
Why Choose Pumpkin Pancakes?
First off, let’s dive into why pumpkin pancakes are a top-notch choice. For one, pumpkin is rich in vitamins A and C, which can support your child’s immune system and promote healthy skin. Plus, it’s high in fiber, helping your little one stay full longer—an absolute win for busy mornings!
You might be thinking, “My toddler won’t eat pumpkin.” Well, here’s the thing: disguising nutritious ingredients in a tasty pancake might just do the trick! They can be so fluffy and delicious that your little one might not even notice it’s a veggie on their plate. You could even check out other delicious options like banana pancakes for babies if you’re looking to mix things up.
Pumpkin Pancake Recipe
Ingredients You’ll Need
- 1 cup all-purpose flour
- 1 cup canned pumpkin puree
- 1 cup milk (or a dairy alternative)
- 1 egg
- 2 tablespoons sugar (optional)
- 1 tablespoon baking powder
- 1 teaspoon cinnamon
- 1/2 teaspoon nutmeg (optional)
- Pinch of salt
- Butter or cooking spray for the pan
Instructions
Combine Dry Ingredients: In a mixing bowl, whisk together the flour, baking powder, cinnamon, nutmeg, and salt. Set this aside.
Mix Wet Ingredients: In another bowl, mix the pumpkin puree, milk, egg, and sugar if using. Combine them until smooth.
Combine Everything: Gently fold the wet ingredients into the dry ingredients, stirring until just combined. It’s okay if there are a few lumps; overmixing can lead to tough pancakes.
Heat the Pan: Preheat a non-stick skillet or griddle over medium heat and add a small amount of butter or spray with cooking oil.
Cook the Pancakes: Pour about a 1/4 cup of batter onto the skillet for each pancake. Cook until bubbles form on the surface (around 2-3 minutes), then flip and cook for another 1-2 minutes until golden brown.
Serve Warm: Serve with your favorite syrup, fresh fruit, or yogurt.
Tips for Perfect Pancakes
- Texture Matters: If your batter seems too thick, add a splash more milk. The right consistency is crucial for fluffiness.
- Keep Warm: You can keep cooked pancakes warm in a low-heat oven while you finish cooking the rest.
- Make Ahead: These pancakes freeze wonderfully. Just stack them between sheets of wax paper, wrap tightly in foil, and store in the freezer. Pop them in the toaster or microwave for a quick breakfast later on.
Variations to Explore
Let’s be honest: kids can be picky, and variety is the spice of life! If you want to ensure your pancakes don’t become boring, try these fun variations:
- Add Chocolate Chips: A few mini chocolate chips mixed into the batter can turn ordinary pumpkin pancakes into something extraordinary.
- Nutty Twist: Add chopped nuts like pecans or walnuts for a crunchy texture that can make them even more delicious.
- Mixing Fruits: How about adding mashed bananas or applesauce for added sweetness and moisture? You can even try this delicious combination of banana and applesauce pancakes—check out this resource for banana pancakes with applesauce ideas.
Cooking with Kids
One of the best experiences can be cooking with your kids. Imagine their excitement as they see the pancakes flip and bubble! Let them help with pouring, mixing, and even choosing toppings. Not only does it make for good family bonding, but it can also boost their confidence as they learn important kitchen skills.
Now, you might be wondering how to balance cooking with the chaos that comes with little ones running around. Here’s my advice: prep as much as you can beforehand. If your kids are old enough, letting them pick out decorations for the pancakes can build anticipation and make the experience even more special.
The Power of Breakfast
We all know the importance of breakfast, but when it comes to our little ones, it couldn’t be more crucial. A hearty pancake breakfast provides energy that can fuel a morning of play and learning. And who wouldn’t feel thrilled to start their day with something as delicious as pumpkin pancakes?
If you want to ensure that every bite is not only tasty but also nutritious, integrating vegetables into meals for your kids is a fun challenge, and pumpkin pancakes are a fantastic way to do just that.
There’s something uniquely comforting about enjoying a warm pancake with your family. These pumpkin pancakes not only taste good but can also make your mornings feel more special. So what’s stopping you? Gather those ingredients tomorrow, and start the day with something truly heartwarming!
Conclusion
As the season shifts to cooler temperatures, your family can enjoy the fun of fall through the deliciousness of pumpkin pancakes. If you’re looking to expand your breakfast repertoire, consider trying out recipes such as Perfect Pumpkin Pancakes or explore a thicker version by visiting Sally’s Baking Addiction for information on making thick and flavorful pumpkin pancakes. Enjoy the cozy mornings ahead!
Grazing Style No Cook Dinner Ideas for Busy Moms to Save Time
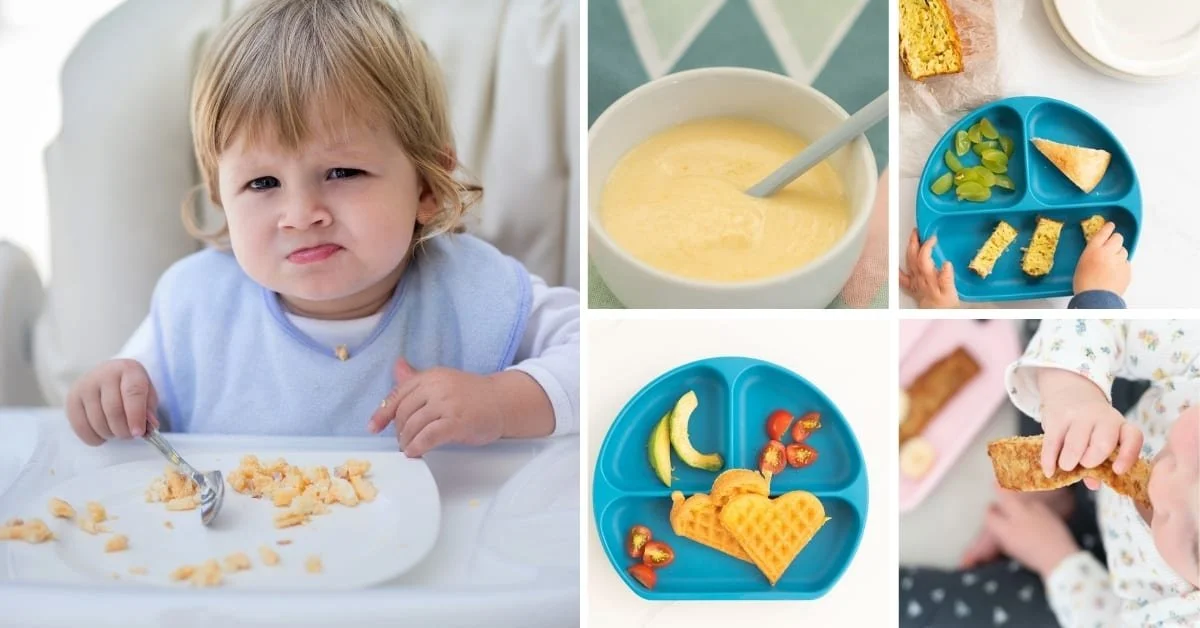
Imagine it’s a Tuesday evening, and you’ve just come home from a long day juggling work and your little whirlwind. The last thing you want to do is stand in front of a hot stove, right? Now, you might be wondering how you can get a nutritious and engaging meal on the table without that hassle. Here’s where the concept of a grazing style no-cook dinner comes to the rescue. It’s all about creating an exciting spread of food that allows your kids to nibble, explore, and enjoy a variety of tastes without you spending hours in the kitchen.

What is a Grazing Style No Cook Dinner?
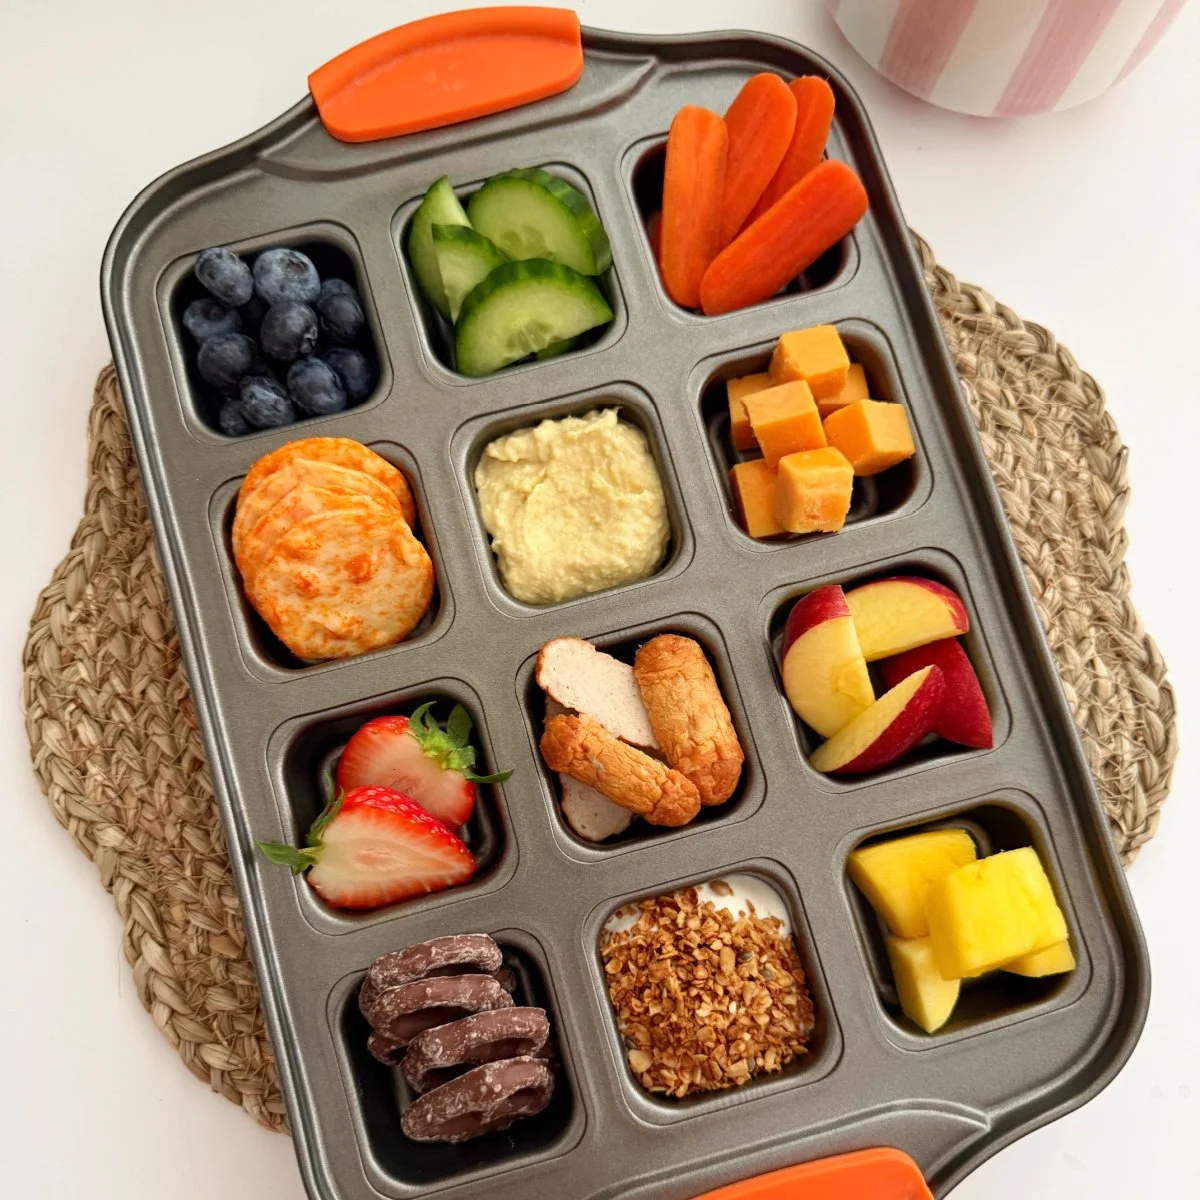
A grazing style no cook dinner is essentially a buffet of lightweight, ready-to-eat foods that you can lay out on the table. It’s super flexible, meeting both your child’s adventurous nature and their sometimes picky eating habits. Picture a spread filled with fresh fruits, crunchy vegetables, meats, cheeses, and dips. Your little ones can create their own plates, tailoring their meal to what they enjoy at that moment. Wouldn’t it be great to see them eat a variety of food without you having to put much effort into it?
Benefits of Grazing Dinners for Kids
There are plenty of perks when it comes to grazing dinners, especially for young kids:
- Encourages independence: They get to choose what they want to eat, which can help foster a sense of independence and decision-making.
- Promotes variety: With so many options available, they’re more likely to try new foods. You’ll know firsthand that a colorful plate can entice even the pickiest eater!
- Easy cleanup: No pots and pans to clean up afterwards? Yes, please! Most grazing foods can be eaten straight from the table.
Now, it might sound chaotic, but remember, kids thrive in environments where they feel in control. Parents have found that grazing style meals can lead to fewer food battles and less stress at dinnertime. So, why not embrace this fun approach?
Ideas for a Successful Grazing Dinner
Now that you’re on board with the idea, let’s dive into how to create your own grazing dinner spread. Here are some tips and ideas to get you started:
1. Choose a Base
Start with a strong base of fresh produce. Think about crunchy veggies like carrots, cucumbers, and bell peppers. You can pair these with fruits such as grapes, apple slices, or berries. Having a mix of colors not only looks appealing but also offers a variety of nutrients. If you need some inspiration, check out this list of healthy foods for young children that are great for grazing.
2. Protein Power
Add some protein to keep everyone satisfied. You could include cubed cheese, deli meats, hard-boiled eggs, or hummus. For kids who enjoy some crunch, consider adding nuts (if allergies aren’t a concern) or chickpea snacks. This variety can spark curiosity and might even lead to them discovering new favorites.
3. Fun Dips
Dips can transform any vegetable or fruit into something exciting. Try including options like guacamole, tzatziki, or a yogurt-based dip. Not only do these add flavor, but they can also encourage your kids to try dipping and tasting.
4. Themed Plates
If you want to add a fun twist, consider themed grazing platters. For instance, you could do a Mediterranean spread with olives, feta cheese, pita, and hummus, or a fiesta with salsa, corn chips, and guacamole. Kids love the novelty of themes, and it could be a fun way to broaden their culinary horizons.
5. Sweet Treats
Don’t forget dessert! No-cook desserts, like a selection of no-bake cookies, can be the perfect finishing touch. For a simple yet delicious recipe, check out these no-bake cookie options. They offer a sweet ending while keeping things light and low-maintenance.
Putting it All Together
When it comes time to serve, arrange the items on a big platter or several smaller plates. Encourage your kids to build their own plates. This experience not only makes dinner more enjoyable for them but also fosters creativity. You might even find they try foods they were previously hesitant about!
You can turn the evening into a family affair by sharing stories and encouraging everyone to talk about their favorite foods. Make it a community vibe where everyone has a role in shaping the meal.
Mistakes to Avoid
As with any new approach, there can be pitfalls. Here are a few missteps to watch out for:
- Overwhelming Choices: While variety is great, too many options can actually be intimidating. Stick to a range of 5-10 items.
- Forgetting Allergies: Always be mindful of food allergies, not just for your kids but any other young guests you might have.
- Not Planning Ahead: Grazing dinners can still benefit from a bit of prep time. Having your ingredients ready to go can make all the difference.
Quick Tips for Parents
- Engage the Kids: Let them help in choosing foods during grocery shopping.
- Involve Them in Setup: Bringing your children into the preparation process can lead to greater excitement and willingness to eat.
- Be Open-Minded: Encourage them to try new things without pushing too hard; we’ve all been there when it comes to stubborn eaters.
Conclusion
Grazing style no-cook dinners can be a fantastic solution for busy parents, providing an opportunity for children to explore new foods while giving you a break from the kitchen. It’s all about creating a fun, engaging, and healthy dining experience that fits into your family’s lifestyle. If you’re looking for more ideas, you might find inspiration in the no cook dinner ideas for kids or explore some delicious options with the vegan grazing platter. Don’t worry; you can make mealtime enjoyable without spending hours cooking!

Easy Sweet Potato Brownies Your Family Will Love and Feel Great
Sweet Potato Brownies
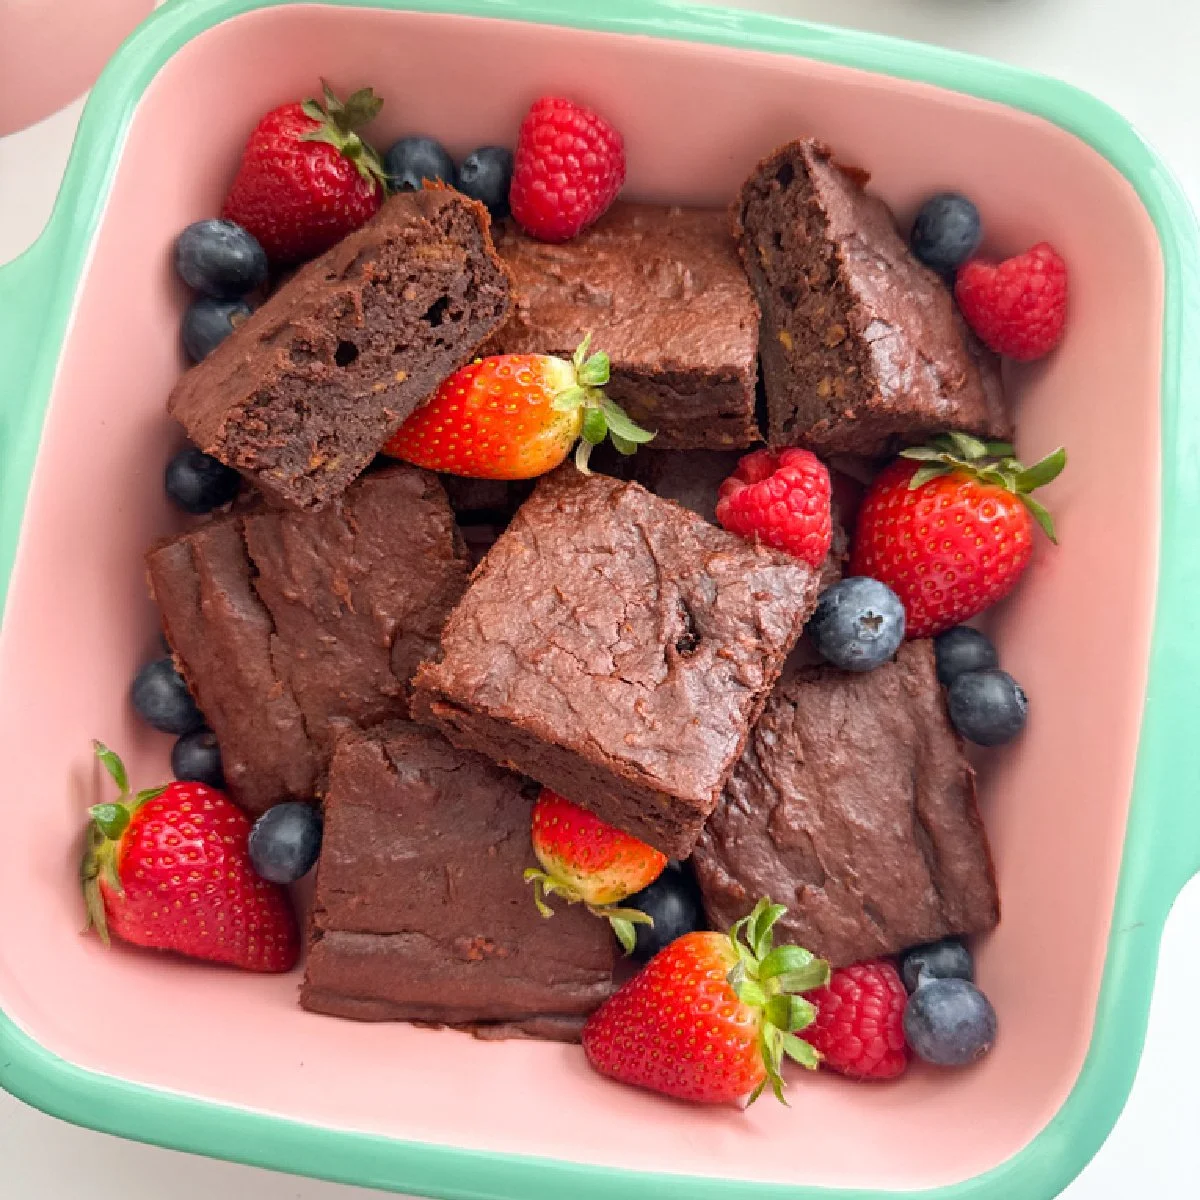
Imagine this: it’s a busy afternoon, and you’re trying to find a snack that’s not only delicious but also nutritious for your little ones. You want something that’ll make their taste buds dance while also giving them the vitamins and fiber they need for energy. Sounds like a tall order, right? Well, what if I told you that sweet potato brownies could be the perfect answer? Yes, you heard that right! Sweet potatoes are not just for savory dishes; they can be transformed into an indulgent treat that your kids will love, and you won’t have to feel guilty about serving it!
Now, you might be wondering why sweet potatoes? These vibrant veggies are powerhouses of nutrition. They’re packed with vitamins A and C, potassium, and fiber. Plus, the natural sweetness of sweet potatoes can help create a dessert that’s far healthier than traditional brownies. In fact, you can even find some cute options like gluten-free potato recipes that can inspire your cooking with kids!
The Benefits of Using Sweet Potatoes
Let’s talk about the benefits of incorporating sweet potatoes into your kids’ diets. We’ve all been there—trying to sneak in healthy veggies without a whine or a fuss. Sweet potatoes have a naturally sweet flavor that can satisfy your child’s cravings without the need for added sugars. Here’s a breakdown of why sweet potatoes are a fantastic choice:
- Rich in Nutrients: Sweet potatoes are loaded with beta-carotene, which our bodies convert into vitamin A. This vitamin is essential for healthy vision and immune function.
- Fiber-Rich: The dietary fiber in sweet potatoes can aid digestion and keep that little tummy satisfied longer.
- Naturally Sweet: The sweetness of sweet potatoes means you might need to add less sugar to your recipes, making them healthier overall.
Making Sweet Potato Brownies
Diving into making sweet potato brownies is simpler than you might think! You can easily whip them up with just a few ingredients that you likely already have at home. Here’s a basic overview of what you’ll need:
Ingredients
- 1 cup of mashed sweet potatoes
- 1/2 cup of nut butter (peanut, almond, or your kids’ favorite)
- 1/2 cup of cocoa powder
- 1/3 cup of maple syrup or honey
- 1 teaspoon of vanilla extract
- 1/2 teaspoon of baking soda
- A pinch of salt
- Optional: chocolate chips or nuts for added texture
Directions
Preheat Your Oven: Get your oven preheating to 350°F (175°C).
Mix the Wet Ingredients: In a large bowl, mix together the mashed sweet potatoes, nut butter, maple syrup, and vanilla until smooth.
Combine Dry Ingredients: In another bowl, whisk together cocoa powder, baking soda, and salt.
Combine Mixtures: Gradually add the dry ingredients to the sweet potato mixture. Stir until just combined. If you’re feeling adventurous, fold in some chocolate chips at this point!
Bake: Pour the mixture into a greased baking dish and spread it evenly. Bake for about 20-25 minutes or until a toothpick comes out clean.
Tips for Perfect Brownies
Here’s the thing—making sweet potato brownies is all about balance. If you want the best texture, ensure your sweet potatoes are thoroughly mashed. Any lumps will create uneven brownies. Also, if you’re experimenting with flavors, consider adding a sprinkle of cinnamon or a dash of nutmeg to elevate the taste.
Another crucial aspect is to let your brownies cool completely before cutting them. This helps them firm up and allows that delicious fudginess to develop. You might also want to keep experimenting with different nut butters; some offer a richer flavor profile than others.
Kid-Friendly Variations
Let’s be honest, kids can be notoriously picky, but offering variations can make trying new things a whole lot easier! Here are a couple of alternatives to keep your sweet potato brownies exciting:
- Peanut Butter Swirls: Create a simplified version of a marble brownie by swirling in some peanut butter on top before baking.
- Fruity Fun: Toss in dried fruits like raisins or cherries into the batter for an added burst of flavor.
And remember, if your little one is celebrating a special occasion, you can turn your brownies into a stunning centerpiece. Consider decorating with some fruit or even using a natural frosting made from blended fruits to create that birthday cake vibe. You can check out a great idea for this in a fruit-sweetened smash cake recipe.
The Sweet Potato Brownie Experience
When serving sweet potato brownies to your kids, consider making it a fun event! You might host a little taste-testing session where you try different toppings or variations. Let’s be real, how many times have you watched your child wrinkle their nose at a healthy snack? By turning food prep into a delightful experience, you’re not just preparing them a treat; you’re also teaching them about healthy eating habits in a fun way.
Storing Leftovers
If you find yourself with leftover brownies (which is rare, right?), you can store them in an airtight container for up to a week. Just be sure to layer them with parchment paper to keep them from sticking together. And if they last more than a week, you can freeze them for a rainy day!
Conclusion
Incorporating sweet potatoes into brownies is not only a creative and delightful way to provide a nutritious snack, but it also opens up a world of possibilities for family cooking. Plus, you can feel good knowing you’re sharing nutritious ingredients with your kids. If you’re looking for more inspiration, be sure to check out these delicious recipes for sweet potato brownies: Healthy Sweet Potato Brownies – The Roasted Root and Sweet Potato Brownies – Running to the Kitchen®. By blending healthy ingredients with fun preparation, you’re setting your kids up for a lifetime of enjoying nutritious foods!
Easy Stage 2 Baby Food Combinations for Healthy Growth and Flavor
Baby Food Combinations for Stage 2 Eating
Imagine this: your little one has just surpassed the infant puree stage and is ready to explore new flavors and textures. You’re excited about this next milestone, but maybe a bit overwhelmed by the idea of whipping up meals that are diverse and packed with nutrients. You’re not alone—lots of parents find themselves in this similar boat as they dive into the world of baby food combinations.

This shift into Stage 2 meals can be both fun and beneficial for developing tastes and textures. Mixing flavors and ingredients can help your baby not only enjoy their food but also develop a palate that’s ready for more complex foods later on. And let’s be honest, as parents, we all want our kids to enjoy a variety of healthy options without battling at every meal!
Why Baby Food Combinations Matter
You might be wondering why combinations are emphasized so much—there are compelling reasons! First off, different foods come with unique nutrients, and mixing them allows your baby to receive a well-rounded diet. Plus, combining tastes can lead to culinary adventures that keep mealtime interesting and enjoyable.
At this stage, your baby is ready for thicker textures and more complex materials. Gradually introducing different flavors makes food more appealing and encourages your little one to try new things. If you’re looking for easy and successful baby food purees, check out these easy baby food purees that can be great foundational recipes before moving on to more adventurous combinations.
Simple and Tasty Combination Ideas
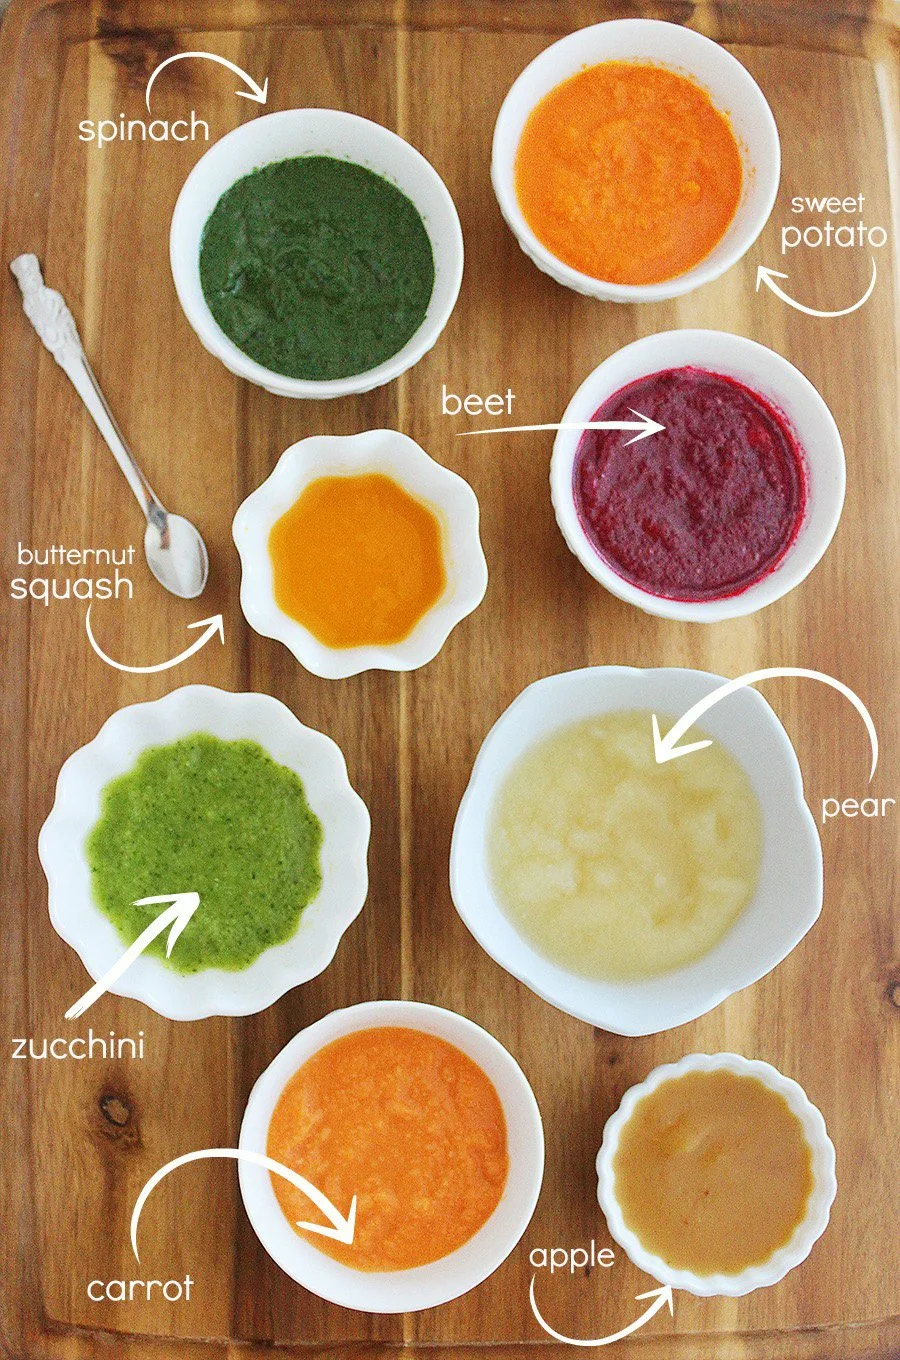
Here are some delightful baby food combinations that are simple to prepare. They’re nutritious and appealing to young taste buds:
1. Sweet Potato and Black Bean
Sweet potatoes are rich in vitamins A and C, while black beans offer fiber and protein. Simply steam or bake a sweet potato and mash it with some cooked black beans. This texture is perfect for your little one’s developing palate.
2. Peas and Carrots
A classic combination that packs a punch! Blend cooked peas and carrots for a sweet, green puree that is full of fiber and vitamins. This colorful mix is visually appealing as well!
3. Avocado and Banana
If you want to introduce healthy fats along with some potassium, this combo is perfect. Simply mash ripe avocado and banana together until smooth. They provide a creamy texture that’s easy for babies to manage.
4. Apples and Butternut Squash
This is a delightful combo with a hint of sweetness. Roast butternut squash and blend it with cooked apple for a warm and comforting puree. The flavors mix beautifully!
5. Chicken and Sweet Peas
For a protein-boosting meal, try pureeing cooked chicken with sweet peas. You can season it lightly with a pinch of herbs to expose your baby to new flavors.
6. Quinoa and Broccoli
Rich in protein and vitamins, quinoa blended with steamed broccoli makes a protein-packed meal that’ll keep your little one energized.
Preparing Meals on the Go
What if you find yourself in a pinch? Preparing meals in bulk can be a lifesaver. Here’s a tip: batch cook several combinations and freeze them in ice cube trays. You can pop out a cube or two when needed, and soon enough, you’ll have a varied menu ready at your fingertips.
If you’re looking for additional ideas focused on chicken recipes, check out these chicken baby food recipes to broaden your meal planning even further.
Bonus Tips
Introduce New Flavors Slowly: Each time you introduce a new food, do it separately for a few days to ensure your baby is adjusting well and doesn’t have any adverse reactions.
Textures Matter: As your baby’s eating skills develop, consider offering textured purees instead of smooth ones. This transition can help with chewing skills later on.
Allergies: Be mindful of allergic reactions, especially with popular allergenic foods like peanuts or eggs. Introducing them carefully can help your baby adapt better.
Stay Innovative: Don’t be afraid to experiment. Mixing veggies with fruits or incorporating mild spices can lead to delightful surprises in flavor that your baby might love.
Daily Meal Planning
A well-thought-out daily meal can set up routines that make feeding easier and more enjoyable. Try to aim for a combination of grains, proteins, fruits, and vegetables throughout the day. Here’s an example:
- Breakfast: Oatmeal mixed with mashed bananas.
- Lunch: Sweet potato and chicken puree.
- Snack: Peas and carrots.
- Dinner: Quinoa and broccoli with a pinch of cumin.
Having a structured plan helps you ensure that your little one receives balanced nutrition while also making meal prep a breeze.
Encouragement and Next Steps
As you delve into the world of baby food combinations, remember it’s all about exploration and enjoyment. Embrace the messiness of this stage, and don’t forget to savor those little precious moments. It’s completely normal to experience some challenges along the way, so don’t hesitate to lean on fellow parents for support or advice.
Conclusion
To wrap things up, crafting delicious baby food combinations is not only a vital step in your baby’s journey but also an enjoyable experience for both of you. Remember to keep the meals simple and engaging. As you’re finding inspiration in creating everything from sweet potato blends to quinoa mixes, consider exploring even more options like these best baby food combinations or finding unique recipes such as this curried apple and vegetable puree. Happy feeding!
Easy Homemade Baby Food Recipes No-Cook Purees for Busy Parents
Homemade Baby Food Recipes for Busy Parents
Picture this: You’re juggling a million things at once. Your toddler is throwing a tantrum, the baby is crying, and you’re trying to figure out what to feed them for dinner. Sound familiar? In those frantic moments, you might wonder how you can make nutritious meals without spending hours in the kitchen. Well, I’ve got good news for you. Homemade baby food recipes—especially no-cook purees—can save your sanity and your baby’s mealtime!
Here’s the thing: Making your own baby food doesn’t have to be complicated. You don’t need fancy gadgets or a degree from a culinary school. With a few simple techniques and fresh ingredients, you can whip up delicious meals that your little one will love. Plus, it’s a great way to ensure they’re getting all the nutrients they need. If you’re looking for easy recipes that require little prep, you’re in the right place!
Why No-Cook Purees Are Ideal for Babies
Now, you might be wondering why no-cook purees are the way to go. Let me break it down for you. No-cook purees usually retain more of the vitamins and minerals found in the raw ingredients, and they’re super quick to make. This means you can have nutritious meals ready in no time, which is crucial when you’re managing a busy household.
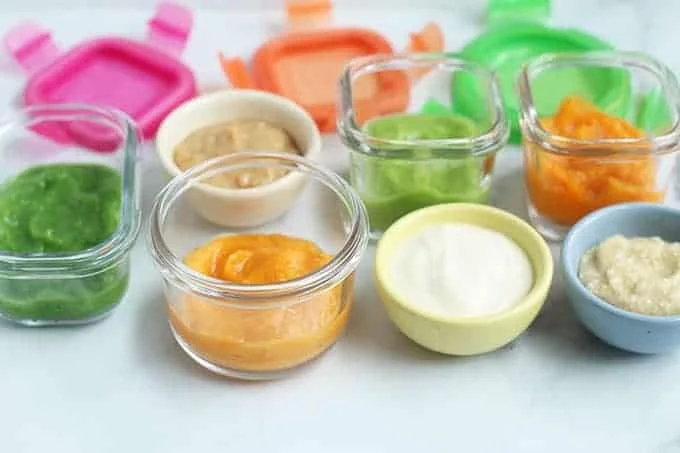
For example, simple fruits like bananas, avocados, or steamed sweet potatoes can be blended into smooth purees without any cooking at all. They make for fantastic first foods, and your baby will enjoy the fresh flavors.
If you’re exploring other homemade baby food options, you may want to check out this resource for easy homemade baby food recipes that are perfect for beginners.
Essential Ingredients for No-Cook Baby Purees
Before getting into the recipes, let’s talk about what you’ll need. The beauty of no-cook purees is in their simplicity. Here are some must-have ingredients:
- Fruits: Bananas, avocados, apples, pears, and peaches are all fantastic choices.
- Vegetables: Sweet potatoes, carrots, and peas can often be blended raw if they’re tender enough.
- Grains: Oats can be ground and added to purees for extra nutrition.
- Protein: Yogurt and soft cheeses can be mixed in for a creamy texture and added protein.
You can mix pieces of fruits or veggies with each other to create exciting combos, keep your little one’s palate intrigued, and ensure they’re getting a variety of nutrients.
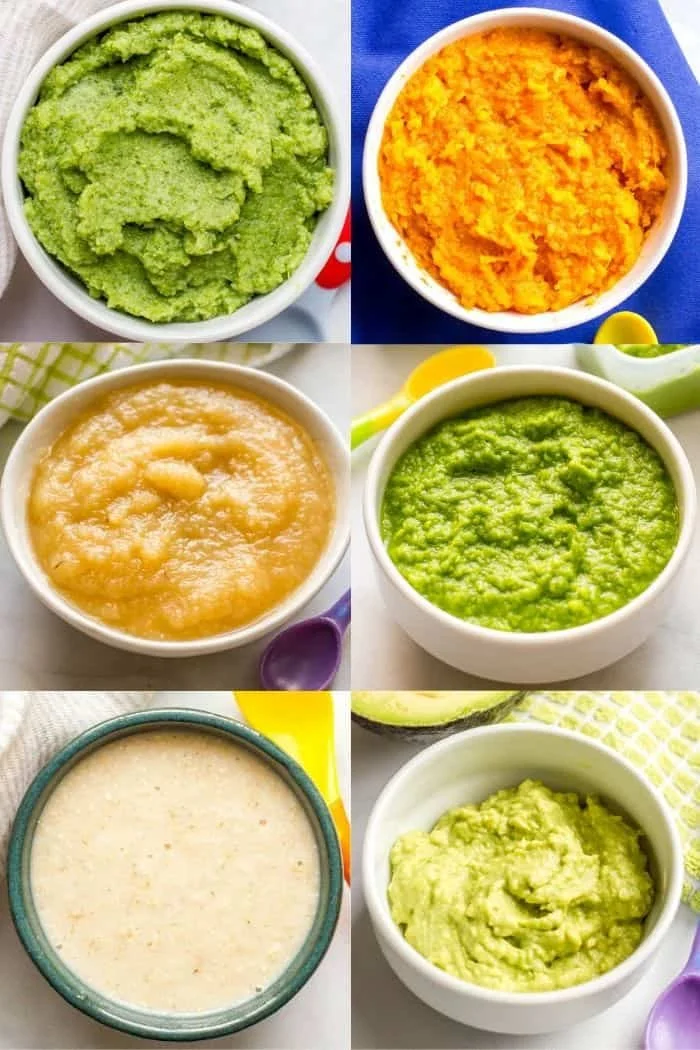
Easy No-Cook Puree Recipes
Avocado and Banana Mash
This is a classic favorite that’s easy to make. Simply mash one ripe avocado and one ripe banana together until they reach your desired consistency. Not only does this combination offer healthy fats and potassium, but it’s also perfect for baby’s developing taste buds.
Pear and Spinach Puree
Grab a ripe pear, peel it, and chop it into small pieces. Combine it with a handful of fresh spinach leaves. Using a blender or food processor, blend until smooth. This puree is rich in vitamins A and C—perfect for your little one’s immune system!
Pea and Mint Puree
Take a cup of fresh or thawed peas and blend them with a few mint leaves for a refreshing twist. The sweetness from the peas combines beautifully with the mint, giving your baby a taste of something a little different!
Tips for Storage and Usage
Once you’ve made your purees, you’ll want to store them properly. I recommend using ice cube trays to freeze portions for easy serving later on. Just pop out a cube when it’s mealtime and defrost it in the fridge or using a warmer. This method allows you to have home-cooked baby food ready to go, which can be a lifesaver on busy days.
The great thing is that as your baby grows, you can gradually introduce more textures. You can mix in cooked grains or even some shredded chicken from your previous meals. If you are looking for chicken recipes, consider exploring our easy chicken baby food recipes that can inspire your cooking.
Mistakes to Avoid When Making Baby Food
We’ve all been there, right? You whip up a batch of food only to have it rejected outright. Here are some common pitfalls to avoid:
- Too Much Variety Too Soon: It’s essential to introduce one new food at a time to monitor for allergies. Stick with single-ingredient purees initially.
- Over-Seasoning: Keep it simple. Babies certainly don’t need salt or sugar in their purees.
- Ignoring Texture: While you’re prepping no-cook purees, remember to adjust the consistency as your child grows. They’ll need to learn how to handle different textures.
Final Thoughts
Being a parent can feel overwhelming at times. But providing your baby with nutritious meals doesn’t have to be one of those stressors. By incorporating no-cook purees into your routine, you not only save time but also give your baby a foundation for healthy eating habits.
Remember that every little bit counts, and giving your child a variety of flavors will help them develop a more adventurous palate. So here’s to the delicious adventures ahead!
Conclusion
Creating homemade baby food can be so rewarding, especially when you see your baby enjoy what you’ve prepared. If you’re interested in exploring more ideas, check out these simple no-cook purees that can replace store-bought options. Additionally, you might like these homemade baby food recipes to diversify your baby’s diet. Happy cooking!

Gentle Tips for Introducing Eggs to Your Baby Safely and Joyfully
Introducing Eggs to Baby
Imagine you’ve finally decided to introduce solid foods to your little one. You’ve navigated through endless lists of “what’s safe,” and now you’re here considering eggs. Here’s the thing: introducing eggs to your baby can feel both exciting and nerve-wracking. You might be asking, “Am I doing this right?” Trust me, you’re not alone in this little parenting puzzle.
Why Eggs?
Eggs are a powerhouse of nutrition; they’re rich in protein, vitamins, and minerals, making them a great choice for growing babies. They can boost brain development and provide essential fatty acids. Just picture your tiny tot getting all those vital nutrients from a simple scrambled egg or a creamy egg yolk! Plus, eggs are so versatile; they can be boiled, scrambled, or even made into an omelet.
When to Introduce Eggs
So, when exactly should you introduce eggs to your baby? The general recommendation is to start around 6 months, as this is when most babies are ready for solid foods. But before you whip up that first egg dish, let’s talk about the signs of readiness.
Make sure your baby can sit up with support and shows interest in food. You want to feel confident that your little one is ready to embark on this culinary adventure. Feeling unsure? That’s completely normal; we’ve all been there! If you want to explore more about baby development milestones, you should check out this helpful guide.
How to Prepare Eggs Safely
When preparing eggs for your baby, focus first on the method of cooking. Hard-boiled eggs and scrambled eggs are excellent choices because they’re fully cooked. Here’s a quick rundown on how to cook eggs safely:
Hard-boiled eggs: Place the eggs in a pot, cover them with water, and bring them to a boil. Once boiling, cover, and remove from heat. Let them sit in the hot water for about 9-12 minutes, then cool in ice water before peeling.
Scrambled eggs: Crack the eggs into a bowl, whisk them well, and cook in a non-stick skillet over low heat. Make sure they’re fully cooked and solidified before serving.
Now, you might wonder if it’s okay for your baby to eat both the whites and yolks. It’s generally recommended to introduce the yolk first, as egg whites can sometimes cause allergic reactions. Once you’re assured that your little one handles the yolk well, you can try adding the whites later.
Signs of Allergies
As with any new food, it’s crucial to watch for any signs of allergies. Symptoms can include hives, rashes, or even more severe reactions like difficulty breathing. The first time you introduce eggs, consider trying it early in the day so you can monitor any reactions throughout the day. Here’s a real tip: keep a food diary! It can be a great way to track what your baby eats and spot any patterns.
Funny Egg Recipes to Try
Getting creative in the kitchen can make the introduction of eggs a lot more fun! Here are a couple of easy recipes you can whip up:
Egg and Avocado Mash: Mash a boiled egg with a bit of ripe avocado for a creamy, nutritious treat.
Veggie Omelet: Incorporate finely chopped veggies into scrambled eggs. Spinach, bell peppers, and even zucchini mix well and can make the dish colorful and flavorful.
If you want to explore even more fun ideas that might inspire your baby’s meals, consider checking out these super budget-friendly shower ideas for parents: innovative tips.
Incorporating Eggs into Your Baby’s Diet
Once your baby has successfully tried eggs without any allergies, think about incorporating them into their diet regularly. They can be a delightful addition to breakfast, lunch, or even dinner. They make an excellent protein source, so feel free to mix them with other healthy foods. The sky’s the limit!
Balancing with Other Foods
While eggs are great, it’s important to balance them with a variety of other foods. You could offer fruits, veggies, grains, and even proteins like legumes or fish to ensure your little one gets a well-rounded diet. Meal diversity not only supports nutrition but also exposes your baby to various flavors, helping to develop their palate from an early age.
Conclusion
Introducing eggs to your baby can be a joyful experience filled with exploration and tasty discoveries. Just remember to start slow, watch for any reactions, and get creative in the kitchen. As you embark on this adventure, consider learning more about when to introduce other common foods and allergens to your child by visiting these expert guidelines. Additionally, for a deeper dive into safe egg consumption for infants, check out this resource on the safety of eggs for babies. Enjoy these moments and happy feeding!
