
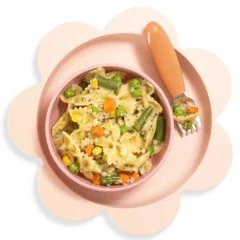
Easy-Peasy 5 Veggie Baby Pasta for Kids A Fun Healthy Dinner Idea
Imagine this: You’re in the kitchen, the smell of garlic and fresh veggies wafting through the air. Your little one is seated at the table, a big smile on their face, eagerly waiting for dinner. What’s on the menu? Easy-peasy 5 veggie baby pasta! If you’re anything like me, mealtime can often feel like a battlefield. We’ve all faced the drama of toddlers who turn their noses up at vegetables, despite our best efforts. So, how do we get those green goodies in their bellies without all the fuss? This delightful pasta dish could be your secret weapon!
The great thing about this recipe is that it’s not only packed with nutrition, but it’s also quick to whip up and delicious enough for everyone in the family, big and small. With just five simple veggies, you’ll have a colorful, vibrant meal that appeals to those picky eaters. Plus, it’s a great way to introduce your child to new flavors while keeping it familiar.
Why Introduce Veggies Early?
Starting your baby on solid foods is an exciting milestone, and it’s essential to make that experience as positive as possible. Introducing a variety of vegetables early on can help prevent aversions later. You might wonder how to make veggies exciting for your little one. That’s where our easy-peasy veggie pasta comes into play. It’s visually appealing, has the perfect texture, and can be easily customized based on your child’s preferences.
Not to mention, when you include veggies like spinach, carrots, and peas in the pasta, you’re providing essential vitamins and minerals. These nutrients contribute to their energy levels and overall growth. If you’re looking for more ideas on pasta suitable for your baby’s palate, you can check this baby pasta resource for additional insights and recipes.
Selecting the Right Veggies
So, what are the five veggies you can use? Let’s break it down:
- Spinach: Packed with iron and vitamins A and C, spinach is a powerhouse veggie. It’s tender and blends beautifully into sauces or pastas.
- Carrots: Naturally sweet, carrots are easy to cook and grate. They’re full of beta-carotene, which is great for eyesight.
- Bell Peppers: These colorful veggies add crunch and sweetness, plus they’re rich in vitamins and antioxidants.
- Zucchini: Zucchini is mild in flavor and can be spiralized for a fun twist that kids love.
- Frozen Peas: An easy and convenient option, frozen peas are a good source of protein and fiber.
Feel free to swap any of these veggies based on what you have on hand or what your child enjoys—it’s all about making it work for your family!
Cooking the Pasta
To prepare the pasta, you’ll want to start with the right kind of noodle. Whole grain or lentil-based pasta is a fantastic choice for nutritious options, as they offer more fiber and protein compared to regular white pasta. Cook your pasta according to the package instructions, ensuring it’s al dente. This consistency will serve well for little mouths trying to master their chewing skills.
As the pasta cooks, it’s time for the veggies. You can steam them for a few minutes until they’re tender. It’s okay if they retain a little crunch; this helps in keeping their vibrant colors and nutrients intact.
Here’s a quick tip: If you have a blender, you can blend the cooked veggies with a tiny bit of cooking water to create a smooth sauce that coats the pasta nicely. This will make it more palatable for younger babies who might be sensitive to texture.
Bringing It All Together
Once your pasta is cooked and your veggies are prepped, it’s time for the fun part! Toss everything together in a big bowl. You can add a sprinkle of cheese if your baby is okay with dairy, or even a splash of olive oil for a touch of flavor. The beauty of this dish lies in its versatility!
Now, you’re not just serving a meal; you’re creating an experience. Encourage your child to help out with the mixing. Kids love being involved in the process, and it may make them more excited to eat what they’ve helped prepare.
As an added bonus, if you’re planning a special event or a gathering, you might want to check out some creative ideas for baby showers. The pasta dish can easily be adapted for a festive occasion, ensuring that even the smallest guests are well-fed.
Making It Fun
Let’s be honest, kids can be fickle when it comes to food. One minute they’ll gobble up what you’ve made; the next, it’s like you’ve served them poison. To keep things interesting, try presenting the pasta in different shapes or using fun plates. What if you turned the meal into a game? You could ask them to find their favorite veggie in the bowl or guess how many colors they see!
Sometimes, serving with a side of a favorite dip can make all the difference. Think hummus or yogurt-based dips—these can be a hit!
Storing Leftovers
If you find yourself with leftovers (which might be rare if your little one loves this dish), fret not! Store the cooked pasta and veggies in an airtight container in the fridge. They generally keep well for a couple of days. You can even repurpose them into a new meal—mix with some scrambled eggs for a breakfast stir-fry, or blend them into a soup!
Conclusion
Getting your little ones to eat their veggies doesn’t have to be a chore, and with recipes like easy-peasy 5 veggie baby pasta, you’re on the right track. It’s satisfying to watch them enjoy something you’ve made with love (and a few sneaky veggies!). If you’re on the lookout for more pasta ideas that are toddler-approved, be sure to check out the recipe for Easy-Peasy 5 Veggie Baby Pasta (for kids, too!). And if you’re feeling inspired to try something new, the easy peasy pasta primavera recipe might be your next go-to dish. Remember, each meal is a new opportunity for your kid to discover flavors, so don’t stress too much—have fun with it! You’ve got this!
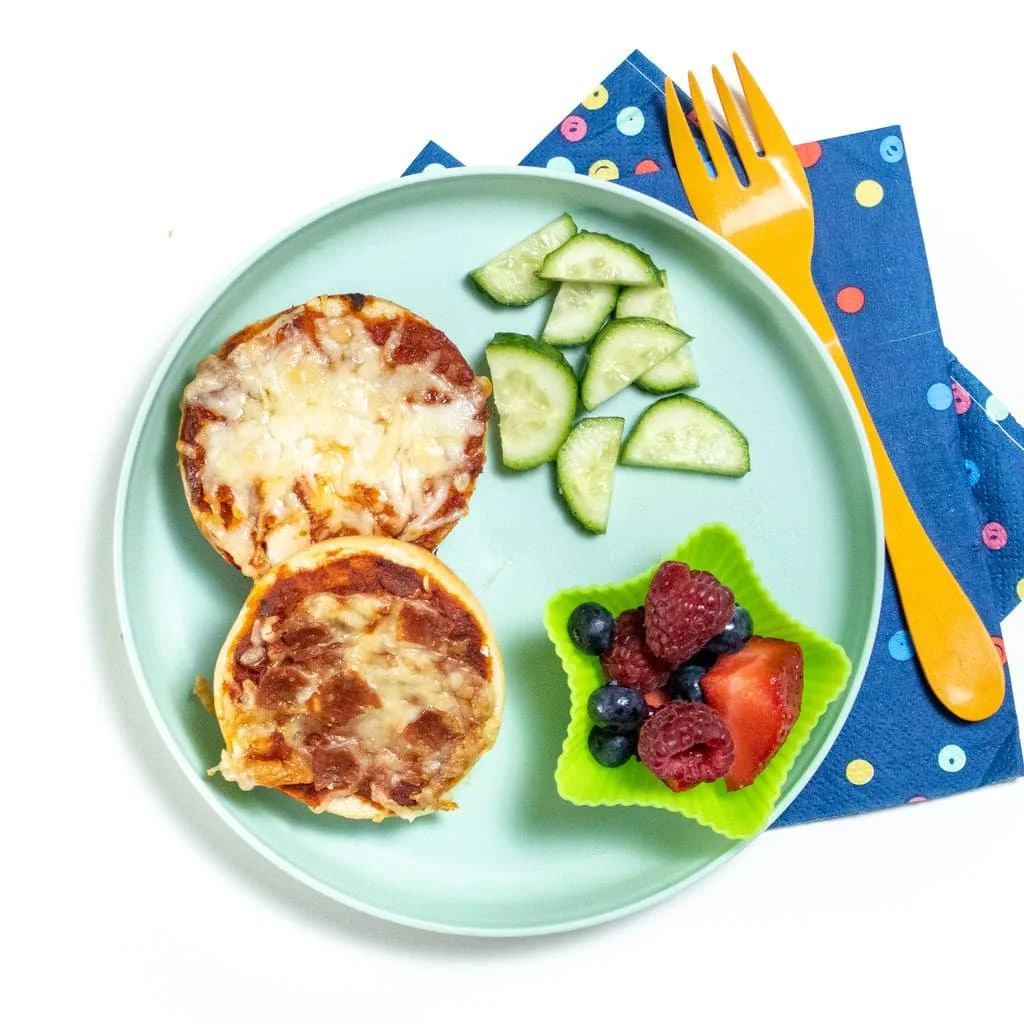
Easy Steps to DIY 10 Minute Pizza Bagel Bites for Busy Moms and Kids
Imagine this: It’s a busy weekday afternoon and you’ve just come home from a long day. As your little ones bustle around, you hear the familiar chorus of "I’m hungry!" ringing in your ears. Sound familiar? We’ve all been there, right? You want to provide a tasty snack, but you also need something quick and easy that’ll make your kids smile. That’s where DIY 10-minute pizza bagel bites come into play.
These delightful morsels are not only a hit with little ones, but they also give you the opportunity to whip up a fun meal without spending hours in the kitchen. Plus, you get to involve your kids in the process, making it a bonding activity as well. With just a few basic ingredients and simple steps, you can satisfy their cravings and have some fun along the way.
The Basics of Pizza Bagel Bites
So, what exactly do you need for these pizza bagel bites? The wonderful part about this recipe is its simplicity. You likely have most of the ingredients at home. Here’s a quick rundown of what’s involved:
- Mini bagels or regular bagels sliced in half
- Pizza sauce
- Shredded mozzarella cheese
- Your choice of toppings (think pepperoni, olives, or vegetables)
Tip: If you’re looking for creative lunch ideas, these pizza bagel bites can easily be adjusted with your child’s favorite flavors. For even more inspiration, you might want to check out this article on easy pizza bagels lunch ideas that suit busy schedules.
Get Started
Preparing Your Bagel Bites
Let’s get into the nitty-gritty of making these snacks. First, you’ll want to preheat your oven. Setting the oven to about 375°F (190°C) is perfect for achieving that crispy, gooey texture we’re all aiming for.
While the oven warms up, take your bagels and slice them if you haven’t already. Lay them on a baking sheet cut-side up. Then comes the fun part—adding the pizza sauce! Don’t be afraid to get generous with it; this is your chance to customize the flavors to your liking. Plus, the more sauce, the better the flavor.
After the sauce, sprinkle a hearty amount of shredded mozzarella cheese on top. Feel free to add your favorite toppings; whether it’s a few slices of pepperoni or diced bell peppers, make it personal!
Baking Your Delightful Creation
Place the baking sheet in the oven and in about 8-10 minutes, you’ll notice the cheese bubbling and turning golden brown. Keep an eye on them, as oven temperatures can vary. The sight alone will have your kids running to the kitchen, excited for snack time.
Once you take them out, let them cool for a minute or two—trust me, melted cheese can be deceivingly hot! Now you’re ready to serve these delectable bites, and I bet you’ll see smiles all around.
Fun Variations to Try
What’s even better about these pizza bagel bites is how versatile they are. If your kids are feeling adventurous, here are a few ideas to switch it up:
- Breakfast Bagel Bites: Top with scrambled eggs, cheese, and a little bacon or sausage.
- Veggie Lovers: Load them up with bell peppers, mushrooms, and olives for a healthier twist.
- Tex-Mex Style: Use salsa instead of pizza sauce, add cheese, and top with cooked ground beef and jalapeños.
The possibilities are endless! You could even create a DIY pizza bagel bar where each child gets to customize their own. It turns lunch into an engaging activity, and they’re more likely to eat something they’ve created themselves!
Engaging Kids in the Kitchen
As a parent, involving your kids in meal prep can be a game changer. Not only does it make the process more enjoyable, but it’s also a fantastic learning opportunity. They can practice measuring ingredients, discussing flavors, and even practicing some light cooking skills under your supervision.
Don’t forget to take pictures of the fun moments. These slice-of-life memories are the treasures we cherish! Plus, it can spark conversations about food and nutrition in a light, friendly way.
For parents who are preparing for baby showers, adding an element of DIY fun might be just as inspired as creating delicious snacks. You might want to explore budget-friendly DIY baby shower ideas that allow for creativity and personal expression in planning.
Conclusion
Creating DIY 10-minute pizza bagel bites can transform an ordinary day into something special as you whip up fun memories with your kids. Just imagine the joy on their faces, both from eating the tasty snacks and from participating in the cooking adventure. It really is a win-win for busy parents!
And if you’re looking to expand your repertoire in the kitchen, check out more creative options like Quick & Easy 10-Minute Pizza Bagel Bites or check out a 15-Minute DIY Bagel Bites Recipe for even more ideas! Happy cooking!
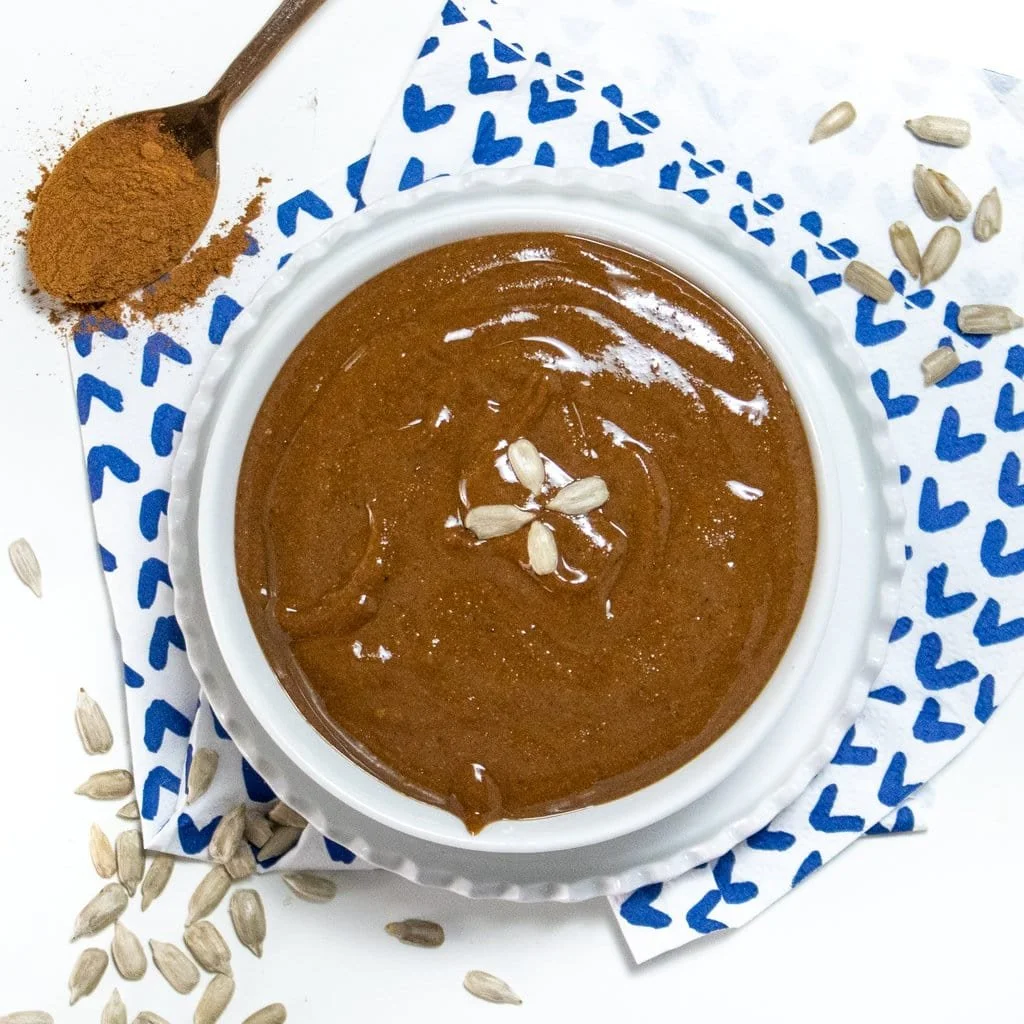
Easy Ways to Make DIY Spiced Sunflower Seed Butter for Busy Moms
Discovering the Joy of DIY Spiced Sunflower Seed Butter
Imagine this: It’s a lazy Saturday morning, and you’re rifling through your pantry looking for a wholesome snack for your little ones. You have a bag of sunflower seeds and spices, and suddenly, an idea hits you. How about creating your very own spiced sunflower seed butter? Not only is it a fun cooking project to do with your kids, but it’s also nutritious and packed with flavor. Here’s the thing: making your own nut or seed butter can be both satisfying and rewarding—and it’s easier than you might think! You may also find 77 Diy Baby Shower Ideas For Girls Budget Friendly useful.
Sunflower seed butter is an excellent alternative to peanut butter, particularly for kids with nut allergies, and offers a similar creamy texture along with its unique taste. Plus, it’s loaded with healthy fats, protein, and vitamins, making it an ideal choice for little ones. If the thought of introducing a new ingredient to their diets makes you a bit anxious, you’re not alone! We’ve all been there, wondering how to keep our kids’ snacks both nutritious and exciting.
But fear not! I’m here to share not just the recipe, but also tips, variations, and the joy you’ll feel when your kids take their first taste.
Gather Your Ingredients
Before we dive into the nitty-gritty of making this delightful sunflower seed butter, let’s gather what you’ll need. Here’s a simple list:
- 2 cups of raw sunflower seeds
- 1-2 tablespoons of honey or maple syrup (adjust according to your family’s sweetness preferences)
- 1 teaspoon of vanilla extract
- A pinch of salt
- Optional spices like cinnamon, nutmeg, or even cocoa powder for a twist
Feel free to adapt the ingredients as needed. You could even throw in some of your kids’ favorite flavorings! If you’re curious about how to incorporate more wholesome ingredients like oats into your family meals, consider checking out these great recipes that might inspire you!
The Simple Steps
Now that we have everything ready, let’s get to making this scrumptious sunflower seed butter!
Step 1: Toast the Seeds
To bring out the nutty flavor, start by toasting the sunflower seeds in a dry skillet over medium heat for about 5-7 minutes, stirring frequently. Keep an eye on them; you want them golden brown but not burnt! The smell will be heavenly and might even entice your little ones into the kitchen for a sneak peek.
Step 2: Blend it Up
Once toasted, transfer the seeds to a good-quality food processor. Here’s where the magic happens! Blend on high speed for about 5-10 minutes. The seeds will first turn into a meal, then begin forming a thick paste, and eventually turn into that creamy, delicious butter we’re after. Don’t forget to scrape down the sides occasionally to ensure everything gets blended evenly.
Step 3: Flavor it
Once you achieve the desired consistency, it’s time to add the honey or maple syrup, vanilla extract, and salt. If you’re adding any spices, toss them in as well! Blend again for another minute until everything is well incorporated.
Step 4: Storage
Transfer your homemade sunflower seed butter into a clean jar. It can be stored in the refrigerator for up to a month, although I doubt it will last that long once your kids get a taste of it.
What to Pair With Your Sunflower Seed Butter
So now you have this amazing spiced sunflower seed butter. But what can you do with it? Let’s be honest—just spreading it on bread is great, but why not get a little creative? Here are a few ideas:
- Fruit Dipper: Slice apples or bananas for a fun and nutritious snack.
- Yogurt Mixer: Swirl it into yogurt for an extra protein punch.
- Smoothies: Add a spoonful into smoothies for a creamy texture.
- Dips: Mix into oatmeal or use it as a dip for celery sticks.
With all these options, you can keep snack time interesting!
Mistakes to Avoid
When tackling your first DIY spiced sunflower seed butter, here are some common mistakes to watch out for:
- Not toasting the seeds: This enhances the flavor significantly.
- Over-processing: If you stop too early, you might end up with grainy butter instead of that smooth consistency.
- Adding too much sweetener: Start with a little and adjust according to your family’s taste preferences. You can always add more, but you can’t take it out!
Quick Tips for Success
- Use a powerful food processor: The more power, the smoother your butter will be.
- Experiment with flavors: Don’t hesitate to tweak the ingredients to suit your family’s taste. After all, cooking should be a fun adventure!
- Involve Your Kids: Let them help with mixing and tasting. This engagement could encourage more adventurous eating habits!
Conclusion
Making your own spiced sunflower seed butter is not just about creating a delicious snack; it’s a wonderful bonding activity you can enjoy with your children. Watching their faces light up when they taste something they’ve helped make is what parenting is all about! For those looking to dive deeper into the world of seed butters, you might find some interesting perspectives in this ultimate guide to seed butters. Additionally, if you’re eager to elevate the fun, explore a delightful recipe like Cinnamon Vanilla Sunflower Seed Butter that takes your homemade creation to another level of tasty! Enjoy the journey!

Quick Back to School Lunch Ideas Your Kids Will Actually Eat
Back to School Lunch Ideas to Delight Your Kids
Imagine this: it’s that time of year again—the back-to-school rush is upon us. As parents, we want our little ones to have the best start possible. We gather supplies, fight over the perfect backpack, and then comes that all-important task: packing their lunches. Let’s be honest, the lunchbox can either be a canvas for creativity or a battlefield! You may also find Delicious Back To School Lunch Recipes Kids Love useful.
Here’s the thing: nobody wants to find half-eaten lunches or sad remnants of squished sandwiches at pickup. You’re not alone in this—sneaking in nutrition while making food fun can feel like an uphill battle. But with a little planning and some tasty ideas, you can create lunches that your kids will actually look forward to.
Start with the Basics
When it comes to packing a lunch, having a go-to list of ingredients can save you major stress. Here’s a quick breakdown to make things easier:
- Proteins: Think deli meats, cheese, yogurt, or nut butter.
- Fruits & Veggies: Fresh options like apples, carrots, or grapes are great. Dried fruits can also add a nice touch.
- Grains: Whole grain breads, pasta, or brown rice can be the building blocks of a filling meal.
Now, you might be wondering about specific meal ideas—how do you combine all these ingredients into something your kids will love? Let’s dive into some fun and creative lunch ideas.
Delicious Variety
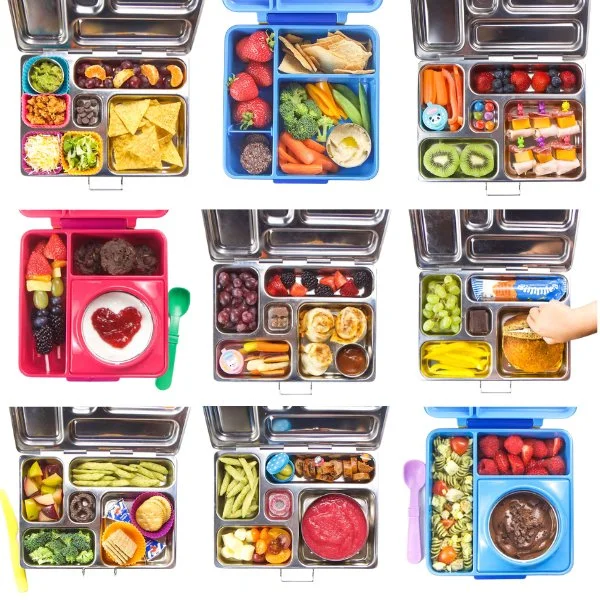
Picture this: a colorful bento box filled with small portions of different foods. Kids love variety! Consider making mini sandwiches using cookie cutters to create fun shapes, or you can try rolling up wraps with their favorite fillings. The best part is that you can mix and match to keep things exciting throughout the week!
For those days when you have a little more time, you might want to try some delicious back-to-school lunch recipes that are both easy to make and appealing to little eaters. If your kids love cheese, you can’t go wrong with some delightful cheesy options to include in their meals.
Snack Time Fun
Don’t forget about snacks! A good snack can be the highlight of a child’s lunch. What about packing some quick cheesy ham and cheese sticks? These are easy to make and can be a great source of protein. Kids love finger foods, so include some fruits or veggie sticks for good measure.
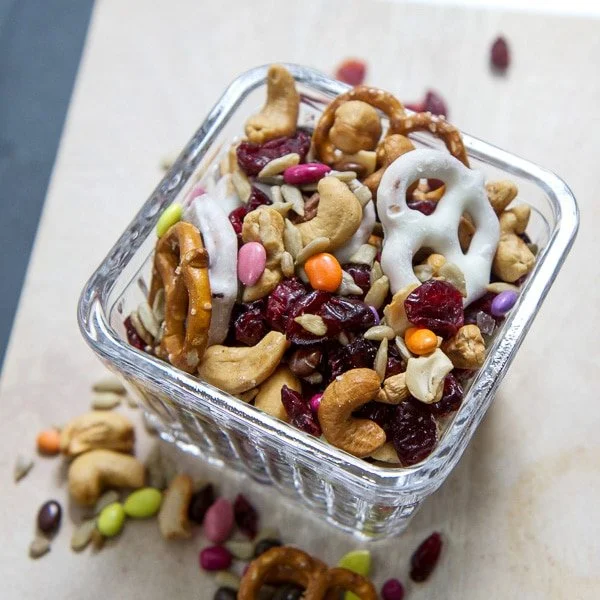
Another fun idea is to create a snack mix: combine some nuts, dried fruit, and a few pieces of chocolate or yogurt-covered raisins. They’ll think they’re getting a treat, and you’ll feel good knowing it’s a healthier option.
Meal Prepping Like a Pro
Let’s be honest—mornings can be chaotic! One way to make your life easier is to meal prep. Spend a little time on the weekend preparing several lunches in advance. You could portion out fruits, veggies, and proteins into containers. Your weekday self will thank you, trust me!
Batch cooking can also help. Consider making a couple of different meals that can be easily stored and reheated. Soups, pasta dishes, and grain bowls freeze well and can be packed in a thermos for lunch.
Fun with Themes
Sometimes, turning lunch into something playful can ignite your child’s enthusiasm. Why not create themed lunch days? For instance, have a “Taco Tuesday” where you include a few taco ingredients, or a “Pizza Friday” with mini pizzas made from pita bread. Themes can help children get excited about what they’ll be eating and make lunch something to look forward to.
Leftover Magic
Don’t forget about leftovers. They can be a lifesaver and often taste even better the next day. Whatever you’re having for dinner, think about how it might fit into your child’s lunch box the following day. Pizza, stir-fry, or even a pot roast can be repurposed into a lunch that’s both tasty and convenient.
Final Touches
Sometimes, the little details can make a big difference. Use fun napkins or write a sweet note to brighten your child’s day. These small touches show your love and can make lunchtime feel special.
Let’s be real, packing school lunches doesn’t have to be a chore. By incorporating some simple tips and tricks, you can transform the lunchbox into a source of nutrition and joy. Plus, involve your kids in the process; let them pick out their favorite fruits or help prepare their lunches. It can be a bonding experience and teach them about making healthy choices.
Conclusion
As the back-to-school season rolls around, it’s essential to have some fun, nutritious, and quick meal options ready for your child. If you’re looking for further inspiration, check out some great ideas on back to school kids lunch ideas. Additionally, for a variety of delicious recipes to try out, the Back To School Lunch Round-Up has got you covered. Remember, you’re not in this alone—many parents are striving to make mealtime delightful and nourishing. Happy lunch packing!
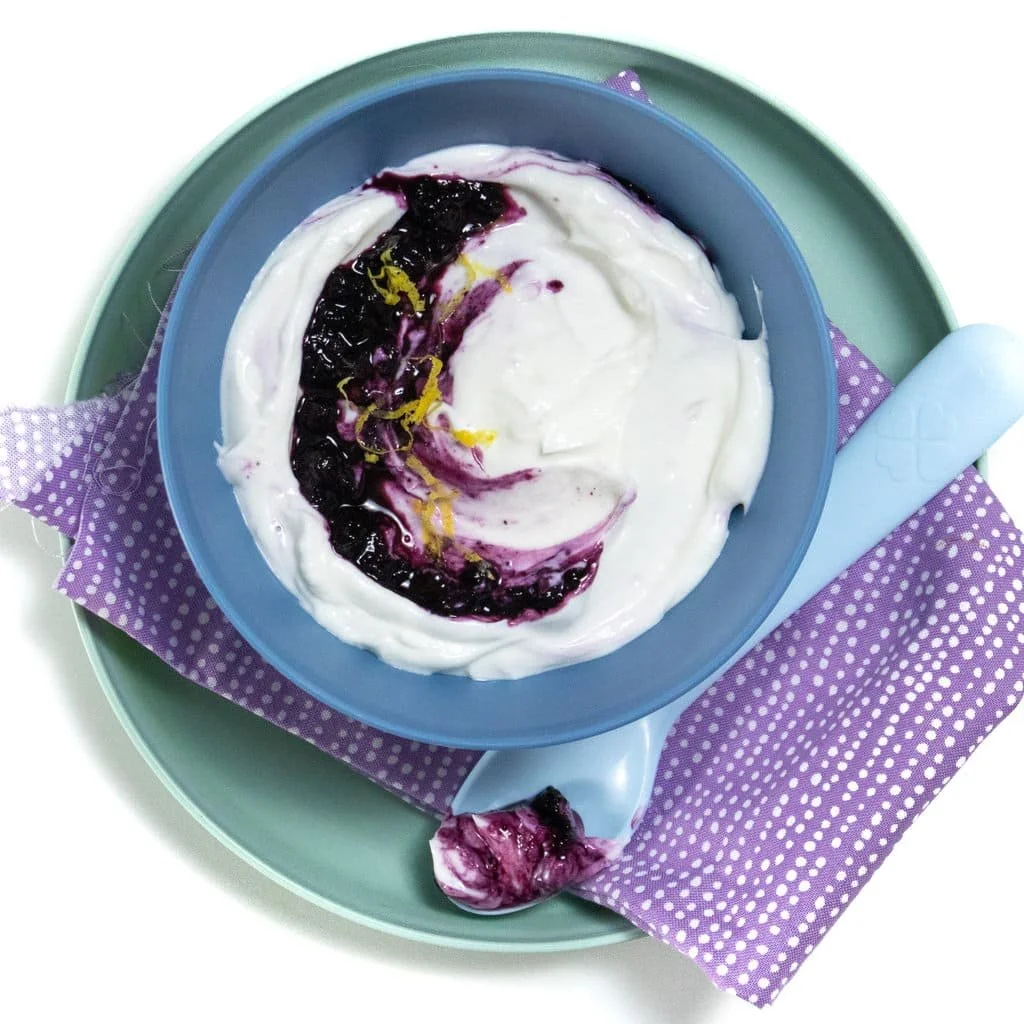
Swoon-Worthy Blueberry Greek Yogurt Hacks for Busy Moms to Try
A New Way to Enjoy Blueberries
Picture this: it’s a busy morning in your household, and everyone is running around in a frenzy trying to get out the door. Maybe you’re fighting with your toddler about brushing their teeth or negotiating three more minutes of screen time before breakfast. Sound familiar? Amidst all this chaos, you stumble upon a delightful treat that not only pleases the taste buds but also gives your little ones a nutritious start to the day: Blueberry Greek Yogurt.
Blueberries, often considered a superfood, are packed with antioxidants, vitamins, and minerals that are essential for your child’s development. They also make any meal seem more exciting. Now, you might be wondering how you can incorporate them into a yogurt dish that your kids will actually eat. Trust me; the combination of blueberries and Greek yogurt is not just delicious, but it can also be the secret weapon you need in your parenting arsenal.
The Health Benefits of Greek Yogurt
Let’s be honest, one of the main reasons we gravitate towards Greek yogurt is its creamy consistency and the health benefits it brings to the table. Greek yogurt is higher in protein compared to regular yogurt, which means it can help keep your child feeling fuller for longer. Plus, it contains probiotics, which are fantastic for gut health—something we parents should always keep in mind.
When paired with blueberries, you get an extra boost of nutrients. Blueberries are low in calories while being high in fiber, which is wonderful for digestion. The blend of the tartness of blueberries and the creamy tang of Greek yogurt is not only a match made in heaven but also a practical choice for breakfast or snack time. If you’re looking for more ideas on incorporating blueberries into meals, check out these tasty blueberry avocado mini muffins that can easily become a family favorite.
Crafting Your Swoon-Worthy Blueberry Greek Yogurt
Now that we’ve established why Blueberry Greek Yogurt is a great choice, let’s get to the fun part: making it! The beauty of this dish is its simplicity. You don’t need to be a master chef to whip up something delicious. Here’s a quick rundown of how to get started.
Ingredients you need:
- Plain Greek Yogurt: Choose a full-fat or low-fat version based on your preference.
- Blueberries: Fresh or frozen, the choice is yours! If using frozen, be sure to thaw them first.
- Honey or Maple Syrup: For a touch of sweetness. Adjust according to your child’s taste.
- Optional toppings: Think granola, nuts, or even more berries.
Simple Steps:
- Mix: In a bowl, combine Greek yogurt and blueberries.
- Sweeten: Add honey or maple syrup. Stir it gently; you want the yogurt to take on a beautiful shade of purple.
- Top: Sprinkle on any toppings your little ones enjoy, and voilà—you have a delicious and nutritious meal ready to serve!
Remember, presentation can make a huge difference. If you serve it in a fun bowl or layer it in a clear cup to show off those lovely blueberry swirls, it’ll feel like a treat rather than a chore for your toddler.
Incorporating More Healthy Ingredients
While the classic Blueberry Greek Yogurt is a hit on its own, there are so many ways you can customize this dish. For extra flavor and nutrition, consider mixing in:
- Chia Seeds: They add fiber and omega-3 fatty acids.
- Nut Butters: A spoonful of almond or peanut butter can add healthy fats and protein.
- Oats: Stir in some oats for an unexpected twist; this can also give it a nice texture.
Even better, this dish works wonderfully as a base for other creative recipes. For example, you might find toddlers love these easy healthy blueberry fritters that offer a different spin on the beloved berry.
FAQs
How can I make this yogurt dish more appealing for toddlers?
Try calling it “blueberry ice cream” or layer the yogurt with a bit of granola to create a parfait. Sometimes, a fun name will make all the difference.
Can I prepare this in advance?
Absolutely! You can prepare it the night before and store it in the fridge. The flavors meld beautifully, so you’ll find that it tastes even better after sitting for a while.
What if my child isn’t a fan of blueberries?
If blueberries aren’t a hit, consider switching them out for other fruits like strawberries or bananas. Greek yogurt is versatile and can be enjoyed with a variety of toppings!
Let’s Wrap It Up
Finding nutritious foods that kids will actually eat is no easy task, but incorporating delicious recipes like Blueberry Greek Yogurt can make it more manageable. It’s not just about getting food into their bellies; it’s about making sure they’re getting the right nutrients while enjoying the meals. Remember, parenting isn’t about perfection; it’s about progress.
As you continue on this journey, don’t forget to explore flavors and recipes that keep both you and your kiddos excited about what’s on their plates. If you’re looking for additional tasty ideas, check out these options: learn more about flavorful blueberry yogurt or indulge in a fun breakfast with this viral recipe for baked oatmeal.
Happy eating, parent friends!
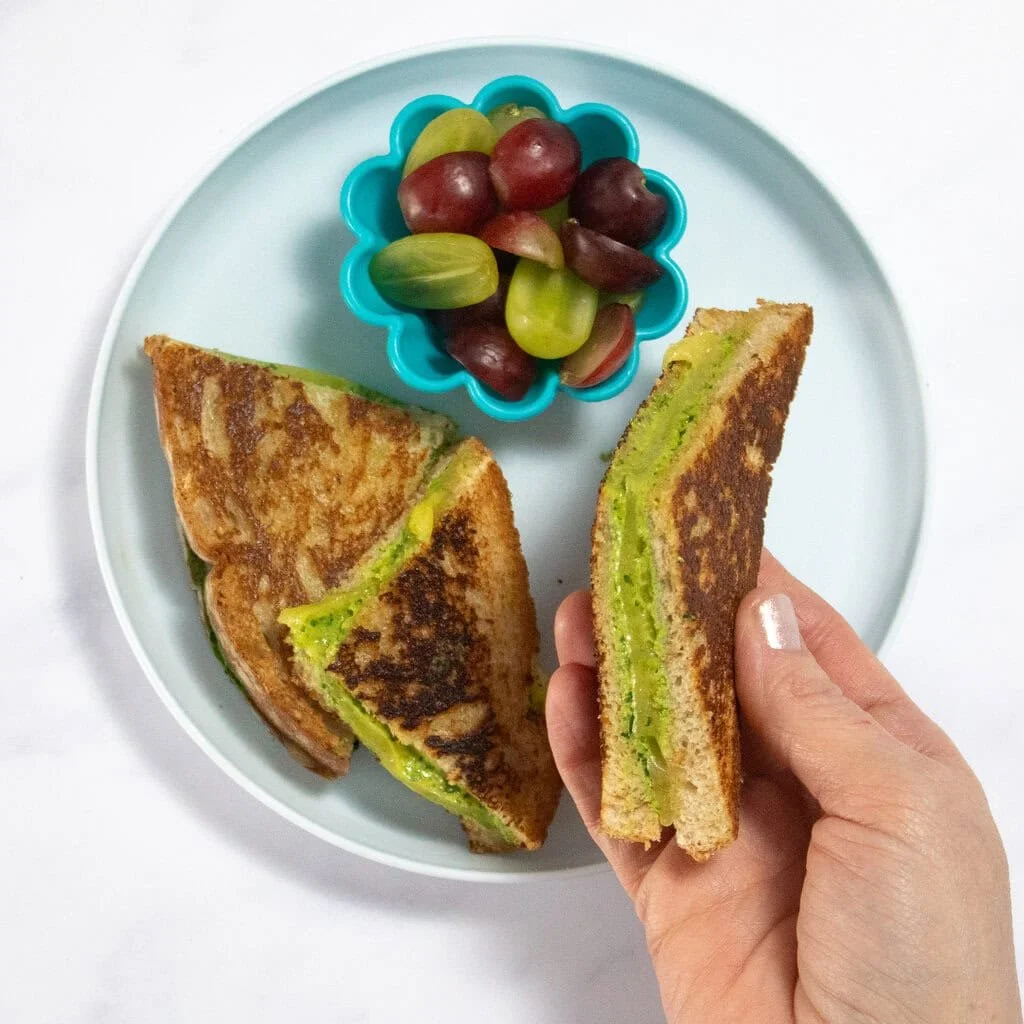
Easy Spinach Grilled Cheese Ideas Your Kid Will Love at Lunch
Imagine this: it’s lunchtime, and your little one is looking at you with those big, hungry eyes, ready for something delicious but somewhat nutritious. You want to serve them something that not only appeals to their taste buds but also packs in some good nutrients. Here’s the thing – I’ve been there, and I have a game-changer for you: my kid’s favorite spinach grilled cheese!
This delightful twist on a classic is the perfect way to incorporate greens into your child’s diet without them even noticing. Seriously, who wouldn’t love the gooey, melty cheese hugged by crispy, buttery bread? It’s comfort food at its finest with a secret healthy punch. Plus, it’s so easy to whip up that you’ll wonder why you didn’t try it sooner.
Choosing the Right Ingredients
Now, you might be wondering, "What do I need to make this deliciousness happen?" Don’t worry; the ingredients are simple and often already in your kitchen. Here’s what you need to grab:
- Fresh spinach: This leafy green is full of vitamins and minerals.
- Cheese: I usually go for a mix of mozzarella and cheddar for that perfect melt.
- Bread: You can pick your favorite – whole grain bread gives a nice health boost!
- Butter: For that golden-brown crispiness when grilled.
Preparing Your Spinach
Before we dive into the cooking part, let’s chat about how to prepare the spinach. Here’s a quick tip: it can be beneficial to sauté the spinach a little first. This not only wilts it down but also enhances its flavor. Plus, if your little one is particularly picky, this sautéing process can help disguise the spinach even more. Just heat a little olive oil in your pan, toss in the spinach, add a sprinkle of salt, and sauté for a few minutes until it’s nice and wilted.
It’s also wise to think of ways to make lunchtime exciting. I love to use colorful plates or funky shapes to present food. If you’re looking for more creative ideas, check out these rainbow grilled cheese ideas that can make your child’s meal extra fun!
Putting It All Together
Once you have your spinach sautéed and your cheese shredded, it’s time to assemble. Here’s how to make the perfect spinach grilled cheese:
- Start by buttering one side of each slice of bread.
- On the non-buttered side, layer your sautéed spinach and generous portions of cheese.
- Top with another slice of bread, buttered side up.
- Heat your skillet over medium heat and grill the sandwich until the bread is golden brown and the cheese is perfectly melty.
- Flip carefully and repeat on the other side.
The Taste Test
Just when you think you’re done, there’s one last step that’s super important: the taste test! You’ll want to let your little one help with this part. Cut the grilled cheese into fun shapes (a heart, perhaps?) and watch their eyes light up. Honestly, have a few bites yourself to ensure it’s as delightful as you expect it to be.
It’s not just about getting greens into their lunch; it’s about making it a fun experience. We’ve all been there with mealtime battles, and creating a playful atmosphere during lunch can change the entire mood.
Tips for Success
Here are a few tips to make your spinach grilled cheese even more appealing:
- Cheese Mixes: Combine different types of cheese for varied flavors. Cream cheese can be a great addition for extra creaminess!
- Extra Veggies: Sneak in more veggies like chopped tomatoes or bell peppers for added nutrition.
- Herbs and Spices: A pinch of garlic powder or dried oregano can elevate the flavor profile and make it truly delicious.
Remember the Essentials
While the sandwich is grilling, it’s good practice to keep an eye on the heat. Too high, and you’ll burn the bread before the cheese melts. Too low, and it’ll be a soggy mess. Finding that perfect medium is key, so don’t rush this step.
And hey, if you’ve got a baby learning about tummy time and the wonders of different foods, check out these 11 genius tips for stress-free tummy time which can complement your food adventures.
Conclusion
Spinach grilled cheese isn’t just a meal; it’s a blended experience of flavors, colors, and memories. As you experiment with different cheeses and perhaps serve it alongside a vibrant side like carrot sticks, you’re cultivating healthy eating habits that can last a lifetime.
Don’t forget, if you want to explore more ideas, you might want to try this delicious spinach grilled cheese recipe or check out an epic green grilled cheese recipe that’s sure to impress both you and your palate. Happy cooking!
Wild Birds Trail Mix for Busy Moms 10 Easy Recipes to Attract Birds
The Joy of Wild Birds Trail Mix
Imagine this: you’re enjoying a sunny afternoon in your backyard with your toddler. The sun’s shining, the birds are chirping, and your little one is giggling over a handful of colorful snacks. That’s where wild birds trail mix comes into play. Not only does it provide a tasty treat for your little one, but it also brings the beauty of nature right into your backyard. Here’s the truth—having a trail mix designed for wild birds can be a magical experience full of learning moments, laughter, and a little extra nutrition.
Understanding Wild Birds Trail Mix
So, what exactly is wild birds trail mix? At its core, it’s a blend of snacks specifically designed to attract various species of birds. This mix can include seeds, nuts, dried fruits, and grains, all of which are appealing to our feathered friends. But here’s the thing—you can also take inspiration from these mixes to create a playful, nutritious snack for your children.
Now, I know you may be thinking about how this ties into your parenting journey. Well, having a blend of wild bird snacks around can actually encourage curiosity about nature. It can foster a sense of wonder in your kids and open up the perfect opportunity for you to teach them about the different species of birds you might encounter in your area. If you’ve ever wondered how to make mealtime more fun and educational, giving your kids a taste of something like a healthy nut mix can align perfectly with that goal while you observe the birds around.
Benefits of Trail Mix for Wild Birds
From a parent’s viewpoint, using wild birds trail mix can bring multiple benefits.
Education: Children can learn about different types of birds and their eating habits. You can turn snack time into a learning experience by sharing facts about the birds that visit your backyard. What does a hummingbird eat? How about a woodpecker?
Connection to Nature: Watching birds can be incredibly calming. When your children see these beautiful creatures, it can spark empathy for wildlife. It’s a small step for them to understand the importance of caring for our environment.
Outdoor Fun: Why not combine a nature walk with bird-watching? You can create a fun scavenger hunt for different birds while enjoying snacks. It’s a great way to get kids outside and away from screens.
Making Your Own Trail Mix
While store-bought trail mix for wild birds is convenient, there’s something truly special about making your own. Not only can you customize it, but kids love being part of the process!
Ingredients to Consider:
- Nuts: Use unsalted peanuts, almonds, or walnuts. They are great sources of protein and healthy fats.
- Seeds: Sunflower seeds and pumpkin seeds are not only appealing to birds but also fun for children.
- Dried Fruits: Raisins, cranberries, and apple bits add sweetness and are packed with vitamins.
- Grains: Oats or whole-grain cereals can be an interesting addition and provide extra crunch.
When you involve your kids in the mixing process, it encourages them to try new flavors! Plus, creating this mixture could lead to a bonding experience, where they can express their preferences and learn about healthy eating.
Observing Birds in Your Backyard
Once you’ve prepared some trail mix, set up a bird feeder or simply spread it on a flat surface in your yard. Sit back and watch. You might be greeted by a flurry of feathered visitors!
To encourage those beautiful creatures to come, consider these tips:
Choose the Right Feeder: Make sure the feeder is designed for the mix you’ve prepared. Some birds prefer platforms while others may like hanging feeders.
Regular Refills: Keep an eye on your feeder and refill it regularly. Birds will become familiar with your yard, and before you know it, you’ll have your very own birdwatching spot right outside your window!
Be Patient: Not every bird will come immediately. Sometimes you’ll have to wait. This is a great opportunity to teach your kids the value of patience—and hey, what a beautiful lesson in life!
Bird-watching can spark wonderful discussions among family members. Share stories, swap facts, and let the inspiration flow as easily as the happiness in your little corner of the world.
Exploring Further
Are you interested in diving deeper into the enchanting world of birds? There are numerous resources available that can help you and your child learn more about various species and how to care for them. A family trip to a local nature reserve can add to the excitement, creating lasting memories together while you explore trails and spot interesting wildlife.
Remember, introducing children to nature doesn’t have to be structured or formal. Sometimes, simply setting up a comfy spot with a view can foster a sense of connectedness with nature you might not have expected. Not to mention, it keeps them entertained!
Encouraging Curiosity
Involving kids in the process of caring for wildlife around them is a delightful way to enhance their understanding of the world. You could turn each visit from a bird into a little celebration!
Imagine this: every time a new bird visitor shows up, let your children make a celebratory banner or start a journal tracking their species. These activities spark creativity while also reinforcing their observational skills.
Of course, there might be challenges along the way. Some days will yield a lot of bird activity, while others might feel quiet and still. Don’t be discouraged; just remember that you’re instilling a sense of wonder and appreciation in your children!
Sharing the Love of Nature
Ultimately, wild birds trail mix can be a catalyst for countless joyful moments and conversations in your home. It generates a space where kids can learn and explore and creates a healthy snack option both for them and the visiting birds.
Enhancing your child’s nutrition is critical, and a fun snack inspired by nature can be a hit! Just add it to your list of nurturing their developing taste buds, and watch how the simple act of sharing a snack can bring forth interest in the natural world.
Conclusion
As you embark on this delightful adventure of birdwatching, consider picking up some nutritious wild bird food options to enhance the experience. For instance, the Bird Lover’s Blend® Woodpecker & Songbird Trail Mix offers a great mix of nutrients to attract your feathered friends. Additionally, you might want to check out the Duncraft Hi-Energy Trail Mix Wild Bird Food for something that can keep your birds buzzing with energy. Enjoy the moments spent in nature and the joy of sharing these experiences with your kids!
School Lunch Ideas Kids Actually Eat for Stress-Free Mornings
30 School Lunch Ideas Kids Actually Eat
Imagine it’s the night before school, and you find yourself staring blankly at the fridge. It’s filled with various ingredients, but you know all too well that packing lunch for your little ones will be a repeat of the previous day’s struggle. Sound familiar? We’ve all been there, trying to strike the right balance between nutritious, fun, and appealing. Here’s the thing: kids can be surprisingly picky, and what was once a favorite can quickly become a rejected food item. So how do we tackle this lunch packing dilemma? You may also find Kids Lunch Ideas For School 2 useful.
Let’s explore 30 creative school lunch ideas that kids will actually eat, ensuring that lunchtime isn’t just another chore but something they look forward to every day. You may also find Kids School Lunch Ideas Picky Eaters Fun useful.
Easy Wraps
Turkey and Cheese Wrap: Use a whole wheat tortilla, spread some hummus or cream cheese, then layer sliced turkey and cheese. Roll it up tightly, and voilà! Ideal for tiny hands.
Veggie Wrap: Load a tortilla with a mix of fresh spinach, shredded carrots, and any other colorful veggies your child loves. Add a spread for flavor, roll it up, and they’re ready to eat!
PB&J Roll-Up: Spread peanut butter and jelly on a tortilla, roll it up, and slice it into pinwheels. Just be sure the school allows peanut products if you decide on this classic favorite!
Fun Bento Boxes
Mini Pita Pockets: Stuff mini pita pockets with chicken salad or tuna salad. Add some baby carrots on the side for an extra crunch.
DIY Pizza Box: Pack mini bagels or English muffins with a small container of pizza sauce, shredded cheese, and pepperoni. Let your kid assemble their mini pizzas right at the lunch table.
Fruit and Cheese Kabobs: Skewer cheese cubes and bite-sized pieces of fruit on toothpicks for a fun, finger-friendly lunch.
Classic Sandwiches with a Twist
Ham and Cheese Sandwich with a Spin: Swap regular bread with a soft croissant or a bagel for a fun twist. Kids will enjoy the new flavors and textures.
Egg Salad Sandwich: Mix hard-boiled eggs with mayonnaise and throw in some diced pickles. Spread it on some whole grain bread for a delicious alternative.
Avocado Toast: Spread ripe avocado on whole grain bread and sprinkle with a little salt and pepper. You might even sneak in some cherry tomatoes on the side.
Packed Snacks
Veggie Sticks with Dip: Send along crunchy veggie sticks (like cucumbers, carrots, and bell peppers) with a small container of ranch or hummus for dipping.
Cheese and Crackers: This is an all-time classic! Include a selection of cheese cubes and some whole grain crackers. It’s simple yet effective.
Trail Mix: Make a homemade trail mix with nuts, seeds, dried fruits, and a few chocolate chips for a sweet touch. Kids love the combination of flavors.
Make-it-Yourself Options
Sushi Rolls: Use rice and seaweed to create simple sushi rolls filled with veggies and cooked chicken or avocado. Kids can be involved in making them at home, which adds to the fun.
Wrap Your Own Tacos: Include separate containers of taco shells, seasoned meat, cheese, and toppings. Kids enjoy building their own tacos at lunchtime.
Build-your-Own Salad: Pack lettuce, assorted toppings, protein (like grilled chicken or beans), and dressing in separate containers so they can mix their salads just the way they like.
Special Treats
Yogurt Parfait: Layer yogurt with fruits and a sprinkle of granola. It’s tasty and gives a break from heavy lunches.
Smoothie Bowls: Send a smoothie bowl filled with blended fruits and a container of toppings like chia seeds or coconut flakes on the side.
Mini Muffins: Bake a batch of mini muffins – think blueberry or banana – for a sweet yet healthy treat.
Breakfast for Lunch
Pancakes or Waffles: Pack a few mini pancakes or waffles with a side of maple syrup for dipping. They might even consider it a treat!
Breakfast Burrito: Scramble some eggs with cheese and veggies, wrap them in a tortilla, and slice for easy eating.
Cereal Mix: A mix of whole grain cereals with fruits on the side can make for a crunchy lunchtime option.
Cultural Inspiration
Falafel and Pita: Pack some mini falafels with pita bread and a side of tzatziki sauce for a delicious Mediterranean-inspired lunch.
Tortellini Salad: Include cold tortellini mixed with olives, cherry tomatoes, and a drizzle of olive oil. It’s a filling option that tastes great!
Minestrone Soup: Send over minestrone soup in a thermos for a warming meal during chilly days.
Themed Lunches
Taco Tuesday: Make it a day to remember by sending everything needed for tacos each Tuesday. Kids will love the theme and culinary adventure!
Pizza Day: Repeat the mini pizza idea weekly but vary the toppings to keep it exciting.
Breakfast Afternoon: Occasionally surprise them with a breakfast-inspired lunch packed with scrambled eggs, fruit, and muffins.
Quick and Easy Ideas
Leftover Stir-Fry: Pack leftover stir-fry with rice or noodles. Kids often love these fresh flavors from dinner the night before.
Chicken Nuggets: Cook up some homemade chicken nuggets or tenders. Pair them with a dipping sauce and some fruit to balance things out.
Quesadilla: Stuff a tortilla with cheese and any other leftovers (like beans or shredded chicken), then grill it. Cut it into triangles for easy self-serve eating.
Conclusion
Navigating school lunches can feel overwhelming at times, but it doesn’t have to be a constant source of stress. With these 30 school lunch ideas, you can make packing lunches a fun and engaging experience for both you and your kids. Remember, it’s all about variety and making food exciting! If you’re looking for even more inspiration, check out 35 Creative School Lunch Ideas Your Kids Will Actually Want to Eat or explore 72 Easy School Lunch Ideas Kids Will Actually Eat! You’ve got this!
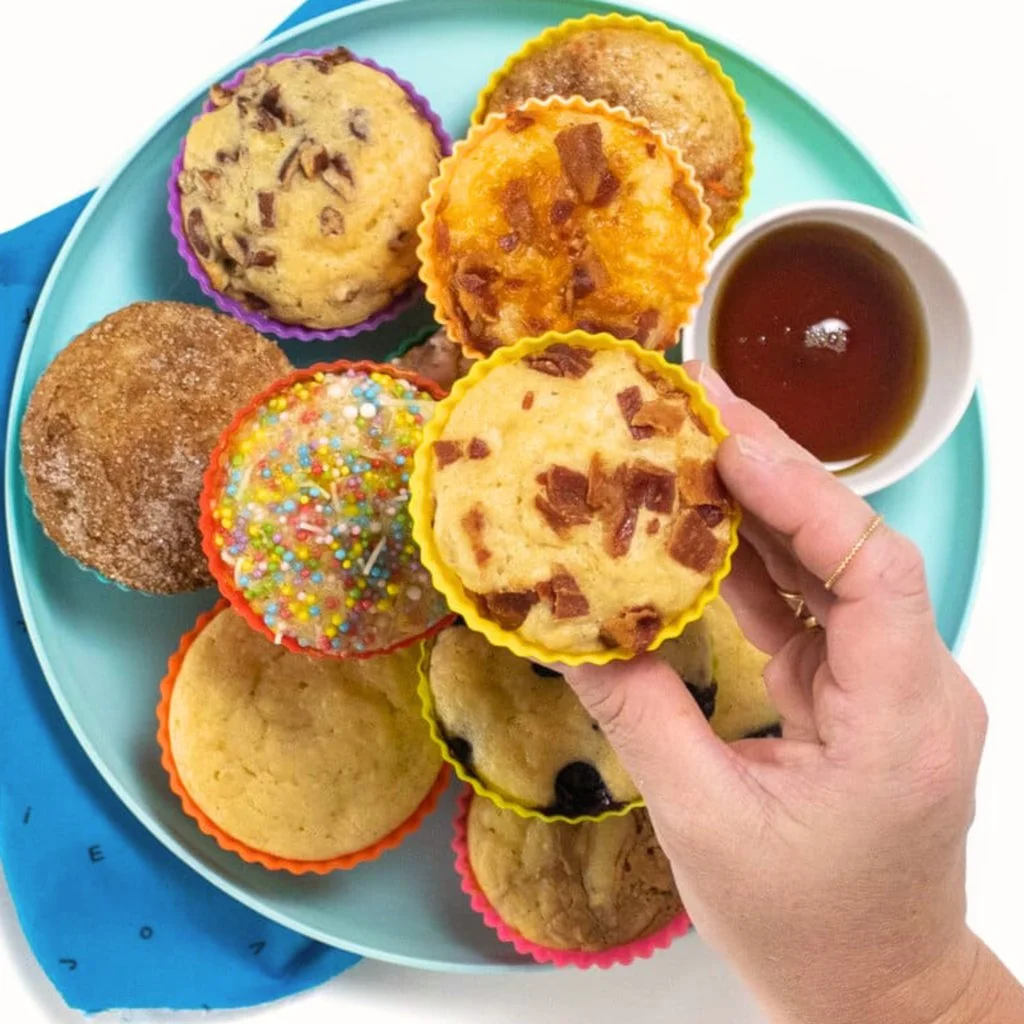
Kid-Loved DIY Pancake Muffins in 25 Minutes for Busy Mornings
Kid-Loved DIY Pancake Muffins in Just 25 Minutes
Imagine this: It’s a brisk Saturday morning, and you’re scrambling to make a breakfast that will tick off the picky eaters in your household. On the menu today? Pancake muffins — a delightful twist on the breakfast classic that will have your kids coming back for seconds (and maybe even thirds). These little gems are quick to whip up and are packed with flavors that your little ones will adore. Let’s dive into how you can make these tasty treats in just 25 minutes! You may also find 77 Diy Baby Shower Ideas For Girls Budget Friendly useful.
Why Pancake Muffins?
Pancake muffins bring together the best of both worlds. They’ve got that fluffy, comforting vibe of a classic pancake but come in a fun, portable muffin form. Plus, they’re easy to customize with various fillings, making them perfect for both adventurous and selective eaters. I mean, let’s be honest — what kid can resist a muffin? Now, you might be wondering how to pull this off in such little time. Well, grab your apron, and let’s get started!
Easy Ingredients for Pancake Muffins
You don’t need a fancy list of ingredients to make delightful pancake muffins. Here’s a simple list to kick things off:
- 1 cup all-purpose flour
- 2 tablespoons sugar
- 1 tablespoon baking powder
- 1/2 teaspoon salt
- 1 cup milk (or a milk alternative)
- 1 large egg
- 2 tablespoons melted butter or vegetable oil
- Optional: Blueberries, chocolate chips, or chopped bananas
Cooking Directions
Here’s how to whip up these pancake muffins in a flash:
Preheat your oven to 350°F (175°C). Grease your muffin tin or use muffin liners to make cleanup easier.
Mix the dry ingredients: In a large bowl, whisk together the flour, sugar, baking powder, and salt.
Combine the wet ingredients: In another bowl, stir together the milk, egg, and melted butter.
Combine the wet and dry ingredients: Pour the wet mixture into the dry ingredients and mix until just combined. It’s okay if the batter is a little lumpy.
Add the fun stuff: If you’re adding blueberries or other fun mixes, gently fold them in now.
Fill the muffin tin: Divide the batter evenly into the muffin cups, filling each about two-thirds full.
Bake: Place in the oven and bake for about 15-18 minutes, or until the tops are golden brown and a toothpick comes out clean.
Cool & Enjoy: Let them cool for a few minutes, then take a bite of happiness!
Mix and Match Flavors
One of my favorite things about pancake muffins is how versatile they can be. Here are some ideas to get creative:
- Banana Nut: Mash a ripe banana into the batter and toss in some chopped walnuts for a delightful crunch.
- Chocolate Chip: Stir in your kid’s favorite mini chocolate chips for a sweet treat they’ll love.
- Berry Blast: Use a combination of raspberries, strawberries, and blueberries for a fruity explosion.
- Cinnamon Swirl: Mix in a teaspoon or two of cinnamon with a swirl of brown sugar for that cozy flavor.
These yummy variations make them exciting, and you can even make them together as a family activity!
Serving Suggestions
Now that you’ve baked these delicious pancake muffins, you might be wondering how to serve them best. Here are some ideas:
- Dip It: Consider serving them with syrup or yogurt for dipping — children love to create their own unique bites!
- Toppings Galore: Place out some toppings like whipped cream, fresh fruits, or sprinkles. Letting your kids customize their muffins could turn breakfast into a fun activity.
And speaking of breakfast creativity, if you’re looking for even more ideas, check out these baby pancake recipes!
Quick Tips for the Best Pancake Muffins
- Don’t Overmix: Mix until just combined to keep the muffins light and fluffy.
- Experiment with Yogurt: For a healthier spin, substitute half the milk with yogurt.
- Get Creative with Add-ins: Consider things like shredded coconut, chopped apples, or even a touch of peanut butter for unique flavors.
Storing Your Pancake Muffins
So, you’ve made a batch (or two). What now? If you’ve got leftovers, simply store them in an airtight container at room temperature for about two days. You can also freeze them for up to three months. Just pop them in the microwave before serving, and they’ll taste freshly baked!
When You Need a Last-Minute Snack
We’ve all been there — everyone’s hungry, and you need something quick. Having a stash of pancake muffins in your freezer is like having a secret weapon in your parenting toolbox. Just heat them up, and voilà! You have a warm, nutritious treat that’s ready in seconds.
Why Your Kids Will Love Them
Kids love to eat what they can see and touch. The fun format of mini muffins allows them to feel more engaged with their food. Plus, they get a kick out of being able to choose their add-ins and toppings. You’re not just serving them breakfast; you’re providing an experience.
Conclusion
Pancake muffins are a quick and enjoyable way to satisfy your kids’ breakfast cravings without the stress. They’re perfect for busy mornings or as an after-school snack. If you’d like to explore even more tempting breakfast ideas, I recommend checking out Kid-Loved DIY Pancake Muffins for some added inspiration. Also, for a broader range of kid-friendly breakfast options, see the list of 35 Breakfast Recipes My Kids Love. Happy cooking!
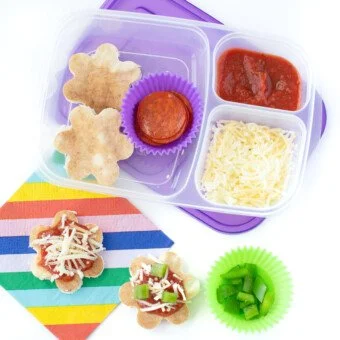
Quick 5-Minute Homemade Pizza Lunchables for Busy Parents Everywhere
Imagine this: It’s a busy afternoon, and the kids are getting restless. You’ve got a million things on your mind, from laundry to dinner prep, but your little ones are hovering around your legs, asking for something fun to eat. Sound familiar? We’ve all been there, trying to find that perfect balance between nutrition and a snack that feels special. That’s where these 5-Minute Homemade Pizza Lunchables come in. They’re quick, customizable, and so much fun for the kids—plus, you’ll feel good about what they’re eating.
The Joy of Homemade Lunchables
Let’s be honest—store-bought Lunchables can be convenient, but they often come loaded with preservatives and fewer nutrients than we’d like. This is a real concern for parents who want to offer wholesome snacks without sacrificing convenience. So why not swap them out for a homemade version that packs in the goodness? You can control the ingredients while keeping it super simple.
Not only do kids love the idea of assembling their lunch, but it also gives them a sense of independence and creativity. You can even involve them in the process, which adds an extra layer of fun. If you find yourself in need of more ideas for meals your kids can help prepare, check out this easy recipe for kid-friendly pizza pasta salad.
What You Need
Creating homemade pizza Lunchables requires just a few simple ingredients and some creativity. Here’s a quick rundown of what you’ll need:
- Base: Choose crackers, pita bread, or mini pizza bases. Whatever your kids enjoy!
- Sauce: Marinara or pizza sauce works perfectly here. If your kids are adventurous, let them try BBQ or even ranch!
- Toppings: Grab some shredded cheese, pepperoni, bell peppers, olives, or whatever toppings your kids love. The beauty of this is that everyone can customize their own!
Quick Tips for Preparation
You’re probably wondering how to make these lunchables without spending a lot of time. Here are some tips to streamline the process:
Batch Prep: On the weekends, consider prepping ingredients ahead of time. Chop vegetables, portion out cheese, and pack them into little containers. This way, you’ve got a lunch option ready to go during the week when things get hectic.
Mix and Match: Keep things interesting by varying the ingredients weekly. One week, use whole grain crackers; the next, switch to something like mini naan or even tortillas. This helps reduce meal fatigue.
Incorporate Healthy Options: If you feel like enriching their lunch, add fruits and veggies. Sliced cucumbers, bell peppers, or grape tomatoes can be a fresh addition, keeping lunch balanced.
Make It Fun
Presenting food in a fun way can make a huge difference in how much your kids enjoy their meal. Try using cookie cutters to create fun shapes from cheese or bread. Alternatively, you can arrange the toppings so they spell out the kids’ names—or even create a smiley face with the toppings!
Engagement Tip: Ask your kids how they would like to personalize their Lunchables. Get them involved and excited about making their own choices. You might find that they’re more likely to try new things if they’re part of the creation process.
Ways to Elevate Your Pizza Lunchables
If you’re looking to elevate the usual lunchtime fare even further, consider a few of these ideas:
- Dips Galore: Instead of just pizza sauce, include different dips to try with the pizzas. Hummus, guacamole, or even a homemade tzatziki sauce can be delicious partners to the meal.
- Themed Lunches: Sometimes, a little flair goes a long way. Consider doing themed lunches (like Italian Day with antipasto items) or mini-tasting parties that introduce a variety of ingredients.
Feeling a bit overwhelmed? You can also explore these easy homemade baby food recipes if you have younger ones in your household. Having accessible recipes can not only help with nutritious choices but also build essential cooking skills as they grow.
Bonus Idea: Pizza Lunchables for Celebrations
Over time, you’ll likely find that these pizza Lunchables are great for more than just a simple snack. They’re perfect for playdates, birthday parties, or any casual gathering. Set up a “build-your-own” bar where kids can create their pizza, making it an interactive and memorable experience. Plus, it automates the process of meal prep significantly as you can set everything out buffet-style.
Final Thoughts
5-Minute Homemade Pizza Lunchables are not just a meal; they are an opportunity for learning, creativity, and fun. They allow your children to both enjoy their food and explore the cooking process, blending nutrition and enjoyment seamlessly. So next time you’re in a pinch, remember that you have the ultimate weapon against hunger (and boredom) right at your fingertips!
Conclusion
While crafting these delightful Lunchables, you may also want to check out other creative lunch ideas. The world of homemade lunches is vast, and there are some fantastic resources available. For an easy 5-minute homemade pizza version, visit Baby Foode. Additionally, if you’re looking to expand your knowledge on DIY lunches beyond pizza, you can find inspiration in the article on making 5-Minute DIY Homemade Lunchables.
Happy cooking!
