

Easy 2-Ingredient Baby Ice Cream Ideas for Healthy Snacks Today
Picture This
It’s a sweltering summer afternoon, and you hear your little one’s pleas for something sweet and cool. You don’t want to give them just anything, so you’re stuck at the crossroads of being a loving parent and a health-conscious one. Sound familiar? We’ve all been there! Now, what if I told you there’s a way to whip up an ice cream treat that’s both delicious and healthy, using just two ingredients? That’s right—I’m talking about baby ice cream!
Making baby ice cream is as simple as it gets, and you probably have the ingredients you need right in your kitchen. Plus, it’s a fantastic way to introduce your child to healthier snacks while giving them the joy of enjoying a frozen treat. Let’s dive into this fun, easy recipe that you can make today!
The Basics of Baby Ice Cream
Before we get into specifics, it’s helpful to know why making baby ice cream is a great choice. First off, you can control what goes into it, ensuring there are no hidden sugars or artificial flavors. As parents, we want our little ones to develop a healthy relationship with food, and this simple recipe helps with that.
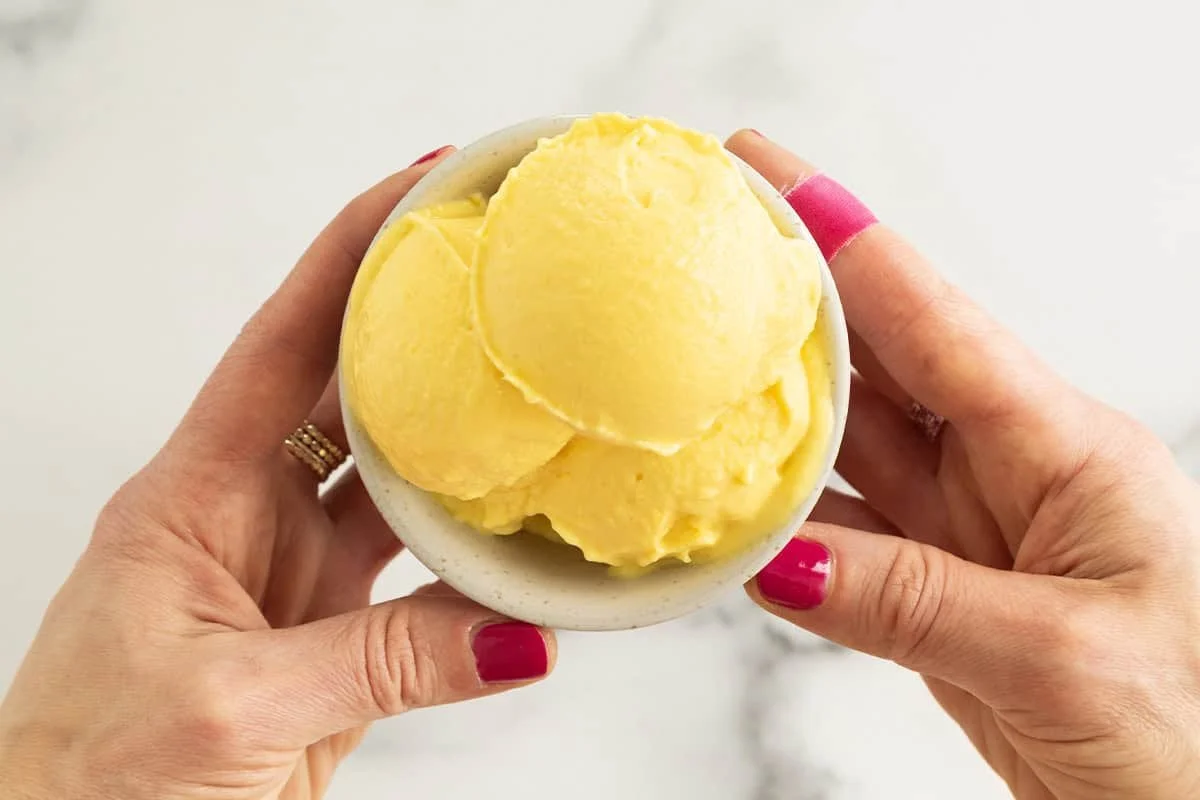
You might be wondering how to make this dreamy delight. Well, the base is deceptively easy! By using just ripe bananas and a splash of your child’s favorite milk (dairy or non-dairy), you can create a creamy texture that mimics traditional ice cream but without the guilt. If you’re interested in ways to make baby food even more enjoyable, check out these easy chicken baby food recipes for more inspiration!
Making Baby Ice Cream
Ingredients
For a super-easy batch of banana baby ice cream, all you need is:
- 2 ripe bananas
- ½ cup of milk (your choice of dairy or non-dairy)
Directions
- Prep the Bananas: Start by peeling your ripe bananas and cutting them into small pieces. This helps them blend more easily.
- Blend: Place the banana pieces in a blender or food processor, and pour in your milk. Blend until smooth and creamy. You want the consistency to resemble soft serve.
- Freeze: If you want a firmer ice cream, pour the mixture into an airtight container and freeze for about two hours. If not, you can enjoy it right away!
Variations to Try
This is where the magic really happens! You can personalize this recipe in numerous ways. Mix in some peanut butter, cocoa powder, or even pureed fruits to switch things up. Imagine combining banana and strawberries for a tangy twist! For this, you could use additional ingredients and create a delightful party treat for your next gathering.
The Benefits of Homemade Ice Cream
Nutritional Value
One of the greatest perks of making ice cream at home is knowing exactly what goes into it. With ripe bananas as your base, you’re providing potassium, fiber, and essential vitamins. Unlike store-bought options, which can be loaded with sugars and preservatives, homemade baby ice cream is a wholesome treat you can feel great about serving your little one.
Encouraging Healthy Eating Habits
By making your own ice cream, you’re not only serving a tasty treat, but you’re also teaching your child that healthy snacks can be delicious. The more you expose your baby or toddler to natural flavors, the more likely they are to develop a preference for them as they grow. It’s a win-win situation!
Creative Serving Ideas
Fun Serving Methods
When serving baby ice cream, it’s nice to make the experience as interactive and enjoyable as possible. Try pouring the ice cream into fun molds to create playful shapes. Picture a bright, sunny afternoon with your little one holding a charming star-shaped ice cream. It’s not just the taste but the delight on their face when they see it that makes this fun!
Ice Cream Cones for Babies
You can even let your child enjoy it in a soft cone or unsweetened wafer, introducing them to a classic ice cream experience. Just be sure to supervise closely to avoid any choking hazards.
Toppings to Consider
Depending on your child’s age and chewing capabilities, let them decorate their ice cream with toppings. Think crushed nuts (as a fun, crunchy texture), small pieces of fruit, or even a sprinkle of cinnamon for some warmth.
Tips for Success
Picking the Right Bananas
Ensure you choose ripe bananas for maximum sweetness. A banana that’s speckled with brown spots is perfect because they’re naturally sweeter and make the creamiest ice cream!
Storage
If you make a big batch, store it in an airtight container. However, homemade ice cream can harden quite a bit in the freezer, so let it sit out for about 5-10 minutes to soften before serving again.
Common Mistakes to Avoid
- Using Unripe Bananas: They won’t blend smoothly and won’t taste sweet.
- Not Freezing Long Enough: If you want a firmer consistency, make sure to freeze your ice cream for the right amount of time.
- Over-blending: While you want it smooth, over-blending can cause the mixture to become too liquidy.
Conclusion
Making baby ice cream is not just a fun, creative activity; it’s an opportunity to foster healthy eating habits from an early age. You can explore additional recipes to keep mealtime exciting and nutritious. For instance, why not try making two-ingredient banana ice cream or even a strawberry banana variation to mix things up? Enjoy those sunny afternoons with your little ones, knowing you’re giving them a treat that’s as nutritious as it is delicious!
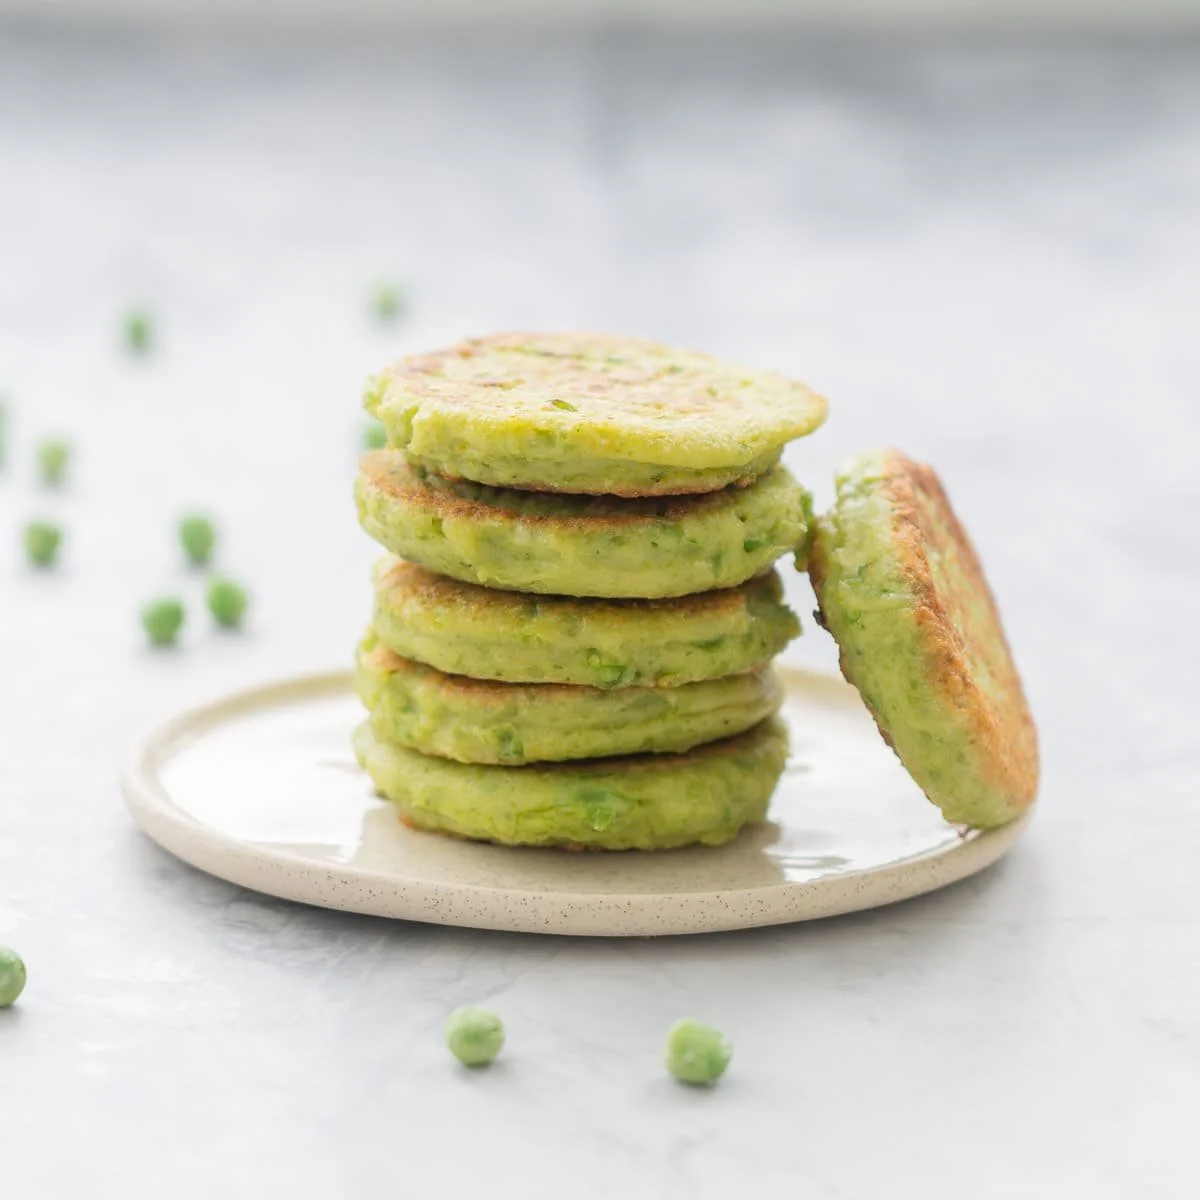
Pea fritters
Imagine it’s a busy evening, and the kids are bouncing off the walls after a long day. You’re wondering what to whip up for dinner that’s not only quick but also something they’ll actually eat. Here’s the thing: pea fritters might just be the answer you’ve been looking for. They’re simple to make, packed with nutrients, and they can be incredibly fun for kids. Plus, you can sneak in those greens without any complaints!

The Benefits of Pea Fritters
Peas are an excellent source of vitamins and minerals, making them a great addition to your little one’s diet. They’re rich in protein, which is essential for growing bodies, and they contain fiber that helps with digestion. By introducing peas early on, you can help your child develop a taste for vegetables that will last a lifetime. If you’re unsure about when to start introducing peas to your baby, check out this informative piece on starting babies on peas.
Easy Pea Fritter Recipe
Now that we’re on the same page about how great peas are for your little ones, let’s dive into what makes a delicious pea fritter. They’re not just easy to prepare; they’re also versatile. You can serve them as a side dish, a snack, or even as a main meal. Here’s a quick recipe to get started:
Ingredients
- 1 cup of frozen peas (thawed)
- 1 cup of flour (you can use whole wheat or gluten-free if needed)
- 1 egg
- 1/4 cup of grated cheese (optional)
- 1/4 cup of chopped herbs (like parsley or mint)
- Salt and pepper to taste
- Oil for frying
Directions
- In a mixing bowl, mash the peas lightly with a fork.
- Add the flour, egg, cheese, and herbs. Mix well until combined.
- Heat oil in a skillet over medium heat.
- Drop tablespoon-sized amounts of the mixture into the skillet and flatten slightly.
- Fry until golden brown on each side, about 2-3 minutes per side.
Personal Tips for Making Pea Fritters
Getting kids involved in the kitchen can be a game changer! Depending on their age, you can let them mash the peas or mix the ingredients. It’s a great way to bond and create excitement around food. Personally, I find that when my kids are involved, they’re much more likely to try new foods.
You can also experiment with adding different flavors. For instance, try incorporating some spices like garlic powder or onion powder for added taste. If your little ones are fans of different veggies, feel free to mix in finely chopped carrots or zucchini. It’s fun to switch things up! And if you’re looking for another easy and healthy recipe for toddlers, take a look at these blueberry fritters.
Ways to Serve Pea Fritters
When it comes to serving, the possibilities are almost endless. You can pair pea fritters with a yogurt dip or a simple sauce of your choice. Sometimes I serve them with a side of fruit to give a fresh balance to the meal. The colorful presentation always attracts my kids’ attention. Engaging them with “What color do you see on your plate?” makes it even more enjoyable!
Making it a Family Affair
How about making fritter night a family event? Set up a “fritter bar” where everyone can customize their fritters with different toppings, dips, or side dishes. Create a fun atmosphere by playing some music, and let your kids get creative with their meals. It’s all about making mealtime something to look forward to instead of just a routine—trust me, you’ll notice happier faces at the dinner table!
Common Mistakes to Avoid
We’ve all been there: you make a new recipe, and it doesn’t turn out quite the way you envisioned. Here are a few common pitfalls to watch for with pea fritters:
- Too Much Flour: If the batter feels stiff, you may have added too much flour. You want it to be just thick enough to hold together but not dry.
- Inadequate Oil: Make sure the pan is well-oiled to avoid sticking. If it’s sticking, the fritters won’t cook properly and may fall apart.
- Skipping the Herbs: Don’t skip the flavor! Fresh herbs can elevate the taste dramatically, making the fritters much more enjoyable.
Conclusion
Incorporating pea fritters into your family’s meal rotation can lead to healthier eating habits without sacrificing flavor or fun. They’re a fantastic way to introduce new tastes while enjoying quality time together. For more inspiration, consider checking out recipes for crispy pea fritters and gluten-free baked green pea fritters. Get ready to watch the smiles on your little ones’ faces as they dive into their tasty creations!

Actually Fun Baby Shower Game Ideas for a Memorable Party
Are you in search of genuinely enjoyable baby shower games for 2025 and 2026?
Picture this: you’re planning a baby shower, and the pressure’s on to create a memorable day for the parents-to-be and all your guests. You’ve probably seen the usual games—guess the baby food, diaper raffles, and bingo—but let’s be honest, we can do better than that! The goal here is to create a lively atmosphere where everyone can genuinely have fun, create lasting memories, and escape from the ordinary tired tropes. So, let’s explore some distinctive baby shower games that will elevate your event into a truly exciting celebration.
Unique Baby Shower Games
Here’s the thing: when it comes to throwing a baby shower, it’s all about the element of surprise. Think outside the box! Some genuinely enjoyable baby shower games allow guests to engage and break the ice. One gem that stands out is "Guess the Baby Item." You can gather all sorts of baby items in a bag, and each guest takes turns guessing what they are by feeling through the bag. This game not only gets everyone talking, but it also adds a bit of mystery—plus, they’ll have a blast trying to identify what’s what!
Speaking of engaging activities, have you ever considered a "Baby Pictionary" game? It’s the classic game of Pictionary but with a baby-themed twist. Guests draw prompts like “changing a diaper” or “first baby steps” while others guess what they are. This truly is a surefire way to get everyone laughing and perhaps a little competitive!
Let’s not forget about tangibles—one of the best baby shower activities is creating a personalized message board. Set up a board where guests can write advice or well wishes for the new parents. This even turns into a lovely keepsake that they can cherish forever. Plus, you could tie this into a more interactive game where guests read out loud what they wrote later on.
For a mix of energy and movement, consider hosting a "Baby Olympics." Divide the guests into teams and set up baby-related challenges—who can bottle-feed a doll the fastest, or change a diaper on a doll within seconds? It’s all in good fun, and you’ll definitely get some great photos to commemorate the day.
Amusing Activities That Aren’t Games
Not everything has to be a game to be enjoyable! Some innovative baby shower activities can add a creative flair to your event. Try a "DIY Onesie Station," where guests can decorate simple white onesies with fabric pens or iron-on decals. This engages everyone and leaves the parents-to-be with a personalized wardrobe for their little one.
Perhaps you’re considering a “Photo Booth” area with props like baby bottles, bibs, and fun hats. Guests can let loose, snap some silly pictures, and create their own memories while celebrating the new arrival. It’s a great way to encourage social interaction and provide a tangible memory afterward felt even more special when shared in an album.
Another cool idea is to set up a "Message in a Bottle" station where guests can write notes, blessings, or wishes for the parents. They can seal their messages in a bottle that the parents can open on future anniversaries or milestones. It’s meaningful and perfect for creating heartfelt moments during the gathering.
To keep the ball rolling on memorable games, why not opt for some of the amusing baby shower games that provide a unique experience? These are not just your standard fare; take a look at these distinct activities that steer clear of the clichés and instead focus on creating those unforgettable laughs and moments.
Tips for a Fun Atmosphere
Let’s be honest—sometimes the key to a smashing baby shower lies in the atmosphere more than the games. So how can you foster a fun vibe?
Set Up a Theme: You don’t have to go overboard, but having a theme (like "woodland creatures" or "under the sea") can guide your decorations and games while enhancing the overall experience.
Create a Playlist: Background music can completely transform the energy of a space. Curate a fun playlist with upbeat tunes that resonate with all ages.
Icebreaker Activities: Sometimes, everyone just needs a little encouragement to join in on the fun. Icebreaker activities can help shy guests get a little more comfortable and engage with one another.
Provide Good Snacks: The food can make or break an event! Ensure you have a mix of sweet and savory options that accommodate dietary restrictions. Food should be a conversation starter, not a hassle.
Encourage Storytelling: Stories of birth, parenting challenges, and humorous anecdotes can bond everyone together. Encourage guests to share their stories, creating a lovely atmosphere of warmth and familiarity.
As you can see, there is a wealth of options for making any upcoming baby shower not just enjoyable but thrilling! These games and activities will surely keep everyone entertained and connected.
Next-Level Engagement
Now, you might be wondering how you can keep the energy high throughout the event. A crucial aspect of planning an unforgettable baby shower is ensuring there’s a good flow between the games and activities. Try setting timers for short rounds of each game so that guests are continually engaged and excited about what comes next.
Additionally, don’t hesitate to mix up the types of activities—a game followed by a crafting session or an emotional moment with guests will create a beautifully balanced atmosphere. You could also include some giveaways for winners across the games, adding a lovely competitive edge to the festivities.
One last idea to keep in mind is the popularity of productive co-ed parties. More and more, people are looking for shared experiences that can engage both men and women. Tailor your games and activities to accommodate diverse interests, ensuring everyone feels included.
Conclusion
To sum up, you have plenty of ways to incorporate fun into the baby shower experience while steering clear of the same old clichés. Dive deep into unique, engaging games and interactive activities that will create lasting memories for the parents-to-be and all your guests. For more inspiration, check out this resource on unique baby shower games, or explore a list of baby shower games that guests will actually want to play. Embrace the joy, the laughter, and the moments, and your celebration will be a hit!
Kids Tea Party Food Ideas They’ll Actually Love and Share Today
Imagine this: you’re planning a delightful birthday tea party or a fun playdate for your little ones. You’ve got decorations, and games in mind, but then the most important question arises—what on Earth should you serve? We’ve all been there, stressing about finding the right food that not only pleases the kiddos but is also easy to make. Let’s dive into some fantastic tea party food ideas that will keep the stress level low and the smiles high.
Sweet Treats to Brighten the Day
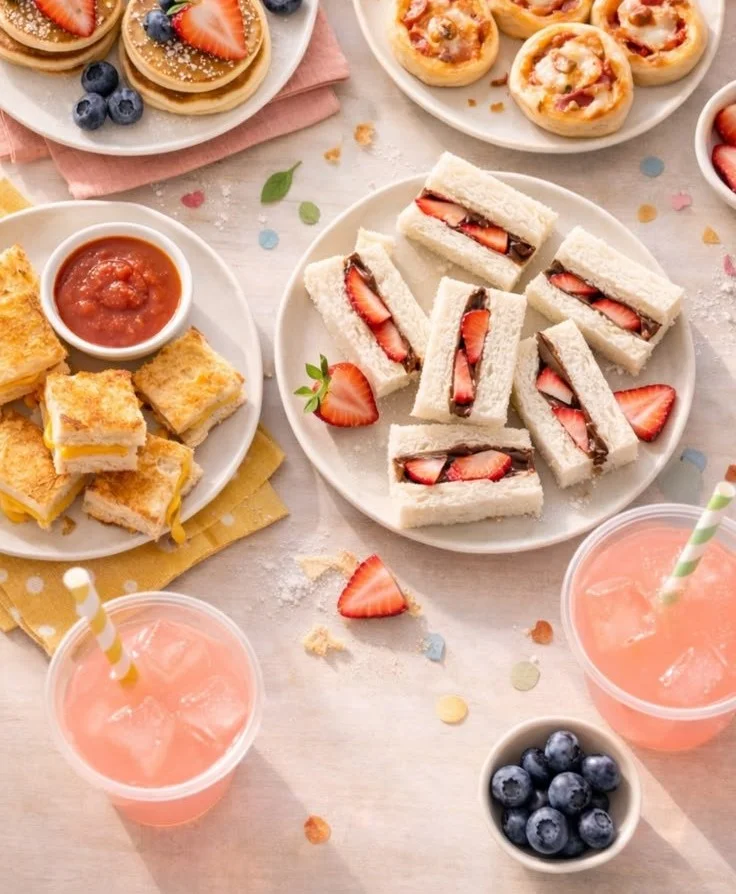
First up, let’s talk about sweet treats! Kids have an innate love for sweets, and a tea party wouldn’t feel complete without them. One (if not the best) go-to item is chocolate strawberry tea sandwiches. They’re as delightful to eat as they are to look at! Just imagine fresh, soft bread, spread generously with cream cheese and topped with juicy strawberries. They’re a perfect finger food and easy for little hands to manage.
Another fun idea? Mini pancake stacks! They can be made with a variety of toppings, like fruit, syrup, or even whipped cream. Kids love building their own pancake towers, which adds an interactive element to the meal. If you’re looking for even more fun food inspirations, check out these amazing picnic food ideas for kids that will surely spark some excitement.
Savory Snacks to Balance the Sweet
Now, let’s balance those sweet treats with some savory options. Kids often appreciate bite-sized foods that they can easily pick up. Grilled cheese bites are a classic choice. Just picture crunchy, golden triangles of cheesy goodness—definitely a hit with the young crowd! You can even mix things up by adding some veggie sticks on the side for a crunch that’s both healthy and fun.
Pizza pinwheels are another crowd-pleaser. These rolls are easy to make and even easier to devour. You can fill them with marinara sauce, cheese, and their favorite toppings, making them both customizable and exciting. With a bit of planning, you can even prep these ahead of time to reduce fuss on the day of the party.
Warm Finger Foods That Make Everyone Happy
What’s a tea party without warm food? Considering that little ones often have a love for anything cheesy and warm, mini quiches can be a great addition. They’re easy to eat and can be packed with delicious ingredients like spinach or ham without much fuss. Plus, they look fancy on the table!
And how could we forget about delightful meatballs? These are always a hit, whether served with toothpicks for easy eating or alongside some yummy dipping sauces. Kids enjoy them, and parents love how manageable and quick they are to prepare.
Creative Drink Options
No tea party is complete without refreshing drinks. You want to keep the kids hydrated but also offer something special. You could create a “tea” that’s really a flavorful fruit-infused beverage. Simply steep some fruit slices in warm water for a delightful mix that’s bright and appealing—perfect for their tiny little fingers to hold.
An easy and fun idea is to provide colorful "tea" cups filled with fruit smoothies. Not only are they nutritious, but they’re also visually appealing. Kids generally love the vibrant colors, especially if you let them choose their own toppings like granola or berries. It creates a fun DIY experience during the party!
Bonus Ideas to Enhance the Party
Thinking of going the extra mile? Why not encourage the little ones to get creative with their food as well? Another fun treat to consider is “banana sushi." It’s simple—just wrap a banana in a tortilla with nut butter, then slice it into bite-sized pieces. Kids love the fun of sushi-style rolls without any fuss, and it can be made ahead!
You might also want to explore some unique dessert options, like fruit kabobs or edible flower cookies. They add a touch of whimsy to the table setting while still being super tasty.
Wrapping It Up With Positive Vibes
Planning a children’s tea party does not have to be a daunting task. By offering a mix of sweet, savory, and fun finger foods, you’re sure to create an entertaining atmosphere that the kids will cherish. Remember, it’s all about keeping things lighthearted and enjoyable! Serve what resonates with your kids, and feel free to ask them for their input. You might be surprised at what ideas they come up with. And when you’re ready to tackle another fun meal, consider these easy banana sushi ideas.
Conclusion
When organizing a tea party for kids, the options are virtually endless. Consider planning your theme around their favorite colors or characters, which can add an extra layer of fun to the event. You can find helpful themes, decor, and dessert suggestions by checking out these tea party ideas for kids. Additionally, be sure to explore these fun tea party food ideas to make your planning even easier! Here’s to a delightful occasion filled with laughter, love, and lots of yummy treats!

Fun Sidewalk Chalk Art Ideas That Boost Kids’ Creativity and Joy
Imagine it’s a bright Saturday morning, and your little ones are bouncing off the walls. You want to create some family fun that won’t drain your energy or wallet, right? The good news is that there are countless ways to engage with your kids that are easy and enjoyable. Here’s the thing—they don’t always have to be extravagant activities. Sometimes, the simplest ideas bring the most joy.
Create a Scavenger Hunt
Let’s start with something that never fails to excite kids: a scavenger hunt! You can easily set this up right in your backyard or even indoors. Get creative with the items to find—think leaves, toys, or even household items. Make a list, hand it to your kids, and let the adventure begin! It’s a fantastic way to get them moving, and you’ll enjoy joining in on the search.
Quick Tip: You could theme your scavenger hunt according to the season or upcoming holiday, making it even more fun. For example, a Halloween hunt could include finding spooky decorations!
Arts and Crafts Galore
Next up, why not pull out the art supplies? Kids love to express themselves through art. Gather some paper, markers, paints, or even recyclables like cardboard and plastic containers, and let their imaginations run wild.
Here’s the thing: you don’t always need a structured project. Sometimes, just letting them create freely can lead to wonderful masterpieces! Consider hosting an outdoor art day where kids can paint rocks or create nature collages. Need inspiration for projects? You can dive into amazing activities for various age groups, such as these five-year-old birthday party ideas that encourage creative expression!
Backyard Obstacle Course
Feeling a little more ambitious? A backyard obstacle course can be a hit! Use items like hula hoops, pool noodles, and cones to create fun challenges. You might set up a tunnel to crawl through, an area to jump over, or a balancing beam made from wood. The only limit is your imagination!
Before you start: Make sure to tailor the course based on your child’s age and abilities to keep them safe and engaged. You could even time them to see who completes the course fastest, adding a touch of friendly competition!
Family Movie Night with a Twist
Here’s an idea that’s perfect for winding down after a busy day: a family movie night. But let’s give it a fun twist! Instead of just watching a movie, why not have a theme night? Choose a movie like Finding Nemo and serve fish-shaped snacks or have everyone wear ocean-themed outfits. Not only does this create excitement, but it also helps with planning and can spark discussions about the movie’s themes afterward.
Pro Tip: Consider themed decorations or activities that tie into the film’s plot.
Nature Walk and Journal
You might have heard that getting outdoors can do wonders for both kids and adults. Plan a nature walk where everyone is encouraged to observe and write down their findings. You can even take it a step further and keep a family nature journal, where everyone can sketch, write, or stick in leaves and flowers they find.
This activity is not only fun but educational, helping kids learn about the environment. Plus, it gives everyone a chance to bond while enjoying the beauty of nature.
Cooking Together
What if you transformed meal prep into a family fun activity? Cooking with your kids can be an amazing way to bond and teach them valuable skills. Let each child pick a recipe they want to make, whether it’s cookies, homemade pizza, or even a family favorite.
You’ll find that cooking together helps kids feel appreciated and part of the family routine. Plus, you get a delicious meal as a bonus! You can integrate this into a birthday theme, gathering ideas from creative ways to spice up a birthday celebration.
Dance Party in the Living Room
Bring the party indoors and crank up the music! A dance party is a fantastic way to let loose, exercise, and most importantly, have a whole lot of fun. Let everyone take turns choosing songs, and throw in a dance-off to keep it lively!
Here’s the catch: You can even introduce a theme for your dance party—like disco, hip-hop, or even a favorite movie soundtrack. This adds another layer of excitement to the activity.
Story Time with a Twist
Let’s be honest; we can all appreciate a good story, whether it’s a classic children’s book or a new favorite. But have you considered making storytime interactive? You could assign characters, have everyone act it out, or even create an improvised version of the story!
Sharing Stories and Family History
To make it meaningful, involve family history tales. Grandparents can be part of this, sharing stories from their childhood. You can also create a family book at the end, filled with everyone’s stories and drawings!
Gardening Together
This is another fun activity for all ages. If you have space in your backyard, create a small garden patch. Choose easy-to-grow veggies like tomatoes or beans, and get your kids involved in the process of planting, watering, and nurturing the garden.
Kids will learn responsibility, understanding where food comes from, and the joy of seeing their hard work blossom. You might even inspire them to love healthy eating as they pick fresh vegetables for dinner!
Conclusion
To wrap it up, family fun doesn’t have to be complicated or expensive. What matters most is the time spent together and the memories you create. You can explore creative ideas like sidewalk chalk art with your little ones, enhancing their artistic flair while enjoying the outdoors. If you’re looking for some guidance on that, you might find valuable tips in these tips for summertime sidewalk chalk art.
Similarly, if you’re interested in creating more magical moments for your kids, check out the delightful street art by David Zinn for some inspiring visual fun! Explore his creativity here.
So, what will your next family adventure be? Remember, it’s all about having fun together!
Fun Boho Bedroom Ideas for Toddler Girls to Create Cozy Spaces
Picture this whimsical tea party in your toddler’s bedroom
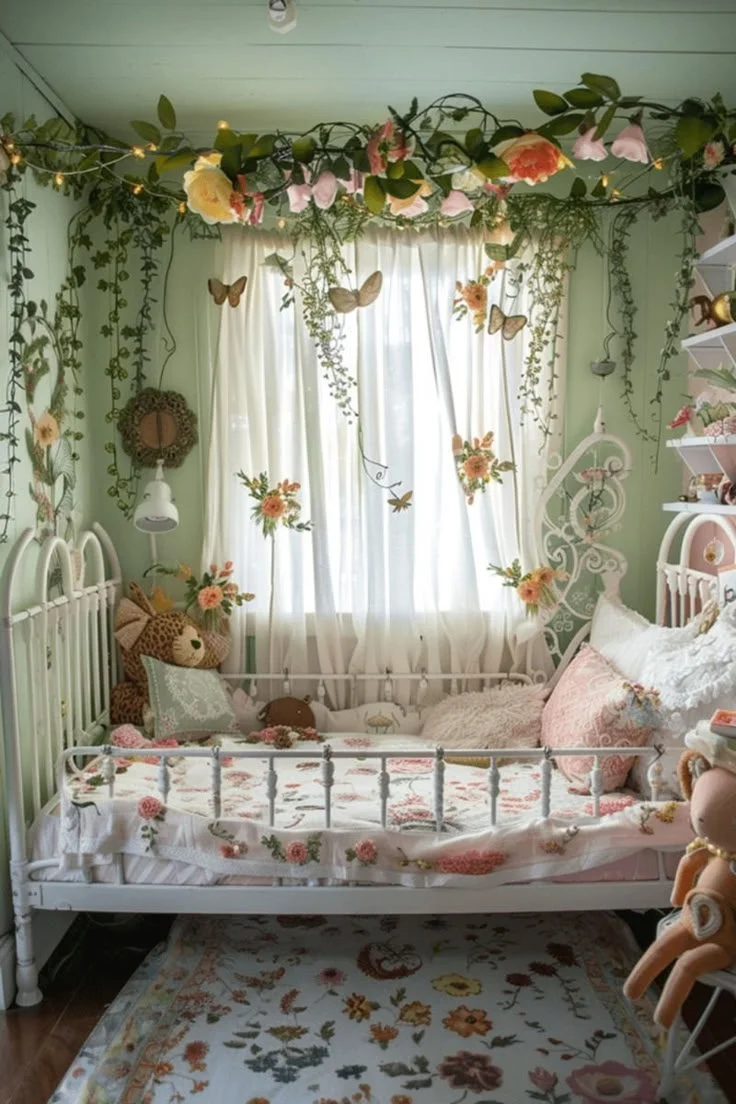
Imagine this: it’s afternoon, the sun is shining through a soft pastel curtain, and your little girl is giggling with delight as she serves imaginary cups of tea to her beloved stuffed animals. Hosting a garden tea party every day isn’t just a fun idea—it’s a chance to nurture your child’s imagination and creativity right in her own bedroom. With a touch of Boho-inspired decor, you can create a charming space that encourages whimsy and playtime adventure.
You might be wondering how to transform her space without an overhaul. The beauty of Boho decor is in its eclectic, carefree style. Let’s explore some ways to effortlessly inspire that garden party vibe, filled with vivacious colors, soft textiles, and delightful decor elements.
Embrace the Bohemian Style
The Bohemian style embraces a mix of bold patterns, earthy tones, and playful accessories. A Boho-inspired room should feel inviting and cozy, reflecting your child’s personality. Here’s how to bring that dream to life:
Color Palette: Start with a base of soft neutrals—think whites, beiges, and warm browns. Layer these with pops of vibrant colors, like deep pinks, turquoise, and yellows. This colorful contrast sets a nice backdrop for lively playtime.
Textiles Galore: Soft rugs with interesting patterns, fluffy pillows, and layered throws can create an inviting and comfortable atmosphere. You could even include a bean bag or two for that extra seating!
Fun Wall Art: Add wall art that features flowers, butterflies, or whimsical quotes. Framed family photos can also add a personal touch, making the space feel even more loved.
DIY Decor That Engages Their Imagination
Creating your own decor pieces can be a fun project to do together and can engage your little girl’s imagination further. For example, why not make a flower crown using faux flowers? Not only does it add a fun accessory for her tea parties, but it also serves as a memory-making activity.
You can also craft some chalkboard signs to label each teacup or food item. Trust me, your little one will feel like a real hostess! Additionally, you can repurpose old jars into colorful vases to further enhance the decor. You don’t have to break the bank; it’s all about creativity!
If you’re looking for more ideas about toddler-friendly activities, consider these fun activities that promote creativity while being easy to manage.
Setting the Scene for Imagination
Let’s dive deeper into how to create a magical ambiance for your garden tea party.
Lighting Matters
Soft lighting can set an enchanting mood. Draping fairy lights around the room or placing a few strategically positioned lamps can create a cozy fairy-tale vibe. Tea parties often happen in the golden glow of afternoon light, so simulating that feeling can make an ordinary day feel special.
Themed Table Setup
Next comes the heart of the tea party—setting up a charming table. This could be a simple blanket spread on the floor or a small table adorned with a lovely tablecloth. Include a pretend tea set along with some whimsical snacks, which can be fruit slices or mini sandwiches. You could even freeze these fun snacks for future parties, discovering an additional benefit from efficiency—for easy toddler breakfasts too!
Don’t forget about adding flowers. A small vase with fresh or faux flowers can bring life to your setup and create an inviting atmosphere.
If you’re short on time for breakfast ideas, check out these quick breakfast ideas that can be prepared in advance.
Interactive Props to Spark Creativity
Engaging your toddler with interactive props is critical to making the tea party more fun. Incorporate dress-up options that align with the theme, such as fairy wings, princess tiaras, or even chef hats to let them feel involved as they play their roles. You can also add a storytelling element by providing some storybooks or a puppet that can introduce new characters to the tea party.
Moreover, consider getting a mini teapot or cup set (perhaps a wooden one) that’s child-friendly. Letting your child pour tea (even just water) into cups can enhance the interactive experience, making everything feel real and more engaging.
Encourage Play Dates
What if you invited a few of your child’s friends for a tea party? It provides an exciting opportunity for social interaction while letting them enjoy all the whimsy of the garden theme. When children gather to play, there’s always a spark of creativity that ignites their imagine.
Make it more enjoyable by adding activities like flower arranging or painting pots during the gathering, so everyone can create a little something special to take home.
Create Lasting Memories
Remember, the most important aspect of your garden tea party is to create beautiful memories. It’s not about perfection; it’s about the unique experiences you share with your child and their friends. These enchanting moments can inspire creativity, foster friendships, and teach valuable life skills through play.
Final Thoughts
In this ever-busy world, carving out moments of spontaneity for your toddler can significantly impact her childhood experience. Embracing whimsical décor and hosting daily tea parties can offer enriching opportunities for bonding and imaginative play.
Encourage your little one to dream big and allow her creativity to flourish. With just a sprinkle of Boho charm, her bedroom can transform into a delightful space where every day feels like a celebration of imagination and joy.
You won’t just be decorating a room; you’ll be crafting a magical experience that your child will cherish forever.
Conclusion
Creating a whimsical garden tea party in your toddler’s room can spark joy and creativity. It’s about embracing imaginative play while celebrating the beauty of childhood. For more ideas, you might want to look at this Boho Girls Room makeover which can provide some fabulous inspirations in decor. Additionally, this article on A Modern BOHO Bedroom can also help you incorporate those dreamy elements beautifully. With just a little effort, you can create a space that feels enchanting every single day!
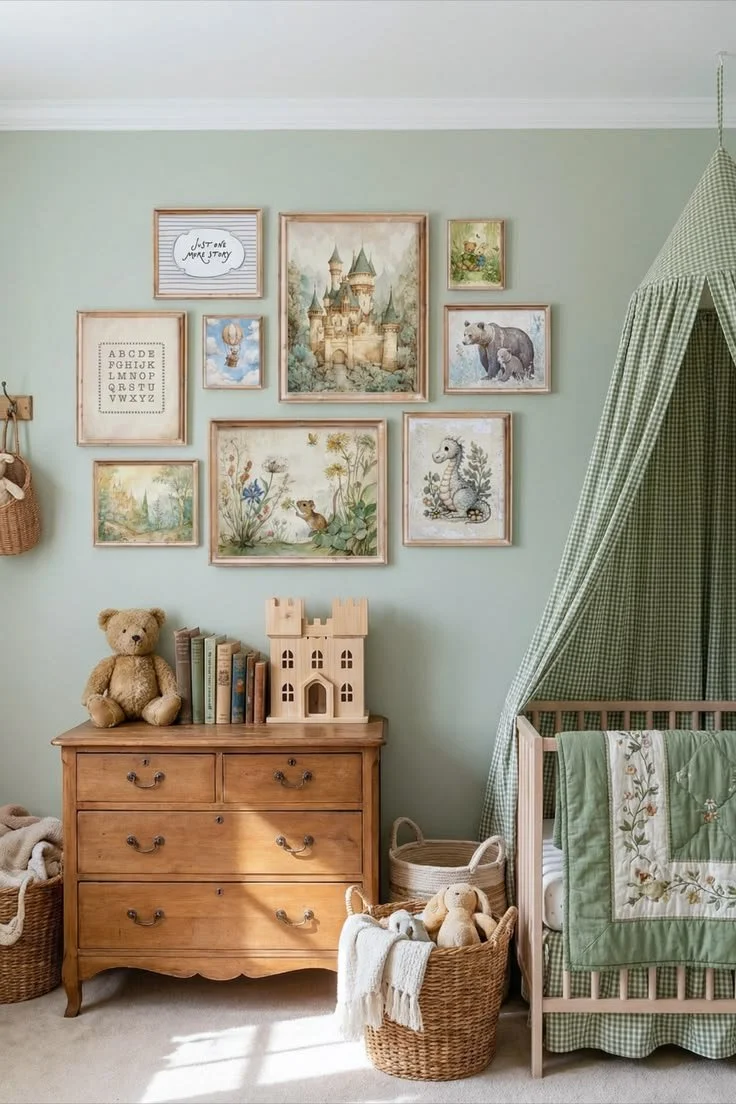
Ways to Style a Storybook Nursery Wall Art Set for Baby Boy Room
Understanding Plywood Edge Layers for Your Home
Imagine stepping into a beautiful room filled with warm, vibrant colors and imaginative designs. You know, the ones that instantly bring a smile to your face? Well, picture this — your little one’s nursery is just waiting for that special touch. When it comes to designing spaces for our children, every detail matters, including the materials we choose. Have you ever thought about plywood edge layers and how they can make a difference in your home decor?
Plywood offers a unique combination of strength and beauty that can elevate any space. It’s more than just a material; it’s a creative opportunity for crafting charming settings where your children can learn, grow, and dream. I remember when I was decorating my child’s nursery; the choices felt endless. However, once I understood the components and benefits of materials like plywood, the vision became clearer.
What Are Plywood Edge Layers?
Let’s delve deeper into what makes plywood such a versatile choice for home decor. Plywood is made up of several layers of thin wood veneers, known as plies, which are glued together. The edge layers, or the outermost layers of this composite wood, play a significant role in both aesthetics and durability.
Edge layers can vary in thickness and quality, influencing the overall appearance of the finished product. For example, a thicker edge layer can provide a more robust and finished look, which is particularly appealing in settings like a nursery or playroom. But, here’s the thing: not all plywood is created equal.
Choosing a high-quality plywood can mean the difference between that cozy feeling of home and a less inviting space. If you’re looking to customize your baby boy’s room, consider using plywood with a lovely edge finish for a touch of elegance. Check out decor ideas that incorporate beautiful nursery wall art that can perfectly complement the aesthetic.
The Advantages of Plywood Edge Layers
You might be wondering what makes plywood a preferred choice for parents and designers alike. Here are a few reasons why plywood stands out:
Durability: Plywood is known for its resistance to warping and cracking, which is essential in furniture that will endure wear and tear from lively toddlers.
Versatility: It can be used for various applications—from cabinets to cribs—seamlessly fitting into any design style.
Sustainability: Many manufacturers source wood from sustainably managed forests, making plywood an eco-friendly option.
Aesthetic Appeal: With various finishing options, plywood can blend beautifully into modern or traditional decor.
When you’re selecting furniture for your little one’s space, keep in mind that the edge layers can offer additional charm. A well-finished edge not only enhances the appearance but also makes the surfaces safe for curious hands. After all, we’ve all seen little ones exploring their environment, right?
Crafting with Plywood
Creating your own pieces with plywood can be an exciting project, especially if you want to add personal touches. Here are a couple of ideas to consider:
Bookshelves: A floating bookshelf made from plywood can create a delightful reading nook. A well-designed bookshelf can hold your child’s favorite stories and make for exceptional wall decor. You might want to check out vintage-inspired nursery art that would pair wonderfully.
Play Tables: Craft a sturdy yet stylish table where your kids can unleash their creativity with arts and crafts. By using plywood, you can create a piece that stands the test of time.
Tips for Using Plywood in Children’s Spaces
When it comes to working with plywood, consider these practical tips:
Opt for Quality: Choose plywood labeled as “void-free” or “marine-grade” as they tend to be sturdier and smoother, ensuring a safe environment for your children.
Smooth Edges: Make sure to sand the edges, especially if you have crawling babies or adventurous toddlers.
Choosing Finishes: Go for non-toxic stains and finishes to ensure a safe setting for your little ones.
safety First: If you’re working on furniture, use screws or nails that won’t pop out to avoid any potential injuries.
Conclusion
Understanding the nuances of plywood edge layers not only helps in aesthetic decisions but can also create functional spaces for your children. Whether you’re crafting nursery furniture or integrating design elements into your kid’s room, the choices you make today set the tone for years to come.
If you’re looking for unique additions to your child’s nursery, I recommend checking out this set of floating nursery book shelves for a stylish storage solution. Additionally, consider this Goose and Bunny nursery wall art to bring whimsy to the decor. Here’s to creating memories in a space designed with love!
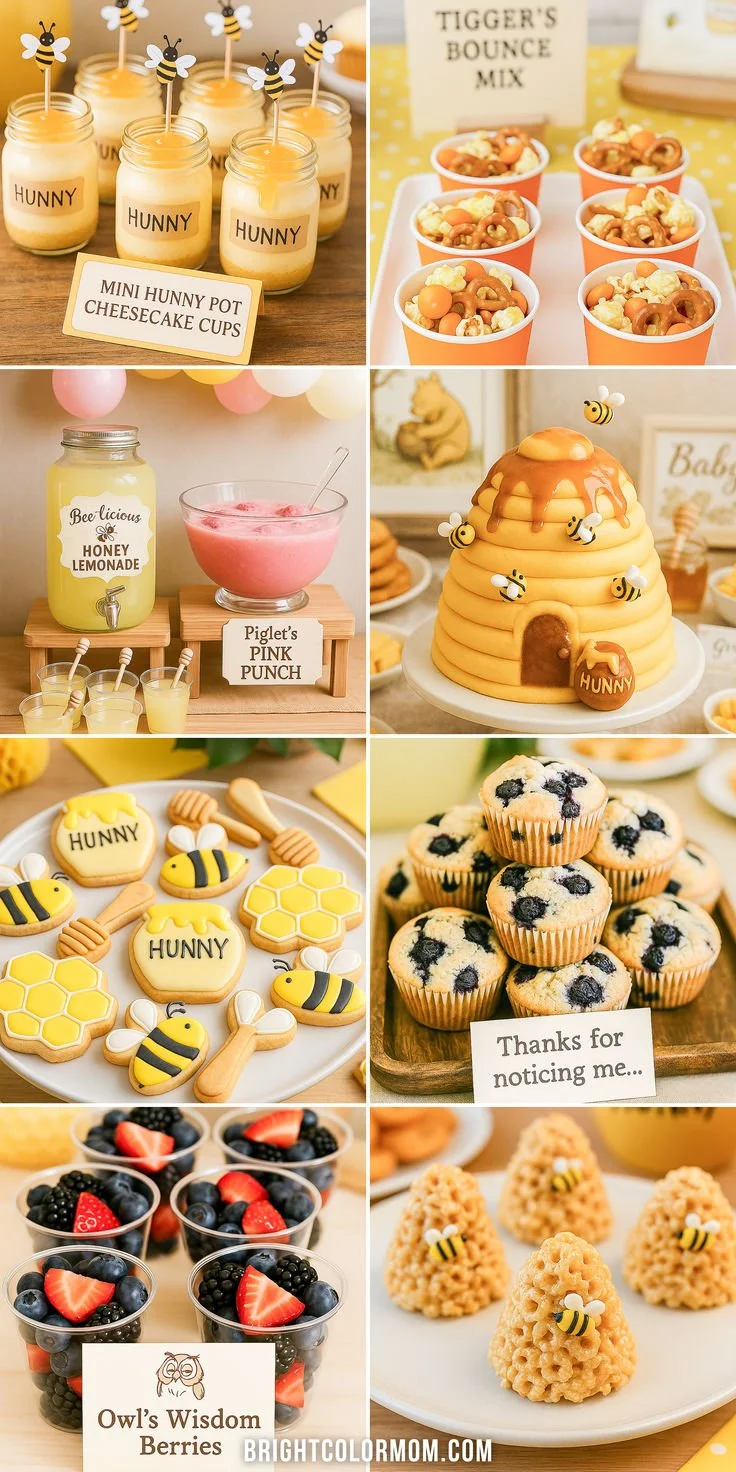
Winnie the Pooh Themed Food Ideas for Baby Shower or First Birthday
A Sweet Celebration with Winnie the Pooh Themed Food Ideas
Picture this: it’s a sunny afternoon, and you’re surrounded by the laughter of little ones, all gathered to celebrate a birthday or baby shower. The theme is none other than the lovable Winnie the Pooh, and you want to create an unforgettable experience. Here’s the thing: the food can really set the tone for your party. You’re not just feeding kids; you’re creating delightful memories! So, let’s dive into some charming and delicious Winnie the Pooh themed food ideas that will surely make your event honey-sweet.
One great way to get started is by designing a menu that features not only Pooh Bear but also his adorable friends like Tigger, Piglet, and Eeyore. Imagine sweet treats and savory bites that pay homage to these beloved characters. If you’re looking for a start, check out these baby shower food ideas that can easily be adapted for a Winnie the Pooh celebration.
Sweet Treats Inspired by Pooh
No Winnie the Pooh party would feel complete without some "hunny" treats, right? Here are some ideas that will add a sweet touch to your celebration:
Honey Pots
You can make honey-colored cupcakes topped with golden yellow frosting and adorned with little honey pot decorations. Use chocolate molds for the pots, and perhaps sprinkle some edible glitter if you want to add a magical touch.
Eeyore’s Blueberry Muffins
Blueberry muffins can represent Eeyore, and you can even decorate them with little gray fondant ears. Serve them in cute paper cupcake liners to enhance the visual feast. It’s a fantastic way to sneak in some healthy fruit amidst the sweets!
Tigger’s Tail Dips
For something a bit more savory, create a layered dip that resembles Tigger’s stripes. Use orange cheese and black olives for decoration. Serve it with colorful veggies or pita chips, which the little ones will love.
Animal-themed Snack Ideas
In addition to sweet treats, consider adding some playful animal-themed snacks that will resonate with the kids and parents alike. Here are some fun ideas:
Piglet’s Fruit Salad
A simple fruit salad can become a hit if you playful name it after Piglet. Use a mix of juicy watermelon, strawberries, and blueberries. You can even use cookie cutters to shape the fruits into fun animal shapes — a crafty addition that kids will love!
Pooh’s Honey Granola Bars
These no-bake granola bars are an easy option that can mirror Pooh Bear’s love for honey. Mix oats, honey, and some dried fruits. Cut them into bear shapes for an added touch that will have everyone smiling.
Tigger’s Bouncing Cheese Balls
Who could resist some cheese balls shaped like Tigger’s face? Just use cheese spread, a bit of orange food coloring, and some olives for the eyes. These yummy bites bring a splash of fun to your snack table!
Savory Goodies
Don’t forget about savory bites that parents will enjoy just as much as the kids! Here are a couple of ideas:
Piglet’s Mini Sandwiches
Mini sandwiches are always a hit at kids’ parties. Make them with ham and cheese or peanut butter and jelly, and use cookie cutters to shape them into fun animal forms. These are not only tasty but also easy for little hands to hold.
Pooh’s Honey BBQ Chicken
Roasted chicken pieces drizzled in honey BBQ sauce will melt in your mouth. Set them out on a platter and let your guests dive in! You could even label them as “Pooh’s Chicken” to keep with the theme.
Themed Drinks
What good would a delicious menu be without equally charming drinks? Think creative and movable, so kids can manage their drinks easily.
Honey Lemonade
For a refreshing option, serve up some lemonade sweetened with honey. Not only is this delicious, but you can add fun label stickers saying "Pooh’s Favorite Drink."
Tigger’s Sippy Cups
Get colorful sippy cups for the little ones, filled with fruit punch or juice. Add little tiger-faced stickers to make them pop!
Presentation is Key
Now, let’s be honest: you can have the tastiest food, but if it’s not presented well, it’ll miss that magical touch. That’s where creativity comes in! Use vibrant tablecloths with Winnie the Pooh motifs and thematic plates and utensils. It’s all about immersing your guests in the experience.
For additional decoration ideas, consider checking out some outstanding jungle baby shower decorations, which can easily be adapted to fit a Winnie the Pooh theme.
Bonus Tips
- Cohesion: Use similar colors across your dishes to maintain a cohesive look. Think yellows, browns, and greens.
- Interactive Elements: Consider involving the kids in making some of the snacks, such as decorating their cupcakes. It’s often the little activities that they remember the most.
- Label Everything: Use cute labels for all food items. It not only guides guests but can also tie in more themed elements.
- Photo Opportunities: Create a fun photo booth with props themed around Winnie the Pooh; think wooden honey pots and plush characters.
Conclusion
Planning a party around a beloved theme like Winnie the Pooh can be incredibly fun and creatively fulfilling. The food can become a delightful part of that experience, making it not only tasty but also visually appealing. For some additional inspiration, check out this Winnie-the-Pooh baby shower guide and some fantastic Winnie the Pooh party food ideas that can help you make the day truly special. So get ready to create some sweet memories with your little one’s friends and family!
Healthy Toddler Meals for Picky Eaters That Boost Appetite
Navigating Toddler Meals Without the Meltdown
Picture this: it’s dinnertime, and your precious little one is sitting at the table, pushing their food away with a look that screams, “Not interested!” Sound familiar? You’re not alone in this struggle. Many of us parents have been there, facing the challenges of picky eaters who seem to have a personal vendetta against anything that even remotely resembles a vegetable. But fear not! There’s hope, and it starts with understanding how to make toddler meals exciting, nutritious, and most importantly, palatable for your tiny taste testers.
Understanding Toddler Meal Preferences
Here’s the thing: toddlers can be notoriously fickle when it comes to food. One day, they might adore broccoli, and the next, they act like you’re trying to serve them a plate of rocks. This inconsistency can be especially stressful for parents trying to provide nutritious meals. One effective approach is to keep a few core meal ideas in your back pocket that are not only healthy but also appealing to those delicate palettes.
For instance, when you’re looking for easy meal ideas, consider incorporating foods that allow for fun and creativity in preparation. Dishes that let toddlers get involved can turn an ordinary meal into an exciting culinary adventure! You might find recipes that engage them as mini-chefs more successful, making food more appealing and less like a chore. You can find some helpful ideas for picky eaters in this list of easy toddler meal ideas that focus on building healthy eating habits from the start.
Meal Planning Tips to the Rescue
Every parent knows that planning meals ahead can save your sanity. Not only does this strategy reduce the daily “What’s for dinner?” anxiety, but it also lets you take stock of what your child enjoys and ensure you’re offering a balanced diet throughout the week. Here are a few tips to effectively plan your toddler’s meals:
- Make a Weekly Menu: Set aside some time each week to plan out meals. This helps you avoid the last-minute chaos of scrambling to find something, anything, your child might eat.
- Incorporate Themed Meals: Consider having specific themes for each night of the week, like “Taco Tuesday” or “Fun Finger Food Friday.” This can spark excitement and anticipation for what’s coming next.
- Involve Your Toddler: Let them pick a few meals during the week. Give options such as chicken, pasta, or rice with veggies. It’s amazing how much more willing they are to eat something they chose!
Easy and Healthy Meal Ideas
When it comes to actual dishes, simplicity often reigns supreme. Here’s a quick roundup of toddler-friendly meals that you can whip up without a hassle:
Mini Pita Pizzas: Use whole grain pitas as the base. Top with tomato sauce, cheese, and whatever toppings your toddler enjoys. Bake until the cheese is melted, and watch them devour it.
Veggie Smoothies: Blend fruits with a handful of spinach or kale. It’s a sneaky way to pack in some greens that they won’t even notice. Try different combos to keep it fresh!
Fruit and Yogurt Parfaits: Layer yogurt, granola, and fruit in a clear cup. Toddlers love the “dessert” look of this while benefiting from the nutrition.
Healthy Quesadillas: Fill whole grain tortillas with cheese and any veggies your child might tolerate. Grill them until golden, then cut into wedges for easy handling.
DIY Snack Trays: Offer a variety of bite-sized foods like cheese cubes, cucumber slices, baby carrots, and hummus. This option encourages exploration and tasting without pressure.
These simple meal choices can help diversify your toddler’s palate while also being a fun way for them to explore food! Additionally, you can refer to this guide to healthy kid meals, especially designed for busy nights, for more inspiration.
Finding Your Way Through Picky Eating
Let’s be honest: it can sometimes feel like you’re waging a war over mealtimes, and it’s easy to get discouraged when toddlers turn their noses up at what you’ve lovingly prepared. But remember, persistence is key! It’s completely normal for them to resist new foods; the key is to keep offering them in a non-pressuring way.
Try introducing one new food at a time alongside favorites so your child feels more comfortable. If they refuse, don’t take it to heart. Sometimes, using creative presentation can help, such as cutting fruits into fun shapes or using colorful plates.
Additionally, be aware of your reactions. If your toddler sees you enjoying a meal, they may be more inclined to try it themselves. Often, we model behaviors, and this applies to eating habits too!
Common Mistakes to Avoid
In the quest to make mealtimes easier, here are some common pitfalls to watch out for:
- Forcing Them to Eat: No parent wants to turn mealtime into a battlefield. Instead, encourage tasting without pressure.
- Getting Discouraged: If a food gets refused, don’t give up! It may take multiple exposures before they’ll accept it.
- Neglecting Texture: Some toddlers are sensitive to textures. Pay attention to these preferences and adjust your foods accordingly.
Quick Tips for Success
- Stay Consistent: Offer a variety but be consistent with meal times and snacks.
- Be Creative with Leftovers: Repurpose yesterday’s dinner into today’s lunch in a fun way, helping children to see familiar foods in a new light.
Encouragement on Your Journey
Feeding toddlers can be daunting, but with each little victory, you’re paving the way for a healthy relationship with food. Remember, you’re not alone in this experience, and there are countless parents who’ve walked this path before you.
Embrace the chaos, enjoy the ups and downs, and don’t forget that every small step counts toward building healthy eating habits that can last a lifetime.
Conclusion
In conclusion, feeding toddlers can be a rollercoaster ride filled with ups and downs, but it’s completely manageable with a bit of creativity and planning. For more fresh ideas and inspiration, check out Toddler Meals for Picky Eaters: 75 Easy Ideas That Actually Get Eaten for a diverse range of meal options or browse through 44 Meals Your Toddler Will Devour – Taste of Home for delicious possibilities that can satisfy even the pickiest of eaters. You’ve got this!
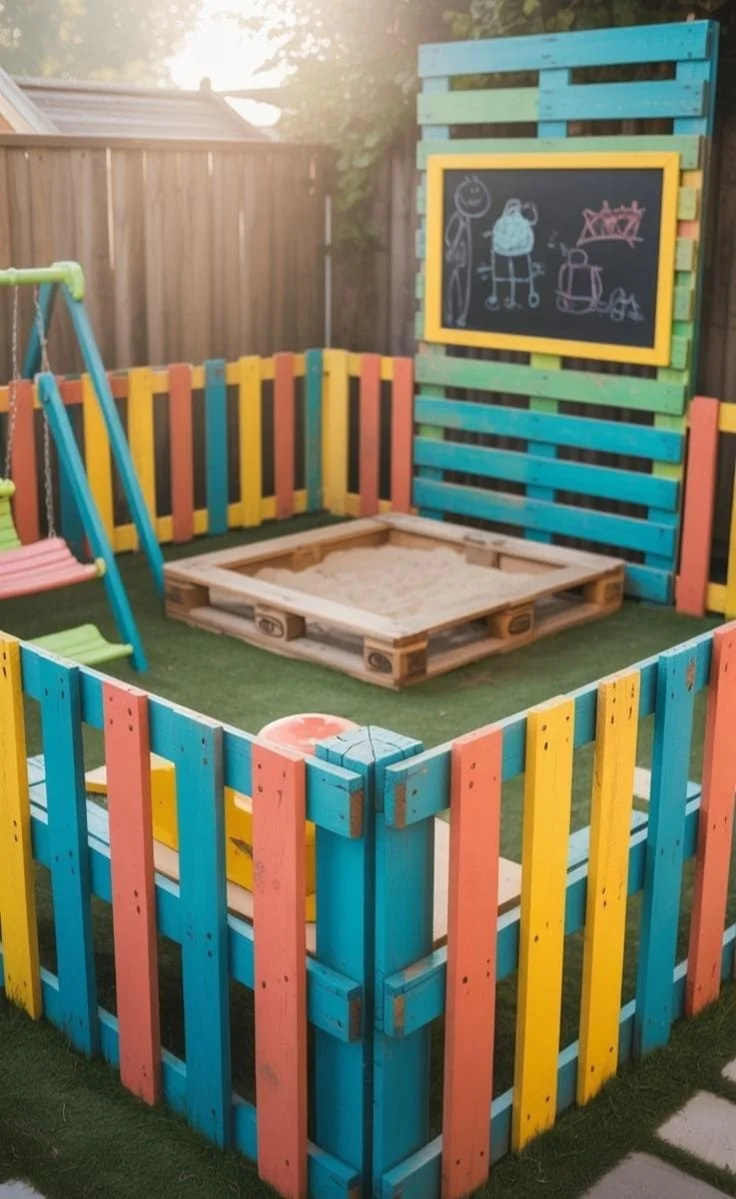
Pallet Fence Ideas for an Enclosed Rainbow Fence with Sandbox
A Colorful Haven for Playful Moments
Imagine this: your little one dashing outside to a vibrant play area designed just for them. A joyful enclosure bordered by bold, color-blocked pallets that not only adds a splash of fun but also provides a safe space to swing, draw, and explore. I can almost hear the laughter and see the smiles as kids engage their imaginations in this whimsical corner of your backyard!
Creating a backyard oasis like this doesn’t have to be as tricky as it sounds. Let’s be honest; we all want our kids to have a place where they can play freely, while still keeping a close eye on them for safety. A pallet fence is not just a practical solution but also a charming DIY project that can bring tons of joy to your family. Plus, it’s a fantastic way to involve the kids in the process, teaching them about creativity and teamwork along the way.
Crafting the Perfect Pallet Fence
Starting with the foundation, let’s consider what materials you’ll need. High-quality pallets are essential. Look for ones that are sturdy and free from splinters or broken boards. You might find them at local garden centers or even online marketplaces. A little bit of effort at the beginning can lead to an awe-inspiring transformation of your backyard.
Here’s the thing: it’s not purely about the fence. Adding features like an oversized chalkboard can create an incredible play backdrop for your little artists. It can be an outlet for their creativity; they can draw whatever comes to their mind, turning your backyard into an art gallery of sorts! Also, if you’re looking for more creative ideas, consider checking out fun and easy crafts for kids to inspire your DIY spirit.
Designing the Sandbox Area
Once you have your fence set up, next comes the fun part—designing the sandbox area. A sandbox isn’t just a big box of sand; it’s a world of imagination! Kids can shovel, build castles, or even dig for "treasures." Opt for non-toxic, play-safe sand to keep things worry-free.
If you want to blend in other play elements, consider installing a low picket-style design. This type of fence creates an appealing enclosure that doesn’t close off the view. It keeps your kids safe without making them feel isolated from the world around them. Imagine them giggling as they make sandcastles, while you relax just a few steps away.
Adding Color and Personal Touches
What’s a backyard without a bit of color? Paint those pallets in bright, cheerful shades like sunny yellows, vibrant blues, or playful pinks. Not only will this attract your little ones, but it’ll also bring life to your yard.
And, let’s be honest, adding colorful cushions or bean bags around the sandbox will enhance the coziness of the space. You might find that your kids are more likely to invite friends over for a playdate, creating cherished memories together.
Safety Measures and Playtime
Let’s take a quick moment to chat about safety. Just as we want to foster fun, we also need to ensure that our kids are playing in a secure environment. A well-constructed pallet fence can be incredibly effective in keeping toddlers safe while they explore. Make sure to inspect the area for any potential hazards, like sharp objects or uneven ground.
And if your kids enjoy tinkering, consider creating a simple DIY robotic hand using some household materials. It’s a great way to engage their minds while reinforcing fine motor skills. You can find detailed steps for that project here: DIY robotic hand for kids.
Engaging the Imagination
Now, you’re probably wondering how to keep your little ones entertained during their outdoor adventures. One idea is to organize themed play sessions. You might set up a pirate treasure hunt one weekend and a princess garden on another. Kids love role play, and transforming their sandbox into a magical world can ignite their imaginations like nothing else.
Remember to stock up on toys and tools that will enhance their experience, like shovels, buckets, and molds. The more hands-on they can be, the better!
Encouraging Social Skills
Involving your kids’ friends in playtime can develop their social skills and help them learn cooperation. If you’ve created a lovely fenced-off area, it becomes an inviting spot for group activities. Perhaps set up a small picnic station where kids can have imaginary treats after a day of "hard work." It’s the little things that create lasting memories, don’t you think?
Conclusion
Building a backyard play area with a pallet fence can be a fun and fulfilling project. With just the right materials, a splash of creativity, and a heart full of love, you’ll create a safe haven for your children to laugh, learn, and grow. It’s amazing to see how a simple enclosure can transform a space and provide so many happy moments.
For those considering expanding their outdoor play options, you can explore wonderful swing sets at The Home Depot or check out various playground plans at Paul’s Playhouses to enrich your backyard with even more fun and adventure for your family. Enjoy the journey of creating a play paradise for your little ones!
