
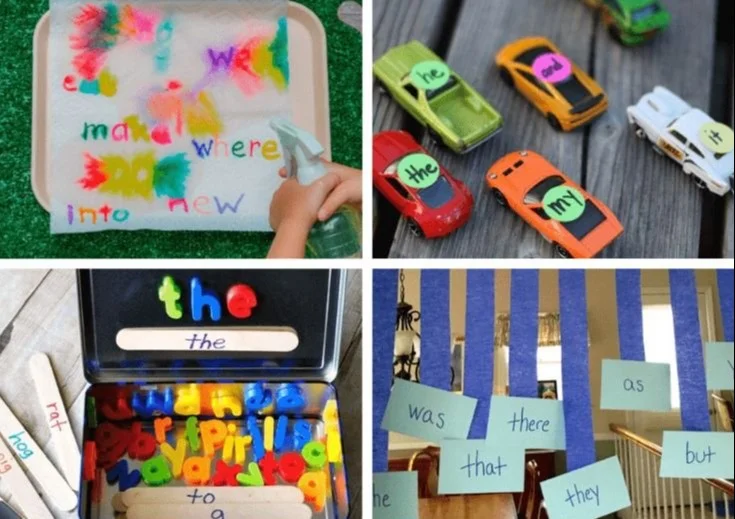
100+ Fun Ways to Teach Sight Words with Hands-On Games & Activities
100+ Hands-On Ways to Teach Sight Words: Games, Activities, and Tips
Teaching sight words can be a joyful, playful journey instead of a rote chore. This guide collects practical, hands-on ideas and strategies you can use with preschoolers and early readers to build automatic word recognition. For inspiration about turning gatherings and group time into playful learning moments, see this roundup of baby shower activities that aren’t games, which includes creative ways to structure short, interactive segments—an approach that adapts well to classroom centers.
Whether you’re a teacher, parent, or tutor, the focus here is on tactile, movement-based, and game-like approaches that make sight words memorable and fun.
Why hands-on sight word practice works
- Multi-sensory engagement (touch, sight, sound, movement) strengthens memory.
- Play reduces pressure and increases repetition without boredom.
- Physical involvement helps kinesthetic learners lock in recognition.
- Games create natural opportunities for reading in context and following directions.
Quick-start games you can do today
- Word Treasure Hunt: Hide word cards around the room and give clues. Kids read a word when they find it.
- Bingo with a Twist: Use sight words on Bingo cards; when a word is called, the child must read it and use it in a sentence before marking it.
- Hopscotch Words: Write words in chalk squares. Kids hop and read each word aloud as they land on it.
- Flashlight Find: Turn off lights and shine a flashlight on a word card on the wall; the child reads the word the light lands on.
- Speed Race: Line up cards and time how quickly a child reads through a list correctly, then try to beat their best time.
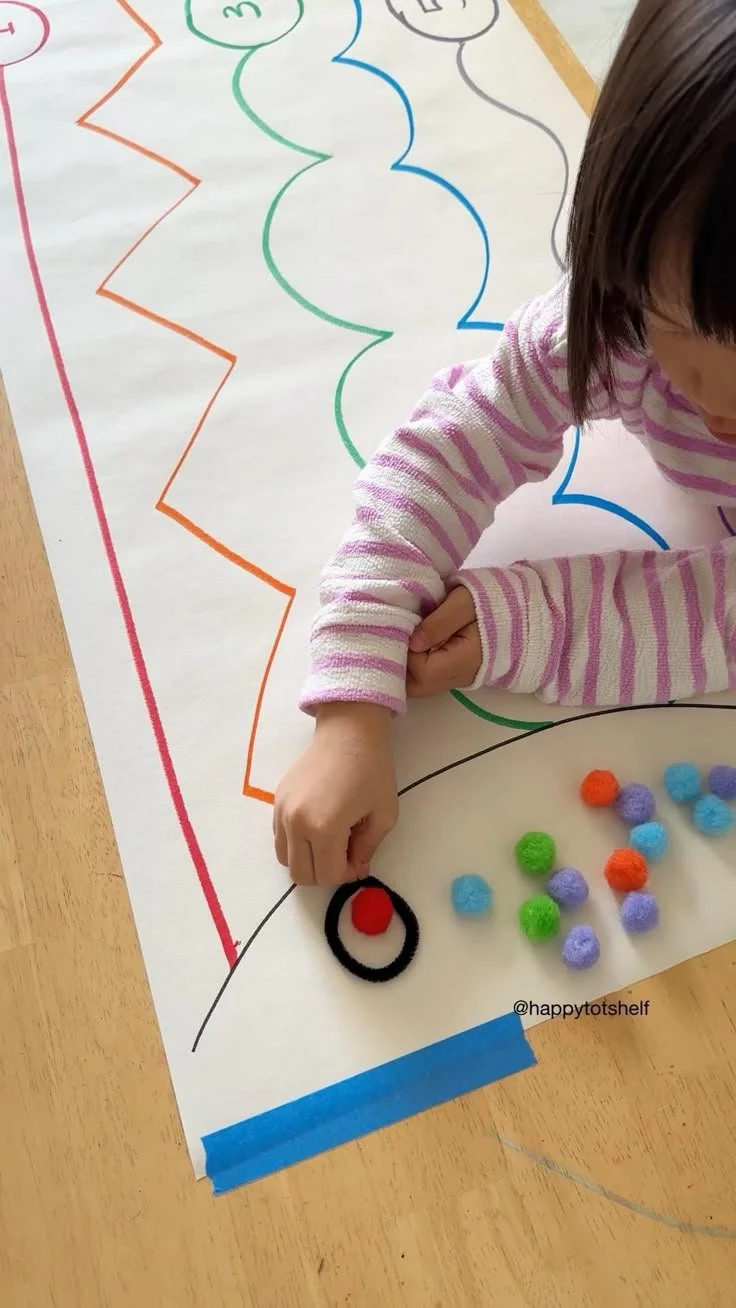
Tactile and sensory activities
- Playdough Words: Roll letters into playdough to form sight words or press letter stamps into dough.
- Sand Tray Writing: Have children trace sight words in sand, salt, or shaving cream.
- Letter Bead Strings: Form words on pipe cleaners or string letter beads to build and read.
- Sensory Bins: Bury word cards in beans or rice and let kids dig them up, read them aloud, and sort them.
Low-prep and on-the-go ideas
- Car Trip Sight Words: Tape cards to the back of seats for quick practice between destinations.
- Sticky Note Switch: Post words around the house; swap a few out daily and have kids find the changed word.
- Grocery Store Hunt: Ask children to spot sight words on cereal boxes or signs and read them aloud.
- Two-Minute Reviews: Short, frequent practice beats long sessions—do micro-games during transitions.
DIY materials that stretch your resources
- Recycled Card Deck: Cut old cards or cereal boxes into uniform squares to make durable word cards.
- Velcro Word Boards: Use Velcro strips to create interchangeable words for quick manipulation.
- Puzzle Words: Split sight words across two puzzle pieces; children match halves to read the whole word.
- Laminated Rings: Place word cards on a ring for portable review—perfect for small-group rotations.
Group games and partner work
- Word Relay: Teams race to read and correctly place sight word cards on a board.
- Partner Quiz: One child reads a word, the partner uses it in a sentence or points to a picture that matches.
- Musical Words: Play music as kids pass a word card; when the music stops someone reads the card aloud.
- Charades for Words: Act out a meaning or use gestures for sight words that have clear actions or contexts.
Using movement and gross motor skills
- Simon Says Words: Combine “Simon Says” commands with sight words, e.g., “Simon says read ‘and’ and jump.”
- Yoga Word Poses: Assign a word to each pose—read the word before holding the pose.
- Ball Toss Read: Toss a soft ball; the catcher reads a sight word on a card before throwing back.
Technology-friendly adaptations
- Interactive slides: Create drag-and-drop slides where students match words to pictures.
- Voice-recorded practice: Kids record themselves reading words and play back for self-assessment.
- Simple apps: Use keyboard-free apps that emphasize sight word recognition with audio support.
Tracking progress and assessment
- Sight Word Checklist: Maintain a simple list of words and mark mastery with short, frequent checks.
- Goal Cards: Set mini-goals (e.g., learn 5 new words this week) and celebrate small wins.
- Error Analysis: Note which words are frequently confused and design targeted games to address them.
Differentiation and extension ideas
- For beginners: Focus on the most frequent 10–20 words with tactile supports.
- For advanced readers: Combine sight words into phrases and short sentences for fluency practice.
- For multilingual learners: Pair sight words with translations or pictures to strengthen meaning.
Classroom management tips
- Rotate centers with clear time limits so variety is always available.
- Use a visual timer for independent practice to keep students on task.
- Keep sets of duplicate cards to reduce wait time and maintain momentum in group games.
Materials list (starter)
- Index cards or recycled card stock
- Laminator or clear packing tape
- Playdough, sand tray, or sensory bin filler
- Velcro strips, pipe cleaners, beads
- Soft balls, chalk, masking tape
Quick templates to create
- 10-word weekly packs: Choose 10 target words, make 2–3 activities for each, and rotate.
- Printable word rings: Group words by level on rings for easy distribution.
- Mini-assessments: 30-second timed reads to check fluency growth.
Troubleshooting common issues
- If kids are bored: Add a competitive element or change the physical setting.
- If a word won’t stick: Increase multi-sensory reps—write, speak, move, and touch it.
- If mixed-ability groups struggle: Use tiered cards so every child has an appropriate challenge.
Building a long-term sight word routine
- Daily micro-practice: 3–5 minutes, multiple times a day.
- Weekly themes: Reinforce words in thematic contexts (e.g., “school,” “kitchen”).
- Parental involvement: Send home quick games and word lists for family practice.
Additional creative spins
- Sight Word Theater: Use words to build lines in a mini-play.
- Recipe Readers: Follow a simple recipe together, reading sight words as you go.
- Picture-Word Chains: Connect words to images in a scavenger series that tells a short story.
Body paragraph with a practical link for curious caregivers
If you’re juggling caregiving and learning contexts—such as teaching while caring for a little one—you might find practical guidance about family logistics helpful; for example, read about whether it’s possible to take a baby to university with you to explore strategies that keep both parenting and teaching routines manageable.
Conclusion
For a large, ready-made collection of playful activities you can adapt to different ages and settings, check out this comprehensive list of 100+ fun sight word activities and games that includes tactile, movement, and printable ideas. If you prefer step-by-step, easy-to-implement suggestions that guide early readers through sight word mastery, this resource on simple sight word activities for early readers is practical and classroom-tested. For playful printable games like dominoes and speed racer formats that make repetition feel like play, see this creative example of sight word dominoes and speed racer games to inspire your next center rotation.
20 Fun Kids Crafts That Will Keep Your Little Ones Engaged for Hours! – Cozy Home Buzz
20 Fun Kids Crafts That Will Keep Your Little Ones Engaged for Hours!
Looking for fresh, easy crafts to entertain the kids while encouraging creativity and fine motor skills? This collection of 20 kid-friendly projects includes simple setups, inexpensive materials, and variations for different ages. For even more inspiration and step-by-step ideas, check out this roundup of fun and easy crafts for kids designed to spark imagination.
Whether you’re prepping a rainy-day activity, planning a weekend craft party, or building a calm, creative routine, you’ll find projects here that are quick to set up and rewarding to finish.
How to use this list
- Choose projects based on available materials and the child’s age.
- Prep a craft station with all supplies and a trash bin.
- Offer open-ended variations so kids can customize colors and themes.
- Keep wet wipes and aprons nearby for quicker cleanup.
1. Paper Plate Animals
Materials: paper plates, paint, construction paper, glue, googly eyes.
Quick steps: Paint the plate, add ears and snouts cut from paper, glue on eyes. Great for storytelling afterward.
2. Pom-Pom Paintings
Materials: pom-poms, clothespins, paint, cardstock.
Quick steps: Clip pom-poms in clothespins, dip in paint, stamp colorful dots. Encourages pattern making.
3. Sock Puppets
Materials: old socks, buttons, fabric scraps, glue or needle and thread.
Quick steps: Decorate a sock with eyes and mouth, invent characters and voices for a puppet show.
4. Nature Collage
Materials: leaves, twigs, glue, cardboard.
Quick steps: Collect natural bits on a walk and arrange them into shapes or scenes on cardboard.
5. Bubble Wrap Prints
Materials: bubble wrap, paint, paper.
Quick steps: Roll paint on bubble wrap and press paper to create textured prints.
6. Toilet Roll Binoculars
Materials: two toilet rolls, tape, string, paint.
Quick steps: Tape rolls side-by-side, decorate, add a strap—instant explorer gear.
7. Salt Dough Keepsakes
Materials: flour, salt, water, cookie cutters.
Quick steps: Mix into dough, cut shapes, bake, and paint. Makes personal ornaments.
8. Straw Weaving
Materials: straws, yarn, cardboard loom.
Quick steps: Create a simple loom and weave patterns with yarn for a tactile activity.
9. Paper Mosaic Art
Materials: colored paper scraps, glue, base paper.
Quick steps: Tear or cut scraps and glue them to form images like animals or landscapes.
10. Homemade Play Dough
Materials: flour, salt, cream of tartar, oil, food coloring.
Quick steps: Cook on low until dough forms, cool, knead, and play. Add scents for extra fun.
11. Sticker Storyboards
Materials: stickers, paper, markers.
Quick steps: Use stickers as characters to build a sequential story, then write captions.
12. Egg Carton Flowers
Materials: egg cartons, paint, pipe cleaners, beads.
Quick steps: Cut and paint cups, thread pipe-cleaner stems and add bead centers.
13. Yarn-Wrapped Letters
Materials: cardboard, yarn, glue, scissors.
Quick steps: Cut initials from cardboard and wrap in colorful yarn for room decor.
14. Suncatcher Crafts
Materials: clear contact paper, tissue paper, frames.
Quick steps: Stick tissue pieces to contact paper, trim into shapes, and hang in windows.
15. Balloon-Powered Cars
Materials: small boxes, straws, bottle caps, balloons.
Quick steps: Build a lightweight car body, attach wheels, and use a balloon for propulsion.
16. Felt Food Set
Materials: felt scraps, thread, stuffing.
Quick steps: Cut food shapes, sew and stuff for a pretend kitchen collection.
17. Painted Rock Pets
Materials: smooth rocks, paint, varnish.
Quick steps: Paint faces and patterns, seal with varnish, and create a rock family.
18. Recycled Robot Sculptures
Materials: boxes, cans, bottle caps, tape, paint.
Quick steps: Stack and decorate recycled items to invent robot friends.
19. DIY Stamps
Materials: foam shapes, bottle caps or blocks, glue, ink or paint.
Quick steps: Attach foam to a base, press into paint, and stamp patterns on paper. Need a light moment during cleanup? Try sharing the best joke about anger for kids to get giggles and reset the mood.
20. Shadow Puppets and Theater
Materials: cardstock, sticks, tape, flashlight.
Quick steps: Cut characters, attach to sticks, and use a flashlight against a wall to perform stories.
Extra tips to extend the fun
- Theme craft days: ocean, space, animals, or seasons.
- Combine sensory elements like rice bins, water beads, or sand to enhance exploration.
- Turn finished crafts into themed activities—use sock puppets in a storytelling hour or rock pets in a scavenger hunt.
Safety notes
- Supervise young children, especially with small parts or hot glue.
- Use non-toxic paints and washable materials when possible.
- Adapt tools and complexity for different ages to keep projects frustration-free.
Conclusion
Planning simple, engaging crafts can transform downtime into creative learning moments—if you’d like seasonal planning ideas that pair well with these projects, explore this collection of activity calendar ideas and inspiration. If balancing chores and family schedules feels challenging while fitting in craft time, these tips on modern marriage and dividing chores may help you carve out regular creative slots. And if a child shows signs of overwhelm or withdrawal during activities, reviewing resources on autistic burnout recognition and support can guide you to adjust expectations and create a gentler, more accommodating routine.
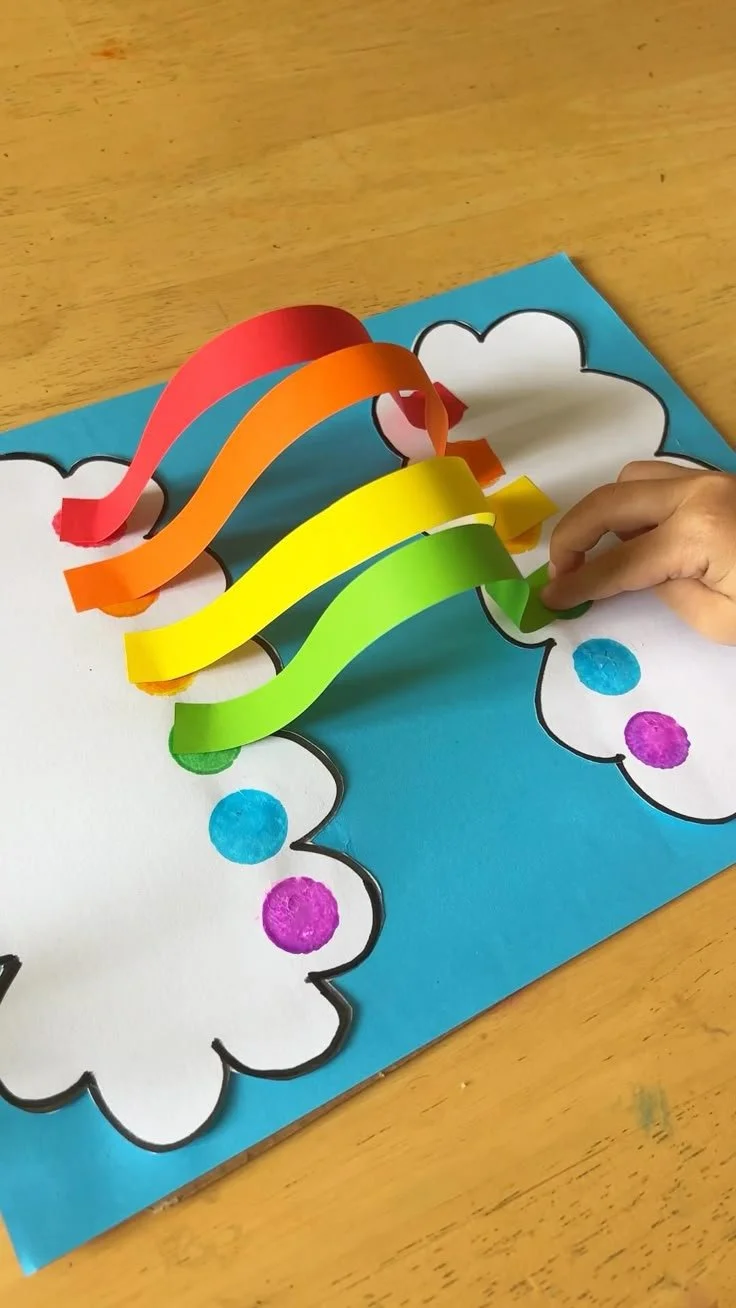
3D Rainbow Craft for Kids
3D Rainbow Craft for Kids
Introduce a simple, hands-on 3D rainbow craft that delights children and builds fine motor skills, color recognition, and creativity. This project is inexpensive, adaptable for different ages, and great for rainy-day activities or classroom centers. For more ideas on easy projects to try alongside this one, see this collection of easy crafts for kids.
Materials
- Colored paper or cardstock in red, orange, yellow, green, blue, indigo, violet (or any seven-color set)
- White cardstock or a sturdy backing sheet
- Scissors
- Glue stick or craft glue
- Pencil and ruler
- Cotton balls or white paper for clouds (optional)
- Markers, stickers, or sequins for decoration (optional)
Why kids love it
- The 3D effect looks magical when the rainbow arches off the page.
- It’s tactile: folding, curling, and gluing keep little hands busy.
- The craft can be personalized with names, patterns, or additional elements like suns and rain.
Step-by-step: Simple 3D Rainbow
- Prepare stripes: Cut seven strips of colored paper about 1–1.5 cm wide and 15–20 cm long. Cardstock gives a sturdier arch; thinner paper curls more easily.
- Curl the strips: Gently roll each strip along a pencil to create a soft curve. For a more pronounced 3D effect, fold each strip into a gentle arc rather than curling tightly.
- Mark placement: On the white backing, draw a shallow arc as a guide where the rainbow will sit. This can be a pencil semicircle or a faint template.
- Attach ends only: Glue the ends of each colored strip to the backing so the center of the strip lifts away from the paper. Start with the red strip at the top of the arc and layer the remaining colors beneath it, keeping consistent spacing.
- Build the rainbow: Continue gluing ends for all strips, ensuring they align into a tidy arc. Press the glued ends firmly and let dry.
- Add clouds and details: Glue cotton balls or white paper “clouds” at each end to hide the strip ends. Decorate the background with sun, raindrops, or stickers.
Variations to try
- Mini rainbows: Use shorter strips to create small rainbows for cards or bookmarks.
- Layered texture: Use different materials for each color — tissue, felt, foil, or patterned paper — for sensory variety.
- Pop-up card version: Attach the outermost strip to the inside of a folded card so the rainbow pops up when opened.
- Story prompt: Turn the finished rainbow into a page in a handmade book and ask kids to write a short tale about where the rainbow leads. If you want to add a moment of silliness, you might include the best joke about anger for kids to make them laugh before they write.
Teaching moments and skills
- Color order and sequencing: Talk about ROYGBIV or have children arrange strips by memory.
- Fine motor practice: Cutting, curling, and gluing strengthen hand skills needed for writing.
- Following instructions and creativity: Children practice a sequence of steps while making choices about decoration and materials.
Classroom or group adaptations
- Assembly line: Assign cutting, curling, and gluing to different children to build teamwork.
- Collaborative mural: Combine multiple rainbows into a large sky on bulletin-board paper.
- Cross-curricular tie-ins: Link the craft to weather lessons, poetry about rainbows, or color-mixing science demonstrations.
Safety and cleanup
- Use child-safe scissors and supervise glue use with younger children.
- Limit glitter and small embellishments for toddlers to avoid choking hazards.
- Keep a damp cloth or baby wipes handy for easy cleanup of glue and marker marks.
Conclusion
For a step-by-step visual guide on creating a similar effect at home, check out this clear tutorial on how to make simple 3D rainbow art that is amazing: How to make simple 3D rainbow art that is amazing – Twitchetts. If you’d like seasonal inspiration and variations for spring-themed 3D projects, see this post about making stunning 3D spring art with kids: Make Stunning 3D Spring Art With Your Kids – One Time Through. For another kids’ paper rainbow idea with different assembly techniques, try this 3D paper rainbow kids craft tutorial: 3D Paper Rainbow Kids Craft – Crafty Morning.
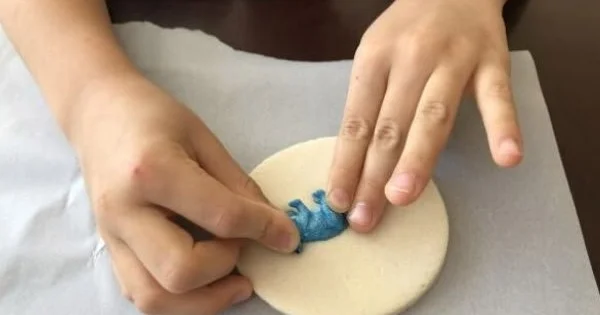
How to Make Salt Dough Dinosaur Fossils | Mombrite
How to Make Salt Dough Dinosaur Fossils
Turn a rainy afternoon into an archaeology adventure with this easy salt dough dinosaur fossil activity. It’s a hands-on way to teach kids about paleontology, textures, and cause-and-effect while using materials you probably already have in the kitchen. If your child gets frustrated when projects don’t go perfectly, remember to use gentle strategies like those suggested in how to make an angry child happy to keep the experience positive and fun.
What you’ll get from this activity:
- A sensory, creative craft that doubles as a learning tool
- Homemade “fossils” you can paint and preserve
- Opportunities to practice vocabulary (fossil, imprint, extinct) and fine motor skills
Materials
- 2 cups all-purpose flour
- 1 cup salt
- 1 cup water (add a little at a time)
- Rolling pin or a sturdy bottle
- Toy dinosaur feet, claws, or small plastic skeletons (or household items like shells and keys)
- Parchment paper or a nonstick baking sheet
- Acrylic paints, brushes, and a thin black wash or antiquing glaze (optional)
- Clear sealer (optional)
Preparation
- Mix the flour and salt in a large bowl.
- Gradually add water and stir until a stiff dough forms. Knead it briefly on a floured surface until smooth. If the dough is too sticky, add a little more flour; if it’s too dry, add a splash of water.
- Preheat your oven to 250°F (120°C) — a low and slow bake prevents cracking.
Making the Fossils
- Roll or press the dough into a flat slab roughly 1/2 inch (1–1.5 cm) thick. Larger fossils will take longer to dry.
- Choose how you want to create imprints:
- Press toy dinosaur feet or claws into the dough firmly to leave clear tracks.
- Use small plastic bones or model dinosaurs to create skeletal impressions.
- Let children experiment with household items to see what textures look like as fossils.
- For plaque-style fossils, cut the dough into shapes (circles, rectangles) around the imprint to make display pieces.
- Use a toothpick or skewer to write the “species” name, date, or the child’s name into the edge of the dough for a museum-label effect.
- Carefully transfer pieces to a parchment-lined baking sheet.
Baking and Drying
- Bake at 250°F (120°C) for 2–3 hours depending on thickness. Thinner pieces may dry in 1–2 hours; thicker pieces can take up to 4 hours. Turn pieces halfway through to ensure even drying.
- Alternatively, air-dry thinner pieces for several days, turning occasionally.
Finishing Touches
- Once completely dry and cooled, lightly sand any rough edges if desired.
- Paint fossils with acrylics. A dry-brush technique with darker paint can highlight crevices and mimic aged bone.
- Apply a thin black wash or antiquing glaze to bring out details, wiping excess away with a paper towel.
- Seal with a clear spray or brush-on sealer to protect the surface.
Learning Extensions and Play Ideas
- Create a “dig site” by burying the dried fossils in a sandbox or large tray of rice and let kids excavate with brushes and small tools.
- Pair the fossils with a short read-aloud about dinosaurs or fossils to build context.
- Turn it into a science journal project: have children record their “discoveries” and sketch the fossils.
Troubleshooting and Tips
- Cracking: If small cracks appear, they can be filled with watered-down glue and re-baked briefly. To reduce cracking, avoid making pieces too thick.
- Too soft: Bake longer at the low temperature until the center is fully dry. Thicker pieces may feel firm on the outside but still be soft inside.
- Texture variations: Press different materials at varying pressures to show how deeper imprints create more detailed fossils.
Safety and Cleanup
- Supervise young children with small toys and baking.
- Salt dough is not edible — keep a bowl of snack-safe items separate.
- Dough can be stored for a few days wrapped in plastic in the refrigerator if you want to make multiple batches.
Activity Variations
- Make life-size footprint tracks across a long strip of dough to create a trail.
- Color the dough with food coloring before shaping for vibrant fossils.
- Use a mixture of flour and cornstarch (1:1) for a smoother clay-like texture if you want finer detail.
If sibling dynamics or attention challenges emerge during the project, consider strategies for sharing tools and turn-taking; practical tips can be found in resources like how to deal with a self-centered toddler to keep the activity harmonious and enjoyable for everyone.
Conclusion
For a detailed, photographed walk-through of a similar step-by-step process, check this helpful guide on How to Make Dinosaur Fossils for Kids {From Salt Dough!}. If you want creative alternatives for shaping and aging your pretend bones, this blog post offers fun ideas and variations in Homemade Dinosaur Bones – Kitchen Floor Crafts. For another beginner-friendly tutorial with tips on painting and preserving your fossils, see Salt Dough Dinosaur Fossils | DIY for Beginners – KiwiCo.
Pompom Sorting and Counting Activity for Preschoolers
Pompom Sorting and Counting Activity for Preschoolers
This simple pompom sorting and counting activity is perfect for preschoolers learning colors, numbers, and fine motor skills. It can be set up in minutes with inexpensive materials you probably already have at home. For ideas on pairing this activity with healthy snack or mealtime learning moments, check out these suggestions for the best vegetables for preschoolers.
What you’ll gain from this activity:
- Color recognition and matching
- One-to-one correspondence and basic counting
- Fine motor control using tongs, tweezers, or fingers
- Vocabulary building (colors, numbers, sizes)
Materials
- Small pompoms in several colors (or alternatives like buttons, beads, or cotton balls)
- Several small bowls, muffin tin, or egg carton compartments for sorting
- Tweezers, small tongs, or spoons for picking up pompoms
- Number cards or sticky notes to label piles (optional)
- A tray or towel to contain spills
Preparation
- Choose 3–6 colors of pompoms, depending on your child’s attention span.
- Place a mixed pile of pompoms in the center and bowls or compartments around it.
- If you want a counting component, add number cards (1–10) beside each bowl or label bowls with small sticky notes.
Activity steps
- Demonstrate: Pick up a pompom using fingers or tweezers and sort it into the matching colored bowl. Count aloud as you place each pompom in the bowl.
- Invite your child to sort: Encourage them to pick one pompom at a time, name the color, and place it in the correct container.
- Add counting: Once a color bowl has several pompoms, count them together. For older preschoolers, ask “How many more do we need to make five?”
- Challenge variations: Ask your child to find a certain color first, or time how many pompoms they can sort in one minute for a playful race.
Variations and extensions
- Size and texture sorting: Mix different sizes or fuzzy vs. smooth pompoms and ask children to sort by size or feel.
- Counting games: Use number cards and have the child place the exact number of pompoms required.
- Pattern practice: Create simple color patterns (red, blue, red, blue) and ask the child to continue the sequence.
- Fine motor focus: Use clothespins, tweezers, or chopsticks to increase the challenge and strengthen hand muscles.
- Practical tie-in: Turn the activity into a story about shopping or cooking, and extend learning with a themed book such as the Cooking Name for Preschoolers book to build vocabulary and context.
Tips for success
- Keep sessions short (10–15 minutes) to match preschool attention spans.
- Praise effort and reinforce language: “You counted to four! Great job picking up those tiny pompoms!”
- Rotate materials so the activity feels new—change colors, add themed trays, or introduce scoops.
- Make it inclusive: Use larger pompoms for children who need bigger targets or add visual cues for children with color-blindness (e.g., label bowls with stickers).
Learning outcomes to look for
- Accurate color sorting and consistent counting
- Improved pincer grasp and hand strength
- Ability to follow multi-step instructions
- Increased vocabulary related to colors, numbers, and actions
Assessment and next steps
Observe whether the child can match colors reliably and count with one-to-one correspondence. If they’re ready, move from counting small sets to simple addition (combine two bowls and count total pompoms) or introduce subtraction through “taking away” games.
Conclusion
For a step-by-step example and variations focused on fine motor practice, see the detailed activity guide at Pom Pom Sorting: Fine Motor Skills Activity – Busy Toddler. If you’re looking for early math ideas using pom-poms that emphasize color sorting and counting, this resource explores playful approaches at Pom-pom Colour Sort & Count. Early Maths – Learn with Play at Home. For another simple counting variation and printable ideas, check out the activity suggestions at Simple counting activity for children – Laughing Kids Learn.
3 actividades para aprender a escribir el nombre propio – Mamá y maestra
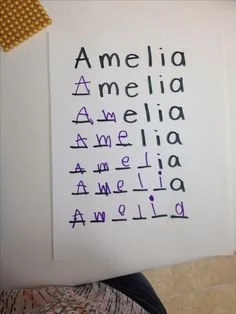
Three engaging activities to help a child learn to write their own name
Helping a young child learn to write their own name is an important milestone. These activities are playful, multisensory, and adaptable for children aged about 3–6 years. They focus on letter recognition, fine motor control, and the connection between the spoken name and its written form. For family-oriented inspiration beyond writing activities, you might also enjoy these maternity photoshoot ideas to capture special moments as your child grows.
How to approach teaching a name
- Start with the child’s spoken name: sing it, spell it aloud, and use their name frequently in conversation.
- Use consistent letter forms (e.g., capital first letter, lowercase for the rest) so the child learns a stable visual model.
- Keep practice short and fun — multiple short sessions work better than long drills.
Activity 1 — Sensory name tray (salt, sand, or shaving cream)
Materials: shallow tray, salt/sand/shaving cream, a printed name card.
Steps:
- Place a name card in large, clear letters where the child can see.
- Fill the tray with a thin layer of salt, sand, or shaving cream.
- Ask the child to write each letter of their name in the sensory medium using their finger.
- Encourage them to say each letter aloud as they write it.
Why it works:
- The sensory feedback reinforces muscle memory.
- Mistakes are easy to erase and try again, lowering frustration.
Variations:
- Use a paintbrush or a cotton swab for a different motor challenge.
- For older children, write words that start with the same letter as their name.
Activity 2 — Name puzzle cards
Materials: cardstock, marker, scissors, optional laminate.
Steps:
- Write the child’s name on a strip of cardstock in bold letters, each letter spaced evenly.
- Cut vertically between letters to make a simple puzzle (one piece per letter).
- Mix the pieces and have the child reassemble the name in order.
- Once assembled, ask them to trace the name with a finger or pencil.
Why it works:
- Breaking the name into pieces builds letter-by-letter recognition and sequencing.
- Reassembling the puzzle increases visual discrimination and problem-solving.
Variations:
- Make multiple copies and create timed challenges for older children.
- Use pictures that begin with each letter to add phonics practice.
Activity 3 — Rainbow writing with markers or playdough letters
Materials: sheet with name printed lightly, several colored markers or playdough.
Steps (rainbow writing):
- Print the child’s name faintly on paper as a guide.
- Have the child trace the name multiple times, using a different color each pass to make a “rainbow” effect.
Steps (playdough letters): - Have the child form each letter from playdough and place the letters in order.
- Ask them to say each letter as they form it and then copy the formed letters onto paper.
Why it works:
- Repeated tracing builds visual-motor integration.
- Colors and tactile play increase interest and attention.
Variations:
- Use stickers, stamps, or highlighters for additional sensory input.
- Challenge the child to form letters in increasingly smaller sizes to refine fine motor skills.
Tips for progression and assessment
- Move from large, whole-arm movements (air writing) to small, wrist-based movements on paper.
- Celebrate attempts and progress rather than perfection.
- Keep informal records: note which letters are consistently correct and which need more work.
- Observe whether the child recognizes letters out of sequence — this can indicate whether they know individual letters or only the whole word pattern.
- For broader guidance on observing developmental progress, consult resources focused on early-childhood assessment.
In the body of activities and tips you can also explore broader wellbeing ideas; for example, these child wellness resources offer related approaches to support learning readiness and fine motor development.
Conclusion
If you want ready-made activity ideas in Spanish with step-by-step instructions, see this article on Actividades para que aprenda a escribir su nombre – Mamá y maestra. For professionals and parents who need guidance on observing and assessing young children’s progress, consult the observation and assessment guide for early childhood. To explore more play-based stimulation ideas in Spanish, review the Estimulación temprana archive on Mamá y maestra.

40 Spring activity ideas
40 Fresh Spring Activity Ideas for Families, Classrooms, and Kids
Spring is the perfect season to get outside, get creative, and try new activities that celebrate growth, color, and warmer weather. Whether you’re planning family weekends, classroom centers, or simple boredom busters, this list of 40 ideas offers something for every age and interest. If you need celebration inspiration that pairs well with seasonal activities, check out these 10th birthday party themes and activities for ways to tie spring fun into a memorable event.
Outdoor Adventures
- Nature scavenger hunt — make a checklist of leaves, flowers, rocks, and insects.
- Backyard picnic with a themed menu and blanket fort.
- Chalk art sidewalk gallery — host a friendly neighborhood show.
- Kite-flying afternoon — decorate homemade kites with paint and streamers.
- Bird feeder building — use pine cones, peanut butter, and seeds to attract feathered friends.
- Plant-a-pizza-garden — tomatoes, basil, and oregano in pots for a family pizza night.
- Pond dipping — observe aquatic insects and tadpoles (use a net and shallow tray).
- Bike parade — decorate bikes with bunting and host a short neighborhood route.
- Mini outdoor obstacle course using household items.
- Cloud-watching and drawing what you see in the sky.
Creative Crafts
- Pressed-flower bookmarks — laminate or seal between contact paper.
- Painted rock garden labels — decorate stones to mark herbs and veggies.
- Nature weaving on a twig loom — use grass, flowers, and ribbons.
- DIY seed bombs for easy wildflower planting around town.
- Butterfly life-cycle mobile with paper, strings, and imagination.
- Sun-print art using cyanotype paper or simple sun-sensitive crafts.
- Egg-carton flowers — a colorful, recycled bouquet.
- Spring sensory bottles filled with sequins, water, and tiny flowers.
- Homemade wind chimes using shells, beads, and driftwood.
- Collage posters using magazine pictures of spring themes.
Learning & Sensory Play
- Seed germination experiments in clear cups to watch roots form.
- Garden math: measure plant growth, count leaves, and chart progress.
- Bug hotel construction to study beneficial insects and biodiversity.
- Spring-themed storytime with puppets or felt board scenes.
- Scent exploration station with herbs, citrus, and blossoms.
- Color-mixing with flower-petal dyes or food coloring in water.
- Weather journal: record daily temperatures, wind, and cloud types.
- Taste test of seasonal fruits—compare textures and flavors.
- Sensory mud play with safe, clean mud kitchen setups.
- Plant-an-instrument: make simple shakers using seeds and bottles.
Activities for Young Children and Classroom Groups
- Garden mural — large paper outdoors painting with washable paints.
- Flower petal mosaics for fine-motor practice.
- Role-play farmer’s market with play food and real coins for math.
- Match seeds to plants card game for memory and recognition.
- Nature-themed dramatic play corner (bandages, magnifiers, baskets).
- Interactive story walk around the neighborhood or school yard.
- Bug observation jars with magnifying lids and note cards.
- Spring relay races with spoon-and-egg or flower transfer tasks.
- Plant-themed sensory tray with soil, pots, scoops, and scooping tools.
- Seasonal treasure box: let each child add a small nature find and share why it matters.
If you want whimsical nursery or classroom décor ideas to pair with your craft stations, consider decorating suggestions inspired by classic themes like Winnie the Pooh to make cozy reading corners come alive — see these Winnie the Pooh nursery ideas for decorative inspiration.
Tips for Success
- Keep materials simple and reusable when possible.
- Let kids lead exploration—ask open questions and observe.
- Mix high-energy and calm activities across the week.
- Adapt difficulty and safety measures by age: smaller parts for older kids only, sun protection for outdoor play, and adult supervision for water or tools.
Conclusion
For a curated list that inspired many of these prompts, explore this comprehensive collection of spring activities from ChildsplayABC for additional project details and seasonal inspiration: ChildsplayABC’s 40 Spring activity ideas.
If you’re also planning holiday mischief or family traditions beyond spring, Madison Mom offers creative and easy seasonal ideas that can spark playful weekly rituals: Madison Mom’s Elf on the Shelf ideas.
For teachers and kindergarten educators seeking classroom-ready spring projects and printable ideas, Simply Kinder compiles approachable activities designed for young learners: Simply Kinder’s spring activities for kindergarten.

Cold Lunchbox for Teens
Cold Lunchbox Ideas for Teens
Packing a cold lunchbox for a teen can feel like a balancing act: it needs to be nutritious, portable, visually appealing, and something they’ll actually eat. Teens are developing tastes and independence, so the key is variety, simple assembly, and a few grown-up flavors that don’t feel “babyish.” For extra inspiration, consider browsing broader lists of cold lunch ideas for kids to adapt favorites into teen-sized portions.
Why cold lunches work for teens
Cold lunches are quick to assemble, typically safer without reheating equipment, and easy to customize for dietary needs. A well-packed cold lunch can deliver the protein, fiber, and healthy fats teens need to stay focused through afternoon classes and activities.
Containers and gear
- Use an insulated lunch bag or soft-sided cooler with a removable ice pack to keep perishable items safe.
- Bento-style containers with multiple compartments help separate sauces and soggy items.
- Leakproof tubs for dressings and dips prevent mess and keep salads crisp.
If your teen has outgrown child-themed boxes, consider compact tote-style options that look more mature and fit a water bottle and phone.
Protein-forward main ideas
- Turkey, chicken, or roast-beef sandwiches on whole-grain bread with avocado or hummus.
- Rice or grain bowls with cold grilled chicken, edamame, shredded veggies, and a small container of dressing.
- Pasta salads with chickpeas, diced veggies, olives, and feta for a Mediterranean twist.
- DIY wraps with spinach, turkey, avocado, and a smear of pesto.
Aim for 15–25 grams of protein to help maintain energy and concentration.
Snacks and sides that travel well
- Fresh fruit (grapes, apple wedges with lemon juice to prevent browning, or clementines).
- Crunchy raw veggies plus a hummus or yogurt dip.
- Cheese cubes or string cheese for calcium and satiety.
- Whole-grain crackers, nut mixes (if nuts are allowed), or roasted chickpeas for crunch.
- A small treat like dark chocolate or a granola bar for an afternoon pick-me-up.
Flavors teens will appreciate
Swap plain mayo for flavored spreads—garlic yogurt, spicy mustard, or sun-dried tomato tapenade. Add pickled elements (pickled onions or cucumbers) for tang. Fresh herbs and citrus zest elevate simple salads and wraps without adding prep time.
Drinks and hydration
A reusable 20–24 oz water bottle is a must. Include iced tea or a low-sugar flavored water if your teen prefers something with taste. Avoid glass containers for safety.
Meal prep and time-saving tips
- Make double portions of grain salads or proteins on weekend nights to assemble lunches fast.
- Pre-portion snacks into small containers or bags so teens can grab-and-go.
- Keep a “lunch station” in the fridge with dressings, packed fruit, and ready proteins to encourage independence.
Safety and freshness
- Use frozen or chilled ice packs to maintain 40°F (4°C) for perishable items.
- Pack dairy and meats in the coolest part of the lunch bag and advise eating refrigerated items first.
- Replace soft cheeses or mayonnaise-filled items if left unrefrigerated for more than two hours.
Accommodating restrictions and preferences
For vegetarian, vegan, gluten-free, or allergy-sensitive teens, swap proteins accordingly: marinated tofu, lentil salads, or quinoa bowls work well. Make sure labels or a quick note helps coaches or friends understand restrictions when needed.
Making it appealing
Presentation matters: cut sandwiches on the diagonal, use colorful produce, and vary textures (creamy dip plus crunchy veggies). Let teens help plan the menu once a week so they’ll be more likely to finish their lunch.
Quick recipe ideas
- Mediterranean chickpea salad: chickpeas, cucumber, tomato, olives, lemon, olive oil, and feta.
- Chicken Caesar wrap: romaine, shredded chicken, grated Parmesan, and a light Caesar dressing on a whole-wheat tortilla.
- Soba noodle salad with edamame, shredded carrot, and sesame-ginger dressing.
If you’re also packing for younger siblings, you can adapt these ideas by checking age-appropriate portions and simpler flavors such as the cold lunch ideas for kindergartners and scaling down spice or texture.
Conclusion
For teens who want something more grown-up, consider looking at guides to stylish, practical options like cool lunch bags for teens that replace kid-centric boxes with tote-style solutions. If you’re focused on choosing a durable, functional container, read the roundup of the best lunch boxes of 2026 to compare tested options.
16+ Adult Lunchable Ideas You Need To Try!
16+ Adult Lunchable Ideas You Need To Try!
Lunchables were the ultimate convenience of childhood—compartmentalized, customizable, and fun. Reimagined for grown-ups, they become a way to eat smarter, indulge in better ingredients, and still enjoy the playful “build-your-own” experience. If you’ve ever wondered why we recreate childlike comforts as adults, see this exploration of why young children want to be adults for a quick look at the psychology behind nostalgia and imitation.
Below are 18 inspired adult lunchable ideas, plus packing tips and pairings so you can make balanced, delicious midday meals that feel like a treat.
Quick rules for adult lunchables
- Choose one protein, one or two carbs, a veggie or fruit, something creamy or spreadable, and a snack/treat.
- Opt for high-quality ingredients: artisan cheese, cured meats without fillers, whole-grain crackers, and fresh fruit.
- Use small reusable containers or bento boxes to keep components separate and fresh.
18+ Adult Lunchable Ideas
- Mediterranean Mezze Box
- Hummus, falafel bites, cucumber slices, cherry tomatoes, pita wedges, olives, and a few almonds.
- Charcuterie Lunchable
- Thinly sliced prosciutto, salami, manchego, fig jam, cornichons, and seeded crackers.
- Sushi Rice Bowl Box
- Cold sushi rice, slices of smoked salmon or tofu, avocado, pickled ginger, and soy sauce in a small flask.
- Caprese Bento
- Fresh mozzarella balls, cherry tomatoes, basil leaves, balsamic glaze, and toasted baguette slices.
- Greek Salad Kit
- Feta cubes, cucumber, red onion, olives, pepperoncini, and a lemon-oregano dressing pouch.
- Tex-Mex Snack Pack
- Sliced grilled chicken, black bean salad, tortilla chips, salsa, and shredded cheddar.
- Scandi Smørrebrød Box
- Rye crisps, pickled herring or smoked trout, dill, radish slices, and butter.
- Italian Antipasto
- Mortadella, marinated artichokes, roasted red peppers, parmesan shards, and olive oil crostini.
- Protein Power Bento
- Grilled steak strips, quinoa salad, steamed broccoli florets, and tzatziki.
- Vegetarian Delight
- Roasted chickpeas, baby carrots, guacamole, whole-grain pita, and a square of dark chocolate.
- Salad-in-a-Jar Lunchable
- Layered jar with dressing at bottom, grains and beans in middle, leafy greens on top—shake when ready.
- DIY Taco Box
- Mini corn tortillas, seasoned ground turkey, shredded lettuce, pico de gallo, and lime wedges.
- Cheese Lover’s Pack
- Three cheese varieties, honeycomb or chutney, grapes, and oatcakes.
- Breakfast-for-Lunch Box
- Hard-boiled eggs, smoked salmon, sliced avocado, mini bagel halves, and chives.
- Asian-Inspired Bento
- Sesame tofu or teriyaki chicken, edamame, pickled cucumber, steamed rice, and a small sesame dressing.
- Pâté & Picnic Box
- Chicken liver pâté, cornichons, buttered baguette slices, and a few macaroons.
- Middle Eastern Feast
- Labneh, za’atar pita, grape leaves, roasted eggplant dip, and pomegranate arils.
- Dessert-First Box
- A small slice of pound cake, berry compote in a separate cup, mascarpone, and toasted almonds.
Bonus idea: Build a theme lunchable around a special event—baby shower, game night, or travel snack board—to make meals feel festive.
Packing, storage, and make-ahead tips
- Keep wet items separated in small containers or silicone cups to prevent sogginess.
- Use ice packs for perishable items and choose insulated lunch bags if you’re away from refrigeration.
- Portion sauces into tiny jars to control moisture and flavor.
- Make components the night before to save time—assemble just before you eat.
- If you’re planning themed food for a gathering or special moment, you might like browsing creative maternity photoshoot ideas for inspiration on color palettes and presentation.
Pairings & Drinks
- Light white wine (if appropriate), sparkling water with citrus, or an iced herbal tea pair beautifully.
- For a balanced plate, aim for at least one vegetable and a source of healthy fat every lunchable.
Troubleshooting common issues
- Soggy crackers: pack crackers separately and add only when eating.
- Lack of variety: switch up cheeses, swap meats for legumes, or add a seasonal fruit each week.
- Time constraints: keep a few ready-to-go elements (hard-boiled eggs, roasted veggies) in the fridge for quick assembly.
Why adult lunchables work
They offer control, portioning, and the joy of building your own combinations. They also encourage trying new flavor pairings without committing to a full cooked meal—perfect for busy workdays, picnics, or when you want a satisfying lunch without ordering takeout.
Conclusion
If you want a ready-made round-up that inspired some of these combos, check out the original collection of 16+ Adult Lunchable Ideas on Slimming Violet for more variations and photos. For a lighter take on pizza-style lunchables and a fun perspective on fast-food comparisons, read this Pizza Hut vs. Domino’s vs. Papa John’s pizza ranking which can spark ideas for quick pizza-themed lunchables.
Budget-Friendly School Lunches That Actually Get Eaten
Budget-Friendly School Lunches That Actually Get Eaten
Packing lunches that kids will finish — without breaking the bank — is part art, part planning. The goal is simple: nutritious, appealing, and quick. Start by thinking in themes (protein + carb + fruit/veg + fun), and you’ll assemble winning combinations in minutes. For simple vegetable options that most little ones accept, see our guide to the best vegetables for preschoolers to pair with lunches.
Quick Principles
- Keep portions child-sized and varied so nothing feels overwhelming.
- Repeat favorites with small twists (different dips, shaped cutters, or new spice blends).
- Cook once, use twice: roast a tray of chicken or beans and reuse across meals.
- Use inexpensive pantry staples — rice, pasta, canned beans, eggs — as the backbone of many lunches.
Budget-Friendly Lunch Ideas
Make-ahead mains
- Pasta salad: whole-grain pasta, a simple vinaigrette, shredded rotisserie chicken (or canned tuna), and frozen peas or chopped cucumber. Make a big batch and portion for several days.
- Egg muffins: whisk eggs with leftover veggies and cheese, bake in a muffin tin. Store in the fridge and grab a couple for lunchboxes.
- Bean burritos: mash canned beans with spices, add cheese, roll in tortillas and freeze. Thaw overnight and pack cold or warm in an insulated container.
Wraps & roll-ups
- Hummus and veggie roll-up: whole-wheat tortilla, hummus, shredded carrots, and sliced bell pepper. Cut into pinwheels for fun finger food.
- Pizza pocket: whole-wheat pita, tomato sauce, mozzarella, and diced pepperoni or veggies. Toast quickly in the morning or pack cold.
Veg-forward sides (low-cost, high-return)
- Roasted chickpeas: inexpensive, crunchy, and full of protein.
- Frozen steamed edamame: a filling, wallet-friendly option that kids enjoy popping open.
- Quick cucumber salad: sliced cucumber tossed with vinegar, a pinch of sugar, and sesame seeds.
Snackable add-ins
- Yogurt tubes (freeze them to keep lunch cool and thaw by lunchtime).
- Homemade trail mix with cereal, a few chocolate chips, and sunflower seeds.
- Fruit kabobs (use seasonally cheap fruit or canned fruit in juice if fresh is pricey).
Packing & Presentation Tips
- Use small containers and bento-style compartments to separate items — variety sells, even when components are familiar.
- Include a dip: a small container of ranch, hummus, or yogurt can turn raw veggies into a winner.
- Let kids help pack: if they choose between two veggie options or two fruits, they’re more likely to eat their choice.
Picky Eater Strategies
- Sneak veggies into favorites: blend spinach into smoothies, add finely shredded zucchini to muffins, or stir pureed carrots into mac and cheese.
- Offer two acceptable choices rather than open-ended options; a constrained choice feels safer to picky kids.
- If lunchroom dynamics or safety concerns ever affect eating or social comfort, parents may want to read guidance on what to do if a kid threatens another kid to be ready to advocate for their child.
Stretching a Food Budget
- Buy in bulk what your family uses most (rice, oats, canned tomatoes).
- Embrace seasonal produce and freeze extras for later.
- Plan lunches around dinner leftovers to avoid waste and save time.
Simple Weekly Prep Plan (30 minutes)
- Cook a grain (rice or pasta) and a protein (eggs or beans).
- Roast a tray of mixed vegetables.
- Portion into containers: mains, veggies, fruit, and a small treat.
- Label and stack in the fridge for grab-and-go mornings.
Conclusion
For fresh, ready-to-use inspiration, the list of 72 Easy School Lunch Ideas Kids Will Actually Eat! offers dozens of practical combos to try. If you want more creative combos and seasonal suggestions, these 30 Creative School Lunch Ideas Your Kids Will Actually Want to Eat are great for sparking variety and keeping lunches exciting without overspending.
