
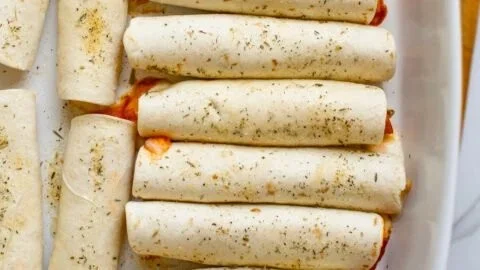
Pizza Roll Ups
Pizza Roll Ups: A Quick, Fun Twist on Pizza Night
Pizza roll ups are bite-sized, handheld parcels of all the flavors you love from pizza — melted cheese, savory sauce, and your favorite toppings — wrapped in a soft dough or tortilla and baked until golden. They’re perfect for busy weeknights, parties, or a kid-friendly snack that feels special without much fuss. If you’re balancing snack prep with childcare, you might also want to review what to do when a baby rolls onto their stomach while sleeping but can’t roll back for peace of mind during kitchen time.
Why Pizza Roll Ups Work
- Portable and portion-controlled — easy to serve and enjoy without a plate.
- Customizable — switch up sauces, cheeses, and fillings to suit dietary needs.
- Fast to make — many recipes use store-bought dough or tortillas to cut prep time.
Ingredients (basic batch)
- 1 sheet of pizza dough or 6 large tortillas
- 1/2 to 3/4 cup pizza sauce
- 1 to 2 cups shredded mozzarella (or blend of cheeses)
- 1/2 cup sliced pepperoni or other thinly sliced toppings
- Optional: chopped veggies, cooked sausage, red pepper flakes, Italian seasoning
- Olive oil or melted butter for brushing
- Salt and garlic powder for extra flavor
Instructions (simple method)
- Preheat oven to 400°F (200°C). Line a baking sheet with parchment.
- If using dough: roll it out into a rectangle about 1/8-inch thick. If using tortillas, lay them flat.
- Spread a thin layer of pizza sauce, leaving a small border on the edges.
- Sprinkle cheese evenly, then add toppings in a single layer so the roll seals easily.
- Starting at one edge, roll the dough or tortilla tightly. For dough, you can slice the roll into 1-inch pieces to make pinwheels; for tortillas, keep them whole or cut in half.
- Place seam-side down on the baking sheet. Brush with olive oil or butter and sprinkle with garlic powder or Italian seasoning.
- Bake 10–15 minutes (less for tortillas, longer for dough) until golden and the cheese is melted. Let cool a couple minutes before serving.
Variations and Serving Ideas
- Vegetarian: use grilled veggies and a mix of mozzarella and feta.
- Calzone-style: fold dough over fillings and crimp the edges for a sealed pocket.
- Dipping: serve with warmed marinara, garlic butter, or ranch dressing.
- Make-ahead: assemble and freeze on a sheet pan; transfer to a zip bag for later baking from frozen with a few extra minutes in the oven.
Tips for Success
- Avoid overstuffing: too much sauce or filling makes rolling and baking messy.
- Even slices: if making pinwheels, chill the roll briefly to make clean cuts.
- Crisp up: a quick pass under the broiler (watch closely) will add extra browning.
- Supervision: while these are family-friendly, keep hot trays and small toppings out of infants’ reach, and consider safety resources such as advice on babies who roll onto their stomach while sleeping if you’re preparing food while caring for little ones.
Storage
- Refrigerate leftovers in an airtight container for up to 3 days.
- Reheat in a 350°F (175°C) oven for 8–10 minutes to restore crispness, or microwave briefly if convenience matters more than texture.
Conclusion
For a classic pepperoni version and a straightforward approach, try the recipe and tips from I Am a Honey Bee’s easy pepperoni pizza roll ups to get started. If you prefer step-by-step instructions with cost-conscious options and photos, see the detailed guide at Budget Bytes’ pizza roll ups recipe.
Dinner Ideas for Kids Picky Eaters
Dinner Ideas for Kids Who Are Picky Eaters
Feeding picky children can feel like a daily puzzle: one night they love pasta, the next they refuse anything with sauce. Start simple and predictable, then build slowly toward variety. For helpful ideas that translate well to school meals, see school lunch ideas for picky eaters.
Why small changes work
- Familiarity reduces resistance. Keep the plate recognizable while introducing tiny tweaks (a new dip, a different cheese, or a mild herb).
- Control and choice empower kids. Let them pick between two vegetables or choose the order they eat items.
- Texture matters as much as taste. If your child dislikes mushy foods, offer roasted or crunchy options instead.
Dinner strategies that actually help
- One-ingredient swaps: Replace white rice with cauliflower rice mixed 50/50, or try whole-grain pasta paired with a butter-and-parmesan sauce.
- Build-your-own plates: Create stations with protein, starch, and veggies so kids assemble their own meals. This encourages exploration without pressure.
- Sneak nutrition subtly: Blend cooked vegetables into sauces, or grate carrots and zucchini into meatballs and patties where texture is hidden but nutrients remain.
- Set predictable mealtimes and a no-snacking window before dinner so hunger helps motivation.
Easy, kid-friendly dinner ideas
- Mini quesadillas: Use small tortillas with cheese and finely chopped mild peppers or shredded chicken. Serve with a small side of salsa for dipping.
- Pasta with hidden veg sauce: Purée roasted tomatoes with red peppers and a bit of carrot; mix with their favorite pasta and top with grated cheese.
- Baked chicken tenders: Coat strips in crushed cereal or panko for crunch. Offer ketchup or yogurt-based dips to make them appealing.
- Breakfast-for-dinner: Scrambled eggs, whole-grain toast soldiers, and fruit are familiar and often well-accepted.
- Mini frittatas or egg muffins: Bake eggs with small bits of ham and cheese in a muffin tin—portable, mild, and customizable.
- Veggie-loaded meatballs: Meatballs made with grated zucchini and carrot can be served with dip or in a slider bun.
- DIY grain bowls: Let kids choose a base (rice, quinoa), a protein (beans, chicken), and two mix-ins (corn, cucumber) with a mild dressing.
Portion, presentation, and patience
- Start with small portions so rejection doesn’t feel wasteful; offer seconds if they’re interested.
- Use fun plates, cutters, or even simple food faces to make meals inviting without being gimmicky.
- Introduce one new food at a time alongside favorites; it can take 8–15 exposures before a child accepts something new.
- Avoid pressure or bribery; praise tasting attempts and stay calm about refusals.
Make leftovers work
Leftovers can become entirely new meals: roast chicken becomes tacos, steamed veggies blend into a cheesy soup, and last night’s rice can become a fried-rice-style bowl with tiny, well-tolerated mix-ins. If you need cold, make-ahead options to reduce evening prep, explore cold lunch ideas for kids.
Quick grocery staples to keep on hand
- Mild cheeses, plain yogurt, and hummus for dips
- Whole-grain bread and simple wraps
- Frozen veggies (easy to roast or hide)
- Eggs, canned beans, and versatile proteins like rotisserie chicken
- A few favorite sauces (tomato, mild salsa, or a light peanut sauce) to make new foods more familiar
Conclusion
For hands-on recipe ideas you can try with kids, the roundup at 40 Easy Recipes You Can Cook with Your Kids (Even Picky Ones!) offers many projects that make mealtime playful. If you want ready-to-make, kid-approved dinners, check the collection at Easy Kid-Friendly Meals for Picky Eaters – Rachael’s Good Eats for simple recipes that tend to win over finicky eaters.
24 Sweet Baby Shower Decoration Ideas
24 Sweet Baby Shower Decoration Ideas
Planning a memorable baby shower means balancing charm, comfort, and a little bit of whimsy. Whether you’re aiming for an elegant tea, a playful gender-reveal bash, or a cozy brunch, these 24 decoration ideas will help you create a warm, picture-perfect celebration. For inspiration focused on girly themes, consider these baby girl shower theme ideas to kickstart your design choices.
Pastel Balloon Garland
Create an arch or table runner of mixed pastel balloons for an instant festive focal point.Floral Backdrop Wall
Use paper flowers or fresh blooms on a large foam board to make a stunning photo backdrop.Personalized Banner
Spell out the baby’s name or a sweet phrase with a custom banner across the dessert table.Themed Table Runner
Choose fabric or paper runners that match your theme—clouds for a sky shower, gingham for a picnic vibe.Mini Hot Cocoa Bar
Set up labeled jars and toppings with tiny scoops; add a menu card for a cozy touch.Diaper Cake Centerpiece
Craft a tiered diaper cake decorated with ribbons, small toys, and faux flowers.Cloud or Balloon Ceiling Décor
Hang clusters of white balloons or cotton batting "clouds" from the ceiling for a dreamy effect.Pastel Tassel Garland
Drape tassels across doorways and tables to add texture and movement.Sweet Treat Display
Use tiered cake stands and labeled platters for cupcakes, cookies, and macarons to create visual variety.DIY Photo Booth Props
Offer themed props like baby bottles, pacifiers, and cute signs attached to sticks for fun photos.Elegant Neutral Tablescape
Combine muted tones, greenery sprigs, and soft linens for a timeless, sophisticated look.Mason Jar Flower Arrangements
Fill jars with seasonal blooms and tie with twine or ribbon for simple, charming centerpieces.Onesie Display Line
Hang decorated onesies on a string as both décor and an interactive activity for guests to sign.Balloon-filled Welcome Box
Place a decorated box at the entrance that releases a small bunch of balloons when opened for a playful surprise.Themed Tableware
Coordinated plates, napkins, and cups reinforce your chosen palette and make cleanup easier.Dessert Table Signage
Use chalkboards or framed signs to label sweets and add a personal message from the parents-to-be.Hanging Paper Lanterns
Mix sizes and colors of paper lanterns to add depth and warmth overhead.Storybook Corner
Create a cozy nook with children’s books stacked beautifully for guests to browse and gift to the baby.Ribbon Backdrop
Layer ribbons of varying lengths and textures on a dowel rod to frame photos or the gift table.Balloon Confetti Balloons
Fill clear balloons with confetti or small paper hearts for a playful floating element.Seasonal Touches
Incorporate seasonal items—mini pumpkins for fall or sprigs of eucalyptus for winter—for a timely feel.Interactive Guest Wishes Station
Provide cards and a decorated jar where guests can leave wishes or parenting tips for the new parents.Edible Favor Bags
Wrap small homemade cookies or candies in clear bags with a personalized tag as a sweet takeaway.Coordinated Color Blocks
Design tables and zones using blocks of two or three coordinating colors for a cohesive, modern look.
If your shower will be held mid-morning, consider lighter decor elements and food-focused displays; for more ideas on planning a meal-oriented gathering, these baby shower brunch ideas can help you map the flow and décor around the menu.
Conclusion
For additional inspiration and visual examples of decorations similar to those listed here, check out The Bump’s gallery of sweet baby shower decoration ideas which features a wide range of styles and setups. If you need coordinating tableware for a boy-themed shower, consider the ready-made options like the Sweet Baby Co. Oh Baby Boy shower plates and napkins to simplify styling and cleanup.

11 Food Hacks Every Parent Should Know
11 Food Hacks Every Parent Should Know
Parenting around mealtimes can feel like a full-time job. From picky eaters to rushed mornings, small tweaks can save time, reduce waste, and make meals more enjoyable for the whole family. If you’re starting solids, try these easy chicken baby food recipes as simple, high-protein first meals that freeze well and reheat quickly.
Below are 11 practical, time-tested food hacks to streamline feeding, introduce new flavors, and keep your sanity.
Batch-cook and portion right away
Cook larger batches of staples (rice, pasta, proteins) and freeze individual portions in silicone molds or small containers. Label with date and contents so you always have ready-made meals.Use muffin tins for balanced plates
Pour mixed foods—like mini omelets, veggie-packed rice, or meatloaf mix—into muffin tins for perfectly portioned, kid-sized servings that are easy to freeze and reheat.Sneak in veggies with sauces and dips
Puree spinach, carrots, or cauliflower into tomato sauce, pesto, or yogurt dips. Kids often accept familiar textures and flavors when veggies are blended smoothly into favorite sauces.Make “snack stations” instead of packed lunches
Set out several small bowls of finger foods—cheese cubes, sliced fruit, crackers, hummus—and let kids build their own plates. This boosts autonomy and reduces complaints.Freeze smoothies into popsicles
Blend fruits, greens, and yogurt, then pour into popsicle molds for a nutritious on-the-go treat that doubles as a portion-controlled snack.Reheat without drying—use a splash of liquid
When reheating pasta, rice, or casseroles, add a tablespoon of water or stock and cover to trap steam. This restores moisture and avoids dried-out leftovers.Prep a “safety net” snack bag
Keep a small bag in the freezer or pantry with shelf-stable, healthy snacks (nuts if age-appropriate, whole-grain crackers, fruit leather) to prevent emergency fast-food runs.Try one-bite introductions for new foods
Offer a tiny taste—just one or two bites—of a new food alongside favorites. Repeated neutral exposure (without pressure) often leads to acceptance over time.Use themed dinners to expand palettes
Create a “colors night” or “taco bar” where kids pick components. Framing new ingredients as part of a game reduces resistance and makes trying new things fun.Turn leftovers into new meals
Leftover roasted vegetables become frittata fillings; extra chicken transforms into quesadillas or salads. Repurposing saves time and keeps meals interesting.Freeze fruit portions for easy purees
Keep a stash of frozen fruit chunks to thaw and blend for smoothies, toppings, or baby purees. For a simple single-fruit puree, see this guide to apple baby food for texture and sweetness tips.
Quick tips for picky phases:
- Keep portions small—large piles can overwhelm.
- Offer new foods without pressure; repeat exposure is key.
- Let kids help with simple tasks; involvement increases interest in eating.
Conclusion
For a broader list of practical skills to teach children that pair well with food independence, consider exploring 100 Life Skills to Intentionally Teach your Children to plan meals, use kitchen tools safely, and build confidence. For ongoing parenting ideas, meal-planning strategies, and clever hacks, check out these Parenting tips & hacks — Very Long Chronicles for fresh inspiration.
30 Cozy We Can Bearly Wait Baby Shower Theme Ideas (Boys, Girls & Neutrals)
30 Cozy “We Can Bearly Wait” Baby Shower Theme Ideas (Boys, Girls & Neutrals)
A “We Can Bearly Wait” baby shower is a warm, whimsical theme that works beautifully for boys, girls, and gender-neutral celebrations. Think soft textures, cuddly bear motifs, woodland accents, and cozy details that make guests feel like they’ve stepped into a snug forest den. If your shower will be outdoors, consider adapting these ideas from the best outside baby shower ideas for girls to suit a unisex or woodland vibe.
Below are 30 creative takes and practical touches to customize the theme for any guest of honor.
Planning basics: colors, textures & invitations
- Color palettes:
- Boys: navy, forest green, mustard, taupe
- Girls: blush, warm caramel, cream, sage
- Neutrals: oatmeal, moss green, muted gold, soft gray
- Textures: faux fur throws, knit blankets, burlap runners, wool pom-pom accents
- Invitations: kraft paper with a hand-drawn bear, letterpress paw prints, or a playful “We Can Bearly Wait” script
Decorations & ambiance
- Centerpieces: mini log slices topped with a plush bear and a small vase of wildflowers
- Backdrops: felt leaf garlands and a giant paper bear silhouette
- Lighting: string lights, lanterns, and battery-operated candles for a warm glow
- Signage: wooden signs reading “Bear Hugs Here” or “Snuggle Station”
Food & drink ideas
- Bear-themed snacks: honey-glazed nuts, bear-shaped sandwiches or pancakes, and graham cracker s’mores station
- Cake & desserts: a naked cake decorated with meringue mushrooms and fondant paw prints; honeycomb cupcakes
- Drinks: “Honey Lemonade,” warm apple cider (for cooler months), and a mocktail bar with berry spritzers
Games & activities
- Diaper raffle with a plush bear prize
- “Pin the Paw on the Bear” for a playful twist on a classic
- Create-a-bear card: guests write wishes and advice on bear-shaped cards to attach to a memory book
- Onesie decorating station with fabric markers and cozy bear patches
Favors & keepsakes
- Mini jars of local honey with a tag: “Thanks for making life a little sweeter”
- Knit bear hats or bear-ear headbands for guests to take home
- Seed packets labeled “Watch Love Grow” with a paw-print sticker
Boy-focused ideas
- Rustic lumberjack meets bear: plaids, suspenders for decor props, and a campfire cake
- Blueberry & maple flavor palette for desserts
- Activity: build-your-own bear cub (mini stuffed animal assembly station)
Girl-focused ideas
- Blush-and-gold woodland: floral crowns, rose-gold utensils, and delicate garlands
- Dessert bar with honey macarons, berry tarts, and pink hot cocoa
- Incorporate classic baby-girl mashups and floral accents — see more creative girl-focused motifs with curated baby girl baby shower themes for inspiration
Gender-neutral versions
- Modern woodland: simple lines, natural wood, greenery, and neutral plush bears
- Activity: guestbook tree where attendees add leaf-shaped notes with parenting tips
- Menu: universally loved comfort foods like mini pot pies, mashed potato bites, and a honey butter spread
DIY decor projects
- Felt paw-print garland: cut paw shapes from felt and string with twine
- Log vase holders: hollow thin slices of wood to hold small glass votive cups
- Pom-pom bear garlands in coordinating colors to drape across tables
Season-specific twists
- Spring: pastel wildflowers, bird-nest accents, and light linen
- Summer: picnic blankets, gingham, chilled berry drinks
- Fall: warm plaid, cinnamon-scented favors, caramel apple bar
- Winter: faux fur details, hot cider station, twinkling fairy lights
Budget-friendly swaps
- Replace real florals with dried grasses and eucalyptus
- Use printable templates for signage instead of custom calligraphy
- Borrow blankets and wooden props from family or friends
Photography & guest moments
- Photo booth props: bear ears, plaid scarves, and cardboard tree stencils
- Capture candid moments on a cozy couch area with a faux-fur throw and a “We Can Bearly Wait” pillow
Safety & accessibility
- Choose plush toys without small detachable parts for favor safety
- Ensure seating areas are accessible and child-friendly if littles will attend
- Label food clearly for allergies and offer gluten-free or dairy-free options when possible
Styling checklist for the host
- Invitations sent 4–6 weeks prior
- Confirm dietary restrictions and setup a labeled serving station
- Prep a quiet area for nursing or baby breaks
- Have a backup plan for outdoor events in case of bad weather
Conclusion
For a themed spin with a rustic, playful edge, check these 23+ Easy & DIY Cowboy Baby Shower Theme Ideas on a Budget to borrow Western accents that pair surprisingly well with woodland elements. If you’re feeling overwhelmed by planning or dealing with emotional ups and downs during pregnancy or postpartum, reading about how Grief Makes You Feel Like You’re Going Crazy can help normalize those feelings and point you toward support.
20 Magical Spring Baby Shower Themes for Girls You Can’t Miss
20 Magical Spring Baby Shower Themes for Girls You Can’t Miss
Spring is the perfect season to celebrate new life: soft colors, fresh flowers, and a gentle warmth in the air. Whether you’re planning an intimate gathering or a lively party, these 20 spring-themed baby shower ideas for girls will spark inspiration and help you create a memorable day. If you’re thinking about hosting outdoors, consider browsing some creative outside baby shower ideas for girls to make the most of the season.
1. Blossom & Bows
Think cherry blossoms, delicate bows, and pastel table settings. Use blossom branches, ribbon garlands, and bow-adorned favors to create a whimsical, feminine atmosphere.
2. Butterfly Garden
Invite guests into a fluttering paradise with butterfly garlands, floral cupcakes topped with edible butterflies, and butterfly-shaped cookies.
3. Baby Bird Nook
Create cozy bird nests with faux moss and speckled eggs as centerpieces. Soft bird motifs on invitations and napkins keep the theme sweet and simple.
4. Pastel Picnic
Spread gingham blankets and wicker baskets for a relaxed, outdoor celebration. Offer finger sandwiches, lemonade, and pastel macarons.
5. Fairy Tale Tea Party
Delicate teacups, lace tablecloths, and a storybook corner for guests to write wishes for baby. Encourage guests to wear floral hats or pastel attire.
6. Enchanted Forest
Combine greenery, fairy lights, and wood-slice accents. Use whimsical animal figurines and moss runners down the table.
7. Little Lamb
Soft wooly textures, neutral tones with blush accents, and lamb plushies make for a cozy, classic shower theme.
8. Tulip Terrace
Tulips in varying shades become the focal point—tall vases for centerpieces, petal confetti, and tulip-adorned desserts.
9. Sweet Pea Soiree
Sweet peas and soft greens give a Victorian garden feel. Incorporate vintage bottles, lace, and pastel favors.
10. Sunny Daisies
Bright daisy motifs, yellow-and-white accents, and daisy chains are cheerful and modern for a spring celebration.
11. Little Ladybug
Polka dot decor, red-and-black accents, and ladybug-themed snacks make this playful and kid-friendly.
12. Honeybee Honeycomb
Gold accents, honey-themed treats, and hexagon patterns create a trendy, nature-inspired shower.
13. Garden Tea & Macarons
A refined Parisian twist with tiered macaron displays, petite florals, and elegant place settings.
14. Rainbow After Rain
Soft rainbow pastels, cloud-shaped balloons, and a sprinkle-covered cake provide a joyful, colorful vibe.
15. Vintage Carousel
A nostalgic theme with pastel carousel horses, classic stripes, and carnival-style sweets for a charming celebration.
16. Secret Garden
Hidden details like handwritten wish cards tucked into foliage, lanterns, and muted floral prints create intimacy and wonder.
17. Peony Parade
Lavish peonies in full bloom, soft blush linens, and romantic candlelight for a luxe spring shower.
18. Seashell Cove (Spring Beach)
Light sand tones paired with seafoam greens, shell-adorned cupcakes, and driftwood accents for a coastal spring feel.
19. Little Princess in Bloom
A regal yet sweet theme with a floral crown station, tiara cupcakes, and pastel-velvet accents.
20. Storybook Spring
Choose a beloved children’s book as the motif—decor inspired by illustrations, a storytime nook, and themed games.
Planning Tips & Practical Ideas
- Color palette: Stick to a main color and two complementary shades to keep decor cohesive.
- Invitations: Match your motif—floral die-cuts, butterfly silhouette, or pastel watercolor designs.
- Food: Seasonal items like strawberry shortcakes, asparagus tarts, and lemon bars feel fresh.
- Games & favors: DIY seed packets, mini potted succulents, or herb starter kits double as favors and decor.
- Photography: Set up a floral backdrop or an arch for group photos and to highlight cake or gifts.
For more theme variations and styling examples, check helpful resources on classic baby girl baby shower themes that you can adapt to springtime motifs.
Conclusion
Planning a spring baby shower for a baby girl is all about embracing gentle colors, natural elements, and playful details that celebrate new beginnings. If you’re processing loss or planning a gathering with sensitivity, there are thoughtful reflections like 7 Things I Have Learned Since the Loss of My Child that can offer perspective during difficult times. For those navigating complex emotions, resources such as Grief Makes You Feel Like You’re Going Crazy provide compassionate guidance and validation.
Woodland Baby Shower Ideas
Woodland Baby Shower Ideas
A woodland baby shower is a warm, whimsical way to celebrate a new arrival—think mossy textures, soft animal motifs, natural wood accents, and a palette of greens, browns, and blush. If you’re planning something with a gently feminine touch, these delicate baby girl shower ideas can be blended into a woodland scheme to create an elegant, nature-inspired gathering.
Theme & Color Palette
Start with a clear visual: muted sage, cream, warm tan, and a touch of rose or mustard for contrast. Add metallics sparingly—antique gold or brushed copper—for a sophisticated glint. Use layers of texture (linen napkins, burlap runners, carved wood slices) to make tabletop vignettes feel organic and cozy.
Invitations & Signage
Choose invitations with hand-drawn illustrations of foxes, deer, mushrooms, or ferns. Eco-friendly paper with deckled edges or kraft cardstock reinforces the outdoor theme. For signage, use small wooden easels, chalkboards with calligraphy, or stamped kraft tags directing guests to “Gifts,” “Desserts,” and the “Diaper Raffle.”
Decorations & Centerpieces
- Centerpieces: hollow out small logs or use wooden rounds topped with baby-safe moss, tiny succulents, and a DIY mini terrarium glass cloche.
- Backdrop: create a canopy of string lights and faux greenery for photos; drape a neutral fabric and accent with paper leaves or a garland of felt animals.
- Table accents: scatter pinecones, acorns, and sprigs of eucalyptus; use natural twine to tie napkins and attach name tags.
Food & Drink
Keep the menu seasonal and approachable. Bites that play on the theme—mushroom tartlets, rosemary-roasted nuts, berry pavlovas—feel thematic without being gimmicky. If your shower is a morning event, you can easily incorporate the theme into a brunch spread; these baby shower brunch ideas offer options that transition well from breakfast pastries to savory platters. For beverages, offer a signature mocktail with apple, ginger, and sparkling water, plus a warm cider station for chilly days.
Activities & Games
Choose activities that encourage mingling but aren’t overly competitive:
- Advice cards hung on a “family tree” branch where guests pin written wishes.
- A onesie-decorating station with woodland-themed iron-on patches and fabric markers.
- A gentle scavenger hunt for themed items hidden around the party space; include a small prize like a plantable seed packet.
Favors & Keepsakes
Send guests home with favors that reflect the outdoorsy mood: small jars of local honey, seed packets with a printed thank-you tag, or handmade soap wrapped in kraft paper. For a keepsake, compile a scrapbook page station where guests can add photos, notes, and polaroids to give to the parents-to-be after the shower.
Logistics & Practical Tips
- Choose a comfortable layout with clear traffic flow so guests can circulate between food, seating, and activities.
- Consider weather contingencies if you’re outdoors—tents, portable heaters, or an indoor backup spot keep everyone cozy.
- Keep a basket of essentials (safety pins, stain remover wipes, extra diapers) discreetly available for hosts and parents-to-be.
Conclusion
For a ready-made set of ideas and beautiful visuals that match many of the concepts above, see Woodland Baby Shower Ideas – Jessica Weible Blogs.
If you want more recipes, decor how-tos, and party-planning guidance to help execute a woodland shower, explore Jessica Weible Blogs – Recipes + Party Planning.
25 Spring Math Activities For Preschoolers
25 Spring Math Activities For Preschoolers
Spring is a wonderful time to bring math outdoors and into hands-on play. These 25 activities are designed to build early number sense, sorting, pattern recognition, measurement, and simple geometry — all through playful, seasonal themes. For ideas on healthy, kid-friendly props you can use in counting and sorting games, see this helpful guide to best vegetables for preschoolers.
Quick tips before you start:
- Keep sessions short (10–15 minutes) and focused.
- Use real objects (rocks, flowers, leaves) to make concepts concrete.
- Turn mistakes into curiosity — ask “How could we check that?” rather than correcting flatly.
- Repeat favorites across several days to build confidence.
Activities (with simple setup and learning goals)
- Flower Petal Counting
- Scatter paper or real petals and have children add or remove petals to match a given number.
- Bug Hunt Tally
- Collect toy bugs or draw insects, then make tallies to record how many of each color were found.
- Garden Shape Match
- Cut shapes from cardboard and have children match them to outlines on a garden mat.
- Seed Sorting
- Use pumpkin seeds, sunflower seeds, or dried beans to sort by size, color, or type.
- Pond Life Graphing
- Create a simple bar graph showing how many frogs, ducks, and fish are in a sensory tray.
- Leaf Length Lines
- Line up leaves from shortest to longest to introduce measurement and ordering.
- Spring Pattern Bracelets
- Use colored beads to make repeating patterns (red-blue-red-blue) on pipe-cleaner bracelets.
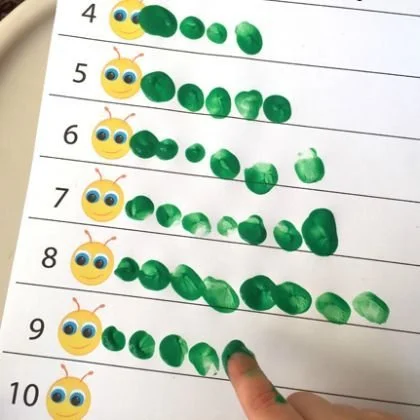
- Caterpillar Addition
- Add paper circles to a caterpillar body to represent simple addition problems (2 + 3 = 5).
- Egg Carton Counting
- Place pom-poms or counters into egg carton cups to practice one-to-one correspondence.
- Rainbow Number Hop
- Number paper plates 1–10 and have kids hop to the plate you call out, reinforcing numeral recognition.
- Butterfly Symmetry Art
- Fold paper, paint one side, and open to reveal symmetrical patterns; discuss halves and mirror images.
- Seed Packet Probability
- Plant mixed-color seeds in small pots and predict which color will sprout most often (early probability talk).
- Spring Sorting Relay
- Set up bins (flowers, insects, tools) and have a relay race to sort items — timing introduces measurement.
- Watering Can Capacity
- Use different-sized cups to fill a watering can, exploring volume and comparisons (more, less, same).
- Match the Shadow
- Cut spring-themed shapes and match them to their shadows; builds visual discrimination and shape knowledge.
- Weather Chart Counting
- Make a daily weather chart and count how many sunny or rainy days occur in a week.
- Seed Counting Mats
- Printable mats with pictures for children to place the correct number of seeds or counters.
- Garden Pattern Paths
- Lay colored stones in repeating sequences to create paths; kids follow and extend the pattern.
- Bunny Hop Skip Counting
- Use bunny cutouts to practice skip counting by twos or fives across a yard or rug.
- Nest Sorting by Size
- Provide different-sized bowls as nests and sort small toy birds into the appropriate nests.
- Spring Measurement Sticks
- Measure items (twigs, flowers) with a nonstandard unit like clothespins or blocks and compare lengths.
- Ladybug Number Match
- Create ladybugs with numbered spots and have kids place the correct number of spots on each ladybug.
- Picnic Plate Fractions
- Divide play plates into halves and quarters using toy food to introduce simple fractions.
- Flower Petal Probability Jar
- Draw colored petals from a jar and record results to discuss chance and prediction.
- Cooking Count-Along
- Use a simple spring snack recipe to measure, count, and sequence steps — great for hands-on math and language development. For a playful book-based cooking idea that supports naming and sequencing, try this cooking name for preschoolers book as a companion to your activity.
Safety and inclusion notes:
- Supervise small objects to prevent choking hazards.
- Offer alternatives for children with sensory sensitivities (e.g., dry materials instead of wet).
- Adapt counting ranges for individual levels — some might work up to 5, others to 20.
Extension ideas:
- Take photos of each activity and create a math scrapbook to track progress.
- Invite families to replicate one activity at home and share results.
- Combine math with literacy by having children describe their process in a sentence or draw what they did.
Conclusion
For a ready-made list of themed ideas and step-by-step instructions, check out this curated collection of 25 Spring Math Activities For Preschoolers – Play Ideas, which pairs well with hands-on teaching. If you want to extend learning into reading and language while keeping activities playful, consider the resource on 25 Fun Literacy Activities for Preschoolers | Rasmussen University to combine literacy with math. You can also find seasonal, kid-friendly projects and printables at 25 Spring Activities for Kids | ABCmouse to keep your spring lessons fresh and engaging.
25 Creative Activities and Ideas For Learning Shapes
25 Creative Activities and Ideas For Learning Shapes
Teaching shapes can be playful, hands-on, and woven into everyday moments. Below are 25 fresh, easy-to-set-up activities that help children recognize, name, and use shapes in creative ways. If you’re planning a shape-themed gathering or want fun snack ideas to match, you might enjoy these baby shower food ideas for a girl for inspiration on shape-based treats and presentation.
Each activity lists simple materials, a short how-to, and one extension to deepen learning.
Shape Scavenger Hunt
Materials: paper shapes or picture cards.
How-to: Hide shapes around the room. Give the child a checklist to find and check off each shape.
Extension: Sort found items by size or color.Playdough Shape Makers
Materials: playdough, cookie cutters (various shapes).
How-to: Press playdough into cutters and name each shape.
Extension: Make patterns of shapes in a row.Shape Stamping with Vegetables
Materials: cut potatoes, paint, paper.
How-to: Carve simple shapes into potato halves, dip in paint, stamp on paper.
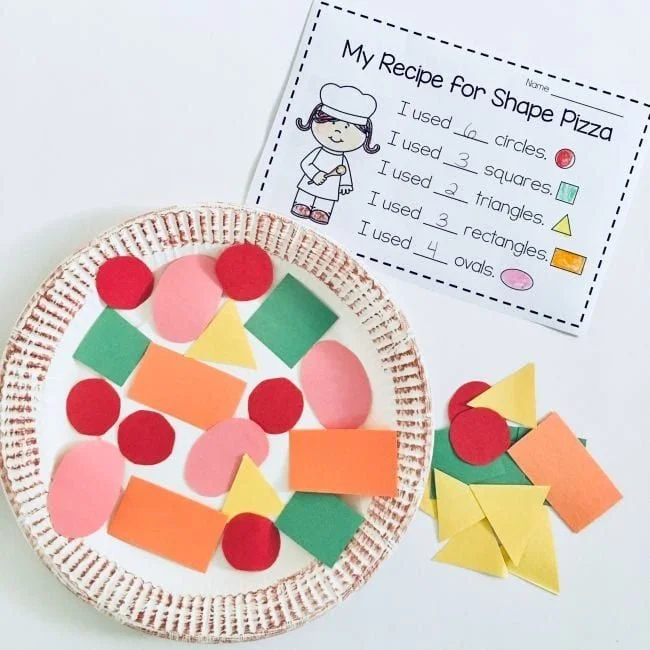
Extension: Count how many of each shape were stamped.Shape Collage Art
Materials: magazines, scissors, glue, construction paper.
How-to: Cut out shapes from magazines and assemble them into a collage scene (houses, trees, people).
Extension: Label each shape on the collage.Sensory Shape Tray
Materials: sand, rice, or dried beans; shape templates.
How-to: Place templates in tray and have kids trace shapes with fingers.
Extension: Bury small shape objects and use a brush to uncover them.Shape Hopscotch
Materials: chalk (outside) or tape (inside).
How-to: Draw or tape different shapes on the ground. Call out a shape and have children hop to it.
Extension: Ask them to make the shape with their bodies.Shape Puzzles from Cardboard
Materials: cardboard, scissors, marker.
How-to: Draw large shapes, cut into two or more puzzle pieces. Mix and have children reassemble.
Extension: Color the shapes before cutting.Shape Sorting with Muffin Tin
Materials: muffin tin, small objects or cut shapes.
How-to: Label each cup with a shape and have children place matching items inside.
Extension: Sort by multiple attributes (shape and color).Shape Matching Memory Game
Materials: pairs of shape cards.
How-to: Flip cards face down and play memory matching.
Extension: Increase difficulty by adding rotated shapes.Shape Yoga Poses
Materials: none.
How-to: Create simple poses that resemble shapes (star pose, triangle arms). Call out a shape to pose.
Extension: Sequence shapes into a “shape story” for balance practice.Shape Sorting Sensory Bottles
Materials: clear bottles, small shape confetti, water, glitter.
How-to: Fill bottles and let children identify shapes as they move.
Extension: Use a magnifying glass to inspect shapes closely.Shape Walk: Neighborhood Hunt
Materials: printable checklist with shapes.
How-to: Walk outside and spot shapes in signs, windows, or architecture.
Extension: Take photos to make a shape scrapbook.Shape Pasta Necklaces
Materials: pasta shapes (or use pre-cut shapes), string, paint.
How-to: Paint or color pasta and string into necklaces by shape.
Extension: Use beads to create pattern sequences.Magnetic Shape Board
Materials: magnetic shapes, cookie sheet.
How-to: Let kids build pictures on the magnetic surface using shapes.
Extension: Challenge them to create a specific object using only three shapes.Shadow Shapes with a Flashlight
Materials: a flashlight, paper cutouts.
How-to: Shine a light on shape cutouts to create shadows on the wall and guess the shape.
Extension: Move the light to change the shadow size and discuss how shapes stretch.Shape Baking: Cookie Cutter Creations
Materials: cookie dough or sandwiches, cookie cutters.
How-to: Cut food into shapes and name them before eating.
Extension: Create a shape-themed meal—see simple breakfast ideas for 1-year-old adaptations like pancake shapes.Bead Shape Patterns
Materials: assorted shaped beads, string.
How-to: Create repeating patterns with different shapes.
Extension: Have children describe or replicate the pattern.Shape Storytime: Books with Shapes
Materials: children’s picture books that feature shapes.
How-to: Read aloud and have children point out shapes on each page.
Extension: Draw a scene from the book using only the shapes learned.Cardboard Shape Houses
Materials: cardboard boxes, markers, scissors.
How-to: Cut and decorate houses using different shapes for doors, windows, and roofs.
Extension: Build a cardboard town using repeated shapes.Shape Fishing Game
Materials: paper fish with shapes, magnet wand, fishing pole.
How-to: Attach paper clips to fish and have kids “fish” for a shape you call out.
Extension: Add point values and play a scoring game.Shape Relay Races
Materials: large shape mats or taped shapes.
How-to: Teams race to collect objects matching their shape and return.
Extension: Swap roles so each child names the shape they collect.Digital Shape Hunt
Materials: tablet or computer with photos.
How-to: Search for shapes in digital images or take photos and label shapes.
Extension: Create a digital slideshow of shapes found in the environment.Build with Shapes: LEGO or Blocks
Materials: blocks or LEGO pieces.
How-to: Challenge kids to build specific shapes or combine shapes to make objects.
Extension: Discuss 2D vs 3D shapes during construction.Nature Shapes Collage
Materials: leaves, sticks, stones, glue, paper.
How-to: Collect natural items and arrange them into shapes on paper.
Extension: Count how many items were used for each shape.Shape Role-Play: Costume Shapes
Materials: colored paper, string, tape.
How-to: Make wearable shape cutouts (e.g., circle hat, triangle cape) and have children act out shape characters.
Extension: Create a short play where each shape has a special skill.
Practical Tips for Success
- Keep sessions short and playful; toddlers learn best in brief bursts.
- Use consistent shape names and reinforce with gestures.
- Rotate materials to sustain interest — switch from paper to fabric, sand to playdough.
- Encourage language: ask open questions (“What can we build with a triangle?”).
- Adapt complexity to age: babies can match and point, preschoolers can classify and create.
Assessment Ideas (informal)
- Observe whether the child can point to a named shape.
- Ask the child to find shapes in a picture book.
- Invite the child to sort mixed shapes into labeled bins.
These quick checks give insight into recognition and categorization skills.
Resources for materials
Most materials are inexpensive or repurposed household items: cereal can act as counters, empty boxes become building blocks, and crayons add color.
Conclusion
For more organized lesson plans and creative activity ideas, see this curated list of 25 Creative Activities and Ideas for Learning Shapes that offers classroom-ready versions. If you want child-friendly craft-focused options, the collection at 25+ Shape Activities and Crafts for Kids has many hands-on projects. For kindergarten-level 2D shapes lessons and printable resources, check out the free ideas at 25 Creative Ways to Teach 2D Shapes in Kindergarten.
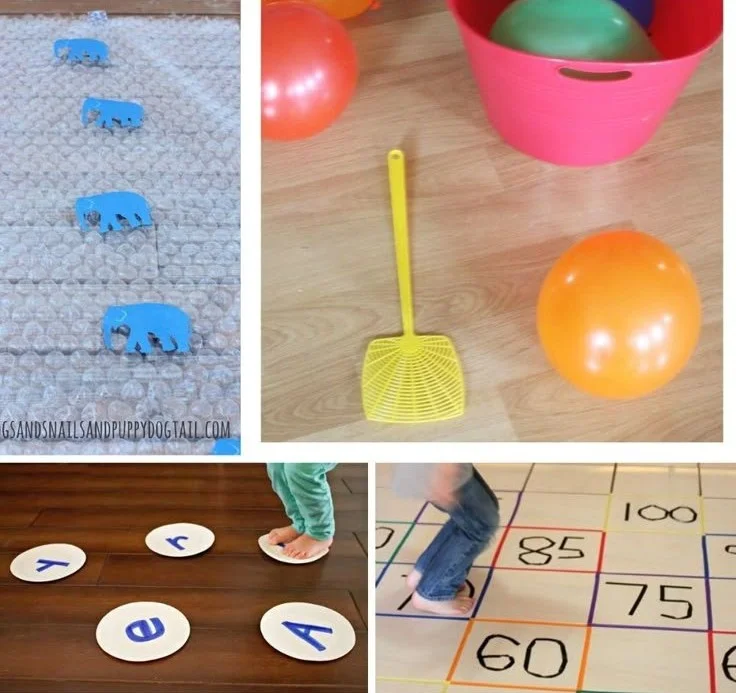
20+ Indoor Energy Burners for Kids
20+ Indoor Energy Burners for Kids
When outdoor play isn’t an option, keeping kids active indoors is still totally possible — and fun. Below are more than 20 creative, safe, and adaptable activities that help children burn energy, work on gross motor skills, and release pent-up excitement. If you’re also looking for ways to redirect strong emotions into laughter, check this resource for a quick mood-shifter that works with kids: best joke about anger for kids.
How to use this list
- Choose activities based on space, child age, and supervision level.
- Swap materials for what you have at home (e.g., socks as beanbags, rolled towels as balance beams).
- Set clear rules for safety (no running near stairs, soft surfaces for tumbling).
- Rotate activities to keep novelty and motivation high.
Active movement games
- Indoor obstacle course — Use cushions, chairs, tape for boundaries, and a timer for friendly competition.
- Animal walks — Crab walk, bear crawl, kangaroo hops, and frog jumps across the living room.
- Stair climbs (if you have safe stairs) — Carry a stuffed toy up and down for reps.
- Balloon keep-up — Keep a balloon in the air as long as possible; add rules (one hand, no touching ground).
- Pillow polo — Use rolled-up socks as balls and a pool noodle as a hockey stick.
- Relay races — Spoon-and-ball, three-legged (with an adult), or suitcase-carry relays down a hallway.
Dance and rhythm
- Freeze dance — Play music; when it stops everyone freezes in position.
- Follow-the-leader dance — Leader makes movements to mimic; swap leaders.
- Dance party cardio — Short playlists of high-energy songs for 5–10 minute bursts.
Mini fitness circuits
- Jumping jacks — Set targets (10–20) or do one-minute rounds.
- Animal-themed circuit — 30 seconds each: frog jumps, bear crawls, star jumps, rest, repeat.
- Yoga flow for kids — Simple sun salutations and balance poses to combine movement with breath.
Ball and toss games
- Sock toss into bins — A simple indoor "basketball" using laundry baskets.
- Bowling with plastic bottles — Fill with a little water or sand and knock them down with a soft ball.
- Target toss — Tape targets on the wall and throw beanbags (or balled-up socks).
Creative movement and pretend play
- Superhero training course — Design missions that require jumping, crawling, and quick sprints.
- Pirate ship adventure — Use a couch cushion island with swashbuckling movement challenges.
- Treasure hunt with movement clues — Each clue requires doing five hops, a spin, or ten toe-touches to get the next hint.
Focused energy burners for small spaces
- Jump rope (pretend or real) — If space allows, long jumps or single-rope attempts in place.
- Hula hooping — Great for core strength and coordination.
- Scooter board or rolling toy races — Use in a hallway with helmet or close supervision.
- Sensory motor bins with movement prompts — Pull a slip that says “do 10 marching steps” or “perform a balance pose” after each scoop.
Games and tech-moderated play
- Interactive video games that require physical movement (dance or sports titles) — short sessions can be great energy outlets. For ideas on engaging screen-based activities for very young kids, see recommendations for the best kids games for under 4 on Steam.
- Simon Says with movement challenges — Add creative tasks (spin, tiptoe, hop on one foot).
Calm-down activities after high-energy play
- Slow stretching and deep-breathing exercises — Transition from high-energy to calm.
- Storytime with gentle movement — Wiggle only during certain words to keep body awareness while settling down.
Tips for success
- Keep sessions short and varied — kids’ attention and energy levels change quickly.
- Use praise and simple rewards (stickers, choice of next game) to encourage participation.
- Adapt intensity for age and physical ability; safety first.
- Rotate toys and props to keep the activities fresh.
Conclusion
For a ready-made collection of kid-tested indoor activities, consider reviewing the curated ideas at Taming Little Monsters’ roundup of 25 indoor energy burners, which offers quick options you can start today. If you want toy-based solutions, this roundup of 32 indoor energy burning toys from Explore More Clean Less highlights items that encourage movement. And for older kids or tweens who need unplugged ideas, browse the 50+ unplugged activities for tween boys at Frugal Fun 4 Boys for projects and challenges that get them moving without screens.
