
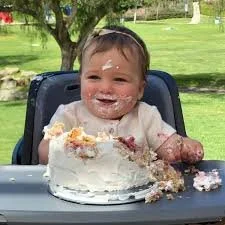
Delicious Fruit-Sweetened Smash Cake For Your Baby Will Love
Create a Delicious Fruit-Sweetened Smash Cake for Your Little One
Are you looking for a fun and healthy way to celebrate your child’s birthday? A fruit-sweetened smash cake might be just what you need. Not only is it a delightful treat that your little one can enjoy, but it’s also packed with natural sweetness and nutrients. Here’s how to create a delicious and nutritious cake that your toddler will love and that parents can feel good about!
Why Choose a Fruit-Sweetened Smash Cake?
So, why go for a fruit-sweetened cake over a traditional sugar-laden option? Here are a few key benefits:
- Natural Sweetness: Fruits like bananas, apples, and dates provide sweetness without refined sugar.
- Healthier Ingredients: You can incorporate whole grains, healthy fats, and more.
- Allergy Friendly: Customizable to fit dietary needs such as dairy-free or gluten-free.
Basic Ingredients for a Fruit-Sweetened Smash Cake
Before we dive into the recipe, let’s look at what you’ll need:
- Fruits: Bananas or apples are great bases.
- Flour: Whole wheat or almond flour works well.
- Healthy Fat: Use coconut oil or unsweetened applesauce.
- Eggs: 1-2 eggs or a flaxseed substitute for binding.
- Baking Powder: For a light, fluffy texture.
- Milk: A non-dairy milk, if needed.
Step-by-Step Guide to Making Your Smash Cake
Step 1: Preheat Your Oven
Preheat your oven to 350°F (175°C). Grease two small cake pans or line them with parchment paper.
Step 2: Prep Your Fruit
- For Bananas: Mash 2 ripe bananas until smooth.
- For Apples: Grate or puree 1-2 apples until you have about a cup of applesauce.
Step 3: Mix Wet Ingredients
In a bowl, combine the mashed bananas (or applesauce) with your healthy fat and eggs (or flaxseed mixture):
- 1/4 cup melted coconut oil
- 2 eggs (or 1 tablespoon ground flaxseed mixed with 2.5 tablespoons water)
Step 4: Combine Dry Ingredients
In another bowl, whisk together:
- 1 cup whole wheat flour (or almond flour)
- 1 teaspoon baking powder
- A pinch of salt
Step 5: Combine Everything
Slowly add the dry ingredients to the wet mix, stirring until just combined. Avoid over-mixing!
Step 6: Bake
Pour the batter evenly into your prepared pans and bake for about 25-30 minutes. Check with a toothpick; it should come out clean.
Step 7: Cool and Decorate!
Let the cakes cool in the pan for about 10 minutes, then transfer them to a wire rack to cool completely.
Tasty Decoration Tips
- Whipped Coconut Cream: A dairy-free option that your toddler will love!
- Fresh Fruit Toppings: Use berries or slices of strawberries and bananas.
- Yogurt Frosting: Mix yogurt with a bit of mashed fruit for a sweet topping.
Quick Tips for Success
- Experiment with Flavors: Try adding cinnamon or vanilla extract for more taste.
- Avoid Overbaking: Keep an eye on it as ovens vary.
- Store Properly: Keep leftovers in the fridge for up to three days.
Common Mistakes to Avoid
- Adding too much fruit can make the cake dense. Stick to the amounts suggested.
- Forgetting to grease the cake pans can lead to sticking.
FAQs About Smash Cakes
How old should my baby be for a smash cake?
Most parents opt for a first birthday, but it can be adapted for any milestone.
Can I make this cake ahead of time?
Absolutely! The cake can be baked and stored in the fridge, covered, for a couple of days.
Is it okay for babies with allergies?
Always check the specific allergies of your child and substitute ingredients accordingly.
Bonus Ideas for a Fun Celebration
- Smash Cake Party: Set up a mini photo booth for memory-making.
- Fruit-themed decorations: Use fruit shapes for the party decor.
- Healthy snacks: Pair the cake with fresh fruit and veggie platters!
This fruit-sweetened smash cake is not just a cake; it’s a wholesome celebration of your little one’s milestone. Sweetened with nature’s candy, your baby’s first birthday will be a hit without the sugar rush! Enjoy this special moment, and remember, it’s all about creating joyful memories.
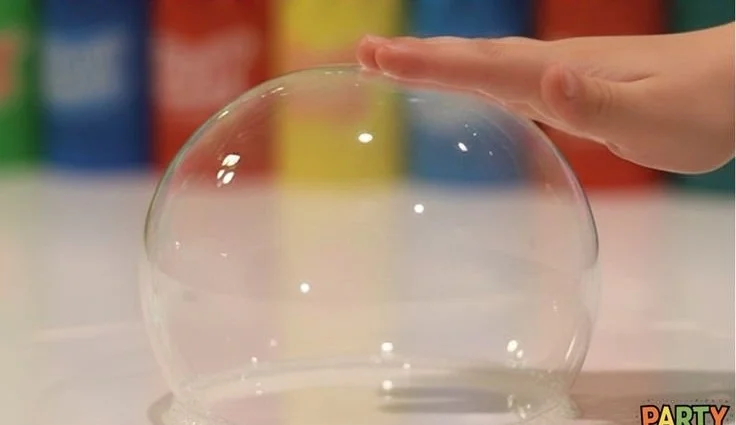
Unpoppable Bubbles Recipe Kids Think Is Actual Magic (Summer Science!)
Unpoppable Bubbles Kids Think Are Actual Magic
If you’re a parent looking for a fun, engaging, and slightly magical activity for your kids this summer, you’ve landed in the right place. Traditional bubbles are great, but what if I told you there’s a recipe for unpoppable bubbles that will leave your kids amazed and begging for more?
Get ready to turn a simple summer afternoon into an enchanting science experiment. Let’s dive into how you can create these incredible bubbles that kids think are actual magic!
Why Unpoppable Bubbles?
Regular bubbles are fun, but they seem to disappear in an instant with the slightest touch. Unpoppable bubbles, on the other hand, can withstand a bit of gentle handling and even blowing! This activity is not only entertaining but also gives kids a peek into the science of surface tension and chemistry.
What You’ll Need
Gather the following items before you begin:
- 1/2 cup dish soap (preferably eco-friendly)
- 1 cup corn syrup
- 3 cups water (distilled is best)
- A large mixing bowl
- Whisk or spoon
- Bubble wands (homemade wands work too!)
Step-by-Step Guide to Create Unpoppable Bubbles
Step 1: Mix the Ingredients
In a large mixing bowl, combine the dish soap, corn syrup, and water.
- Use the whisk or spoon to mix gently—avoid creating too many bubbles in the process!
Step 2: Let It Sit
After mixing, let your bubble solution sit for at least one hour. If possible, overnight is even better!
- This rest period helps the ingredients blend together effectively.
Step 3: Prepare to Blow Bubbles
Once your solution is ready, dip your bubble wand into the mix.
- Try using different shapes for wands: use straws, cookie cutters, or even your hands to make fun bubble shapes.
Step 4: Blow and Watch
Have your kids blow gently through the wands to create bubbles.
- They should be able to see the bubbles forming with less chance of them popping!
Tips for the Best Bubble Experience
- Choose a Wind-Free Zone: Pick a calm outdoor area without too much wind for easier bubble blowing.
- Experiment with Wands: Use different wand shapes to create various bubble sizes.
- Add Food Coloring: If you want to make it even more magical, try adding a few drops of food coloring to the solution.
Mistakes to Avoid
- Too Much Air: When blowing bubbles, remind kids to blow gently.
- Using Tap Water: Tap water can contain minerals that affect bubble formation. Opt for distilled water for the best results.
Frequently Asked Questions
How long do these unpoppable bubbles last?
While they may not be truly unpoppable, these bubbles are designed to last longer than regular bubbles. Expect them to hold up for several seconds if handled gently.
Can I store leftover solution?
Absolutely! Store any leftover bubble solution in an airtight container for future bubble-making fun.
Bonus Ideas
- Bubble Science: Use this opportunity to teach your kids about surface tension. Discuss why some bubbles hold their shape while others pop.
- Bubble Art: Experiment with painting with bubbles by adding food coloring to a shallow dish, blowing bubbles, and using paper to capture their colorful prints.
Creating unpoppable bubbles is not only a fantastic way to engage your kids with science, but it also fosters creativity and a sense of wonder! So gather your supplies, get ready for some magical moments, and enjoy endless fun this summer.
Happy bubbling!
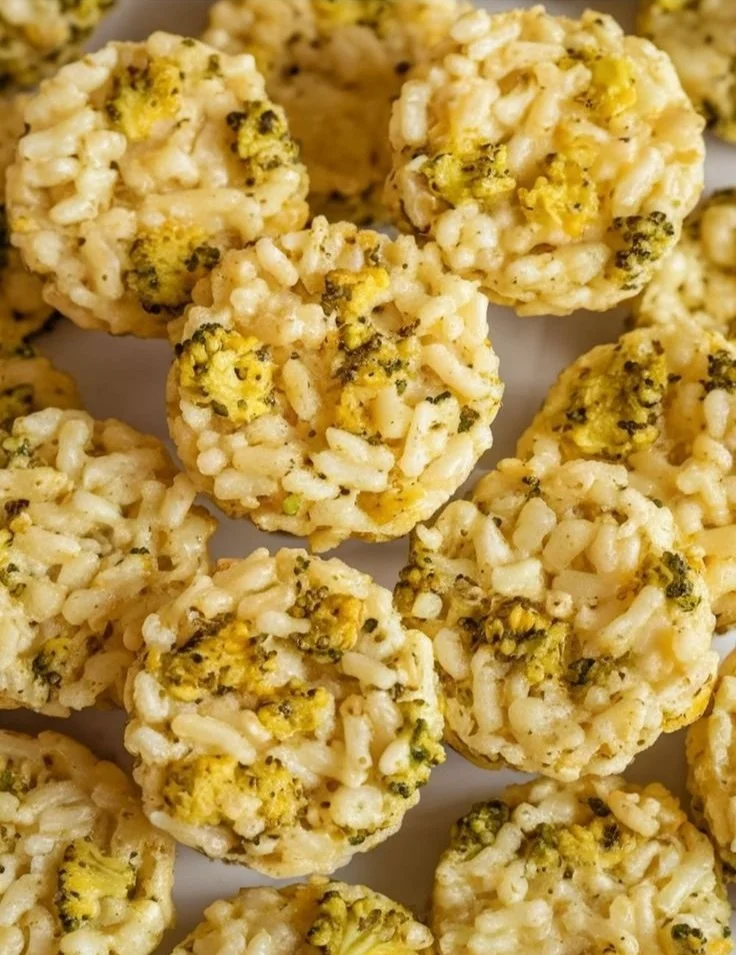
63 Toddler Meals to Meal Prep for Quick and Easy Dinners
63 Toddler Meals for Easy Meal Prep at Dinner Time
As a parent, juggling meals for your little ones can be a daily challenge. After a long day of work or chasing after toddlers, the last thing you want to do is spend hours in the kitchen. The good news is you can simplify your dinner routine with some meal prep. With 63 quick and easy toddler meals ready to go, you’ll save time, reduce stress, and keep those tiny tummies happy!
Benefits of Meal Prepping for Toddlers
Meal prepping doesn’t just make life easier; it offers other advantages too:
- Healthy Choices: Control ingredients, avoid processed foods.
- Time-Saving: Spend less time cooking on busy nights.
- Budget-Friendly: Buy in bulk and reduce food waste.
- Variety: Keep meals exciting and prevent boredom.
Tips for Successful Meal Prepping
- Plan Ahead: Choose a day to prepare meals for the week.
- Keep it Simple: Focus on toddler-friendly recipes that are quick to prep.
- Store Properly: Use clear, airtight containers for easy access.
- Label and Date: Always label meals to know what you have and when to use them.
- Involve Your Kids: Letting toddlers help out can make it fun and teach them about healthy eating!
63 Toddler Meals to Meal Prep
Here are 63 tasty meal ideas that are perfect for meal prepping!
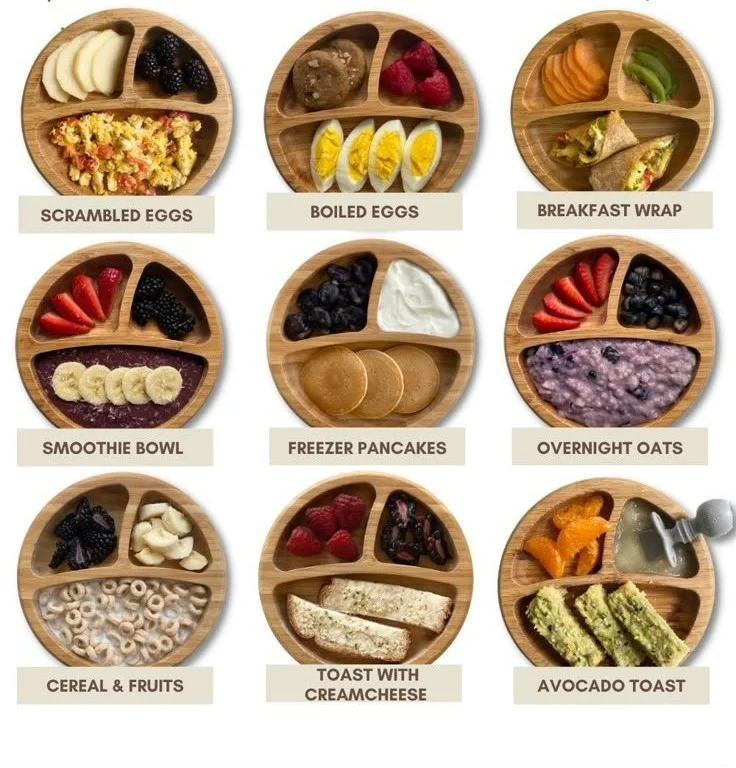
Breakfast Options
- Mini Omelets: Whisk eggs with veggies and cheese, then bake in muffin tins.
- Oatmeal Pancakes: Blend oats, banana, and eggs for a quick breakfast treat.
- Smoothie Packs: Pre-pack fruit, spinach, and yogurt for easy smoothies.
- Yogurt Parfaits: Layer yogurt, fruit, and granola in jars for grab-and-go meals.
- Egg Muffins: Whip up egg muffins with meat and veggies for a hearty breakfast.
Lunch Ideas
- Cheesy Quesadillas: Fill tortillas with cheese and beans, then grill.
- Pasta Salad: Mix whole-grain pasta with veggies and a light dressing.
- Fruit and Cheese Skewers: Assemble skewers with fruit and cheese cubes.
- Hummus and Veggies: Portion hummus with colorful veggies for dipping.
- Turkey and Avocado Wraps: Roll turkey, avocado, and cheese in a whole-grain wrap.
Dinner Dishes
- Baked Chicken Nuggets: Coat chicken pieces with breadcrumbs, then bake until crispy.
- Vegetable Stir-Fry: Sauté a mix of veggies with soy sauce and serve with rice.
- Sweet Potato Mash: Boil and mash sweet potatoes for a nutritious side.
- Mini Meatballs: Make turkey or beef meatballs for pasta or rice dishes.
- Pizza Roll-Ups: Use tortillas, cheese, and tomato sauce for a fun pizza twist.
Snack Ideas
- Peanut Butter Banana Bites: Slice bananas and spread with peanut butter.
- Homemade Muffins: Bake muffins with fruits and oats for a healthy snack.
- Energy Balls: Mix oats, nut butter, honey, and chocolate chips for a quick treat.
- Granola Bars: Make homemade granola bars with oats and nuts.
- Veggie Chips: Bake thinly sliced sweet potatoes or kale for a crunchy snack.
Bonus Meal Ideas
- Rice and Beans: A classic, nutritious combo served with cheese.
- Fish Sticks: Homemade fish sticks are healthier than store-bought.
- Mac and Cheese: Add pureed veggies for extra nutrients in a kid-favorite dish.
- Taco Filling: Prepare seasoned ground beef or lentils for taco night.
- Casserole Freeze Packs: Assemble your favorite casserole and freeze before baking.
Quick Tips and Mom Hacks
- Batch Cook: Make larger quantities to enjoy leftovers during the week.
- Freeze Portions: Freeze some meals in individual portions for easy thawing later.
- Variety is Key: Rotate meals weekly to keep things interesting for your toddler.
- Reuse Ingredients: Use the same ingredients in various dishes to simplify shopping.
Mistakes to Avoid
- Overcomplicating Meals: Stick with simple ingredients and recipes.
- Skipping the Prep: Not prepping ahead can lead to last-minute takeouts.
- Neglecting Nutrition: Focus on balanced meals with the right food groups.
- Ignoring Storage: Invest in quality containers to avoid freezer burn.
FAQs
What foods should I avoid for toddlers?
- Avoid honey (for kids under one), whole nuts, and high-sugar snacks.
Can I involve my toddler in meal prep?
- Absolutely! Children can help wash vegetables, stir mixtures, and even set the table.
How long can I store these meals?
- Most meals can be safely stored in the freezer for 3-6 months.
Now that you’re equipped with 63 toddler meal prep ideas, worry less about dinner time and enjoy more precious moments with your little ones. Feel free to mix and match these meals to cater to your toddler’s taste and dietary needs, and make mealtime stress-free! Happy prepping!

Adorable Handprint Bunny Crafts Your Kids Will Love This Easter
Crafting Joy with Handprint Bunnies for Easter Fun
Are you looking for a delightful and engaging craft to do with your children this Easter? If you’re like me, finding creative activities that keep little hands busy while fostering their imagination is always a win. The handprint bunny craft is perfect for this! It’s simple, fun, and helps develop fine motor skills. Plus, it can become a treasured keepsake for years.
Why Handprint Bunnies?
Handprint crafts are fantastic because they create lasting memories and a personal touch. Your child’s tiny handprints will transform into adorable bunnies, and the best part? You don’t need fancy supplies! All you need is some paper, paint, and a bit of imagination.
What You’ll Need
Before we dive into the steps, let’s gather our materials:
- White or pastel-colored paper
- Non-toxic paint (washable is best)
- Paintbrushes or sponges
- Scissors
- Glue
- Colored markers or crayons
- Optional: Googly eyes, cotton balls, and decorative items for embellishment
Step-by-Step Guide to Make Handprint Bunnies
Follow these easy steps to create your charming handprint bunnies:
Step 1: Prepare the Workspace
Set up a craft area where your child can work comfortably. Lay down some old newspapers or a plastic tablecloth to protect your surfaces.
Step 2: Paint the Hand
- Choose a paint color. Classic white, light pink, or even lavender work beautifully for bunnies.
- Use a paintbrush or sponge to coat your child’s palm with paint.
- Make sure to cover the fingers as well, since they will form the bunny’s ears.
Step 3: Make the Handprint
- Press the painted hand firmly onto the paper, with fingers facing upwards.
- Lift the hand straight up to reveal the handprint. This will be the bunny’s body and ears!
Step 4: Add Details
- Once the handprint dries, use markers or crayons to add eyes, a nose, and a smiling mouth.
- You can cut out additional ears and attach them behind the handprint for a 3D effect or use googly eyes for fun.
Step 5: Final Touches
- Use cotton balls to create a fluffy tail by gluing one to the bottom of the bunny.
- Add embellishments like flowers, grass cut from green paper, or Easter eggs around your bunnies to personalize the scene.
Step 6: Display Your Art
Hang the finished bunnies around your home as festive decorations. They make delightful Easter decor and showcase your child’s creativity.
Quick Tips for a Smooth Crafting Experience
- Set Clear Expectations: Explain the process to your child beforehand to build excitement.
- Supervise the Paint: Keep a close eye to prevent messy hands (and surfaces).
- Allow Drying Time: Make sure that painted hands are clean before touching anything else.
Common Mistakes to Avoid
- Skipping the Cleanup: Don’t forget to prep for potential mess! Lay down protective coverings.
- Choosing Non-Washable Paint: Always use non-toxic, washable paint for easier cleanup.
- Rushing the Process: Enjoy the moments together; crafts aren’t just about the final product.
FAQs
Can I use finger paint instead?
Absolutely! Finger paint is a great option as it allows for a fun, sensory experience.
How old should my child be to do this craft?
This craft is perfect for toddlers and preschoolers, but older kids can also have fun with it by adding advanced details.
What other occasions can I use this craft for?
This craft isn’t limited to Easter! You can adapt it for other holidays by changing the colors and themes.
Bonus Ideas
- Make a Handprint Family: Create handprint bunnies for each family member and turn it into a family portrait!
- Craft a Card: Turn the handprint into a card to gift to family members for Easter.
Getting creative with your child while making handprint bunnies is a fulfilling way to celebrate the holiday. It’s not just about the craft itself; it’s about the laughter, joy, and memories you create together. So grab those supplies and get crafting! Happy Easter!
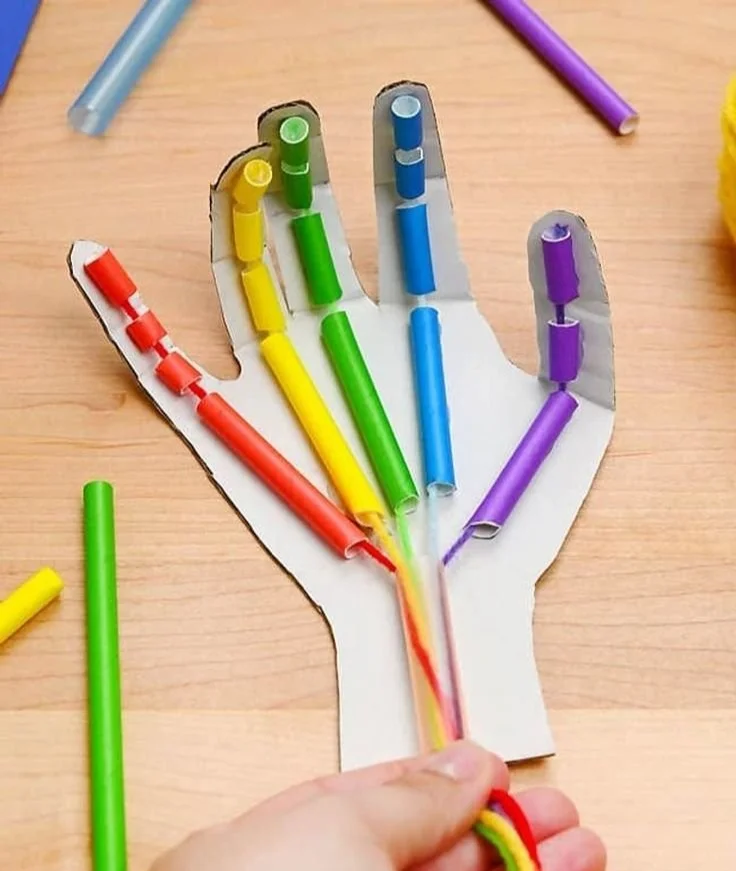
Easy DIY Robotic Hand for Kids
Create an Easy DIY Robotic Hand for Kids
Are you looking for a fun and educational project to spark your child’s creativity? Building a DIY robotic hand is a fantastic way to explore engineering concepts right at home! This engaging activity combines creativity and learning, providing a hands-on experience that kids will love.
Why Build a Robotic Hand?
Creating a robotic hand can help instill a sense of accomplishment in children while teaching them about robotics and mechanics. Plus, it’s an excellent way to bond and have fun together. You don’t need to be an expert; just a few materials and enthusiasm will do the trick!
What You’ll Need
Before starting the project, gather the following materials:
- Cardboard or sturdy paper
- Straws (plastic or flexible)
- String or yarn
- Tape and glue
- Scissors
- Markers or paint (for decoration)
- A ruler (optional)
Step-by-Step Guide to Making a Robotic Hand
Follow these simple steps to create your very own robotic hand:
1. Create the Hand Template
- Draw the outline of a hand on cardboard. Make sure it’s larger than your child’s hand, as it should fit comfortably.
- Cut out the shape, leaving spaces for finger joints.
2. Add Fingers
- Cut the straws into lengths that correspond to the segments of fingers.
- Attach each straw piece to the fingers on your cardboard hand with tape or glue. These will act as the finger bones.
3. Make Joints with String
- Use the string to connect the finger segments. Tie a knot at the end of each segment so that they can bend.
- Thread the string through the straws to allow the fingers to curl when pulled.
4. Attach the Control Mechanism
- Create a system to pull the string and make the fingers move. You can attach the other ends of the strings to a wooden dowel or stick.
- You can also use a piece of cardboard as a base for the control mechanism.
5. Test Your Creation
- Once everything is put together, gently pull the strings to see your robotic hand in action!
- Make adjustments as necessary to ensure it moves smoothly.
6. Decorate Your Robotic Hand
- Let your child unleash their creativity by painting or decorating the robotic hand.
- Add stickers, colors, or even googly eyes to give it personality.
Quick Tips for a Successful Project
- Pre-cut materials: If your child is too young to handle scissors, consider pre-cutting the materials for a smoother experience.
- Experiment with designs: Encourage your child to try different designs or add unique features.
- Safety first: Always supervise when using scissors or glue.
Common Mistakes to Avoid
- Not securing the strings tightly enough could lead to a floppy hand.
- Skipping the testing phase might make you miss important adjustments.
FAQs
How long will this project take?
This DIY project typically takes about 1-2 hours, depending on how many creative touches you add!
What age is this project suitable for?
It’s recommended for kids ages 7 and up, but younger children can definitely participate with adult supervision.
Can we use different materials?
Absolutely! You can experiment with various materials like plastic cups, fabric, or recycled items.
Bonus Ideas for More Fun
- Create a contest: Challenge your child to make a robotic hand that can stack blocks or grasp small objects.
- Make it a learning experience: Discuss the basics of robotics and how our fingers work!
- Record a video: Film your child showcasing their robotic hand and share it with friends or family.
Creating a DIY robotic hand can be an incredibly rewarding experience for both parents and children. It nurtures creativity, problem-solving, and, most importantly, quality time together! So gather your materials, unleash your creativity, and enjoy this hands-on adventure. Happy crafting!
How to Make a Bouncy Ball | DIY Bouncy Balls
Create Fun Memories How to Make a Bouncy Ball
Have you ever found yourself looking for fun and simple ways to keep your kids entertained at home? Making bouncy balls is not only a delightful DIY project but also a fantastic way to bond with your children. In just a few easy steps, you can create colorful bouncy balls that will thrill your little ones. Let’s dive into how to make these fun toys together!
What You Need
Gather the following supplies before you start this exciting project:
- Borax (1/2 teaspoon)
- School glue (1/2 cup)
- Warm water (1/4 cup)
- Corn starch (1/2 cup)
- Food coloring (optional)
- Mixing bowls
- Spoon
- Plastic gloves (optional for easy cleanup)
Step-by-Step Guide to Making Bouncy Balls
Step 1: Prepare Your Workspace
Start by designating an area where your kids can enjoy this activity. Lay down some newspaper or an old tablecloth to catch any spills!
Step 2: Mix the Glue and Water
In a mixing bowl, combine the school glue and warm water. Stir well until the mixture is smooth.
Step 3: Add Food Coloring
If your little ones want colorful bouncy balls, now’s the time to mix in a few drops of food coloring. Let them mix until they achieve their desired hue.
Step 4: Combine Borax and Corn Starch
In a separate bowl, mix the Borax and corn starch. Make sure everything is well blended.
Step 5: Combine the Mixtures
Slowly add the dry mixture (Borax and corn starch) to the glue and water mixture. Stir continuously to combine them. You’ll notice the mixture starting to thicken.
Step 6: Knead the Mixture
Once it thickens up, use your hands (with gloves, if preferred) to knead the mixture together. This will become your bouncy ball! If it feels too sticky, you can sprinkle in a little more corn starch.
Step 7: Shape Your Balls
Once the mixture is fully combined and not sticky, roll it into a tight ball. Make sure it’s firm to ensure it bounces well!
Step 8: Let Them Dry
Place the bouncy balls on a paper towel and let them dry for a few hours. The longer they dry, the better they will bounce.
Step 9: Bounce Time
After the drying period, it’s time for the fun! Test them out in your backyard or living room and enjoy watching them bounce!
Quick Tips for the Best Bouncy Balls
- Experiment With Colors: Mix two colors together for a swirl effect.
- Add Glitter: Besides food coloring, a pinch of glitter adds sparkle!
- Try Different Sizes: Make a variety of sizes for even more fun.
Mistakes to Avoid
- Forgetting to Knead: Skipping this step means your balls might not bounce as well.
- Too Much Water: If the mixture is too runny, the ball will not hold its shape.
FAQs
How long will the bouncy balls last?
If stored in a cool, dry place, bouncy balls can last for months!
Can I make these without Borax?
While Borax helps with the bouncing effect, you can experiment with different binding agents, though results may vary.
Bonus Ideas
- Make a Bouncy Ball Gift Set: Have your kids decorate small boxes and fill them with colorful bouncy balls as gifts.
- Try Different Recipes: Look for alternative recipes online to create glow-in-the-dark versions or larger bouncy balls.
Creating bouncy balls together is not just a fun activity; it’s a wonderful way to bond with your children. Enjoy the laughs and memories you’ll make while bouncing these little treasures around! Happy crafting!

Spinach Zucchini Frittata Fingers | Haute & Healty Living
Tasty Spinach Zucchini Frittata Fingers Your Kids Will Love
Are mealtimes a constant struggle, leaving you wondering what to serve your little ones? If your kids are picky eaters like mine, you know it can be challenging to find healthy recipes that also capture their attention. That’s where these Spinach Zucchini Frittata Fingers shine! Not only are they nutritious, but they are also fun to eat, making them perfect for both meal prep and on-the-go snacks. Let’s dive into this delicious recipe that’ll make your parenting journey a little easier!
Why Spinach Zucchini Frittata Fingers?
Frittatas are incredibly versatile and can be filled with various vegetables. Spinach and zucchini are not only full of vitamins and minerals but also have a mild flavor that even picky eaters can enjoy. Plus, frittatas are a fantastic way to sneak in those greens!
Here are a few benefits:
- Packed with nutrients: Spinach is rich in iron and vitamins while zucchini adds fiber.
- Easy to prepare: Don’t let the sophisticated name fool you; making frittatas is quick and simple.
- Child-friendly: Frittata fingers are bite-sized, encouraging kids to eat more.
Ingredients You’ll Need
- 6 large eggs
- 1 cup fresh spinach, chopped
- 1 medium zucchini, grated (about 1 cup)
- 1/2 cup cheese (cheddar, mozzarella, or your choice)
- 1/4 cup milk (optional for creaminess)
- Salt and pepper to taste
- Olive oil for greasing the pan
Step-by-Step Guide to Make Spinach Zucchini Frittata Fingers
Step 1: Preheat and Prepare
Preheat your oven to 375°F (190°C). Grease a baking dish or a cookie sheet with olive oil. Using parchment paper can also make for easy cleanup!
Step 2: Beat the Eggs
In a large bowl, whisk together the eggs and milk (if using). Season with salt and pepper to taste.
Step 3: Mix in the Veggies
Fold in the chopped spinach, grated zucchini, and cheese. Make sure everything is well combined. You want every bite to be a delicious mix!
Step 4: Pour and Bake
Pour the mixture into the prepared baking dish, spreading it evenly. Bake for 20 to 25 minutes or until the edges are golden brown and the center is set.
Step 5: Let it Cool and Cut
Once baked, let it cool for a few minutes. Cut the frittata into finger-sized pieces. These bites are perfect for small hands!
Step 6: Serve and Enjoy
Serve them warm or let them cool completely and pack them for snacks throughout the week. These frittata fingers can be stored in the fridge for up to 4 days.
Quick Tips for Successful Frittata Fingers
- Mix it up: Feel free to add other veggies like bell peppers, onions, or mushrooms.
- Herbs add flavor: A pinch of garlic powder or some fresh herbs can elevate the taste.
- Engage your kids: Let them help mix the ingredients or choose the veggies. Kids are more likely to eat what they help make!
Common Mistakes to Avoid
- Overcrowding the pan: Ensure the mixture is spread evenly for even cooking.
- Not letting it cool: Cutting while hot can lead to messy frittata fingers; patience is key!
FAQs about Spinach Zucchini Frittata Fingers
Can I freeze frittata fingers? Yes! These frittata pieces freeze well. Just place them in an airtight container or freezer bags and enjoy them later.
What can I serve with frittata fingers? Pair these frittata fingers with a side salad or some fresh fruit for a well-rounded meal.
Are there other variations? Absolutely! Try adding cooked bacon, herbs, or different cheeses to switch up the flavor.
Bonus Ideas for Frittata Fingers
- Dipping sauces: Serve with marinara or yogurt sauce for an extra twist.
- Herb sauce: Drizzle some pesto on top for added flavor.
- Breakfast or dinner option: These frittatas make a perfect meal any time of the day!
Conclusion
These Spinach Zucchini Frittata Fingers are a fantastic option for busy parents looking to offer a nutritious meal that kids can’t resist. They’re simple to make, easy to customize, and perfect for on-the-go eating. So, the next time you’re faced with a dinner dilemma, remember this clever recipe—your kids will thank you! Happy Cooking!
10 Breakfast Ideas For Toddlers And Babies (Freezer Friendly)
Quick and Easy Freezer Friendly Breakfast Ideas for Toddlers
As a parent, finding nutritious breakfast options for your little ones can feel like a daily challenge. You want something quick, healthy, and that your toddlers will actually eat. Plus, the last thing you need is extra stress in the mornings! That’s where freezer-friendly breakfast ideas come in. With a little prep, you can stock your freezer with delicious options that will keep those tiny bellies happy. Here are some tasty and toddler-approved breakfast ideas that you can make ahead and store in your freezer.
10 Quick Breakfast Ideas for Busy Mornings
1. Mini Pancakes
Whip up a batch of mini pancakes using whole wheat flour. Once cooked, allow them to cool, stack them in portions, and freeze. They can be toasted straight from the freezer!
2. Smoothie Packs
Create individual smoothie packs by portioning out fruits, spinach, and yogurt. Just grab a bag, toss it in the blender, and let the breakfast magic happen.
3. Egg Muffins
Mix eggs with diced vegetables, cheese, and a bit of ham or bacon. Pour into muffin tins, bake, cool, and freeze. These can be reheated easily in the microwave.
4. Overnight Oats
Combine rolled oats with milk or yogurt and add fruits or nut butter. Portion them into jars, and once chilled, freeze. Just thaw overnight for a quick breakfast!
5. Whole Wheat Banana Bread
Make a moist, whole wheat banana bread, slice it up, and freeze. It’s perfect for breakfast or snack time, just toast a slice to warm it up!
6. Cheesy Spinach and Egg Wraps
Scramble eggs with cheese and spinach, wrap them in a tortilla, and freeze. A quick microwave and they’re ready for your toddler!
7. Fruit and Yogurt Parfaits
Layer yogurt and fruit in jars, then freeze. Simply let them thaw a bit before serving – a delightful morning treat!
8. Sweet Potato Hash
Cook sweet potatoes with bell peppers and spices. After cooling, portion into containers and freeze. Just heat up a serving for a hearty breakfast.
9. Apple Cinnamon Oatmeal Cups
Mix oatmeal with apples and cinnamon, pour into muffin tins, and bake. These cups freeze well and are easy to reheat for busy mornings.
10. Homemade Fruit Bars
Make fruit and oat bars using blended fruits and oats. Bake, cool, slice, and freeze. They make for a great on-the-go breakfast!
Quick Tips for Freezing Breakfast Foods
- Cool Before Freezing: Always let your food cool down before freezing to keep it fresh.
- Use Airtight Containers: Invest in good-quality freezer bags or containers to prevent freezer burn.
- Label and Date: Keep track of what you’ve made and when it was frozen for optimal freshness.
Mistakes to Avoid
- Overfilling Containers: Leave space in containers as food expands when frozen.
- Freezing without Portioning: Pack meals in single servings to make reheating easy and reduce waste.
FAQs
Q: How long can I keep these meals frozen?
A: Most freezer meals are safe to eat for up to 3 months. Quality may diminish over time, so try to consume them sooner.
Q: Can I reheat these meals in a microwave?
A: Absolutely! Just make sure to heat them evenly and check the temperature before serving.
Bonus Ideas
In addition to these breakfast ideas, try involving your little ones in the food prep process when you can. Kids love to help out, and it might even encourage them to try new foods! Plus, you get to spend some quality time together in the kitchen.
By preparing these freezer-friendly breakfast ideas, you’re not only saving time in the morning, but you’re also providing nutritious, delicious meals that your toddlers will love. Happy cooking!
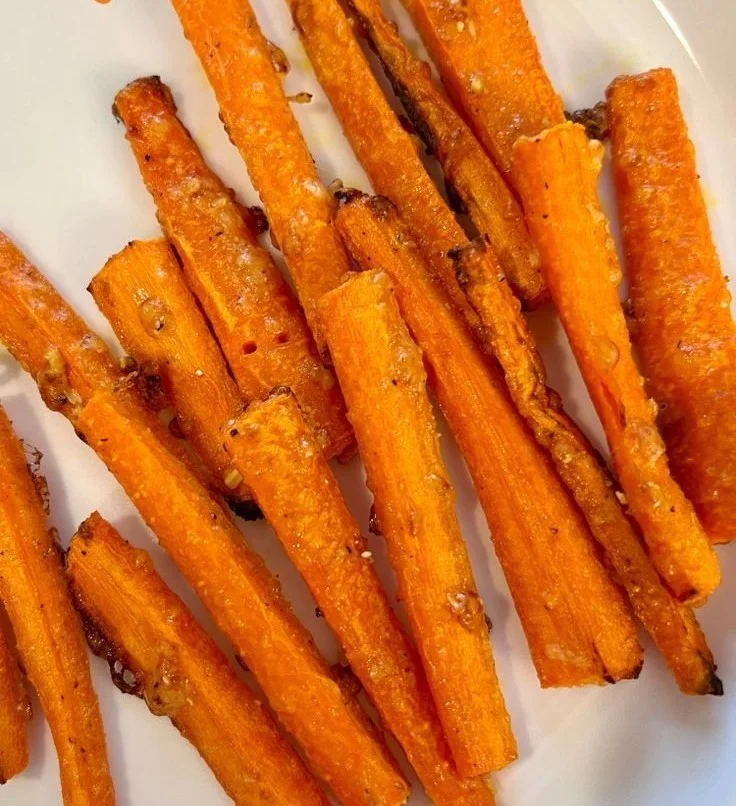
Garlic Parmesan Carrot Fries
Irresistible Garlic Parmesan Carrot Fries Your Kids Will Love
Are you tired of struggle when it comes to getting your kids to eat vegetables? Trust me, you’re not alone! If you’re looking for a tasty and easy way to sneak more health into your little ones’ diets, these Garlic Parmesan Carrot Fries could be your new best friend. With their crispy texture and flavorful coating, they’re perfect as a snack, side dish, or even a sneaky addition to lunchboxes.
Why Choose Carrot Fries
Carrots are a fantastic source of beta-carotene, fiber, and vitamins. Plus, transforming these veggies into "fries" is a fun and appealing way to entice picky eaters. Here’s how to make these delicious Garlic Parmesan Carrot Fries in just a few simple steps.
Ingredients You’ll Need
- 1 pound of carrots (about 6-8 medium-sized)
- 2 tablespoons of olive oil
- 1 teaspoon of garlic powder
- 1/2 teaspoon of salt
- 1/4 teaspoon of black pepper
- 1/4 cup of grated Parmesan cheese
- Optional: chopped parsley for garnish
Easy Steps to Make Garlic Parmesan Carrot Fries
Step 1: Preheat Your Oven
Start by preheating your oven to 425°F (220°C). A hot oven is key to making these fries crispy.
Step 2: Prepare the Carrots
- Wash and Peel: First, wash and peel the carrots, removing any dirt or skin.
- Cut Them Into Fries: Cut the carrots into fry-shaped sticks, about 1/4 inch thick. Try to keep them uniform for even cooking.
Step 3: Seasoning Time
In a large bowl, toss the carrot sticks with olive oil, garlic powder, salt, and pepper. Make sure each fry is well-coated for maximum flavor.
Step 4: Add the Parmesan
Sprinkle grated Parmesan cheese over the seasoned carrot fries and toss again to ensure even coverage.
Step 5: Bake
Spread the fries out on a baking sheet lined with parchment paper. Bake them in the preheated oven for about 20-25 minutes or until they are golden and crispy. Remember to flip them halfway through for even cooking.
Step 6: Serve and Enjoy
Once done, take them out of the oven and let them cool for a minute. Garnish with fresh parsley if desired, then serve!
Quick Tips for Success
- Experiment with Spices: Feel free to add other spices like paprika or Italian seasoning for a twist.
- Make Ahead: You can prep these carrot fries ahead of time. Store them in the fridge before baking.
- Serve with Dips: Pair them with your kids’ favorite dips like ranch, hummus, or yogurt dip for extra fun!
Mistakes to Avoid
- Overcrowding the Baking Sheet: Make sure not to overcrowd the carrot fries on the baking sheet. They need space to crisp up properly.
- Under-seasoning: Don’t hold back on the seasonings; they add so much flavor!
FAQs About Garlic Parmesan Carrot Fries
Can I use baby carrots?
Absolutely! Baby carrots are a great time-saver. Just cut them in half lengthwise to make fries.
How do I store leftovers?
Store any leftover carrot fries in an airtight container in the refrigerator for up to 2 days. Reheat them in the oven for the best texture.
Are these healthy for kids?
Yes! These carrot fries are a healthier alternative to regular fries, providing essential nutrients without sacrificing taste.
Bonus Ideas
- Mix Up the Veggies: Try using sweet potatoes or zucchini along with the carrots for a colorful platter.
- Make it a Meal: Serve these fries alongside grilled chicken or fish for a nutritious dinner option.
With this simple recipe, you can turn a humble vegetable into a fun and tasty treat that your kids will adore. Enjoy those garlic Parmesan carrot fries, and watch as healthy eating becomes a little more enjoyable for everyone!
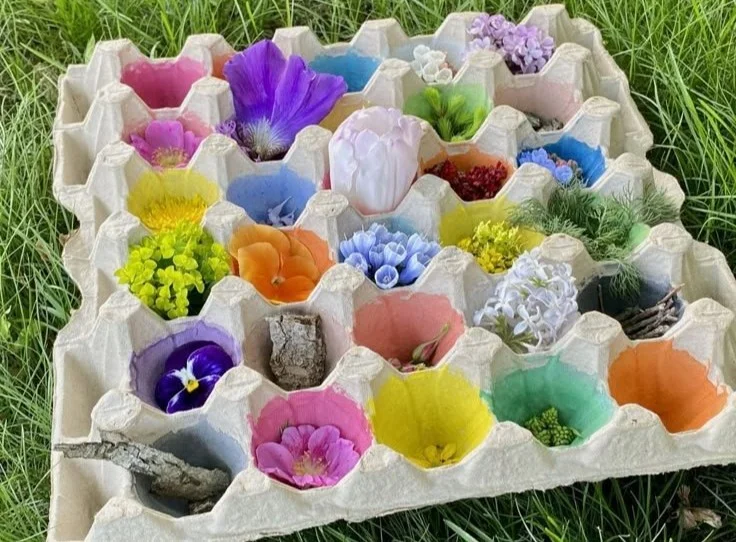
Egg Carton Nature COLOR Hunt Activity for Kids
Fun and Easy Egg Carton Nature Color Hunt for Kids
Are your kids getting restless at home? Looking for a creative way to keep them engaged with nature? The Egg Carton Nature Color Hunt is a delightful activity that combines outdoor exploration with color recognition. It’s simple, requires minimal materials, and provides endless fun!
Why Choose a Color Hunt?
Kids learn best through play, and a color hunt allows them to explore their environment creatively. By searching for items in different colors, children can develop observational skills, enhance their vocabulary, and appreciate the beauty of nature. Plus, it’s a fantastic way to get some fresh air and exercise!
What You’ll Need
This activity is incredibly easy to set up. Here’s a quick list of what you need:
- Egg carton (empty and clean)
- Markers or crayons (in various colors)
- Bag for collecting items (optional)
- A sunny outdoor space (your backyard or a nearby park)
How to Set Up the Color Hunt
Follow these simple steps to get started. You’ll have your little ones excited and ready to explore in no time!
Step 1: Prepare the Egg Carton
- Take an empty egg carton and paint or color each compartment with a different color using markers or crayons. You can choose common colors like red, blue, yellow, green, etc.
- For an extra touch, let your kids help with coloring the carton!
Step 2: Explain the Hunt
- Gather your kids and explain the rules. Let them know they’ll be looking for natural items that match the colors in the egg carton.
- Encourage them to think about different shades and textures. For instance, they might find green leaves, brown twigs, or yellow flowers.
Step 3: Start the Hunt
- Let the kids take their egg cartons outside and begin the hunt! Encourage them to explore different areas, including gardens, parks, or sidewalks.
- Tip: Play some light-hearted music or set a timer for added excitement!
What to Collect
Here are some ideas for colorful natural items to collect:
- Red: Berries or red leaves
- Orange: Orange flowers or fruit peels
- Yellow: Dandelions or buttercups
- Green: Grass blades or green leaves
- Blue: Bluebells or pieces of sky
- Purple: Lavender or purple flowers
- Brown: Acorns or twigs
- White: White blossoms or stones
Fun Variations to Try
- Photography Version: Instead of collecting items, children can take pictures of the colors they find. This can be a fun way to integrate technology!
- Color Matching: Have kids match the color of the items collected to paint swatches. This reinforces color recognition skills.
- Nature Art: Once they return home, create art using the collected items. Glue them onto paper and let your kids create a masterpiece!
Quick Tips for an Enjoyable Experience
- Stay Flexible: If the kids find other colors or items not on their list, encourage them to collect those too! It’s all about exploration and learning.
- Go With Friends: This activity can be even more fun with a couple of friends. Kids can share their findings and experience together.
- Plan a Picnic: Make it a day out by bringing a picnic to enjoy after the hunt!
Mistakes to Avoid
- Overcomplicating the Activity: Keep it simple and focus on fun rather than perfection. The goal is to enjoy nature!
- Not Dressing for the Outdoors: Make sure the kids are dressed appropriately for the weather and wear comfortable shoes.
- Setting Unrealistic Expectations: Kids may not find every color; that’s okay. Celebrate their efforts and discoveries instead!
Frequently Asked Questions
Can toddlers participate?
Absolutely! Modify the activity by focusing on fewer colors and allowing them to collect items with help.
How long does the hunt usually take?
Aim for about 30 minutes to an hour, depending on the kids’ attention spans and enthusiasm.
What if it rains?
Turn the activity into an indoor color hunt! Use colored items found around your home instead.
Conclusion
The Egg Carton Nature Color Hunt is an excellent way to foster curiosity while enjoying the outdoors. With just a few materials, you can provide your kids with an engaging learning experience that combines play with education. So grab an egg carton, some colors, and let the treasure hunt begin!
This activity is perfect for Pinterest sharing, so feel free to pin it to your boards for future rainy days or sunny afternoons! Enjoy the adventure!
