
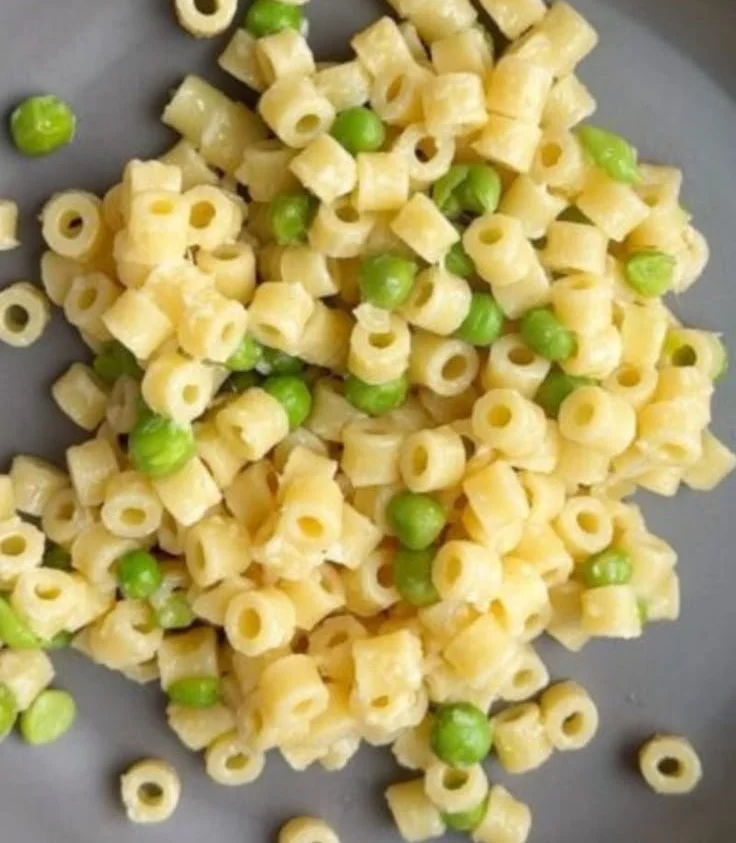
Parmesan Pea Pasta
Deliciously Simple Parmesan Pea Pasta for Busy Families
Do you ever find yourself staring into the fridge, wondering what to cook that everyone in your family will love? If you’re looking for a quick and delightful meal, look no further! Parmesan pea pasta is not only easy to prepare, but it also brings a creamy, cheesy goodness that even the pickiest eaters can enjoy.
Why Your Family Will Love Parmesan Pea Pasta
Parmesan pea pasta is a fantastic dish for several reasons:
- Quick Preparation: Ready in under 30 minutes, perfect for busy weeknights.
- Kid-Friendly: With its creamy texture and mild flavor, kids love it.
- Nutritious: Peas add a dose of vitamins, fiber, and plant-based protein.
- Versatile: Great as a main dish or side, and adaptable to various ingredients.
How to Make Parmesan Pea Pasta: A Step-by-Step Guide
Ingredients You’ll Need
- 8 ounces pasta of your choice (e.g., penne, fusilli)
- 1 cup frozen peas
- 1 cup grated Parmesan cheese
- 2 tablespoons olive oil
- 3 cloves garlic, minced
- Salt and pepper, to taste
- Optional: fresh herbs (basil or parsley), lemon zest
Simple Prep and Cooking Instructions
- Cook the Pasta: Bring a large pot of salted water to a boil. Add your pasta and cook according to package instructions. During the last 2 minutes of cooking, stir in the frozen peas.
- Drain and Set Aside: Once the pasta and peas are cooked, reserve about 1 cup of pasta water. Then, drain the rest and return the pasta and peas to the pot.
- Sauté the Garlic: In a small skillet, heat olive oil over medium heat. Add the minced garlic and sauté for about 1-2 minutes until fragrant, but not browned.
- Combine Ingredients: Pour the sautéed garlic over the pasta and peas. Add grated Parmesan cheese and mix well. If the pasta seems dry, gradually stir in reserved pasta water until you reach your desired consistency.
- Season and Serve: Sprinkle with salt, pepper, and optional herbs or lemon zest for extra flavor. Serve warm and watch the smiles appear!
Quick Tips for Perfecting Your Parmesan Pea Pasta
- Add Protein: Consider adding cooked chicken, shrimp, or chickpeas for a heartier meal.
- Make It Colorful: Mix in other vegetables like cherry tomatoes or spinach for added nutrition.
- Customize Your Cheese: Try replacing Parmesan with pecorino or a dairy-free option if needed.
Mistakes to Avoid
- Overcooking the Peas: Add them at the end of the pasta cooking time to keep them vibrant and tender.
- Skipping the Pasta Water: This starchy water is key to creating a creamy sauce.
- Not Adjusting Seasoning: Taste and season at the end for the best flavor!
FAQs about Parmesan Pea Pasta
Can I use fresh peas instead of frozen?
Absolutely! Fresh peas will add a wonderful, sweet flavor. Just ensure they are cooked until tender before mixing them in.
How can I store leftovers?
Store any leftovers in an airtight container in the fridge for up to 3 days. Reheat gently on the stovetop with a splash of water.
Is this dish suitable for meal prep?
Yes! This pasta dish holds up well for meal prep. Just cook it a day or two ahead, and reheat when you’re ready to eat.
Bonus Ideas for Clever Variations
- Parmesan Pea Pasta Bake: Transfer the pasta to a baking dish, top with more cheese, and bake until golden.
- Creamy Lemon Parmesan Pea Pasta: Add lemon juice and zest for a refreshing twist.
With this quick and delicious Parmesan pea pasta recipe, you can create a meal that not only pleases the whole family but also fits into your busy schedule. Enjoy the smiles at the dinner table, knowing you’ve prepared something tasty and nutritious!

Create Your Own Baking Soda Growing Tree (A Fun DIY Science Project)
Make a Baking Soda Growing Tree: Fun DIY Science for Kids
Have you ever felt the thrill of seeing your kids’ faces light up with excitement when they achieve something incredible? If you’re looking for a creative DIY science project that’s both fun and educational, you’re in the right place! Making a baking soda growing tree is a simple and magical activity that helps teach kids about chemical reactions while having a blast.
What You Will Need
Before diving into the steps, let’s gather our materials. You probably have most of these items at home:
- Baking soda
- Vinegar
- A container (like a small bowl or tray)
- Tray or large plate (to catch any overflow)
- Food coloring (optional for added fun)
- Warm water
- A whisk or spoon for mixing
Step-by-Step Instructions to Create Your Baking Soda Growing Tree
- Prepare the Base
- Start by pouring about 1/4 cup of baking soda into your container. This will be the base of your growing tree.
- Add Color
- If you wish to add some color to your experiment, mix in a few drops of food coloring with the baking soda. This step is optional, but it adds a visual appeal that your kids will love!
- Mix in Water
- Slowly add 1/4 cup of warm water to the baking soda. Use a whisk or spoon to mix it well. The mixture should be paste-like.
- Shape Your Tree
- Using your spoon, mold the baking soda mixture into a tree shape. Don’t worry about it being perfect; creativity is what matters here!
- Prepare the Vinegar Solution
- In a separate bowl, mix 1/2 cup of vinegar with a few drops of food coloring (if using). This is the solution that will create the magical effect of your growing tree!
- Pour the Vinegar
- Once your tree is shaped and ready, slowly pour the vinegar solution over your baking soda tree. Stand back and watch the reaction!
- Enjoy the Show
- As the vinegar interacts with the baking soda, it will create a bubbling, frothy eruption that looks like your tree is growing. Allow your kids to observe the reaction and even get involved by taking turns pouring the vinegar.
- Repeat the Process
- After the first reaction finishes, you can let the mixture dry slightly and then repeat the process. You can even try different shapes or sizes to see how they react differently!
Quick Tips for Success
- Mess Management: Place your project in a tray to catch any overflow. It can get a little messy, but that’s all part of the fun!
- Age Appropriateness: This project is great for kids aged 4 and up with adult supervision.
- Talk About Science: Take this opportunity to discuss the science behind chemical reactions. Explain why the baking soda and vinegar react to create carbon dioxide bubbles.
Mistakes to Avoid
- Skipping Measurements: Make sure to measure your ingredients accurately for the best results.
- Using Cold Water: Warm water helps the baking soda dissolve better, leading to a more impressive reaction.
- Rushing the Steps: Take your time shaping the tree and allowing the reaction to unfold. Enjoy the moment!
FAQs About the Baking Soda Growing Tree
Can I use other liquids instead of vinegar?
While vinegar is the most common option, you can experiment with other acidic liquids, like lemon juice, for a similar reaction.
How long will the reaction last?
The bubbling effect typically lasts a few minutes, but it may vary depending on the amounts you use.
Can we make a mini forest?
Absolutely! By creating multiple trees and using different colors, you can make an entire forest of growing trees!
Bonus Ideas
- Experiment with Different Shapes: Try making mushrooms, flowers, or even rainbow trees!
- Document the Reaction: Have your kids take photos or draw pictures of the process to enhance their learning experience.
Creating a baking soda growing tree is not just an engaging science project; it’s a wonderful way to bond and create lasting memories with your little ones. Embrace the mess, enjoy the learning, and watch as curiosity blossoms into understanding! Happy experimenting!

30 Day Mom Challenge – Be a Happier Mom – Motivation for Mom
30 Day Mom Challenge to Become a Happier Mom
Are you feeling overwhelmed, stretched too thin, or simply tired of the daily grind? You’re not alone! Many moms grapple with feelings of burnout, forgetting to take time for themselves amidst the chaos of parenting. The good news is you can rekindle your joy through a fun and achievable 30-day challenge. Get ready to embrace your role as a mom with renewed passion and happiness!
Why a 30 Day Challenge?
The idea of a 30-day challenge is to introduce small, manageable changes into your daily routine that can significantly boost your mood and well-being. By focusing on one positive action every day, you’ll nurture your happiness and create a more joyful environment for your children.
Your 30 Day Happier Mom Challenge
Here are 30 simple yet impactful activities you can incorporate into your daily life to bring a smile to your face and make being a mom a happier journey.
Week 1: Self-Care Foundations
Day 1: Morning Gratitude
Start your day by writing down three things you’re grateful for. This sets a positive tone.Day 2: Enjoy a Quiet Morning
Wake up 15 minutes earlier to enjoy your coffee or tea in silence.Day 3: Pamper Yourself
Treat yourself to a bubble bath or a mini spa day at home.Day 4: Move Your Body
Engage in a fun 20-minute workout, like a dance class or yoga video.Day 5: Digital Detox
Spend a whole day without social media—enjoy face-to-face connections instead.Day 6: Read a Book
Dive into a fictional world or a self-help book that inspires you.Day 7: Indulge in a Hobby
Spend some time engaging in a favorite hobby that you often neglect.
Week 2: Strengthening Connections
Day 8: Family Game Night
Dedicate an evening to playing board games or video games together.Day 9: Make a Family Meal
Cook a fun meal together, allowing everyone to contribute.Day 10: Share Your Feelings
Open up about your day with someone you trust, whether it’s your partner or a friend.Day 11: Plan a Day Out
Organize a family outing to a park, museum, or nearby zoo.Day 12: Create a Family Photo Album
Dedicate the day to sorting through photos and creating a family album.Day 13: Volunteer Together
Find a local charity and spend some time giving back as a family.Day 14: Motherly Affirmations
Write down positive affirmations about yourself as a mother and read them aloud.
Week 3: Boosting Positivity
Day 15: Start a Happiness Jar
Write down joyful moments on small pieces of paper and collect them in a jar.Day 16: Listen to Uplifting Music
Create a playlist with your favorite happy songs and have a dance party.Day 17: Compliment Yourself
Stand in front of the mirror and give yourself three compliments.Day 18: Try Something New
Experiment with a new recipe or craft with your kids.Day 19: Enjoy the Outdoors
Go for a nature walk, appreciating the beauty around you.Day 20: Set Boundaries
Identify one area where you can say "no" to create more time for yourself.Day 21: Reflect on Your Day
Spend a few minutes every evening journaling about your day’s highlights.
Week 4: Encouraging Mindfulness
Day 22: Start a Mindfulness Practice
Dedicate 5-10 minutes to meditate or practice deep breathing.Day 23: Create a Vision Board
Cut out images that represent your dreams and goals, and create a vision board.Day 24: Spend Time in Silence
Enjoy a moment of silence during your day to gather your thoughts.Day 25: Reach Out
Call or video chat with a friend or family member you haven’t spoken to in a while.Day 26: Laugh Out Loud
Watch a funny movie or a stand-up comedy show.Day 27: Reflect
Spend time reflecting on the changes you’ve made during this challenge.Day 28: Write a Letter
Write a letter to your future self about your hopes and dreams.
Week 5: Celebration and Continuation
Day 29: Celebrate Your Wins
Recognize your accomplishments over the past month—big and small.Day 30: Plan the Next Steps
Decide how you want to continue nurturing your happiness as a mom.
Quick Tips for Success
- Incorporate family: Engage your kids in these activities to build connections.
- Stay flexible: Adjust the challenge to fit your family’s dynamics.
- Keep it positive: Focus on celebrating progress rather than perfection.
Mistakes to Avoid
- Thinking it’s all or nothing: If you miss a day, don’t stress. Just pick up where you left off.
- Overloading your schedule: Be realistic about how much time you can dedicate daily.
FAQs
Why should I take a 30-day challenge?
It helps establish a habit and allows you to track your progress, making it easier to incorporate happiness-boosting activities into your daily routine.
What if I can’t complete an activity?
Life happens! What’s important is the intention to make a change and to pick up again when you can.
Can my kids join in?
Absolutely! Many activities are perfect for family bonding time.
By embracing this 30 Day Mom Challenge, you’re not just enhancing your own happiness, but also creating a more joyful atmosphere for your children. Remember, happy moms raise happy kids! Ready, set, let’s make each day count!
Homemade School Snacks (Nut-free and Nutritious)
10 Easy Homemade School Snacks That Are Nut-Free and Nutritious
Finding delicious and nutritious snacks for your kids that are nut-free can feel like a daunting task. You want something healthy, safe for school, and packed full of flavor. Luckily, homemade snacks check all the boxes! Here are ten easy, nut-free snacks that your little ones will love and you can feel good about serving.
Why Nut-Free Snacks?
Nut allergies are a common concern in schools and among children. Providing nut-free snacks not only keeps your kids safe but also ensures they can share with friends who may have allergies. Plus, homemade snacks allow you to control ingredients and avoid added preservatives.
10 Nut-Free Snack Ideas
1. Veggie Chips
Slice up sweet potatoes, beets, or carrots and bake them until crispy. Season with a pinch of salt for a crunchy snack.
2. Yogurt Parfaits
Layer yogurt with fruit and granola for a quick, nutritious snack. Customize with your child’s favorite fruits!
3. Fruit Kabobs
Skewer pieces of your child’s favorite fruits like grapes, melon, and strawberries. Fun and healthy!
4. Popcorn
Air-popped popcorn tossed with a little olive oil and your favorite seasoning makes for a light and satisfying snack.
5. Cheese and Crackers
Pair cheese slices with whole-grain crackers for a yummy protein-packed snack. Add some apple slices for a sweet twist!
6. Hummus and Veggies
Serve hummus with a variety of colorful veggies like bell peppers, cucumbers, and cherry tomatoes. Delicious and nutritious!
7. Oatmeal Energy Bites
Mix rolled oats, honey, and your child’s choice of seeds (like sunflower or pumpkin) for a quick energy boost.
8. Banana Oat Muffins
Bake a batch of healthy muffins using ripe bananas and oats. They freeze well and make an easy grab-and-go snack!
9. Rice Cakes with Toppings
Top rice cakes with cream cheese and cucumber slices or applesauce and cinnamon for a satisfying treat.
10. Smoothies
Blend together fruits, yogurt, and spinach for a nutrient-rich smoothie. Freeze in individual cups for a quick snack option.
Quick Tips for Nut-Free Snacking
- Batch Cook: Prepare snacks in bulk on the weekends to save time during the week.
- Label Everything: If you’re sending snacks to school, label them clearly to avoid mix-ups with nut-containing items.
- Involve Your Kids: Letting your kids help with snack preparation can make them more excited about trying new foods!
Mistakes to Avoid
- Ignoring Labels: Always check ingredient lists, even for items marketed as nut-free, to ensure safety.
- Skipping Variety: Kids can get bored with the same snacks. Mix up flavors and textures to keep things interesting.
- Overlooking Portion Sizes: Remember that kids’ portion sizes are smaller than adults, so keep snacks appropriately sized.
FAQs
What if my child doesn’t like any of these options?
Experiment with different fruits and vegetables. Sometimes a little creativity—like fun shapes or colorful presentation—can encourage kids to try new things.
Can I make these snacks ahead of time?
Absolutely! Many of these snacks can be made in advance and stored for later use. Just be sure to store them properly to maintain freshness.
Bonus Ideas
If you’re looking for even more inspiration, consider trying:
- No-bake energy bars
- Apples dipped in yogurt
- Peanut-free sunflower seed butter sandwiches
Creating safe, nut-free snacks for your children can be easy and enjoyable. With these 10 delicious ideas, you’ll be well on your way to keeping snack time healthy, safe, and fun! Happy snacking!
36 Genius Mom Hacks and Time-Saving Laundry Tips for Busy Moms
36 Brilliant Mom Hacks to Make Motherhood Easier
Being a parent comes with its own set of challenges, doesn’t it? Many of us can relate to navigating the beautiful chaos of motherhood, from dealing with temper tantrums to fitting in time for self-care. If you’re looking for creative solutions to everyday parenting challenges, you’ve come to the right place! Here are 36 clever mom hacks that are pure genius and sure to simplify your life as a busy mom.
1. Use a Muffin Tin for Snacks
Transform snack time by using a muffin tin to serve a variety of snacks. This not only looks fun but also encourages kids to try different foods.
2. The One-in-One-Out Rule
To control clutter, implement the one-in-one-out rule. When your child receives a new toy, they must donate or throw away an old one.
3. DIY Sensory Bins
Use rice, beans, or pasta in a large container to create a sensory bin. Add toys for immersive play that keeps little hands busy for hours.
4. Meal Prep on Sundays
Spend a couple of hours every Sunday prepping meals for the week. Chop vegetables, cook grains, and portion meals to save time and stress during busy weekdays.
5. Car Seat Cover for Sickness
Keep an extra car seat cover on hand for those inevitable moments of sickness. It’s much easier to wash rather than replacing or cleaning the entire seat.
6. Create a Family Command Center
Set up a command center in your entryway with a calendar, hooks for bags, and a whiteboard. This can help everyone stay organized and informed.
7. Use Old Baby Wipes Containers
Repurpose old baby wipes containers to keep craft supplies or snacks organized. It’s a great way to reuse something that might otherwise go to waste!
8. Set Up a Morning Routine Chart
Design a visual chart that outlines morning tasks for your kids, helping them learn responsibility and independence while easing the morning rush.
9. Establish a Quiet Time
Incorporate a daily quiet time when everyone can relax. This helps you recharge while encouraging kids to engage in independent play or reading.
10. Use Flip Flops in the Pool
Slip flip flops on your kids while they’re at the pool to keep their feet protected from hot or rough surfaces while allowing easy on-and-off access.
11. Color-Code Towel Sets
Assign each family member a color for their towels. This simple trick helps kids recognize which towel is theirs, reducing laundry mix-ups.
12. Create DIY Bath Paints
Mix cornstarch, food coloring, and water to create vibrant bath paints. This makes bath time more enjoyable while keeping them engaged in creative play.
13. Use a Tension Rod
Install a tension rod underneath the sink to hang spray bottles and keep your cleaning supplies organized and easily accessible.
14. Invest in a Large Family Calendar
A large wall calendar can help kids and parents keep track of everyone’s activities, encouraging accountability and reducing scheduling conflicts.
15. Turn Chores into a Game
Make chores fun by turning them into games. Set a timer and challenge kids to beat the clock while cleaning their rooms or doing dishes.
16. Freeze Smoothies in Bags
Prepare smoothie bags with fruits and veggies and freeze them. Grab one each morning, blend it with yogurt or juice, and head out the door!
17. Use a Shower Caddy for Art Supplies
Keep art supplies organized and portable by using a shower caddy. It makes clean-up easy and helps prevent supplies from getting scattered around.
18. Easy Art Displays
Hang a wire with clips in a common area to easily display your kids’ artwork. This not only showcases their talent but also keeps clutter at bay.
19. Bookmark Fun recipes
Teach your kids healthy eating habits by bookmarking nutritious recipes together. It can be fun and educational to involve them in meal planning.
20. Sock Puppets from Old Socks
Encourage imaginative play by creating sock puppets. Just add googly eyes and some fabric scraps for hair!
21. Use a Shoe Organizer for Toys
Transform a hanging shoe organizer into a toy storage solution for smaller items. This helps keep toys tidy and easily accessible.
22. Create a Family Legos Station
Designate a space or bin for Legos where kids can freely build and play. It makes clean-up easier and encourages creativity.
23. Develop a Family Tech-Free Night
Establish a tech-free night once a week where everyone disconnects and spends quality time together, playing games or reading.
24. Use a Sandwich Maker
You can use a sandwich maker to make quick family-friendly meals like quesadillas or grilled cheese sandwiches, speeding up dinner time.
25. Use a Rubber Band for Open Jars
Struggling with stubborn jar lids? A rubber band can help grip the lid better for easy opening.
26. Set Up a Reading Nook
Create a cozy reading corner with pillows and blankets, encouraging your kids to read more while giving you quiet time.
27. Save Your Amazon Boxes
Reuse Amazon boxes to organize seasonal items, clothes, or toys. It’s a cost-effective way to declutter while keeping items sorted.
28. Utilize Shower Rods for Hanging Utensils
Hang utensils from a shower rod in the kitchen to keep them organized and easy to reach while cooking.
29. Make Travel Kits for On-the-Go
Create individualized travel kits with coloring books, snacks, and toys for car rides. It keeps kids entertained and makes travel smoother.
30. Craft with Recyclables
Collect household items for craft projects encouraging resourcefulness. Empty boxes and bottles can lead to exciting creations!
31. Use Parent Volunteer Sheets
Create a volunteer sign-up sheet for school events to keep track of who helps with what. This fosters community while distributing the workload.
32. Implement a Family Fun Jar
Fill a jar with activity ideas and pull one out every weekend. This keeps family time exciting and spontaneous!
33. Backup Snacks in the Car
Keep a stash of healthy snacks in your car. This ensures you’re prepared for meltdowns during outings or road trips.
34. Teach Kids to Use a Timer
Encourage kids to use a timer for tasks. It prepares them for responsibilities while making tasks feel more manageable.
35. Use a Wet Wipes Container for Art Supplies
An old wet wipes container makes the perfect storage for crayons and markers, keeping them accessible for pop-up art sessions.
36. Portable Snack Bags
Keep portable snack bags ready for outings. Fill them with trail mix or fresh fruit for healthy, on-the-go options.
Bonus Ideas
Feeling inspired? Here are a few last-minute hacks to consider:
- Magnetic Spice Jars: Stick them to your fridge for easy access
- Index Cards for Homework: Use them for a simple task reminder
- Reusable Water Bottles: Encourage hydration while reducing waste
Conclusion
Motherhood can be overwhelming, but these 36 mom hacks are designed to make your life a little easier and more organized. Whether you’re tackling snack time or chore resistance, there’s always a clever trick you can use. Remember, you’re not alone—every mom has been there, and together we can thrive in the beautiful chaos that is parenting. Embrace these hacks and save yourself time, effort, and maybe even a little sanity along the way!
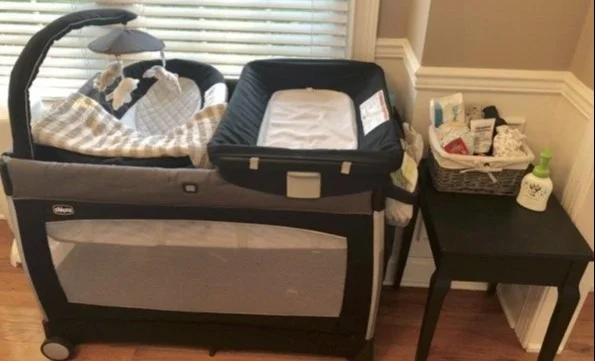
Essential Tips for Newborn Living Room Set Up & First Time Mom Nursery Ideas
Master Organizing Your Home Before Baby Arrives
Bringing home a new baby is a joyful yet overwhelming experience. Every parent wants to prepare their home for this new life, but where do you even start? Organizing your space not only helps reduce stress but also ensures that everything you need for your little one is easily accessible. Here’s how to prepare your home efficiently before welcoming your new addition.
Create a Baby Zone
Designate a Safe Space
Start by choosing a room or area in your home that will serve as your baby’s space. Ideally, this should be near your bedroom for those long, sleepless nights. Your nursery doesn’t have to be elaborate—a simple corner can work.
- Tip: Include essentials like a crib, changing table, and storage for toys.
Focus on Everyday Essentials
Setting up a dedicated area for baby items will streamline your daily routine. Keep the following in mind:
- Crib: Add a comfortable mattress and a few fitted sheets.
- Changing Table: Stock up on diapers, wipes, and changing pad covers.
- Baby Clothes: Organize by size and season in bins or drawers.
Get Organized
Declutter Before Baby
Before the baby arrives, take some time to declutter. This will create more space and reduce the chaos.
- Action Item: Set aside items you no longer need—donate or store them away.
Use Clear Bins for Storage
Transparent storage bins are a game-changer when it comes to organizing baby supplies. You can easily see what’s inside without digging through piles.
- Tip: Label each bin with its contents (e.g., “Diapers,” “Toys,” “Clothes”).
Open Shelves for Easy Access
Consider using open shelving in places like the nursery or your living room for storing baby essentials.
- Example: Put the most-used items within reach—this is especially handy when you have your hands full!
Plan for Safety
Baby-Proofing Checklist
Safety is paramount when preparing your home for a new baby.
- Cover electrical outlets.
- Secure furniture to the wall to prevent tipping.
- Keep hazardous materials out of reach.
Create a Cleaning Schedule
Cleaning can fall by the wayside once the baby arrives, so it’s best to prepare beforehand.
Establish a Routine
Set up a cleaning schedule that focuses on areas you’ll need the most, like the nursery and kitchen.
- Weekly Tasks: Vacuum, sanitize, and dust to keep baby’s environment clean and healthy.
Final Touches
Stock Up on New Baby Products
Before the big day arrives, make sure you have all the necessary products:
- Diapers and wipes
- Bottles and a breast pump
- Swaddles and blankets
- A baby monitor
Enjoy One Last Relaxing Clean
After everything is organized, take a moment to enjoy a clean and peaceful environment. This space will soon be filled with delightful chaos and love!
Bonus Ideas
Fun Ways to Include Siblings
If you have older children, involve them in organizing the baby’s space. This can help them feel included and excited about the new addition.
- Craft Idea: Help them create “Welcome Home” signs or special drawings to hang in the nursery.
Quick Tips and Mom Hacks
- Keep a diaper bag ready: Pack it ahead of time with all essentials so it’s ready for outings.
- Use multi-purpose furniture: Look for items that double as storage and seating.
- Substitute organizers: Use kitchen drawer organizers for baby items; they’re versatile and often less expensive.
Mistakes to Avoid
- Don’t wait until the last minute to start organizing.
- Avoid overbuying baby clothes; babies grow fast!
- Avoid complex organization systems that aren’t easy to maintain.
FAQs
When should I start organizing for my baby? Start organizing at least a few months before your due date to ensure you have plenty of time and energy to set up.
What are some must-have baby products? You’ll need diapers, clothing, a safe sleeping space, feeding accessories, and toys. Focus on the essentials first!
Getting your home organized before your new baby arrives doesn’t have to feel daunting. With a little planning and preparation, you can create a welcoming environment that makes this transition smooth and joyous. Happy organizing!
10 Essential Freezer Meals Perfect for New Parents
10 Essential Freezer Meals Perfect for New Parents
Welcoming a new baby can be an overwhelming experience filled with joy, emotions, and—let’s be honest—a serious lack of sleep. If you’re pregnant and preparing for your little one’s arrival, one of the best things you can do for yourself (and your family) is to stock your freezer with delicious meals. Freezer meals are a lifesaver when life gets hectic, making it easier to enjoy home-cooked goodness without spending hours in the kitchen.
In this guide, we’ll explore 10 essential freezer meals that are perfect for new parents. So grab your freezer bags, and let’s get started!
Why Freezer Meals?
Having pre-prepared meals on hand provides numerous benefits:
- Time-Saving: Less time spent cooking means more time with your baby.
- Healthy Options: You control the ingredients, making it easier to eat healthily.
- Cost-Effective: Avoid last-minute takeout expenses.
- Stress Relief: A well-stocked freezer alleviates the pressure of mealtime.
10 Freezer Meal Ideas for New Parents
1. Chicken and Vegetable Stir-Fry
Packed with protein and fiber, this quick stir-fry can be made in large batches. Portion into freezer bags and simply stir-fry when you’re ready to eat!
2. Hearty Beef Stew
This comforting dish is perfect for chilly nights. Make a big pot and freeze individual servings. Just reheat and enjoy the warm, homey flavors.
3. Spinach and Ricotta Stuffed Shells
These delicious stuffed shells are a hit with both kids and adults. Prepare several trays, freeze them uncooked, and bake them straight from the freezer.
4. Homemade Chili
Chili is a fantastic freezer meal, full of beans and meat. Its flavors only improve after freezing, making it ideal for busy nights.
5. Breakfast Burritos
These burritos are perfect for a quick breakfast. Fill whole wheat tortillas with scrambled eggs, cheese, and your favorite vegetables, then wrap and freeze.
6. Vegetable Quinoa Bowl
A healthy option full of nutrients, quinoa bowls can be made with various veggies and spices. Freeze in single portions for easy access.
7. Baked Ziti
A classic comfort food that freezes beautifully. Prepare a large batch in a casserole dish, and freeze until you need a quick, hearty meal.
8. Lemon Garlic Shrimp
This dish can be frozen before cooking, making it a quick and delicious option for busy evenings. Just sauté the shrimp when you’re ready to eat!
9. Chicken Tikka Masala
Prepare this flavorful dish in advance, and simply reheat when it’s time for dinner. Serve with rice for a complete meal.
10. Creamy Tomato Basil Soup
Warm and comforting, this soup freezes well. Pair it with grilled cheese sandwiches for a cozy meal.
Quick Tips for Freezer Meal Prep
- Use Quality Freezer Bags: Invest in heavy-duty freezer bags to prevent freezer burn.
- Label Everything: Include the date and cooking instructions on each bag.
- Prep Ingredients Ahead: Chop veggies and marinate proteins in advance for quicker assembly.
- Portion Control: Freeze meals in individual portions to make reheating easier.
Mistakes to Avoid When Freezing Meals
- Not Cooling Food Completely: Always let food cool to room temperature before freezing to prevent ice crystals.
- Freezing Too Much at Once: This can raise the freezer temperature. Freeze in smaller batches instead.
FAQs about Freezer Meals
How long can I keep meals in the freezer?
Most freezer meals are good for 3 to 6 months, but always check for signs of freezer burn.
Can I freeze everything?
Not all foods freeze well. Avoid freezing foods with high water content, like cucumbers and lettuce.
How do I reheat frozen meals?
Thaw in the refrigerator for a day before reheating or cook from frozen using a microwave or oven, adjusting cooking times as needed.
Bonus Ideas
- Consider making baby food alongside your meals. Pureed veggies and fruits freeze well and make great quick snacks or meals for your little one.
- Plan a freezer meal prep day with friends. This can add fun to your prep day and provide more meal variety!
By taking some time now to prep these freezer meals, you’ll be setting yourself up for success once your baby arrives. You’ll spend less time cooking, enjoy healthier meals, and have more precious moments to spend with your new little one. Happy cooking (and congratulations on your upcoming bundle of joy)!
10 essential night-time routines perfect for stay-at-home moms
Essential Guide to a Peaceful SAHM Night-time Routine
As a stay-at-home mom (SAHM), winding down at the end of the day can feel like a herculean task. After a long day of caring for little ones, it’s vital to establish a night-time routine that not only helps your children settle down but also allows you to recharge for the next day. If you’re struggling with how to create an effective night-time routine, you’re not alone! Let’s dive into some steps to create a soothing SAHM night-time routine that benefits the whole family.
Why a Night-time Routine is Important
Having a structured night-time routine:
- Promotes better sleep for both you and your kids
- Creates a sense of security and stability in your household
- Provides you time to unwind and reflect after a busy day
Steps to Create Your Perfect Night-time Routine
1. Set a Consistent Bedtime
Pick a bedtime that works for your family and stick to it. Consistency is key in signaling to your little ones that it’s time to wind down.
2. Plan a Family Wind-Down Activity
Spend quality time together as a family before the bed-time hustle. Activities could include:
- Reading stories together
- Playing board games
- Enjoying a calm talk about the day
3. Create a Calm Environment
Transform the atmosphere with gentle lighting and peaceful music. Dim the lights and play soft tunes to help everyone relax.
4. Establish a Nightly Hygiene Routine
Good hygiene habits are important for kids. Encourage your little ones to:
- Brush their teeth
- Take a bath or shower
- Change into pajamas
5. Encourage Quiet Reflection
Give your kids a few minutes for quiet reflection. They can think about their day or dream about tomorrow, helping them relax.
6. Set Up a Bedtime Snack
If it fits into your family’s routine, consider a light bedtime snack such as:
- Whole grain toast with a spread
- A small bowl of yogurt with fruit
- A glass of warm milk
7. Limit Screen Time
Try to minimize the use of screens at least an hour before bed. This will help prepare your mind for sleep.
8. Read Together
Choose a calm bedtime story. Reading not only helps little ones wind down but also fosters a love for reading and learning.
9. Offer a Security Item
If your child has a favorite stuffed animal or blanket, let them take it to bed. This can be comforting and help ease anxiety.
10. Have a Goodnight Ritual
Finish the night with a special phrase or moment, like a “goodnight hug” or a “star in the sky” wish. This reinforces connection and love.
Quick Tips for an Effective Routine
- Utilize a Timer: Set a timer for each part of the routine to keep things moving efficiently.
- Stay Flexible: Not every night will go according to plan, and that’s okay! Adjust as needed.
- Take Time for Yourself: Don’t forget to carve out a few moments for self-care after the kids are asleep.
Mistakes to Avoid
- Being Inconsistent: Try not to change the routine frequently, as this can confuse your kids.
- Skipping Steps: Each step holds importance and rushing through them may lead to chaos.
- Ignoring Your Needs: While caring for your children is crucial, make sure to prioritize your own well-being.
FAQs
1. How long should a night-time routine take?
A typical routine might take about 30 minutes to an hour, depending on your family’s needs.
2. What if my child resists bedtime?
Communicate with them about the routine and let them know what to expect, offering them a sense of control.
3. Is a night-time routine necessary for teenagers?
Absolutely! A consistent routine can still be beneficial for older children and help reinforce good sleep habits.
Bonus Ideas
- Incorporate Breathing Exercises: Spend a few moments doing deep breathing exercises together.
- Journal Together: Encourage writing in a journal before bed to process thoughts and feelings.
Creating a calming night-time routine not only helps your children prepare for bed but also allows you to unwind and take a breath after a busy day. Start gradually implementing these steps to develop a routine that works best for you and your family. You’ve got this, mama! 🌙✨

The Best Gender Reveal Cake Ever: A Delightful Surprise!
Discover the Best Gender Reveal Cake Ever to Surprise Your Loved Ones
Are you looking for a fun and exciting way to reveal your baby’s gender? If so, a gender reveal cake might just be the perfect centerpiece for your celebration! Imagine the look of surprise on your friends’ and family’s faces when they cut into the cake and unveil the big news. In this article, we will guide you through everything you need to know to create the best gender reveal cake ever, providing helpful tips and creative ideas along the way.
What Makes a Gender Reveal Cake Special?
Gender reveal cakes are unique because they allow you to share one of life’s biggest surprises—whether you’re having a boy or a girl—in a delicious way. Here are a few reasons why they have become so popular:
- Element of Surprise: The inner color of the cake (blue for boys, pink for girls) creates a thrilling moment of anticipation.
- Memorable: A beautifully designed cake captures the essence of your love and excitement as parents-to-be.
- Sweet Treat: Who doesn’t love cake? It makes the event even sweeter!
Selecting Your Cake Style
Before you dive into baking (or ordering) your cake, consider the style that suits your celebration best. Here are some ideas:
- Classic Round Cake: A simple yet elegant choice that can be decorated floral or with baby-themed details.
- Cupcake Tower: Individual cupcakes offer more serving options. You can fill them with colored frosting for a twist!
- Layered Cake: Include multiple layers with colors that represent both genders before revealing the final layer.
Step-by-Step Guide to Creating the Best Gender Reveal Cake
Step 1: Decide on Flavor and Color
The flavor of your cake can be anything from classic vanilla to exotic flavors like lemon or red velvet. If you want the cake to be a surprise, use a white or light-colored batter to hide the gender reveal color inside.
Step 2: Ingredients Needed
- Cakes: Your choice of cake mix or homemade batter
- Food Coloring: Bright blue or pink
- Frosting: Your favorite buttercream or cream cheese frosting
- Decorations: Sprinkles, cake toppers, or edible decorations that reflect your theme
Step 3: Assemble the Cake
- Bake the cakes according to your recipe or box instructions.
- Once cooled, carefully carve out a section of the center of the cake if you’re using a round cake.
- Add the colored frosting inside and seal it back up before frosting the outside.
- Decorate as per your theme, ensuring to keep the colors subtle until the big reveal.
Step 4: Make the Reveal Memorable
Let everyone gather around as you slice into the cake. You can enhance the moment with some upbeat music and cheers!
Quick Tips for the Perfect Cake
- Test Run: Consider doing a practice bake to ensure colors and flavors are just right.
- Insider Help: Ask a friend or family member to help keep the gender a secret from you while preparing the cake.
- Weather Check: If it’s warm, consider refrigerating the cake before serving to maintain its structure.
Mistakes to Avoid
- Overbaking the Cake: This can lead to a dry texture, ruining the reveal.
- Skipping Decorations: A plain cake may not yield the excitement you’re looking for. Get creative!
- Neglecting the Cut: Make sure to cut the cake in front of everyone to share the joy of the reveal.
FAQs About Gender Reveal Cakes
How early can I have the cake made?
It’s best to have it made just a few days prior to the event to ensure freshness.
Can I use substitutes for ingredients?
Absolutely! If you have dietary restrictions, feel free to use gluten-free flour or vegan substitutes.
What if I want a neutral theme?
You can opt for yellow or green colors, which works well for a neutral reveal.
Bonus Ideas for Your Celebration
- Surprise Box: Incorporate confetti or balloons that pop out when you cut into the cake.
- A Photo Contest: Let your guests guess the baby’s gender by voting before the reveal for added fun.
Creating the best gender reveal cake is about celebrating new beginnings with those you love. Whether you choose to bake it yourself or order from a bakery, the joy of sharing this sweet moment will be the highlight of your event. Happy celebrating!
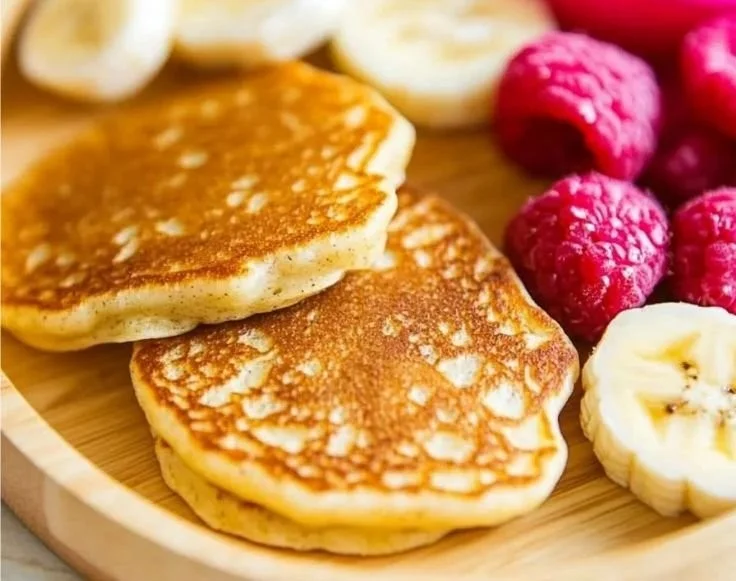
Super Simple Banana Pancakes for Happy Baby Breakfast
Super Simple Banana Pancakes Make Baby Breakfast Joyful
Are your mornings filled with more chaos than cuddles? Do you want to whip up something quick yet delightful for your little one’s breakfast? Let’s face it—busy parents often struggle to find time to prepare a wholesome meal, and that’s where super simple banana pancakes come in. They’re not only a hit with babies but also a breeze to make!
Why Banana Pancakes Are Perfect for Breakfast
Banana pancakes are ripe with nutrients, naturally sweet, and jam-packed with flavor. They’re also a fantastic way to sneak in some healthy fruit. A batch of these fluffy delights will surely start your baby’s day with a smile.
Benefits of Banana Pancakes:
- Easy to Prepare: Just mash and mix—no fancy ingredients needed.
- Nutritious: Bananas provide potassium, fiber, and essential vitamins.
- Customizable: Add oats, nut butter, or even chocolate chips.
How to Make Super Simple Banana Pancakes
Ingredients You’ll Need:
- 1 ripe banana
- 1 egg
- 1/4 cup of flour (whole wheat or all-purpose)
- 1/4 cup of milk (or a dairy alternative)
- A pinch of baking powder
- A dash of cinnamon (optional)
Step-by-Step Instructions:
Mash the Banana
- In a bowl, use a fork to mash the ripe banana until smooth.
Mix the Ingredients
- Add the egg to the mashed banana and mix until well combined.
- Gradually stir in the flour, milk, baking powder, and cinnamon if you’re using it.
Heat the Pan
- Preheat a non-stick skillet over medium heat. Lightly grease with cooking spray or a little butter.
Pour the Batter
- Pour tablespoon-sized amounts of batter onto the skillet.
Cook and Flip
- Cook until bubbles form on the surface, then flip them over. Cook the other side until golden brown.
Serve Warm
- Serve these delicious pancakes warm with sliced bananas or a drizzle of maple syrup (if your little one is old enough).
Quick Tips for Success
- Grind Oats: For a healthier option, grind oats in a blender to use instead of flour.
- Prep Ahead: Make a batch on the weekend and store extras in the fridge for quick breakfasts during the week.
- Add Extras: Customize with blueberries, nuts, or even shredded carrots for added nutrition.
Mistakes to Avoid
- Over-mixing: Be gentle when mixing to keep pancakes fluffy.
- Skipping the Ripeness: Use a truly ripe banana for maximum sweetness and flavor.
FAQs About Banana Pancakes
Can I freeze banana pancakes?
Absolutely! Freeze individual pancakes between layers of parchment paper, then store them in a zip-top bag. Reheat in a toaster or microwave when needed.
How can I make these pancakes dairy-free?
Simply substitute regular milk with almond, oat, or coconut milk for a delicious dairy-free version.
What age can my baby start having pancakes?
Most babies can start enjoying pancakes around 6-8 months old, but always consult with your pediatrician first.
Bonus Ideas to Make Breakfast Even More Fun
- Pancake Art: Use food coloring to make fun shapes that engage your baby’s imagination.
- Smoothie Dipping Sauce: Create a yogurt or fruit smoothie for a fun dipping experience.
In Conclusion
Super simple banana pancakes are a fantastic choice for busy parents looking to give their babies a joyful and nutritious start to the day. With just a few ingredients and simple steps, you can create a breakfast that is not only delicious but also brings your family together. So grab those ripe bananas and let the fun begin! Happy cooking! 🍌🥞
By following these tips, you can ensure breakfast is both easy and delightful—a win for you and your baby.
