
Quick Easy Pizza Cupcakes Ideas Your Family Will Love Tonight
Imagine this delightful scenario
It’s a Friday night, and you’ve just settled into your cozy couch, but—wait a minute! You remember that lingering question we’ve all asked at some point: “What’s for dinner?” You glance at the clock; your little one is about to wake from their power nap, and the last thing you want is a chaotic mealtime. Sound familiar?
Now, let me fill you in on a little secret I stumbled upon during one of those desperate dinner moments (we’ve all been there, right?). I discovered easy pizza cupcakes. These delightful, mini pizza cups are not just delicious but incredibly simple to whip up, making them perfect for parents like us, juggling everything from toddler tantrums to evening routines. They’re fun, versatile, and best of all, your kids will want to help in the kitchen!
Let’s dive into the magic of pizza cupcakes
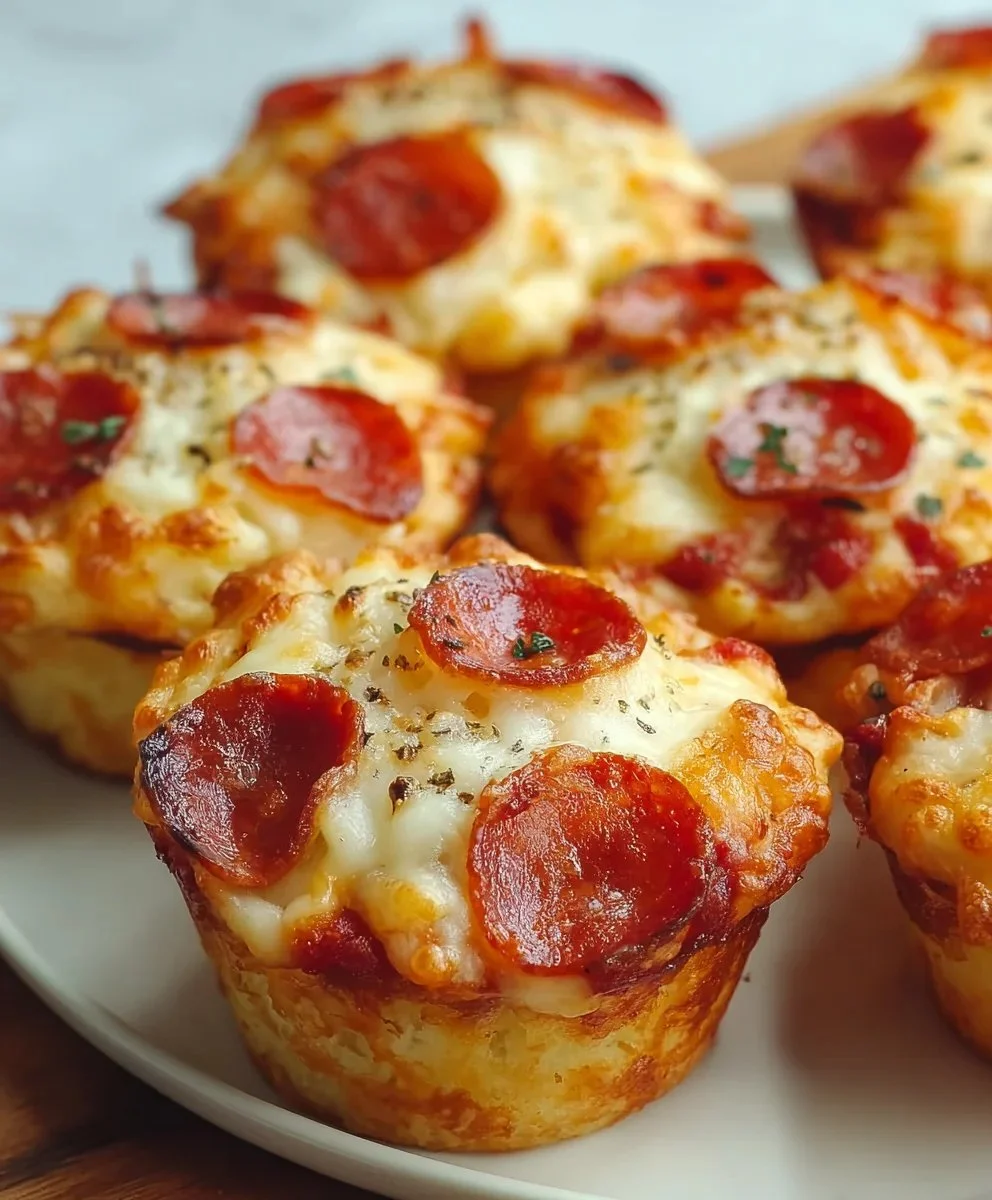
You might be wondering what exactly pizza cupcakes are. It’s like a perfect blend between a pizza and a muffin but with a whole lot more fun. Imagine taking all your favorite pizza toppings and magically transforming them into these cute little cups of goodness. Think about their enchanting aroma filling the kitchen—just picture how your kids will light up with joy when they see them!
Why pizza cupcakes are a hit with kids
Customizable: Every child has their own unique taste. Some love pepperoni; others prefer veggies or cheese. Pizza cupcakes let each child add their favorite ingredients.
Interactive: Kids love getting involved in the kitchen. Involving them in the process, whether it’s pouring, mixing, or sprinkling toppings, turns mealtime into an engaging activity.
Quick and nutritious: They can be prepared in about 30 minutes, which means you can whip these up even on your busiest days. You can pack them with healthy ingredients, making it a guilt-free snack.
Let’s explore how to make these delightful treats and share some tips along the way.
The easy recipe for pizza cupcakes
Now that you’re drooling a bit (admit it, I am too), let’s get to the magical part: the recipe. Here’s what you’ll need to create your own pizza cupcakes.
Ingredients you’ll need
- 1 can of biscuit dough: Yes, the kind that pops open! (You can also use pizza dough if you prefer.)
- 1 cup of pizza sauce: Store-bought or homemade—no judgment here!
- 1-2 cups of shredded cheese: A mixture of mozzarella and cheddar works wonders.
- Toppings: Your favorites! Think pepperoni, diced bell peppers, olives, cooked sausage, or even pineapple if you’re feeling adventurous.
- Seasonings: A sprinkle of Italian herbs, garlic powder, or red chili flakes can elevate the flavor.
Step-by-step guide to creating pizza cupcakes
Preheat your oven: Set it to 375°F (190°C). While the oven warms up, you can gather your ingredients.
Prepare the batter: If you’re using biscuit dough, separate it into small pieces—about the size of a golf ball. If you’re using pizza dough, roll it out and cut it into small squares.
Shape them into cups: Gently press each piece of dough into the cavity of a greased muffin tin, making sure to leave enough room in the middle for that yummy filling.
Fill with sauce: Spoon a small amount of pizza sauce into each dough cup, just enough to cover the bottom.
Add toppings: Here’s the fun part! Let your little chefs add their favorite toppings and sprinkle cheese on top. This is where you can sneak in some veggies if you want to trick them into a bit of nutrition.
Bake: Pop them in the oven for about 15-20 minutes or until they’re golden brown. The smell will be divine, and your kids won’t be able to wait!
Cool and enjoy: Let them cool for a couple of minutes before serving to avoid any burnt tongues.
Tips to make this even easier
Here are some quick tips I’ve learned from experience that might save you time and energy:
Prep in advance: You can assemble these pizza cupcakes ahead of time. Just pop them in the fridge until you’re ready to bake them!
Experiment: Don’t hesitate to try out different sauces like BBQ or Alfredo. You can even swap out the cheese with dairy alternatives if your family has dietary restrictions.
Pack in some veggies: I sometimes grate zucchini or carrots into the sauce (they’ll never know!). Just remember to finely chop anything that seems too noticeable.
Make it a theme night: Turn it into a family pizza-making night. Lay out all the ingredients and let the kids create their own masterpieces.
Mistakes to avoid
It’s completely normal to stumble through a new recipe. Here’s what I learned the hard way:
Too much filling: It can be tempting to load them up, but too much sauce or toppings can make them soggy. Stick to a balanced amount for the best texture.
Overcooking: Keep an eye on them; timing is crucial! Nothing’s worse than burnt pizza cupcakes that nobody will eat.
Unsuitable toppings: Some ingredients might not hold up well when baked. Stick with tried and tested options for the best result.
FAQs about easy pizza cupcakes
Can I freeze pizza cupcakes?
Absolutely! They freeze well. Just wrap them tightly in plastic wrap and place them in a freezer bag. You can reheat them, and they taste just as good!
What can I serve with them?
These little wonders are great on their own, but consider pairing them with a light salad or some fresh fruit for a balance of nutrition.
Can I make them gluten-free?
For sure! There are many gluten-free biscuit or pizza dough options available. Enjoy experimenting!
Bonus ideas to elevate your pizza cupcakes
Once you master the basic recipe, get creative! Try these ideas out:
Breakfast version: Use scrambled eggs, cheese, and breakfast sausage for a morning twist.
Mini version for parties: Make smaller versions in a mini muffin tin for perfect bite-sized appetizers.
Dessert option: What if you try sweet pizza cupcakes? Use a dough base with cinnamon, sugar, and apple slices topped with cream cheese frosting. Sounds interesting, right?
Conclusion: Sharing joy through food
At the end of the day, cooking with your kids doesn’t just fill their bellies; it creates precious moments. These easy pizza cupcakes are not only a fun way to get your little ones involved in the kitchen, but they also remind us that mealtimes can be joyful teambuilding experiences.
So next time you’re stumped for dinner, remember that quick and easy doesn’t mean bland or boring. You can whip up a meal that’s nutritious, delicious, and brings a smile to everyone’s face. Here’s to many delightful kitchen adventures ahead—because cooking together just might be one of the sweetest gifts we can give our kids. Enjoy your pizza-making journey!
DIY Baby Shower Favors Ideas to Wow Guests and Save Time with Ease
DIY Baby Shower Favors That Will Leave a Lasting Impression
Imagine this: you’re at a baby shower, surrounded by friends and family, laughter fills the air, and the guest of honor is glowing with excitement. As the celebration winds down, everyone reaches for the adorable little gift bags filled with unique, handmade favors. You can almost feel the warm sentiments that come with each handpicked item—talk about a memorable send-off!
Now, you might be wondering, “How can I create memorable baby shower favors that resonate with my guests?” The answer is simple: DIY! Not only do homemade favors add a personal touch, but they also show how much you care. Plus, they’re often more budget-friendly than store-bought options. Let’s dive into nine delightful DIY baby shower favors that will have everyone raving about your thoughtfulness long after the party is over.
Personalized Seed Packets
Here’s the thing: who doesn’t love watching something grow? Personalized seed packets are a fantastic way to give your guests a living reminder of the joyous occasion. You could choose flowers for a splash of color or herbs that they can actually use in their cooking.
What you’ll need:
- Seed packets
- Printable label paper
- Scissors and glue
You can create personalized labels that say something sweet like “Watch us grow – Baby [Last Name] arriving [Due Date]!” and attach them to the packets. This touch isn’t just practical; it’s a beautiful metaphor for new beginnings.
Hand-Poured Candles
Picture this: your guests lighting their candles at home while reminiscing about a lovely afternoon spent celebrating your little one. DIY candles are easy and allow you to customize both scents and colors to match your baby shower theme.
You’ll need:
- Soy wax or beeswax
- Candle wicks
- Essential oils for fragrance
- Small jars or molds
Simply melt the wax, mix in your favorite scent, pour it into containers, and voila! You’ve got lovely favors that offer a sensory experience—every time guests light them, they’ll be transported back to the shower.
Sweet Treats in Mason Jars
Let’s be honest; who doesn’t love a sweet treat? Mason jars filled with homemade goodies like cookies, brownies, or granola can bring smiles to everyone’s faces. Plus, they’re super easy to make!
Supplies required:
- Mason jars
- Ingredients for your chosen treat
- Fabric or decorative twine
Simply bake your treats, layer them in jars, and top them with a cute piece of fabric tied with twine. You could even attach a recipe card if you’re feeling generous!
Baby-Themed Coasters
If you want guests to take home something useful, consider creating baby-themed coasters. They’re easy to whip up, and you can customize them to fit any color scheme or design.
What you need:
- Plain cork coasters
- Acrylic paint or permanent markers
- Sealer spray
You could paint sweet sayings like “Baby it’s cold outside” with adorable baby motifs. When your guests use them, they’ll remember the fun they had celebrating your little one.
Custom Bath Salts
Now, let’s talk relaxation. Custom bath salts are a treat that your guests can indulge in after busy days full of parenting. They’re easy to make and wonderfully personal.
Ingredients:
- Epsom salt
- Essential oils (like lavender or eucalyptus)
- Food coloring (optional)
- Small jars or bags
Mix your chosen ingredients and package them in small jars. You might add a label that says, “Take time to relax – you deserve it!” This thoughtful gesture will surely be appreciated, especially by fellow parents juggling their little ones.
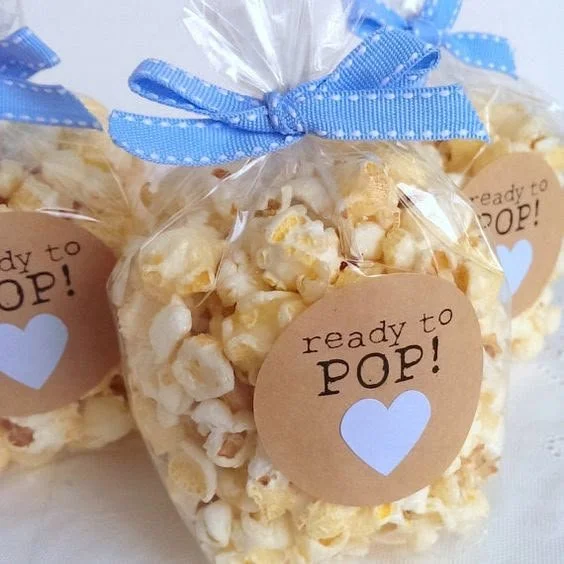
Cute Candy Bags
When all else fails, you can’t go wrong with candy! Filled bags of delicious sweets are a crowd-pleaser. You could throw in some retro candies or local favorites for that special touch.
What you’ll need:
- Assorted candies
- Decorative bags
- Cute labels or stickers
These treats look adorable lined up on the table and are easy to grab as guests head out. Plus, who can resist a bag of candy?
Handmade Baby Wipes
If you’re looking for a practical yet sweet favor, handmade baby wipes can fit the bill. As parents, we all know how handy these little creatures can be.
Materials:
- Bulk paper towels
- Baby wipes solution (you can find tons of recipes online)
- Containers to hold the wipes
Just cut your paper towels in half, soak them in the solution, and place them in cute containers. This gift says “I know what you need” in a charming way that would resonate with any parent.
Tiny Potted Plants
When it comes to thoughtful gifts, tiny potted plants can brighten anyone’s day. They also symbolize growth and new beginnings—perfect for a baby shower.
You’ll need:
- Small pots or cups
- Soil and plants (succulents are great for low maintenance)
- Decorative twine or ribbons
You can paint or decorate the pots and include a little tag that says something whimsical like “Watch our family grow!” It’s a gesture that will continue to grow in meaning over time.
DIY Photo Frames
Finally, let’s talk about something that can capture the beautiful moments to come—DIY photo frames. These are a hit when your friends and family can use them to hold precious memories.
Materials:
- Plain wooden or cardboard frames
- Paints and embellishments
- Craft glue
Encourage your guests to fill them with their favorite memories from the shower or their time with your tiny one. It’s a beautiful way for them to remember the occasion and can serve as a lovely decoration in their homes.
Wrapping It All Up
Creating DIY baby shower favors is not just about the items themselves; it’s about the love and thought you pour into each gift. These gestures don’t just offer your guests a tangible reminder of a joyful day; they convey the excitement and warmth of welcoming a new life into the world.
Whether you choose personalized seed packets or handmade candles, each favor will be a sweet token of your appreciation. Remember, it’s the personal touch that your guests will cherish most, and it’ll surely make your baby shower an unforgettable occasion.
So, as you plan your festivities, embrace the DIY spirit! You’re not alone in this journey, and the memories you create will be cherished by everyone involved. Happy crafting!
Easy Ways to Make 3 Ingredient Chicken Nuggets Your Kids Love
Your New Go-To Snack Idea
Imagine this: it’s a busy weekday afternoon, and your little ones are running around, full of energy and probably a little cranky from being cooped up inside. Sound familiar? You reach for a snack, but what do you give them? Something healthy, of course, but also quick and easy. Well, here’s the thing—if you’ve been looking for a simple yet delicious recipe that your kids will actually enjoy, you’re in for a treat with these 3 Ingredient Chicken Nuggets.
Keeping It Simple
I get it; life as a parent can feel like a circus at times. You want to provide your kiddos with nutritious meals, but it also needs to be easy to prepare. With just three simple ingredients, this chicken nugget recipe is perfect for any busy parent.
What You Need
Before we dive into how to make these super simple nuggets, here’s what you’ll need:
- Chicken breast (or chicken thighs if you prefer)
- Breadcrumbs (you can use plain or flavored, your choice!)
- Eggs (to help everything stick together)
That’s it! Just three ingredients that you probably already have in your kitchen.
Step-by-Step Guide
Now, let’s get into how to whip these up. Honestly, it’s so easy, you’ll wonder why you didn’t try it sooner.
Prep Your Chicken
- Start by cutting your chicken into bite-sized pieces. Aim for uniform sizes so they cook evenly. You want them to be small enough for little hands to grasp.
Set Up Your Breading Station
- Get two bowls ready: one with beaten eggs and the other with breadcrumbs. You might want to sprinkle a little salt and pepper into the breadcrumbs for added flavor. Here’s the kicker: you can also add some Parmesan cheese or even Italian herbs to the breadcrumbs, depending on your family’s taste buds.
Dredging Time
- Dip each chicken piece into the egg wash, making sure it’s well-coated, and then roll it in the breadcrumbs until fully covered. It’s such a fun (and messy) activity that kids can help with.
Bake or Fry
- If you choose to bake, place the nuggets on a parchment-lined baking sheet and spritz them lightly with cooking oil. Bake at 400°F (about 200°C) for 15-20 minutes, flipping them halfway through. They should be golden brown and cooked through.
- Prefer frying? Heat oil in a pan and carefully fry them until they’re crispy on the outside. Just watch out for any splattering; that’s a great time to get the kids to help with clean-up!
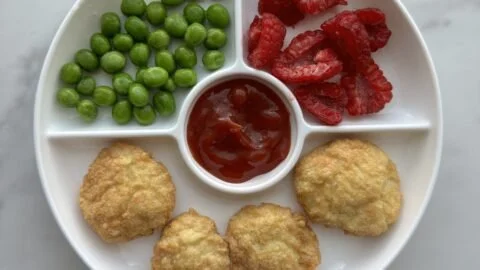
Serve and Enjoy
- They’re best served hot! Pair them with your kid’s favorite dipping sauce—ketchup, honey mustard, or ranch dressing are all winners.
Why Your Kids Will Love Them
You might be wondering why I’m so enthusiastic about this recipe. Here’s why: first and foremost, kids adore anything they can dip! It’s like a fun party on their plate. Plus, when they see you involved in making these nuggets, it instills a sense of excitement and pride. You’re not just handing them a meal; you’re giving them an experience.
The Nutritional Value
Now, let’s talk nutrition. Chicken is a fantastic source of protein, which helps keep those little bodies strong and energized. By making your own nuggets, you’re also skipping out on the additives and preservatives that often come with store-bought options. You’re in control of what goes into your family’s meals, and that can make you feel empowered as a parent.
Quick Tips for Success
- Switch it Up: If your kids are feeling adventurous, chop up some veggies—like zucchini or carrots—and mix them into the breadcrumbs. They’ll be hidden in there, but you’ll know you’re sneaking in some extra goodness.
- Make Extra: Consider making a double batch and freezing some for those nights when you just can’t muster the energy to cook. Frozen nuggets can be baked straight from the freezer—easy peasy!
Mistakes to Avoid
Overcooking: It’s tempting to bake them longer for that ultimate crisp, but overcooking can lead to dry nuggets. Keep an eye on them!
Too Much Oil: If you’re frying, don’t overload the pan. Cooking in batches works better, ensuring they cook evenly and crisply.
Not Prepping Ahead: If you know you’ll have a busy day, you can prep the nuggets earlier and just pop them in the oven or air fryer when you need them.
FAQs
Can I use frozen chicken?
Absolutely! Just make sure to defrost it properly before you start the recipe.
What if my kids don’t like chicken?
No problem! You can easily swap the chicken for turkey or even firm tofu for a vegetarian option.
Can these nuggets be made gluten-free?
Sure! Use gluten-free breadcrumbs to cater to any dietary needs your family has.
Bonus Ideas
Dip Station: Create a little dip station for fun! Place a few bowls filled with different dips and let the kids pick their favorites. This way, each nugget can be a new flavor experience.
Nugget Salad: For a fun twist, toss the nuggets over a bed of greens for a salad your kids just might enjoy—especially if they can assist in making it.
Wrapping It Up
Let’s be honest—having a quick and easy recipe on hand can relieve a lot of stress. These 3 Ingredient Chicken Nuggets are not just a meal; they’re a way to make memories in the kitchen with your little ones. The smiles on their faces when they dig into a plate of homemade nuggets? Priceless.
So the next time you find yourself rushing to get dinner on the table, remember this foolproof recipe. You’re not just feeding your family; you’re also fostering a love for cooking and healthy eating habits. Talk about a win-win!
Now, go ahead and give this a try. Who knows? You might find these nuggets becoming a regular feature on your dinner table, and your kids will be raving about them for days. Happy cooking!

Must-Try 12 Easy Pool Party Snacks for Kids with Finger Foods
Discovering the Best Pool Party Snacks for Kids
Imagine this: it’s a sunny afternoon, and you’ve decided to throw a pool party for your little ones and their friends. The sun is shining, the water’s glistening, and the excitement in the air is palpable. But wait! You’re hit with the sudden realization that you need snacks. Not just any snacks, but the kind that are easy to grab, delicious, and appealing to the pickiest of eaters. Does this sound familiar? You’re not alone in this!
Finding the right pool party snacks for kids can be tricky. Trust me, I’ve been there too. You want to please both the kids, who may only want pizza and candy, and the parents, who are concerned about nutrition and mess. But fear not! I’ve rounded up a list of finger foods and fun ideas that will ensure your party is a huge hit with both kids and parents.
The Essentials for a Pool Party Snack Table
Before we dive into the delicious specifics, let’s talk about some must-haves for your snack setup. Here are a few essentials to keep in mind:
- Easy to grab: Finger foods are key. You don’t want kids making a mess while trying to eat.
- Cool and refreshing: With the summer heat, think refreshing options to keep those little bodies hydrated.
- Fun Factor: Kids love playful foods! Think of ways to make healthy snacks exciting.
Once you’ve got your essentials down, let’s get to the fun part: the snacks!
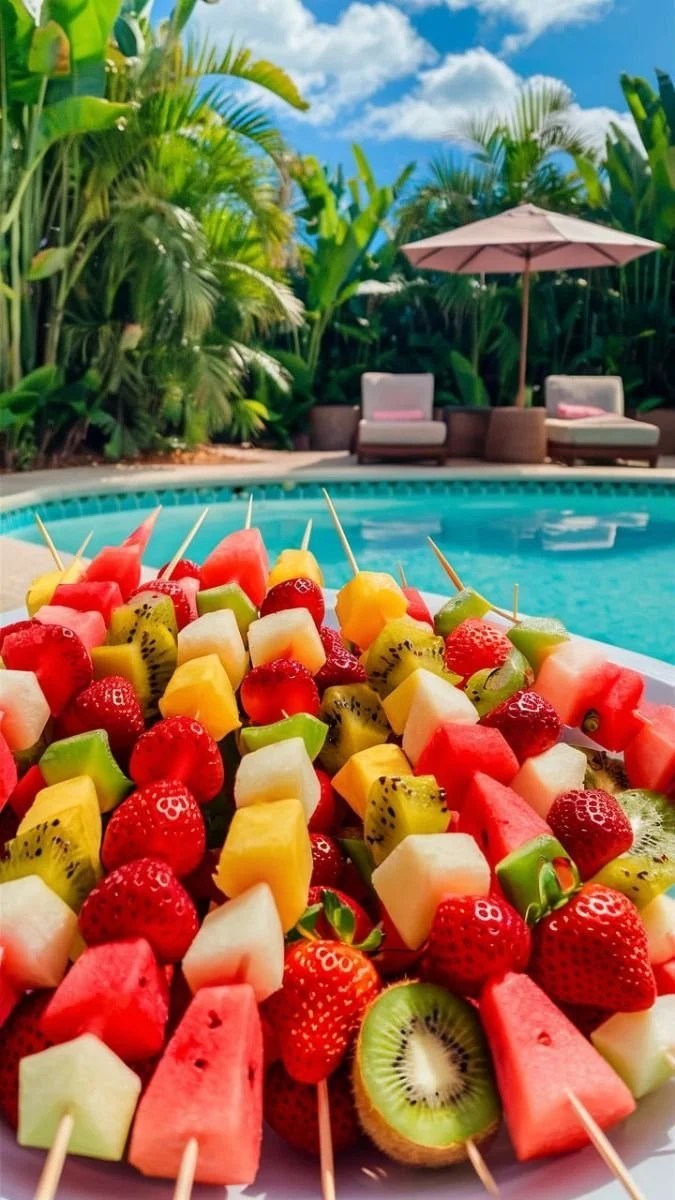
Refreshing Fruit Skewers
Let’s be honest, who doesn’t love fruit on a stick? It’s colorful, healthy, and incredibly easy to make. Here’s how to whip up these refreshing fruit skewers:
- Choose your fruits: Go for a mix of kid-friendly options like melon, grapes, strawberries, and pineapple.
- Skewer them: Use kid-safe skewers or even toothpicks for smaller hands.
- Add a twist: Try drizzling them with a little lime juice or serving with a yogurt dip for added fun.
Not only are these delightful to look at, but they’re also a great way for kids to enjoy their vitamins!
Mini Sandwiches
Next on our list are mini sandwiches. Now, you might be wondering, “What’s so special about sandwiches?” Here’s the thing: when you make them tiny, they instantly become more fun!
- Types to try: PB&J, turkey and cheese, or even hummus and cucumber.
- Cut them out: Use cookie cutters to create fun shapes. Stars, hearts, or even pool floats—get creative!
These bite-sized goodies are perfect for little hands and can easily be prepared in advance.
Veggie Cups with Dip
Now we can’t forget about our veggies! If you’ve got picky eaters, veggie cups might just save the day. Here’s how to set them up:
- Choose your veggies: Carrot sticks, cucumber slices, and bell pepper strips are popular options.
- Portion them: You can use small cups to hold a portion of each vegetable.
- Add dip: A little ranch or hummus at the bottom of each cup makes eating veggies a lot more appealing.
Kids love being able to grab their individual cups, and the presentation is sure to impress parents too.
Popcorn Station
Let’s talk about snacks that add a little bit of crunch and flavor! A popcorn station can be a fun addition to your party. You can offer a variety of toppings to make it exciting:
- Classic butter and salt: A favorite with almost everyone.
- Sweet options: Think of cinnamon sugar or chocolate drizzle.
- Savory mixes: Cheese powder or ranch seasoning can take popcorn to the next level.
Set up a popcorn machine or keep it simple with bags ready to go. Kids can customize their own bags, making it an interactive snack idea!
Frozen Yogurt Bark
If you’re looking for something different and refreshing, frozen yogurt bark could be your new go-to. Here’s how I do it:
- Spread yogurt: Take a cookie sheet and spread yogurt (Greek yogurt works great) evenly on it.
- Add toppings: Before freezing, sprinkle with your choice of fruits, nuts, and maybe a drizzle of honey.
- Freeze & break: Once it’s solid, break it into pieces for easy serving.
This is a unique snack that feels special and luxurious, and it’s also packed with protein!
Ice Cream Cones
Let’s be real; no summer party is complete without a sweet treat. Set up an ice cream cone bar where kids can create their own sundaes!
- Choices: Offer several flavors of ice cream (maybe even some sorbets for a dairy-free option).
- Toppings galore: Sprinkles, chocolate chips, fresh fruit, and whipped cream—go wild!
- Cone options: Don’t forget those waffle cones and cups for variety.
This setup not only keeps the kids happy but also allows parents to join in on the fun (who doesn’t want to create their dream sundae?).
Bonus Snack Ideas
You know what they say, variety is the spice of life! Here are a few bonus ideas that are sure to be crowd-pleasers:
- Cheese and Crackers: A classic combo that kids adore. Use fun-shaped crackers if you can find them!
- Popsicles: Homemade popsicles using fruit juice or smoothies can be a big hit and super healthy.
- Mini Tacos: Provide all the fixings and let kids build their own tacos using small tortillas.
Quick Tips for a Smooth Snack Setup
Before we wrap things up, here’s a few quick tips to ensure your party goes off without a hitch:
- Prep Ahead: Many of these snacks can be made the night before. Less stress for you means more fun for everyone!
- Keep It Cool: Use coolers to keep perishables fresh until it’s time to eat.
- Label Everything: Especially if you have kids with allergies. Clear labeling makes it easy for parents to choose safe options.
Conclusion
So there you have it, a whirlwind of ideas that will keep your pool party snack table bursting with life and flavor! We want to make sure that your little ones are satisfied while also keeping things simple and enjoyable. Remember, you’re not just planning snacks; you’re crafting memories for your kids with every bite.
Next time you fire up the grill, fill the pool, and sound the alarm for a summer splish-splash party, keep this list handy! You’ll be ready to impress kids and their parents alike. And trust me, they’ll be talking about your awesome snacks long after the sun sets and the pool shimmers in the soft glow of evening light.
So go ahead and pin this article, refer back to it when needed, and get ready for a fun-filled day! Happy partying!
Must-Try Baby Shower Games for an Easy, Fun Mom-Approved Party
Picture This Fun Summer Popsicle Theme Party
Imagine it’s a sunny Saturday afternoon, and your backyard is buzzing with excitement. The smell of fresh lemonade fills the air, and bright colors dance across tables adorned with everything from balloons to delightful treats. You’ve decided to throw a popsicle theme baby shower, because let’s be honest, who doesn’t love a refreshing popsicle in the heat of summer? You’re not just celebrating a baby; you’re celebrating the little moments that sprinkle joy into our lives, even if sometimes, "sh*t happens" along the way.
Creating the Perfect Popsicle Baby Shower
When planning a baby shower, especially one with such a fun theme as popsicles, organization is key. You want to create an atmosphere that’s not only inviting and celebratory but also a bit cheeky and relatable—because we all know that raising kids can be a wild ride! Here’s how you can pull off the perfect popsicle-themed party.
Invitations That Set the Tone
Start by sending out colorful invitations that scream summer. Think pastel colors and fun fonts to match your theme. You might include a playful tagline like, “Get ready to pop!” Just a fun heads up—don’t forget to mention that this is a summer baby shower, so flip-flops and tank tops are more than welcome!
Setting the Scene with Decorations
For a popsicle theme party, decorations can be as vibrant as you want. Here are some ideas:
Table Centerpieces: Use small potted plants or vases filled with brightly colored paper popsicles. You can even make paper flowers that look like popsicles, adding a whimsical touch.
Banners and Balloons: A “Popsicle Paradise” banner can be a great focal point. Consider balloons in colors such as pink, blue, and yellow for that sunny feel.
Photo Booth Area: Set up a little corner with fun props like oversized sunglasses, colorful leis, and cut-out popsicles for guests to snap some cute memories.
Delicious Treats for Everyone
What’s a baby shower without some treats? You absolutely can’t skimp on themed snacks. Here’s a list of delicious ideas:
Popsicle Cake Pops: These layered cake pops look like tiny popsicles and are completely irresistible.
Fruit Skewers: Assemble colorful fruit skewers that look like rainbow popsicles. They’re refreshing and healthy!
Popsicle Station: Set up a DIY popsicle station with a variety of juices and fruits so guests can create their own frozen delights. Trust me, kids (and adults) will love it!
Fun Games to Keep the Energy High
No party is complete without games to entertain the guests. A popsicle baby shower can include quirky games that bring smiles and laughter. Here are a few ideas:
Popsicle Bingo: Create bingo cards with different popsicle flavors instead of numbers. It’s simple yet engaging!
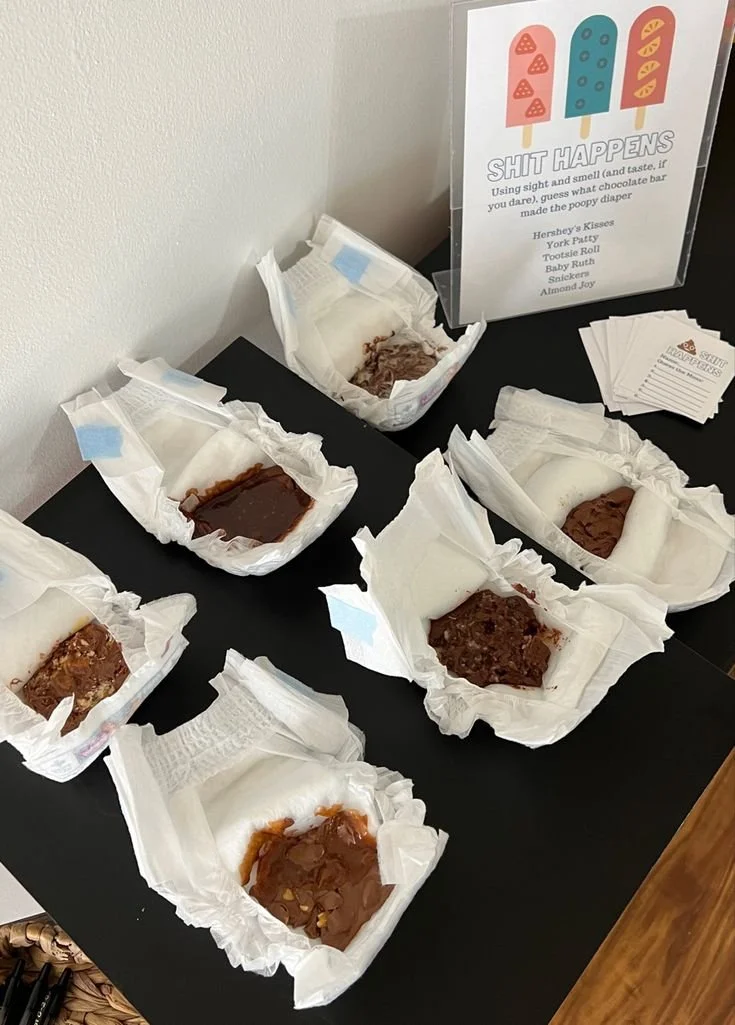
Chocolate Diapers: A classic favorite! Melt chocolate in diapers and let guests guess the “flavor.” It’s hilariously messy and sure to bring out some laughs.
Guess the Baby Food: Could this be more relatable? Have jars of different baby foods, and let guests guess what they are. Spoiler alert: some will be genuinely tough to guess!
Quick Tips That Make a Difference
Here are a few practical hacks to keep the party running smoothly:
Stay Hydrated: With all the excitement, it’s easy to forget about hydration, especially in summer. Have plenty of water and thirst-quenching beverages around.
Set Up a Cooling Area: If your party is outdoors, think about a shaded area where guests can cool off. Maybe an umbrella or a rented canopy?
Handy Essentials: Keeping a basket filled with essentials like sunscreen and wipes will save you from running back and forth.
Handling the Unexpected
Let’s face it, stuff happens. A toddler flips her drink, or a balloon bursts. We’ve all been there—it’s completely normal! Just embrace it. A great mantra to keep in mind is “it’s all part of the fun!”
Wrap-Up with Sweet Memories
As the sun begins to set, gather the guests for a quick toast. Celebrate not just the baby on the way, but the beautiful friendships and family connections that make this journey worthwhile. Here’s the thing: a popsicle theme party isn’t just about the lively decor or the tasty treats; it’s about making cherished memories that you will look back on fondly in the years to come.
Conclusion with Heartfelt Reflections
Hosting a popsicle theme baby shower is a fantastic way to celebrate new life while soaking up the glorious summer sun. It combines fun games, colorful decorations, and delicious snacks into a single heartwarming day that friends and family will talk about for years. Just think of how much joy and laughter will fill your backyard or living room, creating beautiful, lasting memories.
So get ready to pop some treats, embrace the chaos, and enjoy every moment. You’re not just throwing a party; you’re crafting experiences that shine light on the joys of parenthood—no matter what sh*t happens as we navigate this wild parenting journey together.
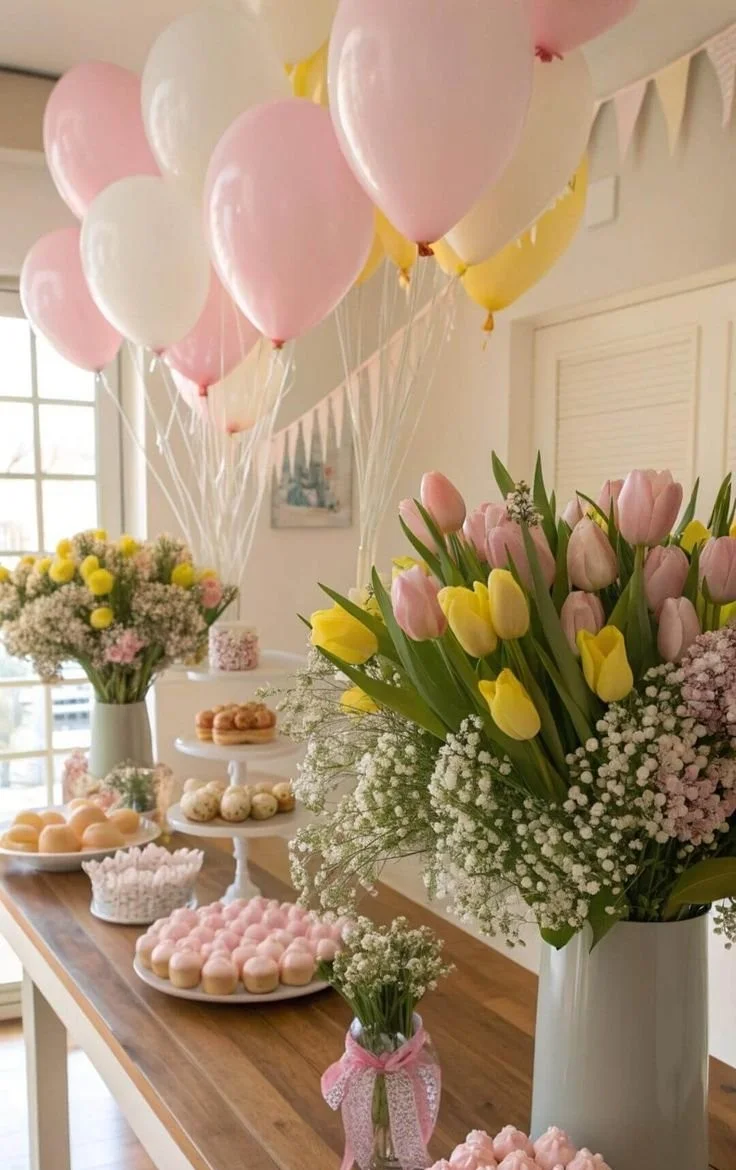
Tiny Tulip Pink and Yellow Spring Baby Shower Ideas That Moms Love
Save Time with Inspired Ideas for a Tiny Tulip Pink and Yellow Spring Baby Shower
Imagine this: the sun shines brightly, the air is filled with the sweet scent of blooming flowers, and laughter dances among the pastel decorations of a spring baby shower. You get to celebrate new beginnings with your closest friends and family in a vibrant and joyful atmosphere. It sounds dreamy, right? If you’re gearing up for an adorable pink and yellow Tiny Tulip-themed baby shower, I’ve got the perfect guide for you!
This celebration can encapsulate the essence of fresh blooms while being manageable and delightful. Trust me, you can save time and energy with these inspired ideas. Let’s explore floral arrangements, dessert tables, DIY activities, and charming party favors that will make your shower the talk of the town. You ready? Let’s get started!
Embracing Floral Arrangements
When it comes to a Tiny Tulip shower, floral arrangements are everything. Just picture a table bedecked with delicate tulips in soft pinks and vibrant yellows. Here are a few ideas to get those blooms front and center:
Sweet and Simple Centerpieces
- Mini Tulip Bouquets: Get small glass vases or mason jars and fill them with fresh tulips. You can place a few on each table. It’s a quick and stunning way to inject some spring flair.
- Tulip Wreaths: Create a gorgeous floral wreath for the entryway using faux tulips (they’re super easy), which you can later use to decorate the nursery!
Floral Alternatives
If real flowers aren’t your thing or you’re short on time, consider floral-themed paper decorations:
- Floral Tablecloths: Find pastel or floral-printed table coverings to set the mood instantly.
- Plant Pot Place Cards: Use mini flower pots as table markers filled with a tiny planting mix, creating a beautiful arrangement.
Dessert Table Delight
Let’s be honest, what’s a baby shower without an irresistible dessert table? This is where you can let your creativity bloom!
Pastel Treats Galore
- Pink and Yellow Cupcakes: Decorate cupcakes with tulip toppers or pastel-colored frosting. You can even use edible glitter for that extra sparkle!
- Tulip Cookies: Bake or order cookies shaped like tulips and ice them in vibrant colors. Trust me, your guests will love them!
Delightful Display
- Tiered Cake Stand: Organize your desserts on a tiered cake stand for a whimsical look. You could mix in some fresh tulips alongside the treats for an added touch.
- Fruit Carvings: How about some colorful fruit skewers? Use watermelon and pineapple in spring hues, garnished with mint leaves for freshness!
DIY Activities That Bloom
Keeping the guests entertained is essential, especially if you have little ones running around (we’ve all been there)! Here are some engaging activities to encourage creativity and connection:
Planting Station
Setting up a small DIY planting station is not only fun but helps guests take a piece of the shower home with them!
- Mini Flower Pots: Provide small pots, soil, and tulip bulbs. Guests can plant their own flowers during the shower. They’ll bloom beautifully just like the new baby arriving soon!
- Decorate Your Pot: Have paint, stickers, and markers available so guests can personalize their flower pots. It’ll turn into a cherished keepsake.
Tulip-Themed Crafts
If you have crafty friends, why not have a crafting table?
- DIY Tulip Headbands: Provide supplies to create colorful headbands adorned with faux tulips. They’re perfect for some fun photo ops!
- Flower Journals: Offer blank journals with tulip stickers. Guests can write baby advice or notes for the new parents.
Photo Backdrops That Create Memories
Every party needs a memorable photo backdrop, especially to capture those precious moments of joy. Here are a couple of ideas that will make it easy (and gorgeous) to snap some pictures:
Floral Backdrop
Imagine a stunning floral wall made of colorful tissue paper tulips or even real blooms! Hang it behind the dessert table and watch guests flock for the perfect shot. Tie in some pastel balloons for an added pop of color.
Fun Props
Offer some props such as oversized flower hats or umbrellas covered in flowers. It’s a great way to encourage fun and laughter while making sure everyone captures the day!
Elegant Party Favors
Let’s not forget party favors! They’re the perfect way to thank guests for their presence and for being part of this special occasion.
Tulip Seed Packets
Personalized seed packets filled with tulip seeds can be a lovely reminder of the day. It’s like giving them a little piece of your garden to take home!
Sweet Treat Bags
You could prepare little bags filled with candy coated in pastel colors or homemade cookies. Tie them up with a pretty ribbon, and you’re good to go!
Quick Tips for a Smooth Celebration
We all want to throw a memorable shower, but let’s be real; time can be scarce. Here are some quick tips that can help you keep things smooth:
- Keep it Simple: Focus on a few beautiful elements rather than overwhelming decorations.
- Delegate Tasks: Don’t hesitate to ask friends and family for help. They often love to pitch in!
- Use Store-Bought Shortcuts: Feel free to use pre-made treats and decorations that you can customize—less stress and still beautiful!
Mistakes to Avoid
As you plan your Tiny Tulip themed shower, just remember a few common pitfalls:
- Overcomplicating Plans: Stick to what you love and can manage.
- Underestimating Time for Setup: Allow for extra time to set up your decorations.
Conclusion
So, here we are, filled with inspiration for a Tiny Tulip pink and yellow spring baby shower that perfectly captures new beginnings amidst the vibrant atmosphere of blooming flowers. With simple yet stunning floral arrangements, delightful desserts, creative activities, and unforgettable photo ops, you’ll have everything you need to make this celebration bloom beautifully.
Let’s remember, the essence of this day isn’t just in the flowers or treats—it’s in the laughter shared with loved ones and the anticipation of welcoming a new baby into the world. Believe it or not, it’s these moments that truly make all the planning worthwhile. Now, if you don’t have time to read again later, save this pin for future reference and get excited about the beauty that’s to come! Happy planning!
Must-Try Best Pool Party Snacks for Kids That Moms Swear By
10 Fun Pool Party Snacks Kids Love
Planning a summer pool party for your kids? The excitement of splashing around in the water is only rivaled by the snacks! Finding fun, delicious, and easy-to-eat pool party snacks can be a bit of a challenge. You want treats that won’t make a mess and will keep everyone’s energy up for swimming and playing. Don’t worry! We’ve got you covered with a vibrant selection of snacks your kids will love.
1. Mini Sandwiches
Mini sandwiches are always a hit! Use cookie cutters to create fun shapes and fill them with turkey, cheese, and veggies for a delicious treat.
2. Fruit Kabobs
Keep things fruity and refreshing with colorful fruit kabobs. Skewer strawberries, grapes, pineapple chunks, and melon for a delightful and healthy snack.
3. Veggie Cups with Dip
Cut up crunchy vegetables like carrots, cucumbers, and bell peppers, and put them in cups with a dollop of ranch dressing at the bottom. Kids love to dip!
4. Cheesy Pizza Bites
Make mini pizza bites using English muffins, pizza sauce, and mozzarella cheese. Just bake them for a few minutes, and watch them disappear!
5. Popsicles
Homemade popsicles are perfect for keeping kids cool. Blend fruit juice with pieces of fruit, pour them into molds, and freeze. Healthy and refreshing!
6. Trail Mix
Let the kids customize their own trail mix with nuts, dried fruits, and chocolate chips. It’s not just a snack but an activity too!
7. Meat and Cheese Roll-Ups
Roll up slices of turkey or ham with cheese for a protein-packed, easy-to-eat option that kids will enjoy.
8. Dippable Nachos
Serve up tortilla chips with various toppings like cheese, guacamole, and salsa. Let the kids build their own perfect nacho combo!
9. Snack Fruit Boats
Cut cucumbers in half and scoop out the center. Fill them with yogurt or hummus for a nutritious and appealing snack.
10. Ice Cream Sundae Bar
Set up an ice cream sundae bar where kids can create their masterpieces with different flavors, toppings, and whipped cream. Pure joy!
Quick Tips for Pool Party Snacks
- Prep Ahead: Make as much as possible the night before to reduce stress.
- Keep it Simple: Focus on snacks that don’t require utensils.
- Stay Hydrated: Provide plenty of water and refreshing drinks.
Mistakes to Avoid
- Avoid Messy Foods: Steer clear of greasy or overly saucy snacks.
- Plan for Allergies: Always check with parents about dietary restrictions.
FAQs About Pool Party Snacks
What snacks are most popular at pool parties?
Mini sandwiches, fruit kabobs, and popsicles usually steal the show!
How can I keep snacks fresh?
Use coolers or ice packs to keep perishable items chilled until serving.
Are there any healthy snack options?
Definitely! Options like veggie cups, fruit kabobs, and yogurt-filled fruit boats are both tasty and healthy.
Bonus Ideas for an Extra Fun Pool Party
- Themed Snacks: Incorporate party themes into your snacks, like “pirate treasure” fruit platters.
- Snack Labels: Create fun labels for each snack to spark excitement among kids.
With these fun and tasty pool party snack ideas, you’re all set to host a fabulous summer bash that your kids and their friends will remember! Don’t forget to save this pin for future reference—it’s time to dive into a summer full of fun and delicious treats!
Must-Try Delicious Lunch Ideas Your Kids Will Love This Week
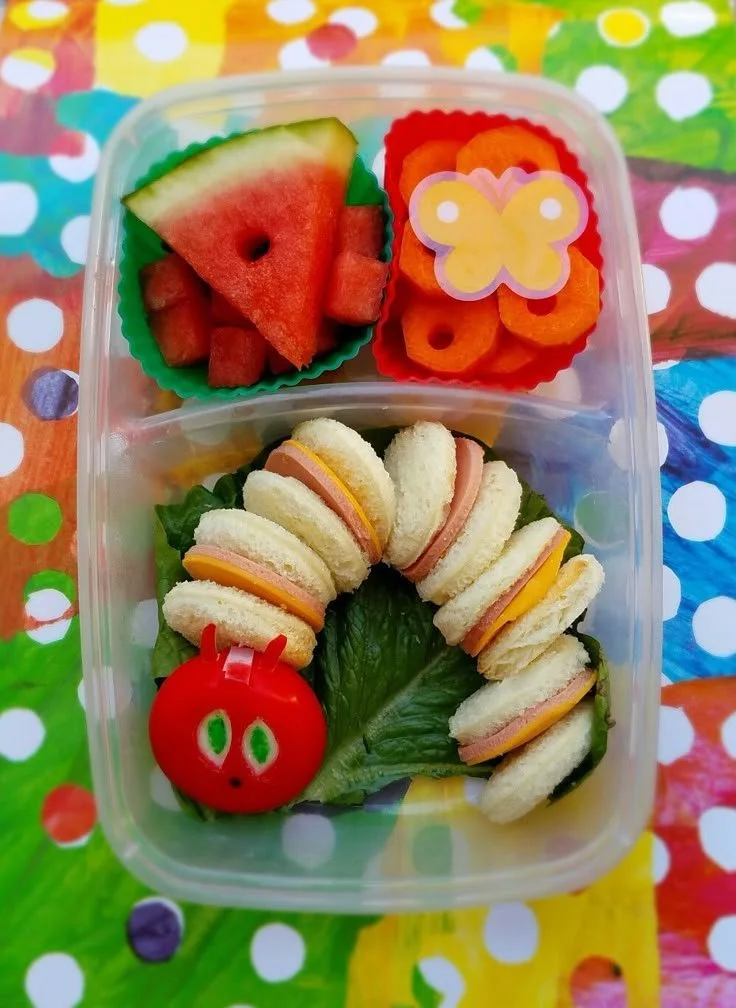
Transform Lunch with a Fun Hungry Little Caterpillar Bento
As a parent, you know the struggle all too well: how do you make lunchtime exciting for your little ones? If your child loves the story of The Very Hungry Caterpillar, why not bring that vibrant imagination to life with a whimsical bento? Not only is it a fun way to present their meal, but it’s also a fantastic opportunity to encourage healthy eating habits. Let’s explore how you can create your very own Hungry Little Caterpillar Bento.
Benefits of a Themed Bento Lunch
Creating a themed bento can be an engaging way to encourage your child to eat a variety of foods. Here are some benefits:
- Encourages Healthy Eating: Fun presentations make fruits and veggies more appealing.
- Sparks Imagination: Kids love stories; turning lunch into a storytelling experience heightens their interest.
- Boosts Creativity: Get creative with colors and shapes, making it visually stunning.
- Enhances Motor Skills: Assembling a bento helps develop fine motor skills in little hands.
How to Create The Hungry Little Caterpillar Bento
Step 1 Gather Your Supplies
Before jumping into the kitchen, make sure you have:
- A bento box or lunch container
- Colorful fruits and veggies
- Small cookie cutters (caterpillar shapes, circles, stars)
- Reusable silicone cups for separation
Step 2 Select Your Ingredients
Choose a variety of colorful and healthy foods inspired by the beloved book. Here’s a quick list of potential ingredients:
- Cucumber slices for the caterpillar body
- Cherry tomatoes for the eyes
- Grapes for the caterpillar segments
- Apple slices for the last food eaten
- Carrots cut into sticks for the antennae
- Cheese cubes to create colorful elements
- Bell peppers for added crunch and color
- Yogurt for a creamy treat inspired by the caterpillar’s journey
- Whole grain crackers for a filling addition
- Dried fruits for a sweet twist
Step 3 Assemble Your Bento
Now it’s time to create your bento masterpiece:
- Layer the Body: Arrange grape halves in a line to form the caterpillar body.
- Add Features: Use cherry tomatoes for the eyes and cucumber sticks for antennae.
- Fill the Box: Surround the caterpillar with colorful fruits and veggies to fill out the bento.
- Create Story Elements: Write little notes about the foods, referencing the story!
- Balance the Meal: Ensure a balance of protein, healthy fats, and carbohydrates to keep little tummies satisfied.
Quick Tips for a Successful Lunch Experience
- Color is Key: Aim for a rainbow of colors to make the meal visually appealing.
- Involve Your Child: Let your little one help pick out veggies or arrange them for extra engagement.
- Make It Fun: Use food picks or edible markers to enhance features and create a fun character face.
Mistakes to Avoid
- Overstuffing the Bento: Allow enough space for food to breathe.
- Skipping Variety: Keep meals interesting by rotating ingredients regularly.
- Neglecting to Prepare: Spend a few minutes the night before to prep items for an easier morning.
FAQs
What if my child doesn’t like some ingredients?
Don’t worry! Tailor the bento to your child’s preferences and substitute with other fruits or vegetables they enjoy.
Can I make this in advance?
Absolutely! You can prepare many items the night before; just be cautious with fruits that brown easily like apples—consider lemon juice to combat that.
Are there any dessert ideas?
Sure! Include some fruit skewers or a small yogurt cup sweetened with honey to keep the healthy theme while satisfying their sweet tooth.
Bonus Ideas
- Consider Special Themes: Dive into other books or characters your child loves for more themed lunches!
- Create a Caterpillar Snack: Use leftover cucumber slices, cheese, and fruit for a fun after-school snack.
Creating The Hungry Little Caterpillar Bento is a fun way to provide nutritious meals while igniting a love for storytelling and creativity in your little one. Go ahead and let your imagination run wild—it may just become your child’s favorite lunch!
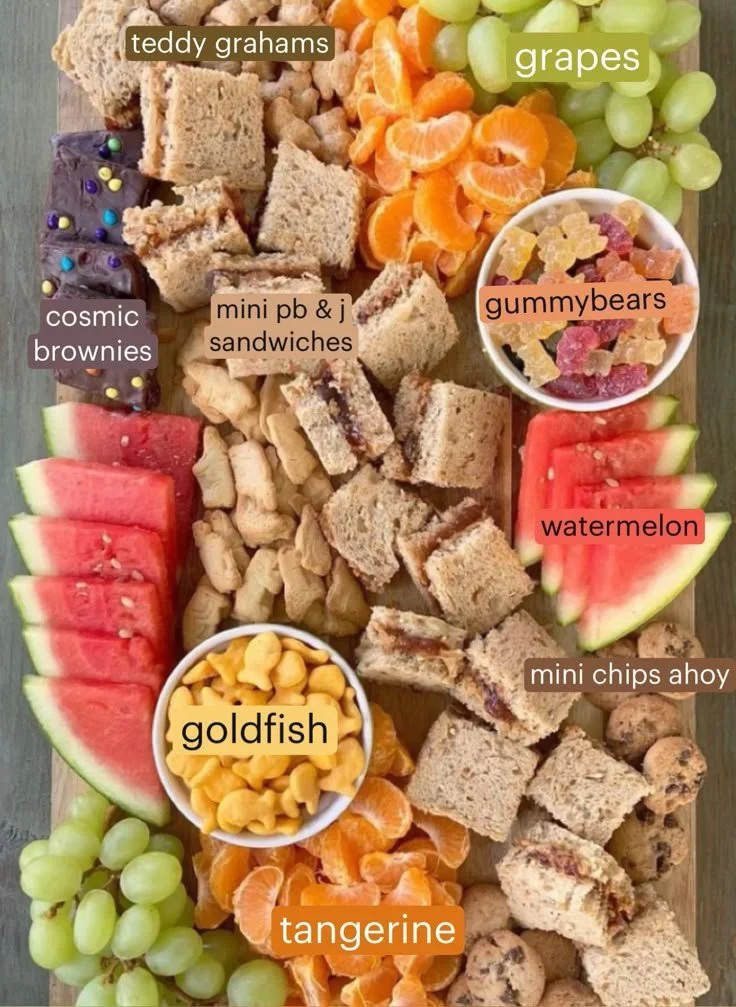
Easy Healthy Kids Snacktime Charcuterie Board Ideas for Busy Moms
Discover Your New Favorite High-Protein, Low-Sugar Snack
Are you tired of unhealthy snacks that derail your family’s diet? If you find yourself nodding along, you’re in the right place! Snack time often comes with the temptation of sugary and carb-heavy options. Don’t worry! We’re here to help you discover your newest favorite high protein, low sugar snack that’s both nutritious and delicious.
Why You Should Choose High Protein Low Sugar Snacks
High protein and low sugar snacks can be a game changer for busy parents. Here are some compelling benefits to consider:
- Keeps You Full: Protein helps satisfy your hunger and keeps you feeling full longer.
- Stabilizes Energy: Low sugar means fewer energy crashes and dips, helping everyone stay active and focused.
- Great for Kids: Healthy snacking habits start young, making it easier to foster a love for nutrition in your children.
Top Picks for High Protein Low Sugar Snacks
Here’s a list of tasty snacks your family will love:
- Almond Butter and Celery: Crunchy and satisfying, this classic combo is packed with protein.
- Greek Yogurt with Berries: A creamy delight that brings sweetness and tanginess to the table.
- Hard-Boiled Eggs: A timeless, protein-rich snack that is incredibly easy to prepare.
- Cottage Cheese and Pineapple: This fantastic mix balances protein and natural sweetness beautifully.
- Roasted Chickpeas: A crunchy and savory treat that you can easily customize with your favorite spices.
- Beef Jerky: Ideal for on-the-go snacking, just be sure to choose brands low in sugar.
- Edamame: These tasty soybeans are not only protein-rich but are also fun for kids to pop out of their pods.
- Protein Bars: Opt for options that are low in sugar but high in taste that your family will enjoy.
- Nut Butter Energy Balls: Combine nut butter, oats, and a little honey for a sweet, nutritious treat.
- Pumpkin Seed Trail Mix: Create a crunchy mix of seeds and maybe a few dark chocolate chips for a delightful snack.
Quick Tips for Healthy Snacking
- Prepare Ahead: Divide snacks into containers for the week to make healthy choices more convenient.
- Teach Kids About Choices: Get your kids involved in selecting healthy snacks, making them feel empowered.
- Experiment with Flavors: Keep snack time interesting by mixing flavors and trying new combinations.
Mistakes to Avoid
- Ignoring Portion Sizes: Even healthy snacks can contribute to weight gain if eaten in large amounts.
- Falling for Low-Fat Products: These often contain hidden sugars to enhance their flavor.
- Not Reading Labels: Always check for unexpected hidden sugars and ingredients in packaged snacks.
FAQs About High Protein Snacks
What are some great options for kids?
Try offering yogurt, nut butters on whole grain toast, or homemade protein balls for tasty, nutritious options.
Can I make my own protein snacks?
Absolutely! You can easily create delicious snacks by combining oats, nut butter, and protein powder.
Bonus Ideas
If you’re ever short on time, consider these quick snack ideas:
- Dark Chocolate-Covered Nuts: A delightful indulgence that still supports healthy eating habits.
- Chia Seed Pudding: Packed with protein and incredibly easy to prepare ahead of time.
- Tuna Salad with Veggies: A hit with both kids and adults, this option is nourishing and satisfying!
In conclusion, keeping healthy snacks on hand doesn’t have to be complicated. By choosing high protein, low sugar options, you can effectively satisfy cravings while also maintaining a balanced diet. Why not explore which of these snacks will become your family’s new favorite?
40 activities to do with your baby
Discover 40 Fun Activities to Enjoy with Your Baby
As a new parent, you might find yourself wondering how to engage and bond with your little one. Babies are naturally curious and eager to explore the world around them. Luckily, there are countless simple yet enjoyable activities you can do together that will create lasting memories and encourage your baby’s development. Here are 40 delightful activities to try with your baby!
Creative Activities
- Finger Painting
- Let your baby explore colors using safe, washable paints. Keep it fun by using large paper and letting them create a masterpiece with their tiny hands.
- Sensory Bottles
- Fill a clear bottle with water, glitter, and small toys. Seal it tightly and let your baby shake it to enjoy the mesmerizing effects.
- DIY Musical Instruments
- Use pots, wooden spoons, and rice to create homemade shakers. Encourage your baby to explore sounds through shaking and tapping.
- Storytime with Pictures
- Read colorful board books aloud. Point to the pictures and make funny noises to engage your baby’s senses.
- Dance Party
- Put on some lively music and have a mini dance party in your living room. Your baby will love the rhythm, and you’ll have fun too!
Outdoor Adventures
- Nature Walks
- Take your baby out for a walk in the park or around your neighborhood. Talk about the sights, sounds, and smells you encounter.
- Play in the Sand
- If you have access to a sandbox, let your baby explore the different textures and sounds. Build castles together!
- Baby Yoga
- Practicing simple poses with your baby can be a fun bonding experience. Look for local classes or online tutorials tailored for parents and babies.
- Bubble Time
- Blow bubbles and watch your baby’s eyes light up as they try to catch them. This activity is not only fun but also encourages hand-eye coordination.
- Picnic in the Park
- Pack a blanket and some snacks for both of you. A changing environment can be refreshing, and your baby can enjoy new sights and smells.
Learning Activities
- Shape and Color Games
- Use soft toys of different shapes and colors to teach your baby while playing. Sort them together by color or shape.
- Interactive Play Mats
- Invest in a play mat with various textures and sounds. It encourages touch, sight, and exploration.
- Mirror Play
- Babies love looking at themselves! Use a shatterproof mirror to foster self-recognition.
- Books with Textures
- Choose board books that have textures for your baby to touch and explore while you read.
- Hide and Seek with Toys
- Hide their favorite toy under a blanket and encourage them to find it. It’s a great way to develop cognitive skills.
Bonding Activities
- Tummy Time
- Encourage your baby to strengthen their neck and shoulder muscles with tummy time. Make it fun with toys placed just out of reach.
- Baby Massage
- Gentle massages not only soothe your baby but also enhance the bond between you. Use organic oil for a relaxing experience.
- Cuddle and Sing
- Sing lullabies or nursery rhymes while cuddling your baby. This promotes a sense of security and love.
- Giggly Faces
- Make funny faces at your baby and encourage them to mimic you. Laughter is a great way to bond!
- Parent-Baby Classes
- Look for local classes, such as swimming or baby gym. These activities can be fantastic for bonding while learning something new.
Imaginative Play
- Dress-Up Fun
- Play with hats, scarves, and other accessories. Encourage your baby to explore textures while you pretend together.
- Puppet Shows
- Use puppets to create a little show. Making the puppets interact can be captivating for your baby.
- Sensory Play with Rice or Pasta
- Fill a container with dry rice or pasta for your baby to explore with their hands. Make sure to supervise closely!
- Building Blocks
- Play with soft blocks to boost your baby’s creativity. Help them stack and knock them down for fun!
- Pretend Cooking
- Set up a play kitchen and use pots, pans, and plastic food. Let your baby explore the utensils as they imitate cooking.
Quiet Time Activities
- Bubble Bath Fun
- Turn bath time into fun with bubbles and toys! Splashing water keeps your baby happy and entertained.
- Quiet Music Time
- Create a peaceful atmosphere with soft music or nature sounds. Gently rock your baby while you both unwind.
- Gentle Rocking
- Spend time just rocking your baby in your arms. It creates a comforting atmosphere perfect for winding down.
- Warm and Cozy Blankets
- Share snuggle time with soft blankets and talk or sing quietly to your baby.
- Calming Mindfulness Moments
- Practice deep breathing while holding your baby. Focus on the rhythm of their breathing to create a sense of calm.
Additional Ideas and Tips
- Mix and Match: Don’t hesitate to repeat your favorite activities or combine elements from different activities for variety.
- Observe Interests: Pay attention to what excites your baby and tailor activities to align with their interests.
- Be Present: Engaging fully with your baby will make any activity enjoyable.
Final Thoughts
Engaging in activities with your baby isn’t just about having fun; it’s also crucial for their development. Explore these activities as often as you can to create beautiful memories and foster a strong bond with your little one. Remember that the most important part is to be present and enjoy this magical time together.
FAQs
What should I do if my baby doesn’t seem interested?
Babies have varying interests, so try different activities. Give them some time and space to explore at their own pace.
How much time should I spend on each activity?
Focus on your baby’s mood; a few minutes can be enough. The key is to keep it light and fun!
Are there any safety tips I should consider?
Always supervise your baby during play, especially with small objects, and ensure that all toys are safe and age-appropriate.
With these 40 activities, you’re equipped to have a fantastic time exploring the world through your baby’s eyes!
