

Egg Carton Nature COLOR Hunt Activity for Kids Boosts Color Skills
Egg Carton Nature Color Hunt Activity for Kids in the Playroom
Imagine this: it’s a rainy day, and your little ones are bouncing off the walls with energy while you’re stuck inside wondering how to keep them engaged. Sound familiar? We’ve all been there. But here’s the thing — with a simple, everyday item like an egg carton, you can turn that energy into something creative, educational, and just plain fun. Enter the Egg Carton Nature Color Hunt Activity, a delightful way to explore nature’s bounty right in your own playroom!
What You Need for the Color Hunt
Gathering Supplies
Before we dive into the fun, let’s gather what we’ll need. The beauty of this activity is that it’s super easy and requires minimal preparation. Here’s your shopping list:
- An empty egg carton (the traditional kind you get from your grocery store works perfectly)
- A set of crayons or paint (for coloring the bottom of the carton)
- A small bag or basket to collect nature items (think little hands here!)
- Optional: A magnifying glass for enhanced exploration (kids love these, don’t they?)
Setting Up the Activity
Coloring the Carton
To kick things off, let’s set the stage. Grab your egg carton and let’s bring it to life with some color. Depending on your child’s age, you can guide them or let them choose the colors.
- Pick vibrant colors for each section of the egg carton. This can be a fun way to talk about colors and encourage creativity. If you’ve got a toddler, maybe focus on one color at a time.
- Let them color or paint each section—this is where the magic begins! It’s a chance for them to express themselves, and you get to make some great memories.
Off to the Great Outdoors
Now, you might be wondering where the nature hunt comes in. Not to worry! It’s time to head outside. But wait—here’s an important tip: if the weather’s not cooperating, you can also do a mini-hunt in your backyard or even on the balcony.
Nature Hunting Tips
- Encourage exploration. Ask them to find items that match the colors they’ve painted in their egg carton. For instance, if they chose green, they might search for leaves, grass, or even a little green pebble.
- Go for variety. While searching for colors, prompt them to observe textures and shapes. This is where the magnifying glass can be super fun—suddenly, a regular leaf becomes something magical up close!
- Talk about what you find. Don’t rush the hunt. It’s all about discovery, right? Ask questions like, “Why do you think the sky is blue?” or “What’s your favorite thing about this flower?” This encourages language development while keeping their minds active.
Collecting Nature Treasures
Once you’ve gathered a colorful array of treasures, it’s time to fill that egg carton! Here’s how to keep the momentum going:
- Place the items inside the corresponding colored sections of the egg carton.
- Discuss their finds. What did they like most? Did they notice any patterns in the colors or shapes? Not only does this encourage conversation, but it also reinforces their learning in a spontaneous, fun way.
Playing with Your Finds
Now that your carton is filled, it’s time to get creative! What if we turned this activity into a game or a storytelling session? Kids love to imagine and create:
- Nature Art. Encourage them to create a collage or small art project using their collected items. A simple piece of construction paper and some glue can transform those treasures into a work of art!
- Storytime! What if you all made up stories about the items collected? Each item could have a “character” in your story. This taps into their creativity and boosts their storytelling skills.
Quick Tips for a Smooth Activity
- Don’t rush! Allowing your child to explore at their pace keeps the joy of discovery alive.
- Encourage safe exploration. Remind them to pay attention to plants and animals. Some might not be safe to touch or pick! You’re helping them learn about nature responsibly.
- Be flexible about the activity. If they want to focus on finding something else—like the biggest leaf or the smallest rock—let them lead!
Common Mistakes to Avoid
When you’re trying to foster a love for learning and nature, it’s essential to dodge a few common pitfalls:
- Over-structuring the activity. Try to avoid turning it into a strict scavenger hunt with too many rules. Kids thrive when they’re given the freedom to explore!
- Forgetting to be present. This is a bonding experience, so engage fully. Put your phone down, and relish the moments with your little one.
- Neglecting post-activity reflection. Make sure to wrap things up by discussing what you enjoyed most about your color hunt!
Bonus Ideas for Extended Fun
If your kids enjoyed the Egg Carton Nature Color Hunt, let’s build on that excitement! Here are a few bonus ideas to keep the fun going:
- Create an Egg Carton Critter. Use the same carton to make little animals or bugs. Just some googly eyes and pipe cleaners can turn your carton into a tiny zoo!
- Plant a Seed. After your adventure, you could use the egg carton as a mini planter. Fill each section with soil, plant seeds, and watch them grow together.
- Nature Journaling. Encourage your child to draw the items they collected or write short descriptions of each. This blends art with literacy and helps reinforce their learning.
Conclusion
At the end of the day, what’s most important is that you’ve created precious memories that will last a lifetime. The Egg Carton Nature Color Hunt Activity turns an ordinary day into an extraordinary adventure, full of laughter, learning, and creativity. As you watch your little ones explore the world around them, remember that every leaf, pebble, or flower petal is a stepping stone in their journey of discovery. So grab that egg carton, let your imagination take flight, and dive into the wonders of nature together. You won’t regret it!
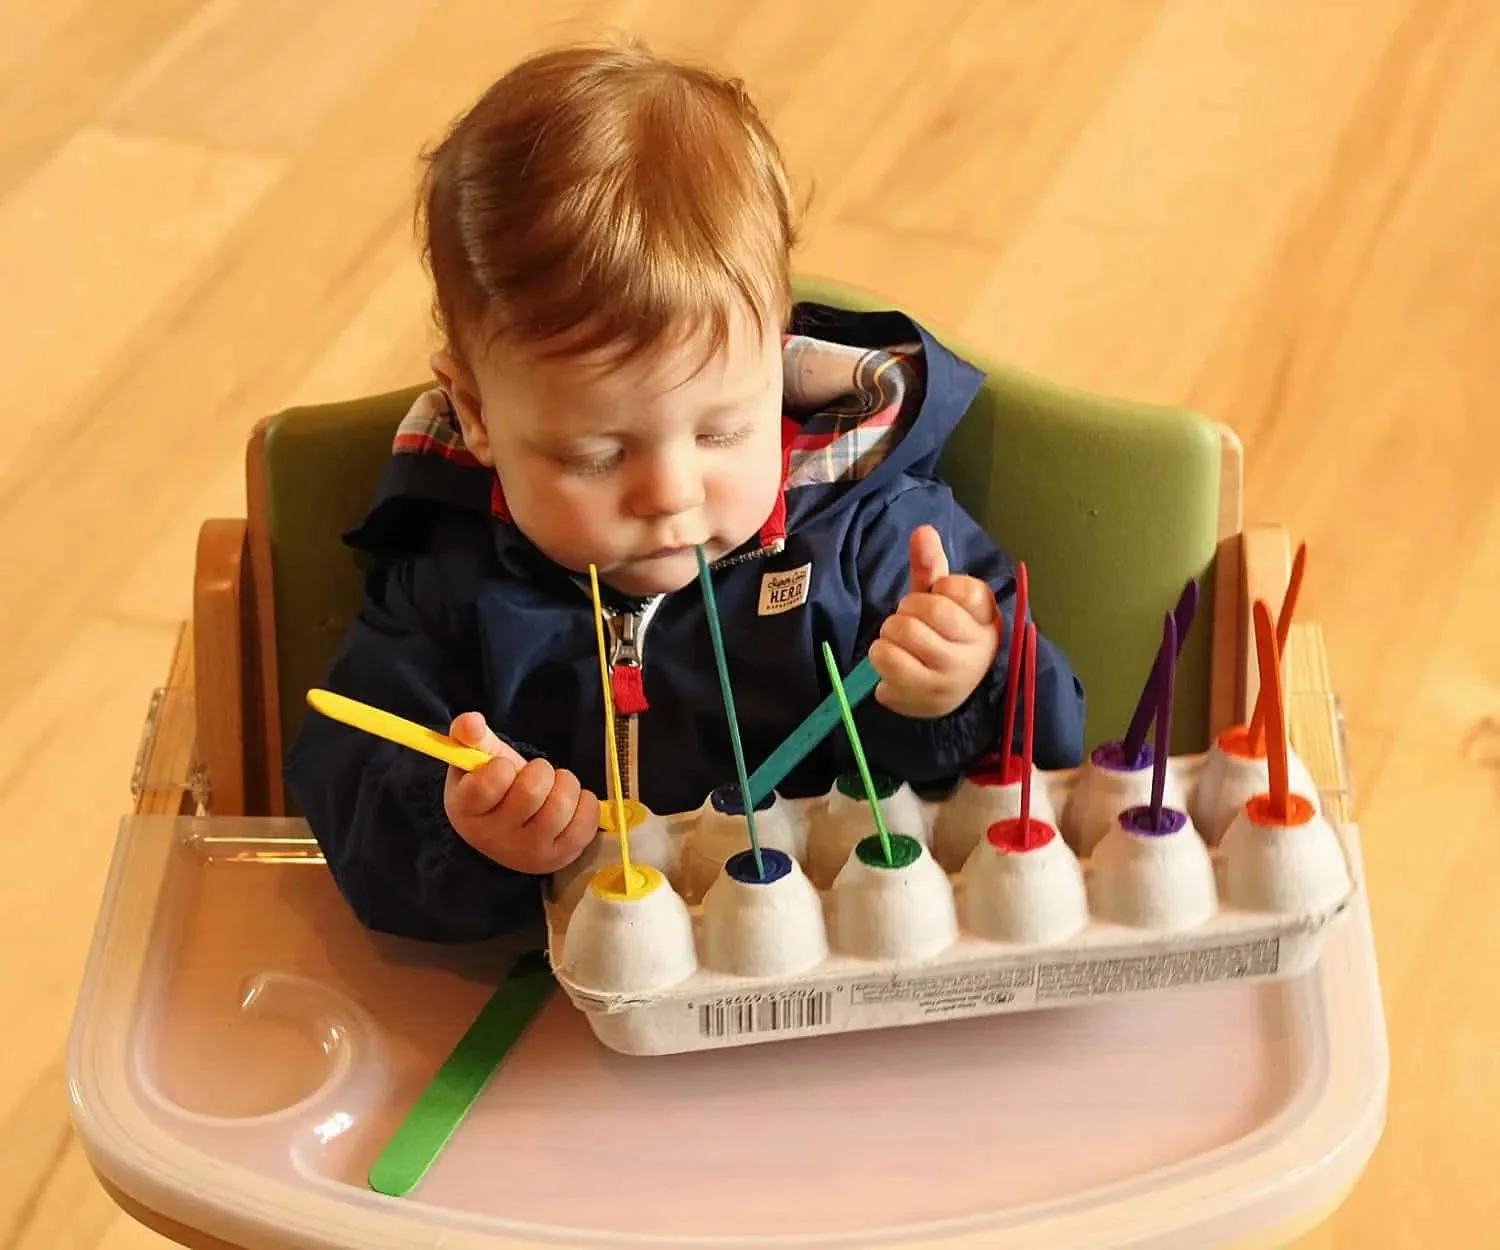
Easy Highchair Activities for Babies for Happy Toddler Playtime
Simple Ways to Entertain Your Baby While You Cook
Imagine this: you’ve just settled into a rhythm in the kitchen—chopping veggies, stirring sauces—when suddenly, you hear it. That unmistakable whine from the highchair, where your little one is eyeing you with those big, curious eyes. Sound familiar? We’ve all been there. You want to whip up a delicious meal, but your baby is craving attention and entertainment.
Now, here’s the deal. Keeping your baby happily occupied doesn’t have to be a Herculean feat. With a bit of creativity and a few household items, you can transform their highchair into a mini play zone. So, let’s dive into these simple activities that’ll keep your baby busy while you cook.
Engaging Highchair Activities
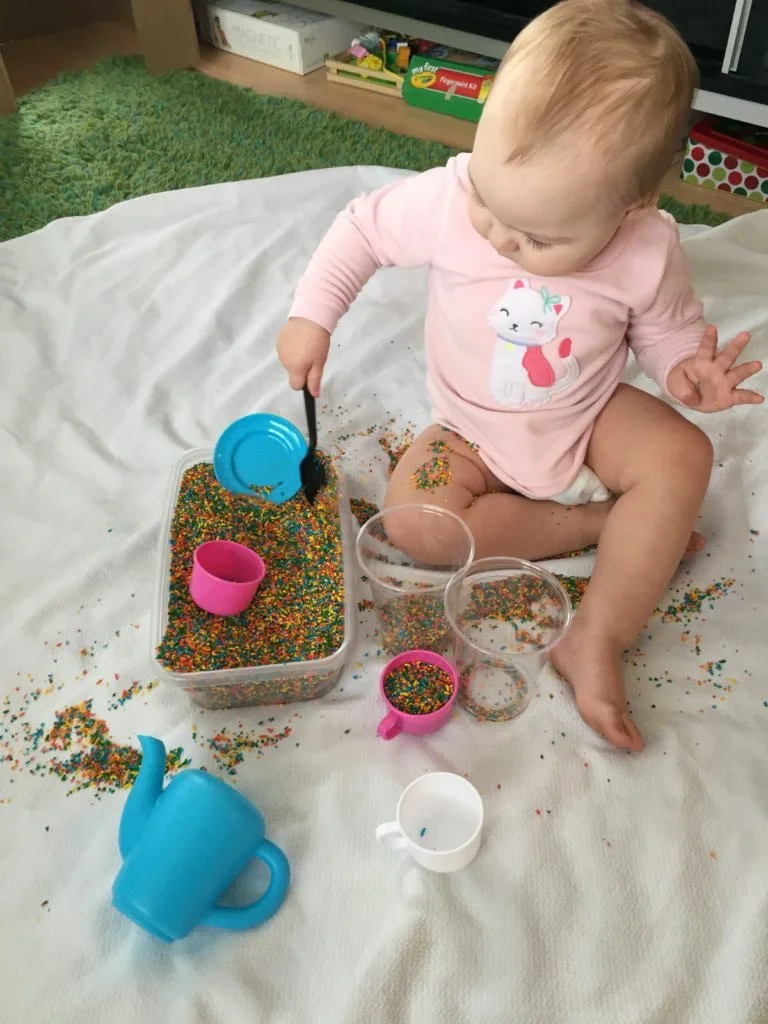
Sensory Bins
One of the best ways to stimulate your baby’s senses is through a sensory bin. You can create one easily using kitchen staples. Simply grab a shallow container and fill it with items that have various textures and colors.
- Rice or Pasta: Dry rice or pasta offers a satisfying texture. Just make sure to supervise closely to avoid any messy situations!
- Water Beads: These are fun, squishy, and visually exciting as they bounce and roll.
- Cereal: Cheerios or similar items are great for little hands to grab.
Baby-Safe Kitchen Utensils
Your baby is probably fascinated with everything you do in the kitchen, so why not give them some “tools” of their own? Hand them some unbreakable measuring cups, wooden spoons, or spatulas to explore. They can bang them together, scoop, and pour without the worry of any harm.
- What if you turn this into a mini cooking lesson? Say things like, “We’re stirring the soup!” as they mimic your movements.
Food Exploration
If your baby is old enough, consider letting them explore a new food on their tray. Cut soft fruits or veggies into chewable pieces and watch their little hands dive in.
- Avocado chunks are perfect for those tiny fingers.
- Sweet potato wedges can also be a tasty and fun option.
Let’s be honest, the messy adventure can lead to some hilarious expressions, and you might even catch yourself smiling more than you expected!
Water Play
No one said highchair time needs to be dry! Grab a small cup of water (make sure it’s shallow) and some bath toys. Place a few floating objects in the cup, and watch your baby’s delight as they splash and explore.
- This can be a perfect sensory activity on a hot day. Just keep a towel nearby for the inevitable mess.
Crinkle Paper Fun
Grab some crinkle paper (like packaging from products you receive) and let your baby squish and crinkle it in their hands. The sound alone is captivating for babies, and it’s such an easy item to keep on hand.
- Pro tip: You can even attach it to the highchair with a clip to prevent it from flying off!
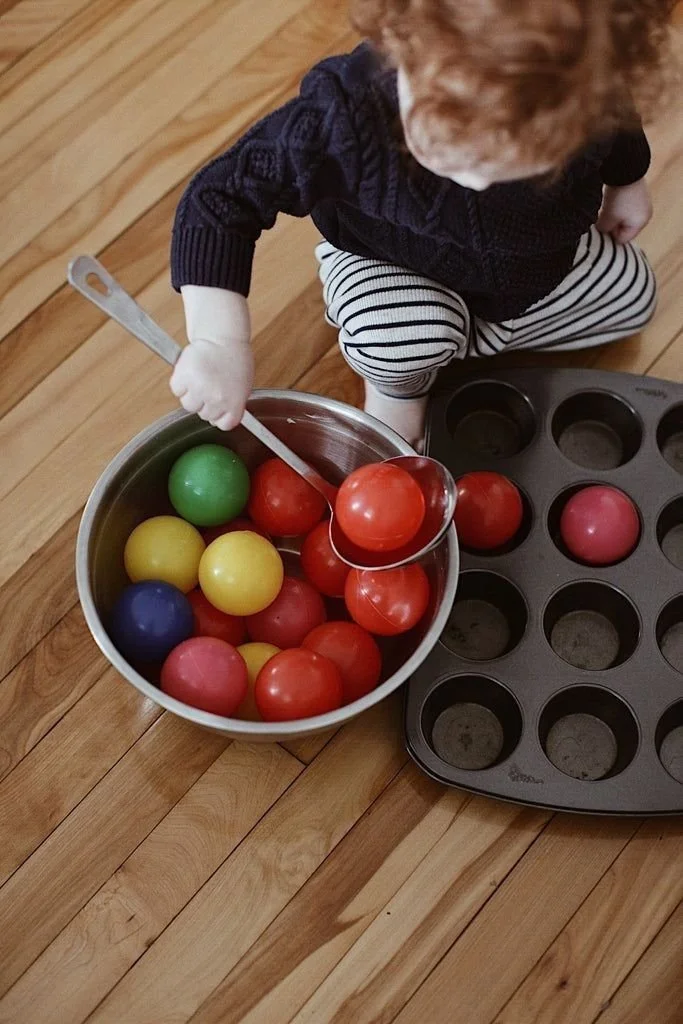
DIY Color Sorting
If you have some colorful blocks or balls lying around, place them next to your baby in the highchair. Encourage them to sort them by color. While they might not get it perfectly, it’s a great foundational skill!
- Here’s the thing: You can make this even more engaging by using simple phrases like, “Can you find the red one?”
Mess-Free Painting
Using large sheets of paper, squirt some finger paints in a Ziploc bag, seal it tightly, and tape it to the highchair tray. Your baby can squish the paint around without the mess.
- Afterward, you might just end up with a unique art piece to hang on your fridge!
Sticker Time
A roll of stickers can become your new best friend. Stickers provide visual stimulation and improve fine motor skills as your baby tries to peel and stick them.
- What if you make it a challenge? “Can you put a sticker on your nose?” This can lead to giggles for both of you!
Bonus Tips to Keep Busy Babies Happily Occupied
Here are a few extra tricks you could consider to enrich the highchair experience:
- Rotate Toys: Keep a few special toys in your cooking rotation so there’s always something fresh for your baby.
- Practice Object Permanence: Hide a toy under a cloth and show your baby how to find it again. This aids in their cognitive development.
- Interactive Books: Board books with flaps can keep your little one entertained and engaged in the world of stories.
Mistakes to Avoid
When it comes to entertaining your baby, there are some common pitfalls to sidestep:
- Choosing Non-Safe Items: Always double-check that whatever you offer is safe for them to handle and won’t pose a choking hazard.
- Overstimulation: Sometimes, less is more. If your baby seems overwhelmed, tone it down and allow for a quieter time.
- Ignoring Routine: Babies thrive on routine, so try to stick to familiar activities that they enjoy regularly.
FAQs
How long can I expect my baby to stay entertained?
The attention span of a baby varies, but most might stay focused on an activity for about 10 to 15 minutes. It’s perfectly normal for them to lose interest quickly!
What if my baby throws everything?
Don’t take it personally! Throwing is a phase many babies go through. Redirect their energy to a different activity or offer a designated “throwing” toy.
Are these activities safe for all ages?
Some activities may be more suitable for different age groups, so always use your judgment on what’s best for your baby’s development stage.
Final Words of Encouragement
We all want to feel like we’ve got it together in the parenting department. Balancing cooking and keeping your baby entertained is no small task, but you’re already doing better than you think. With these fun highchair activities at your fingertips, you can cook a meal without many interruptions and, most importantly, enjoy those little moments with your bundle of joy.
So next time you’re in the kitchen, remember these ideas. They’re simple, fun, and allow you to breathe a bit easier as you whip up dinner. You’ve got this, and your baby will appreciate the creativity you bring into playtime!
Lunch Box Ideas
Is your kid getting sick of eating the same lunch every week? Switch things up with these genius bento box ideas—they’re perfect for school lunches
Picture this: it’s Monday morning, and you’ve just packed your little one’s favorite sandwich for lunch. You know the one—smushed between two slices of bread, maybe with some peanut butter and jelly, maybe just turkey and cheese. As you hand the lunch bag over, the look on their face says it all. It’s a mix of dread and resignation. Sound familiar? We’ve all been there, haven’t we? After all, kids can be picky, and sometimes a repetitive menu does more harm than good.
So, let’s be honest here. Variety is the spice of life, especially for our kids. If your child is getting sick of the same old lunches, it’s time to switch things up! Bento boxes are a fantastic way to bring creativity into lunchtime while ensuring they’re eating a well-balanced meal. Plus, they’re just plain fun!
Here are some genius bento box ideas that’ll keep your kids excited about their lunches and make you a superstar in their eyes.
Why Bento Boxes Work Wonders for School Lunches
Now, you might be wondering: what’s so special about bento boxes? Well, here are a few reasons why they can totally save the day:
They Encourage Variety
Instead of a single sandwich, a bento box can hold multiple small portions of different foods. This means your kids can try a little of everything, from fruits to veggies, proteins, and grains. It’s a mini-adventure for their taste buds every day!
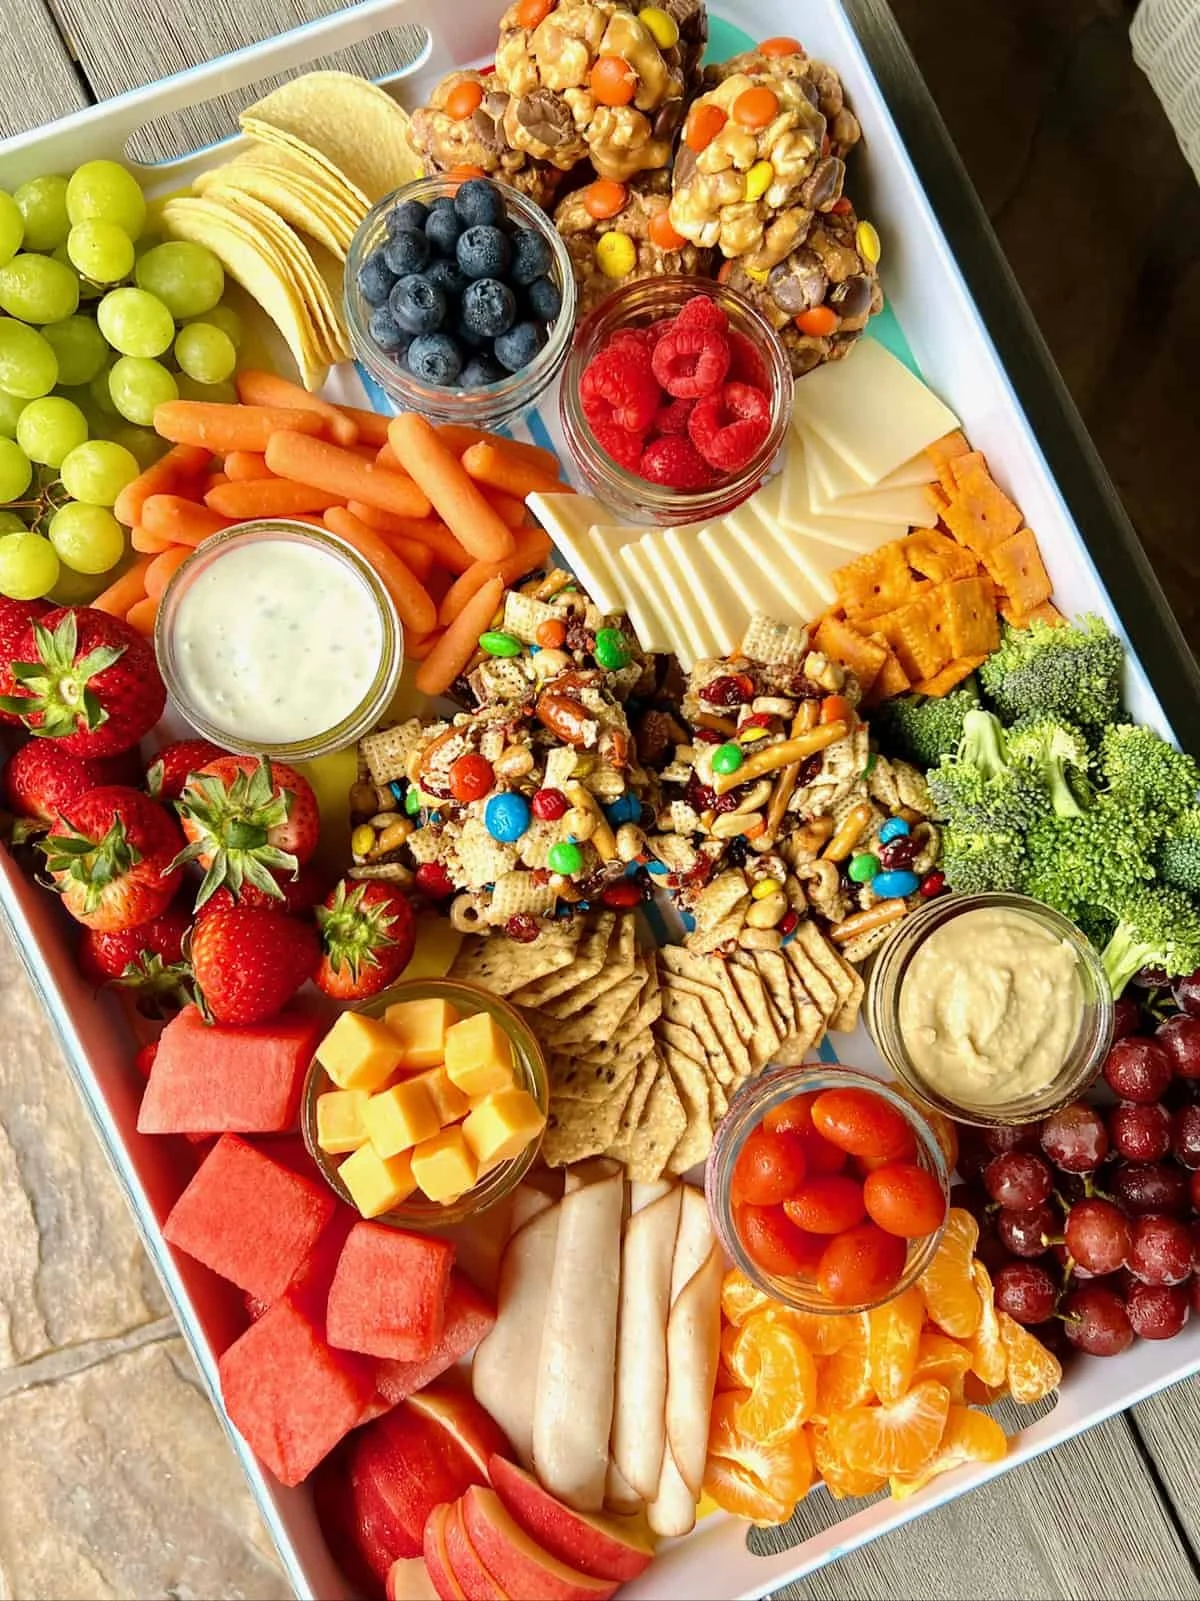
They’re Visually Appealing
Let’s face it: kids are drawn to colorful, well-presented food. A bento box can be an art piece! You can mix and match colors, shapes, and textures to keep it visually stimulating. When lunch looks good, kids are more likely to eat it.
They Promote Independence
Bento boxes allow kids to explore their food choices. They can pick and choose what they want to eat, learning to be mindful eaters in the process. It’s a step toward empowering them!
They’re Easy to Customize
You can adapt a bento box to suit your child’s tastes, allergies, and dietary preferences. No more one-size-fits-all lunches!
Now, let’s get into some bento box ideas that’ll change the lunch game for your little ones!
Creative Bento Box Ideas
- Rainbow Veggie Delight
Offer a variety of colorful vegetables cut into fun shapes. Think carrots, cucumbers, cherry tomatoes, and bell peppers. Pair them with a small container of hummus or ranch dressing for dipping. Not only does it look beautiful, but it’s also healthy!
- Mini Pita Pockets
Pack mini whole wheat pita pockets filled with shredded chicken or turkey, a slice of cheese, and shredded lettuce. Add a side of sliced cucumbers and a small container of tzatziki sauce for dipping.
- Cheesy Roll-Ups
Spread cream cheese over a tortilla, add some deli meat, and roll it up tight. Slice them into pinwheels for an easy-to-eat lunch. Pair this with baby carrots and some apple slices.
- Fruit Kabobs
Kids love food they can pick up with their hands. Create mini fruit skewers using strawberries, grape halves, and melon balls. Include a small container of yogurt for dipping!
- DIY Taco Box
Pack ingredients for a taco feast! Add some mini tortillas, seasoned ground beef (or beans for a vegetarian option), shredded cheese, and small cups of salsa and guacamole. Let your child build their tacos at lunchtime.
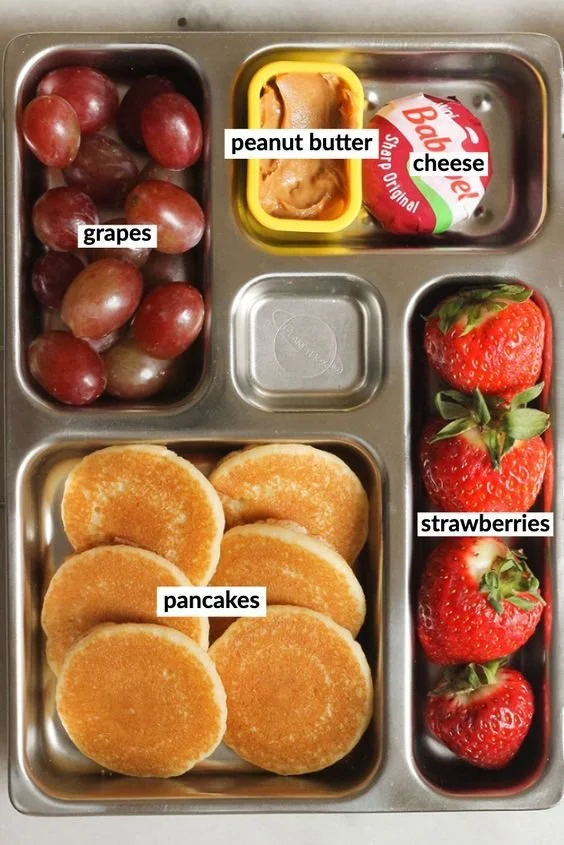
- Breakfast for Lunch
Why not switch it up? Pack a mini pancake stack with syrup in a small container, alongside fresh fruit. Add some yogurt or a hard-boiled egg for protein.
- Sushi Rolls
You don’t have to be a sushi chef to create a fun sushi bento. Make simple rolls with rice, nori, and fillings like cucumber, avocado, or cooked shrimp. Slice them into bite-sized pieces and serve with soy sauce.
- Veggie and Cheese Quesadilla
Make a quick quesadilla filled with lots of cheese and any veggies you have on hand. Cut it into wedges and pack with some salsa or sour cream for dipping.
- Nut Butter and Banana Rolls
Spread your child’s favorite nut butter on a whole-grain wrap, add a banana, and roll it up. Slice it into pinwheels for a tasty and filling lunch!
- Star-shaped Sandwiches
Use cookie cutters to cut sandwiches into fun shapes. Fill them with cream cheese and jelly or ham and cheese. Pair with a side of grapes or berries for a pop of color.
Quick Tips for Effortless Bento Box Packing
Don’t feel like you need to spend hours in the kitchen every night. Here are a few tips to help streamline your bento box packing:
Prep Ahead: Dedicate a few hours on the weekend to wash and chop veggies and fruits. Store them in containers, so they’re ready to go during the week.
Balance is Key: Make sure each box has a mix of protein, carbs, and healthy fats to keep your kids full and focused all day long.
Involve Your Kids: Let your child help pick out their fruits and veggies at the grocery store. They’ll be more excited to eat what they’ve chosen.
Experiment with Themes: You could plan themed lunches! One day could be “Italian,” with pasta salad, cherry tomatoes, and mozzarella balls. Another day can be “Fiesta,” featuring taco ingredients.
Consider Leftovers: Utilize dinner leftovers for lunch the next day. This cuts down on prep and keeps meals interesting.
Common Mistakes to Avoid
It’s easy to fall into some traps when planning bento lunches. Here are a few common mistakes to steer clear of:
Overpacking: Remember, less is often more. It can overwhelm kids if the box is too full. A small selection is sufficient to encourage tasting.
Single Flavors: Avoid packing multiple items that taste similar. Variety is the secret ingredient in keeping lunch exciting!
Ignoring Nutritional Needs: Pay attention to your child’s dietary restrictions and preferences. Make sure each packed meal is appropriate for their needs.
FAQs
How do I keep food from getting soggy in a bento box?
Using silicone cups or paper liners can help separate moist foods from drier ones. Invest in quality bento boxes designed for moisture control.
What can I do if my child refuses to eat their lunch?
Start by including one favorite item in each bento and then slowly introduce new flavors. Keeping it fun and stress-free will encourage them to explore new dishes.
Are bento boxes appropriate for younger children?
Absolutely! Just be sure to cut food into manageable sizes and avoid choking hazards for smaller kids.
Bonus Ideas for Creative Lunches
- Oven-baked veggie chips: Pack with a dip!
- Homemade granola bars: These can be a sweet but healthy treat.
- Pasta salad: Cold pasta with a vinaigrette, veggies, and some protein like chicken or cheese.
By thinking outside the lunchbox, you’ll not only please your little ones, but you’ll also gain confidence in the kitchen. Just remember to embrace the creativity and don’t stress over perfection.
In the end, it’s all about connecting and enjoying this part of the day with your child. A fun-filled bento box lunch can spark joy and anticipation for lunchtime. So get ready, because a whole new world of lunchtime possibilities awaits! Together, let’s make school lunches something they look forward to each day. You’ve got this!
Toddler Montessori Play Ideas to Boost Independence and Joy
Navigating the Early Years of Parenting with Love and Understanding
Picture this: it’s 2 AM, you’ve just settled down for a well-deserved moment of rest after a long day filled with bedtime stories, endless toddler energy, and maybe a few unexpected messes (who knew spaghetti could end up on the ceiling?). Suddenly, you hear that familiar sound—a soft whimper rising in the stillness of the night. It’s your little one, calling out for you. Sounds familiar, right? We’ve all been there, and it’s moments like these that make us question if we’re navigating this wild world of parenting correctly.
The early years of parenting, especially with children aged 0-5, can feel like an emotional rollercoaster. There are boundless joys and unforgettable milestones, but it can also be full of uncertainties and sleepless nights. As you embark on this adventure, it’s helpful to know that you’re not alone. There are countless tips and tricks from other parents just like us ready to share. So, let’s explore the essential aspects of parenting young children that can truly make a difference in your everyday life.
Emphasizing Connection and Communication
Creating a strong bond with your child is fundamental. Often, you might find yourself in a situation where they seem to be throwing a temper tantrum over a toy that they haven’t touched in weeks. Here’s the thing: kids this age need to feel heard and understood.
Active Listening Strategies
To cultivate this connection, try these active listening strategies:
- Get Down to Their Level: Physically kneel or sit so you’re eye-to-eye with your child. It makes a world of difference!
- Acknowledge Their Feelings: Even if it seems trivial to you, acknowledging their emotions (like saying, “I see you’re really upset about that toy”) goes a long way in building trust.
- Reflect Back What They Say: Paraphrasing their feelings helps them know you’re truly listening. If they say, “I want the red car,” you might respond, “You really want the red car, don’t you?”
These practices not only help soothe your child in moments of frustration but also lay a strong foundation for effective communication as they grow up.
Crafting a Routine to Ease Anxiety
Let’s be honest, kids thrive on routine. You might have noticed that your little one feels calmer and more secure when they know what comes next. Routines help create predictability, which can be comforting for both you and them.
Tips for Establishing a Healthy Daily Routine
- Wake Up and Wind Down: Establish a regular time for waking up and going to bed. It can help regulate their internal clock.
- Incorporate Transitional Activities: Use simple activities like singing a favorite song during bath time or reading a book before naps—something that signals to them that it’s time to transition.
- Be Flexible: Life happens! If plans go awry, try to adapt your routine to fit the situation rather than getting upset. Children are resilient and can adjust, especially with your guidance.
Engaging Activities for Early Development
Now, you might be wondering which activities can foster your child’s development while keeping them entertained. Engaging experiences don’t always have to be elaborate. Simple activities can offer immense developmental benefits.
Brain Building Activities to Try
- Sensory Bins: Fill a bin with sand, rice, or water beads and add small toys. It keeps their hands busy (and trust me, it can be quite therapeutic for you too).
- Art Exploration: Let them finger paint with non-toxic paints. You’ll be amazed at how creative they can be (and bonus, you’ll have unique art pieces for your fridge).
- Storytime Adventures: Reading together doesn’t just enhance language skills; it also strengthens your bond.
What if you incorporated one of these into your weekly routine? It can become a wonderful bonding experience, leading to loads of laughs and fond memories.
Nutrition and Healthy Habits
When it comes to nutrition, I know many parents face unique challenges. How many times have you offered a lovingly prepared meal, only for it to end up on the floor? You’re not alone in this!
Nutritional Tips for Picky Eaters
- Blend It In: Smoothies are a fantastic way to sneak in veggies. Throw in spinach with your child’s favorite fruits, and you might just hit a home run.
- Involve Them in Cooking: Children are more likely to eat what they help prepare. Simple tasks like washing veggies or stirring can make them excited about meal time.
- Offer Choices: Instead of “Do you want broccoli?” try, “Would you like broccoli or carrots with your dinner?” Giving them a sense of control can work wonders.
Mistakes to Avoid
Even seasoned parents make errors along the way (trust me, I’ve been there). Here are a few common pitfalls to dodge.
- Over-scheduling: It’s tempting to fill every minute of your child’s day with structured activities, but unstructured play is just as crucial for development.
- Comparing: Each child grows at their own pace. Comparing your child’s milestones with those of others can create unnecessary stress for you both.
- Ignoring Your Own Needs: Let’s face it—self-care isn’t selfish. Remember to take care of yourself too. You can’t pour from an empty cup!
Bonus Ideas for Fun Family Time
Are you looking to spend quality time together while also having fun? Here are some bonus activities to sprinkle into your week:
- Nature Walks: Take a stroll in the park. Ask your little one to collect interesting leaves or rocks. They’ll love feeling like a little explorer!
- DIY Dance Party: Turn on their favorite songs and dance like no one’s watching. It’s hilarious and a great way to let off steam.
- Movie Night: Cuddle up with blankets, popcorn, and a family-friendly movie. You could even create a ‘movie guide’ together for something they’re excited to watch.
Encouragement and Moving Forward
As we wrap up, I want to remind you that every family is different, and you’ll find your rhythm in time. Parenting is filled with exhilarating highs and some challenging lows. It’s completely normal to feel overwhelmed at times, and what matters most is that we love our children deeply and continually seek ways to support their growth and happiness.
Embrace the mess, cherish the cuddles, and try to remember that it’s all part of this incredible, beautiful journey called parenting. You’ve got this! Each day offers a fresh opportunity for laughter, learning, and love. So, take a deep breath, and keep going. You’re doing an amazing job.
10+ Amazing Picnic Food for Kids Ideas That Parents Will Love
Enjoying Picnic Food Ideas that Kids Love
Imagine this: it’s a beautiful sunny day, the kids are bouncing off the walls, and you suddenly think, “Let’s get out of the house!” As a parent, there’s nothing quite like that spontaneous urge to pack a delicious meal and hit the great outdoors. Whether it’s your backyard, a nearby park, or the beach, the fresh air and sunshine can do wonders for everyone’s mood. But here’s the thing: planning the perfect picnic isn’t just about choosing a spot; it’s also about what food to bring along. So, let’s dive into some picnic food ideas that even the pickiest eaters will love.
The Basics of Picnic Food
Now, you might be wondering what makes picnic food different from your regular lunch spread. The key is simplicity and portability. When we’re out there, we want food that’s easy to eat, minimal in mess, and absolutely delightful for our little ones. Plus, let’s not forget about us adults—because we deserve tasty treats too!
Before we jump into the recipes, let’s lay out a few fundamental principles that I’ve found helpful when it comes to packing a picnic:
- Finger Foods Rule: Kids love finger foods. They feel empowered to choose what they want and how much they eat.
- Easy-to-Prepare: Make your life easier by prepping as much as you can ahead of time.
- Mix and Match: Create a balance of colors and textures to keep it visually appealing.
Picnic Food Ideas Kids Will Love
Let’s get into the good stuff! Here’s a list of fantastic picnic food ideas that kids—and let’s be honest, adults—will absolutely enjoy.
Sandwiches and Wraps
- Peanut Butter and Banana Sandwiches
- A classic! Spread peanut butter on whole grain bread, add sliced banana, and you have a nutritious, tasty treat that kids adore.
- Turkey and Cheese Roll-Ups
- Just take a slice of turkey, add some cheese, roll it up, and slice them into bite-sized pieces. Voila!
- Veggie Hummus Wraps
- Spread hummus on a whole wheat tortilla, add a rainbow of sliced veggies (carrots, spinach, bell peppers), roll it tight, and slice. It’s not only colorful but packed with nutrients.
Snackable Sides
- Fruit Skewers
- Kids love anything on a stick! Thread chunks of fruits like watermelon, grapes, and strawberries on skewers for a fun, refreshing treat.
- Veggie Cups with Dip
- Pack some cups filled with cut veggies like cucumber and carrot sticks alongside a small container of ranch dressing. It’s a veggie party!
- Cheese Cubes and Crackers
- Combine various cheese cubes with whole grain crackers. Add some grapes for sweetness, and you’ve got a winning combo.
Main Dishes
- Mini Pizza Tarts
- Use English muffins or small pita breads as a base. Top them with tomato sauce, cheese, and any toppings your kids enjoy. Bake them before the picnic, and they’ll hold up nicely.
- Pasta Salad
- Cook some pasta (like rotini or shells), and toss it with diced veggies and a light vinaigrette. It’s filling and can be served cold!
- Chicken Salad Bites
- Shred cooked chicken (bonus points for using leftovers), mix with a bit of mayo, diced grapes, and celery. Serve in lettuce wraps to keep it light and crunchy.
Sweet Treats
- Yogurt Parfaits
- Layer yogurt with granola and fresh fruits in small cups. They look beautiful and taste heavenly!
- DIY Trail Mix
- Let the kids create their own trail mix combinations with nuts, dried fruits, cheerios, and chocolate chips. It’s a great way to let them feel in charge.
- Frozen Fruit Pops
- Blend fruits and yogurt, pour them into molds, and freeze overnight. On picnic day, you’ll have refreshing popsicles that are guilt-free.
Drinks
Don’t neglect the drinks! Hydration is key for a fun day outside. Pack some water bottles along with:
- Fruit-Infused Water
- Add slices of lemon, berries, or cucumber to water for a refreshing twist.
- Iced Herbal Tea
- A light iced tea can feel fancy and refreshing. Choose caffeine-free options for the little ones.
Quick Tips for Packing and Enjoying Your Picnic
- Use Reusable Containers: It’s better for the environment and keeps everything organized.
- Bring Wet Wipes: Trust me, you’ll want them for sticky fingers!
- Add a Blanket: Not only for sitting down, but it can also hold your tasty treats.
Mistakes to Avoid When Picnicking
- Don’t Forget Sunscreen: Protect those little ones from sunburn.
- Skip the Messy Foods: Avoid foods that are prone to spill (sorry, spaghetti).
- Check for Allergies: Always be aware of any food allergies your children or their friends may have.
Bonus Ideas for Outdoor Fun
While the food is the main attraction, consider bringing along a few activities to keep the whole family entertained:
- Frisbee or Ball: A simple game can rev up the energy.
- Coloring Books: A little creative downtime might also be in order.
- Nature Scavenger Hunt: Create a list of things for the kids to find and explore.
Wrapping Up Our Picnic Adventure
There you have it—a collection of picnic food ideas that cater to both kids and adults, ensuring everyone leaves happy and full. Picture yourselves on that blanket, with the sun shining down, laughter echoing, and delicious food all around. It’s moments like these that create beautiful family memories.
Remember, you don’t have to overcomplicate it—keep it simple, fun, and most importantly, enjoyable! So grab that picnic basket, pack your favorite foods, and get ready to embrace the warmth of the great outdoors together as a family. Happy picnicking!
Top 10 Montessori Toddler Activities for 18 to 20 Months Fun Ideas
Embracing the Montessori Approach with Toys and Activities for Toddlers 18 to 20 Months
Imagine walking into your living room, coffee in hand, and catching a glimpse of your little one, busily engaged in an activity that not only captivates their attention but also fosters their development. Isn’t that an incredible feeling? As parents, we often search for ways to provide enriching experiences for our toddlers, and the Montessori method serves as a wonderful guide. If you’re the parent of an 18 to 20-month-old, you’re in for a treat! Let’s dive into some of the best toys and activities that align perfectly with Montessori principles, nurturing your child’s independence and curiosity.
Understanding the Montessori Method
You might be wondering, “What’s so special about Montessori?” The beauty of Montessori lies in its focus on child-led learning. The idea is that children thrive when they can choose their activities based on their interests. It’s not just about playing; it’s about creating an environment that encourages exploration, discovery, and hands-on interaction.
Here’s the thing: toddlers are naturally curious. At 18 to 20 months, they’re on the brink of discovering more about their world. With the right tools, you can fuel that curiosity, helping them develop skills that will last a lifetime.
Favorite Montessori Toys for Toddlers
1. Wooden Blocks
This classic toy never goes out of style. Wooden blocks aren’t just fun; they promote fine motor skills, hand-eye coordination, and spatial awareness. Plus, they can be used in countless ways! Your toddler can stack, balance, or even sort them by color or size, turning a simple playtime into a learning experience.
2. Practical Life Activities
Think about toys that simulate real-life tasks. Items like child-sized broom sets or small kitchen tools can be fantastic. They not only engage toddlers but also help them learn responsibility and build confidence. Just picture your little one proudly sweeping the floor—pure joy!
3. Puzzles
Puzzles in different shapes and sizes can be a great way to boost cognitive skills. Look for simple wooden puzzles with knobs that make it easy for little hands to grasp. When they successfully fit a piece, their sense of accomplishment is palpable!
4. Sorting and Stacking Toys
Sorting toys that come with different shapes and colors help toddlers develop critical thinking skills. Stacking toys can enhance their motor skills while encouraging creativity. These playthings allow your child to experiment and discover different possibilities—how fun is that?
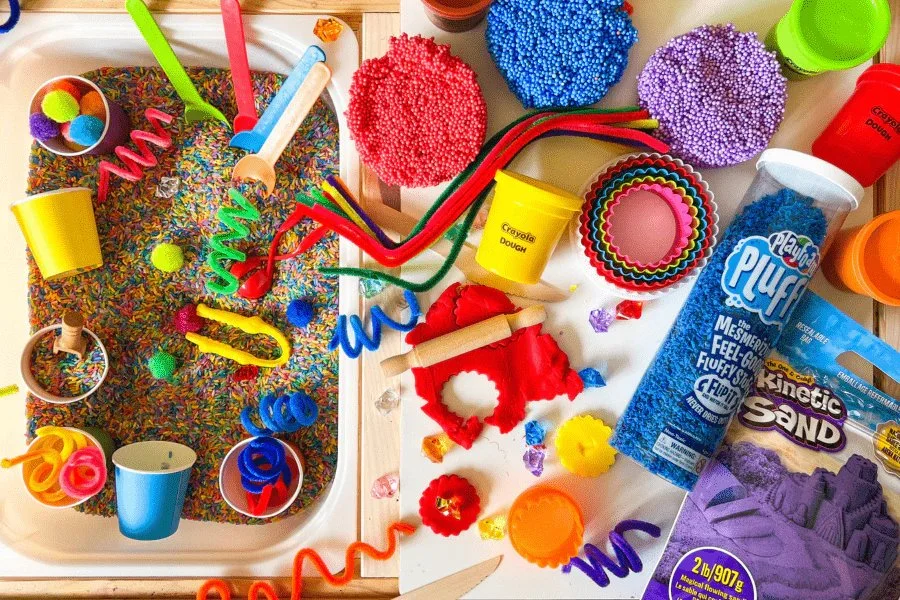
5. Sensory Bins
Here’s where you can get really creative! Sensory bins filled with safe materials like rice, beans, or water play items can be endlessly engaging. You might fill them with spoons, scoops, or small containers for pouring. Just remind yourself to set up this area where you don’t mind some mess (trust me, it will happen)!
Engaging Activities for Your Mobile Toddler
6. Nature Walks
Take advantage of the world outside. A simple walk can turn into an adventure filled with discoveries. Challenge your toddler to find different leaves, rocks, or flowers. Talk about colors and textures (you’ll be amazed at how much they absorb)!
7. Water Play
Water play can be as simple as using a container filled with water and a few cups. Your little one will love pouring, splashing, and experimenting with cause and effect. Just be sure to supervise during this time—it’s a splash zone!
8. Art with Natural Materials
Gather some leaves, sticks, and even flowers for a fun art project. Using non-toxic paint or a glue stick, your child can create a masterpiece with items from nature. This not only fosters creativity but also fosters a love for the environment.
9. Role Play with Dolls and Stuffed Animals
What if you encouraged imaginative play? Provide your child with dolls or stuffed animals to spark their imagination. Pretending to take care of a baby or have a tea party helps develop social skills and empathy.
10. Obstacle Courses
You can create a mini obstacle course at home to enhance gross motor skills. Use cushions, chairs, and other safe items for them to climb over, crawl under, or walk around. The joy in their eyes as they navigate the course will be priceless!
Quick Tips to Enhance Learning
- Follow Their Lead: If you notice your child is particularly fascinated by something, create opportunities around that interest.
- Keep It Simple: Limit the number of toys available at one time. A few high-quality, engaging options are better than a cluttered play area.
- Encourage Exploration: Create a safe environment where your toddler feels comfortable exploring. Trust me, sometimes a little mess is part of the process and totally worth it!
Mistakes to Avoid
- Over-managing Playtime: It’s tempting to guide every activity, but let your child explore freely.
- Ignoring Their Cues: Pay attention to what they gravitate towards or show frustration with—and adjust accordingly.
- Buying Too Many Toys: Quality over quantity is essential! Too many toys can lead to overwhelm, and you want them to engage deeply with their play.
FAQs About Montessori for Toddlers
What are the key principles of Montessori?
Montessori focuses on child-led learning, independence, and hands-on experiences. It encourages children to explore their interests at their own pace.
How can I set up a Montessori-inspired space at home?
Keep it simple. Low shelves, open access to materials, and a tidy play area all promote independence. Encourage a “work” mindset rather than just play.
Are toys really that important for development?
Absolutely! Toys provide opportunities for learning through play, enhancing cognitive and physical development, along with social skills.
Bonus Ideas for Additional Montessori-Inspired Fun
- Treasure Baskets: Create a few baskets filled with interesting textures like soft fabric, sponges, and wooden items. Your toddler will love discovering the different sensations!
- Nature Collection: Involve your little one in a collection activity, where they can gather and learn about various natural objects.
- Music and Movement: Incorporate music into your day with simple instruments. Dancing and singing can be a wonderful way to explore rhythm and movement together.
As you journey through this exciting stage with your little one, remember that it’s completely normal to feel a mix of excitement and curiosity (and let’s be real, maybe a little exhaustion too!). By integrating Montessori principles into your home, you’re creating a rich learning environment that taps into your child’s natural desires to explore and learn.
So, here’s to new adventures filled with laughter, mess, and learning together! Together, we’re all doing our best to raise happy, independent children, and that’s something to celebrate.
15 Fun Activities for Toddlers that Craft-Challenged Parents Can Enjoy
Finding Fun Activities for Your Toddler at Home
Picture this: you’re stuck at home with your energetic toddler, and you’ve run out of ideas on how to keep them entertained. They’ve already scribbled all over the walls (thanks for that, little Picasso), and you’re feeling like a creativity drought is setting in. Here’s the thing, you’re definitely not alone in this. As parents, we often find ourselves grasping for ideas to keep our little ones engaged and happy without losing our sanity.
I remember the days when I thought I needed to be a master craft-maker to entertain my toddler. Spoiler alert: I’m not. So, if arts and crafts aren’t your jam (trust me, you’re in good company), I’ve got you covered with a treasure trove of fun activities that require minimal setup, little to no artistic skill, and are perfect for a rainy day (or any day, really). Let’s dive into some playful ideas that you can whip up without breaking a sweat!
Interactive Sensory Play
1. Magical Sensory Bin
Create a sensory bin with items you already have at home. Grab a large container and fill it with rice, beans, or water beads. Toss in some small toys or cups for scooping and pouring. I’ve found this activity not only keeps toddlers entertained but also encourages imaginative play.
2. DIY Play Dough
Making play dough is easier than it sounds and a great way to engage your toddler’s senses. Mix 2 cups of flour, 1 cup of salt, 2 tablespoons of oil, and 2 cups of water with food coloring. It’s a quick process, and the cleanup? Not too shabby! Once you get the base dough ready, they can mold it into anything their little hearts desire.
3. Water Play
Fill a shallow container with water and let your toddler explore with cups, spoons, and small toys. This is a perfect opportunity to teach them about pouring and measuring, all while keeping it fun! Just keep a towel handy—things might get a bit splashy.
4. Nature Collection
If you can venture outside, take a short walk to collect leaves, rocks, or flowers. Once home, let them explore their treasures. You can even create a mini nature collage or practice categorizing items. It brings a whole new adventure to a simple walk!
Indoor Adventures
5. Dance Party
Let’s be honest, who doesn’t love a spontaneous dance party? Crank up your favorite tunes (sharing a little of your childhood music is always fun) and dance like no one’s watching. It’s a great way to get some energy out while bonding with your little one.
6. Treasure Hunt
Hide small toys or snacks around your house and create a little treasure map or give clues. They’ll love searching and finding “hidden treasures.” You might find that you’re the real treasure amidst all the giggles!
7. Indoor Obstacle Course
Set up a simple obstacle course using pillows, chairs, and blankets. Encourage your toddler to climb over, crawl under, and navigate through. It’s a fun way to develop their motor skills! Just picture the giggles as they conquer the course like little superheroes.
Learning Activities
8. Story Time Adventures
Reading doesn’t have to be just sitting on the couch. Create a cozy reading nook with pillows or blankets and have storytime there. You might even embellish the story with funny voices or act it out if you’re feeling adventurous. You could go as far as puppetry if you have any stuffed animals around!
9. Building Blocks Bonanza
Let their imagination run wild with building blocks or any stacking toys you have. You can build towers, bridges, or even castles. The sense of achievement they feel when they knock one down—only to rebuild—creates tons of laughter.
10. Simple Science Experiments
What if I told you that you can introduce science through play? Mix vinegar and baking soda for a fizzy eruption, or try making a rainbow with a glass of water and a flashlight (science and magic, all in one!). They’ll be mesmerized and you’ll feel like a genius parent!
Creative Activities
11. Indoor Picnic
Lay out a blanket in your living room and have a mini picnic lunch. It’s a change of scenery from the dining table and feels like a special occasion. Don’t forget to pack their favorite snacks!
12. Shadow Play
Dim the lights, grab a flashlight, and create shadow puppets on the wall. You can tell stories or just watch shadows move around. Who knew a flashlight could create such magic?
13. Fun with Dress-Up
Dig through those costume boxes or old clothes and let your toddler dress up as their favorite character. Whether it’s a fairy, superhero, or even a pirate, the make-believe world they create is simply delightful.
14. Cooking Together
Involve your little one in simple cooking tasks like stirring or pouring. You can make banana pancakes or baked goods that don’t require much fuss. It’s tasty, educational, and might even foster a love for cooking!
15. Listening Walk
This one’s a gem! Go for a walk and listen closely. Ask your toddler to point out different sounds like birds chirping, leaves rustling, or cars passing. It helps develop their listening skills and fills the moment with wonder.
Moving Forward
Remember, you don’t have to be perfect. Every parent faces days when the creative well runs dry. The key is to keep it fun and easy, focusing on the joy of spending time together. You could even jot down a few activities or crafts that worked well for your toddler and keep them handy for those “I’ve got nothing left” days.
It’s completely normal to have ups and downs on this parenting journey. On those tough days, take a deep breath and remember the joy in little moments. They might not remember what you crafted or cooked, but they will always remember the laughter you shared and the love you poured into the time spent together.
So here’s to the messy, wonderful, and sometimes chaotic adventures we embark on with our toddlers. Let’s cherish these moments and keep that creative spirit alive, even if we don’t always feel inspired!
Creative Baby Shower Decorations Ideas for Boys in 2024 That Shine
The Chronicles Of Baby Shower Decorations Ideas For Boys
Imagine this: you’re standing in your living room, colorful balloons floating above you, a table adorned with delightful treats, and guests all buzzing with excitement. You’re throwing a baby shower for a friend, and you want to create an unforgettable atmosphere. Sound familiar? Baby showers are such a special time, full of joy and anticipation for the new little one arriving into the world. But, let’s be honest, planning the perfect baby shower can be overwhelming—especially deciding on the decorations, right?
You’re not alone in feeling the pressure. Everyone wants their baby shower to stand out, to be memorable, and to feel just right for celebrating a baby boy. With that in mind, I’ve compiled a treasure trove of ideas—54 to be exact—of baby shower decorations that’ll have everyone talking. Trust me; your friend will be forever grateful for the effort you put into making this day special!
Color Themes That Pop
You might be wondering, “Where do I even begin?” First things first, let’s talk about color themes. Blue is the traditional go-to, but why not explore other palettes too? Here are some classic and fresh ideas:
- Navy and Gold: This classy combination adds a touch of elegance. Think navy balloons, gold tablecloths, and twinkling fairy lights.
- Safari Theme: Opt for earthy tones with greens, browns, and yellows. Incorporate animal designs—think lions, elephants, and giraffes.
- Classic Blue and White: A timeless choice; use blue and white plates, napkins, and centerpieces with delicate touches like lace or burlap.
Fun Balloon Arrangements
Let’s get to the fun part—balloons! They instantly elevate any space.
- Archways: Picture a dazzling balloon arch at the entrance. You can use various blues mixed with white for a cloud effect.
- Balloon Bouquets: Scatter these around the party area. You can even personalize them with prints that say “Welcome, Baby Boy!”
- Helium Balloons: Let some float up high with fun weights attached.
Sweet Table Centerpieces
When it comes to decorating your tables, centerpieces are where you can really let your creativity shine! Here are a few ideas:
- Baby Blocks: Stack wooden or colorful blocks to spell out sweet words or even the baby’s name if it’s known.
- Little Sailor Centerpieces: If the parents are fans of nautical themes, a small sailboat in the center of the table (think DIY here!) can be charming.
- Baby Shoes: Fill tiny baby shoes with flowers or candy for a whimsical touch. Trust me; these are bound to get oohs and aahs!
Themed Decorations
Now, let’s dive deeper into themes. A cohesive decor theme can turn your baby shower into something out of a fairy tale.
Space Adventure
For little astronomers in the making, consider a space theme:
- Stars and Planets: Hang starry paper lanterns and planets made from foam balls.
- Galaxy Backdrop: Use a dark navy cloth with scattered glitter to mimic the night sky.
- Rocket Centerpieces: Craft table decorations shaped like rockets to add a touch of whimsy.
Vintage Cars
If the soon-to-be-parents are car enthusiasts, a vintage car theme isn’t just fun; it’s adorable!
- Old School Car Cutouts: Position cutouts around the space; each can display a fun fact about raising boys.
- Tire Decorations: Decorate faux tires with colorful balloons to tie into the vintage car look.
- Race Flags: Use checkered flags as table runners for a finishing touch.
Fairy Tales
For those who adore nursery rhymes and fairy tales, consider this enchanting theme:
- Storybook Pages: Decorate tables with pages from classic children’s books about boys.
- Crown Centerpieces: Create tiny crowns from gold paper as a nod to the prince theme.
- Character Cutouts: Set up cutouts of popular storybook boys like Peter Pan or Max from Where The Wild Things Are.
Overall Ambiance
What if I told you that the ambiance is just as crucial as the decorations? Here are a few tips to enhance the overall vibe:
- Soft Lighting: Use fairy lights or glow sticks to create a warm atmosphere. They can be draped across tables or hung around the room.
- Background Music: Curate a playlist of soft, feel-good music to elevate the mood.
- Scented Candles: Light some gentle-scented candles (just make sure they’re out of reach of curious hands) to make the space feel inviting.
Interactive Decoration Ideas
If you want to engage your guests, consider some interactive decor options:
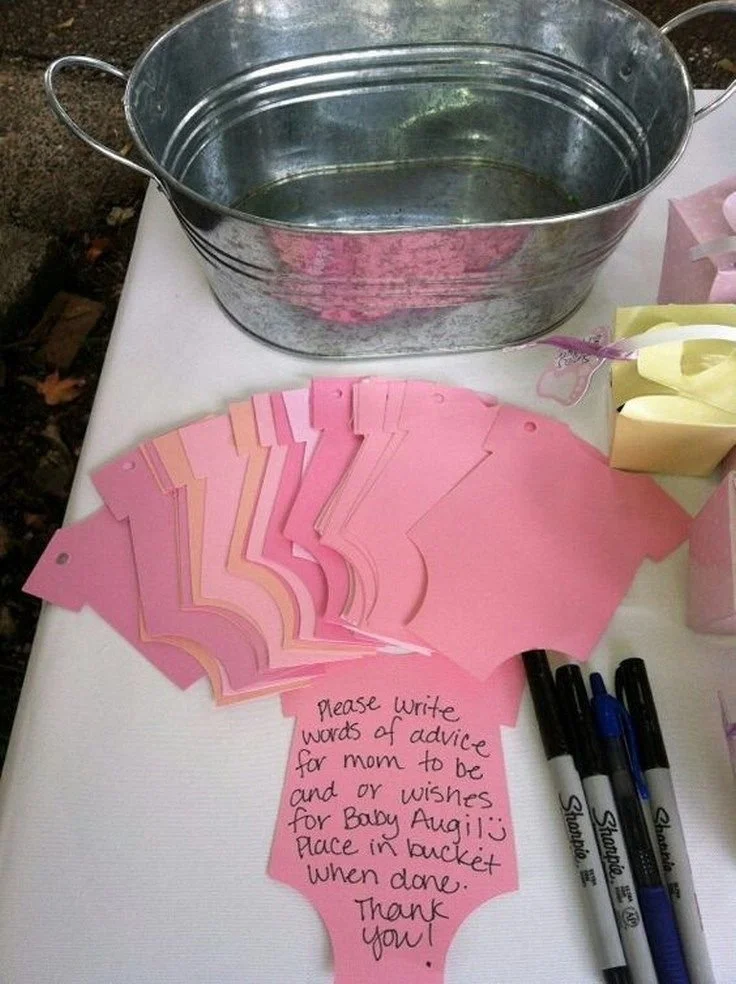
- Baby Predictions Board: Set up a board where guests can write down their predictions for the baby’s height, weight, and birthday. It’s a delightful keepsake!
- Guest Book with a Twist: Instead of traditional guest books, have them sign a baby onesie, which can be displayed later in the baby’s room.
- Photo Booth Fun: Create a cute photo booth with props—think hats, toys, and signs that say things like “Baby Boy’s Workshop.”
Food and Beverages Presentation
Let’s circle back to the most important part: the food! Even your treats can fit the theme with cute decorations.
- Cupcake Toppers: Decorate cupcakes with little baby car or star toppers to match your theme.
- Themed Drinks: Serve refreshing blue punch or design cocktails (for adults) mimicking the baby boy decor theme.
- Creative Food Labels: Label the food stations with fun names; e.g., “Baby Blocks” for cheese cubes or “Mini Cars” for sliders.
Quick Tips and Hacks
Okay, before you run off to plan, here are some mom hacks that might save your sanity:
- Set Up Early: Give yourself plenty of time to set up. This way, you can tweak things until it feels just right.
- Involve Friends: Don’t hesitate to get some help. A team effort not only lightens the workload but also increases creativity.
- Keep It Simple: Sometimes, less really is more. A few standout decorations can create a huge impact.
Conclusion
Now that you’re armed with these ideas, let’s circle back to that vibrant image of your baby shower. Picture friends and family laughing, sharing sweet stories, and celebrating the arrival of a little boy. By using these 54 baby shower decoration ideas, you’re sure to craft a beautiful and memorable day that they’ll always cherish. Trust me; you’ve got this! And if ever you feel stuck, remember, there’s a whole community of supportive parents out there. So open up, ask for suggestions, and embrace the beautiful journey of welcoming a new life into the world. You’ve got a ton of resources and creativity at your fingertips—go make some magic happen!

Adorable Cutie Gender Reveal Party Invitation Ideas for Moms
Create Custom Invitations and Announcements for Every Special Occasion
Imagine this: your little one’s birthday is just around the corner, and you’re feeling that familiar mix of excitement and a bit of anxiety. Between planning the party details and keeping your mini superstar entertained, you realize one crucial element is still missing—invitation cards. Sound familiar? We’ve all been there, and it can feel overwhelming to ensure everything is perfect. But here’s the thing: creating custom invitations and announcements doesn’t have to be stressful!
Let’s dive into how you can design stunning invitation cards for your child’s special moments effortlessly. Whether it’s a birthday, christening, or a simply adorable “we’ve moved” announcement, you can craft something unique and heartfelt.
Why Custom Invitations Matter
You might be wondering why custom invitations even matter in the grand scheme of parenting. The reality is that they set the tone for any event. A beautifully designed invitation can not only excite your guests but also make you feel more connected to the celebration. Think about it; when you receive a touching invite, it builds anticipation, making everyone feel part of something special.
Choosing the Right Paper and Shape
Now that you’re convinced of the importance of custom invitations, let’s look at the fun part: designing them! Start by selecting from six curated paper types. Is it just me, or does the texture of a card really elevate the experience? You can choose from cozy linen to sleek glossy finishes. Choose a paper that matches the theme of your event — think fun, playful invitations for a birthday or elegant ones for a more formal gathering.
And don’t overlook the creative possibilities with six different shape options. Star? Heart? Classic rectangle? The right shape can add a playful or sophisticated touch to your design.
Printing Options That Fit Your Needs
You’ve got your paper and shape chosen. Now it’s time for the next exciting choice: printing options! You can go with Standard or High-Definition printing. If you’re looking for that crisp, vibrant look, especially for those adorable pictures of your little one, I’d recommend going for High-Definition. It ensures that your cards will really pop and grab the attention they deserve.
Design Dimensions and Bleed
When designing your invitation, keep in mind that the customizable area measures 5” x 7”, which is a nice, standard size—easy to fit into any envelope! It’s also important to note the 1/16” bleed to ensure that when your invitation is cut, no critical design elements are lost. Your goal here is to create something that looks polished and professional.
Adding Text and Photos
Feel free to get creative! You can add photos and text to both sides of your card at no extra charge. This feature is a game changer. Imagine including a sweet photo of your child, or even a cute drawing they made, on one side, while the event details adorn the other. It personalizes your invitation and gives a glimpse of the fun awaiting your guests. Plus, you’ll be creating a keepsake that they might cherish for years to come.
Let’s Talk Envelopes
Another fantastic perk? Envelopes are included! However, if you feel that they might not be necessary for your occasion, you can opt to have them removed. Maybe you’re going green or looking to save some time. You do you, friend!
Tips and Tricks for Creating Memorable Invitations
Here are some quick tips to help you make the most out of your invitations:
- Theme Consistency: Ensure your invitation matches the theme of your event. If your child loves dinosaurs, add some fun dino graphics and colors that reflect that passion.
- Color Palette: Pick colors that evoke the right feelings. Soft pastels are perfect for baby showers, while bright and bold colors can amp up a birthday party invitation.
- Engaging Wording: Use inviting language. Phrases like “We can’t wait to celebrate!” or “Join us for a fun-filled day!” instantly create excitement.
- Call to Action: Make sure to include essential details like RSVP info, location, and time, but keep it light and engaging.
Common Mistakes to Avoid
Creating custom invitations is fun, but sometimes we overlook a few critical details. Here are some mistakes to avoid:
- Overloading Text: It can be tempting to include every detail on your invite, but less is often more. Keep the wording concise and to the point.
- Ignoring Guests’ Needs: Make sure you accommodate everyone, especially if your event is kid-centric. Include accessibility details if necessary.
- Procrastination: Last-minute invitations can lead to stress. Aim to send them out at least two to three weeks ahead!
Bonus Ideas for Custom Cards
What if you don’t have a specific event lined up? Why not think ahead? You can create cards for the holidays, seasonal greetings, or just to update friends and family about your little one’s milestones. These custom announcements can be cherished memories in the years to come—imagine looking back at a cute holiday card with your child’s handprint on it!
Final Thoughts
Creating custom invitations and announcements should be a joyful experience. It’s an opportunity to showcase your creativity while celebrating the beautiful moments of parenthood. With the right combos of paper types, printing options, and shapes, the possibilities are truly endless.
Picture this: as the invites arrive, guests are amazed at how beautifully they reflect the spirit of the occasion. You’ve set the stage for a successful event, and that sense of accomplishment feels great, doesn’t it? It’s all about capturing those special moments and sharing that joy with loved ones.
So take the plunge and start designing your custom invitations today. You’ll be amazed at how a little creativity goes a long way in making your special occasion even more memorable. Together, let’s celebrate these beautiful milestones in our children’s lives—card by wonderful card!

Easy Lactation Cookie Recipe Tips to Boost Milk Supply Naturally
The Best Lactation Cookie Recipe to Increase Milk Supply
Imagine this: you’re sitting on the couch, your baby is peacefully nursing, but deep down, you’re worried about your milk supply. Have you ever felt that pang of anxiety while wondering if you’re producing enough? We’ve all been there, and it’s completely normal. But here’s the thing: finding ways to naturally boost your milk production doesn’t have to be complicated. One fantastic solution lies in a simple batch of delicious lactation cookies.
So, let’s dive into how we can whip up the best lactation cookie recipe, ensuring our little ones are well-fed while we indulge in something sweet.
What Makes Lactation Cookies Special?
Before we get to the nitty-gritty of the recipe, let’s explore why lactation cookies are often hailed as a nursing mom’s best friend. These cookies aren’t just a delightful snack; they’re packed with ingredients known to boost milk supply.
Key Ingredients
- Oats: These whole grains are a powerhouse for increasing milk production. They’re full of iron, which is vital for nursing moms.
- Brewer’s Yeast: Often touted for its health benefits, brewer’s yeast is a crucial ingredient that many moms swear by for boosting lactation.
- Flaxseed: Ground flaxseed adds a nutty flavor and is rich in omega-3 fatty acids, which can help improve overall milk quality.
Understanding the Science
Now, you might be wondering why these ingredients work. Oats are rich in beta-glucan, a type of soluble fiber that can help with hormone regulation. Brewer’s yeast contains B vitamins, essential for energy and stress relief — both important for nursing mothers. Flaxseed is great for hormone balance. So, it’s not just a cookie; it’s a little-friendly helper for your breastfeeding journey!
The Ultimate Lactation Cookie Recipe
Now, let’s get to that coveted recipe! This one’s easy, quick, and yields cookies so tasty you might forget their purpose is to help with milk supply (although nobody’s complaining if they serve that dual role!).
Ingredients
- 1 cup of old-fashioned rolled oats
- 1 cup of whole wheat flour
- ½ cup of brown sugar (or coconut sugar for a healthier alternative)
- ½ cup of unsweetened applesauce
- 1/2 cup of almond butter (or peanut butter)
- 1/4 cup of brewer’s yeast
- 2 tablespoons of ground flaxseed
- 1 teaspoon of baking soda
- 1 teaspoon of vanilla extract
- 1/2 teaspoon of salt
- Optional add-ins: chocolate chips, nuts, or dried fruits for extra texture and flavor
Instructions
- Preheat your oven to 350°F (175°C).
- In a bowl, mix the rolled oats, flour, brown sugar, ground flaxseed, baking soda, and salt.
- In a separate bowl, whisk together the applesauce, almond butter, and vanilla extract until smooth.
- Pour the wet ingredients into the dry mixture and mix until combined. Don’t forget to fold in any of your optional add-ins!
- Scoop tablespoons of the dough onto a parchment-lined baking sheet, spacing them out as they’ll spread a bit while baking.
- Bake for 10-12 minutes, or until the edges are golden.
- Let them cool on the baking sheet for a few minutes before moving them to a wire rack.
Enjoying Your Cookies
Once they’ve cooled, grab a cookie (or two) and enjoy! With every bite, you’re not just satisfying your sweet tooth — you’re helping to nurture your body as a breastfeeding mom.
Quick Tips for Maximum Milk Supply
If you’re looking to cultivate a solid milk supply, enhancing your experiences with lactation cookies, here are some quick tips:
- Stay Hydrated: Drink plenty of water throughout the day. Hydration is key to boosting milk production.
- Frequent Nursing: The more you nurse or pump, the more milk you’ll produce. Your body responds to demand, so keep the baby close!
- Balanced Meals: Incorporate a variety of nutrient-rich foods to keep your energy levels high and your body nourished.
Mistakes to Avoid When Making Lactation Cookies
While making these cookies is relatively straightforward, there are some common pitfalls to watch out for:
- Using Old Ingredients: Make sure your oats and baking ingredients are fresh. Stale ingredients can affect both flavor and effectiveness.
- Overbaking: Keep an eye on your cookies in the oven to avoid drying them out. You want chewy and moist, not crumbly and dry!
- Skipping the Brewer’s Yeast: This is one of the star players for boosting milk supply. Don’t omit it unless you have to!
FAQs About Lactation Cookies
How often should I eat lactation cookies?
You can enjoy a couple of cookies a day as part of your regular snack routine. They’re a great way to keep your energy levels up while helping with milk production.
Can I freeze lactation cookies?
Absolutely! These cookies freeze beautifully. Just make sure they’re completely cooled before you place them in an airtight container. Grab one when you need a quick pick-me-up!
Are lactation cookies suitable for everyone?
While they’re generally safe, if you’re watching your sugar intake or following a specific diet, you might want to adapt the recipe. There are numerous substitutions available to cater to different dietary needs.
Bonus Ideas for Customizing Your Cookies
Feeling adventurous? Here are some fun ways to change up the flavor of your lactation cookies:
- Substitute different nut butters for varied tastes.
- Add spices like cinnamon or nutmeg for a warm flavor.
- Toss in some coconut flakes for a tropical twist.
Wrapping It Up
Finding effective ways to support your milk supply journey doesn’t need to feel overwhelming. With this easy lactation cookie recipe in your back pocket, you’ve got a delicious and nutritious snack to help you along the way.
So, the next time you’re feeling uncertain or worried about your milk supply, just remember: you’re not alone in this. Many moms face the same challenges, and these cookies can serve as both comfort food and a helpful hand (or cookie) in nurturing your breastfeeding journey. Enjoying a couple of these cookies while bonding with your little one might just be the sweetest moment of your day.
Happy baking, and cheers to your beautiful breastfeeding journey!
