
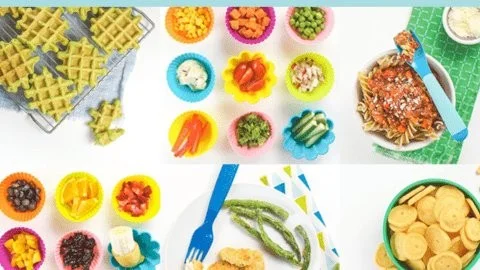
Kid-Friendly Snacks That Pack a Punch for Busy Parents Today
Imagine this: it’s three o’clock in the afternoon, and your little one dashes in from school, bursting with energy but also, let’s be honest, a bit hangry. You can practically hear the rumble in their tummy! You know they need something healthy, but the idea of scouring the pantry or refrigerator for snacks that they’ll actually eat can feel daunting. Sound familiar?
Don’t stress; you’re not alone in this challenge. We’ve all been there, desperately seeking healthy snacks for our kids that won’t result in a wrestling match over broccoli. That’s why I’m excited to share a diverse collection of healthy snacks for kids that are not just nutritious but absolutely delicious. Trust me; these easy recipes will keep your little ones’ taste buds dancing while helping them refuel.
Creative After-School Snacks
Let’s start with some options that are quick and simple for those busy afternoons.
1. Apple Slices with Nut Butter
This classic never goes out of style. Just slice up an apple and pair it with almond or peanut butter. If you want to make it fancy, sprinkle some cinnamon on top. It’s sweet, satisfying, and packed with healthy fats!
2. Yogurt Parfaits
You only need yogurt, granola, and your choice of fruits. Layer them in a cup for a fun snack that feels like dessert. Kids love the build-your-own element, and it’s a great way to sneak in potatoes. A win-win!
3. Veggie Wraps
Take a whole wheat tortilla, slather it with hummus, and load it up with colorful veggies like carrots, cucumbers, and bell peppers. Roll ’em up and slice them into pinwheels for a fun, bite-sized treat. Who says veggies can’t be exciting?
4. Smoothie Bombs
Blend up spinach (you won’t taste it, promise), banana, yogurt, and a splash of milk or juice. Pour it into molds and freeze. Pop one out for a cold, refreshing snack that’s perfect after a long day of school.
Savory Snacks for Kids
In addition to sweet snacks, it’s nice to mix in some savory options to keep things balanced.
5. Cheese and Whole Grain Crackers
A handful of whole grain crackers paired with slices of cheese can do wonders. It provides a good combo of protein and carbs, and let’s be honest—who doesn’t love cheese?
6. Popcorn with a Twist
Air-popped popcorn can be seasoned with a touch of olive oil and dusted with nutritional yeast, which makes it cheesy without dairy. It’s a fun alternative to chips, and you’ll feel good about this crunchy snack.
7. Mini Pita Pockets
Fill mini pita pockets with chicken salad or tuna salad, lettuce, and a drizzle of yogurt dressing. Your kids will love this portable snack, and it’s perfect for those on-the-go afternoons.
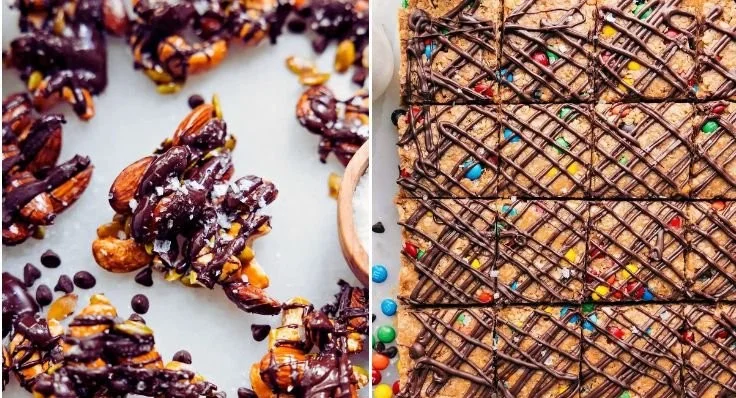
8. Homemade Pizza Bites
Using whole wheat English muffins, spread some tomato sauce, sprinkle mozzarella cheese, and pop on some pepperoni or veggies. Bake until the cheese melts. They’ll feel like they’re getting a treat, while you’re sneaking in some nutrients.
Healthy Sweet Snacks
Now for those afternoons when sweet cravings hit! These snacks offer delightful sweetness without the sugar crash later.
9. Chocolate Banana Bites
Slice a banana, dip the pieces in melted dark chocolate, and freeze. These treats are as tasty as they sound and health-conscious too. You might even want to keep a stash for yourself!
10. Oatmeal Energy Balls
Mix oats, nut butter, honey, and your choice of add-ins (like chocolate chips, shredded coconut, or dried fruit) in a bowl. Roll them into balls and refrigerate. They’re great for a pick-me-up during long afternoons—or even before bedtime if your kids are feeling snacky!
11. Fruit Kebabs
Get your kids involved in food prep by having them help with this one! Skewer different fruits like grapes, strawberries, and melon on a stick. It seems simple, but there’s something magical about eating food off a stick that kids just love.
12. Frozen Yogurt Bark
Spread yogurt on a parchment-lined baking sheet, sprinkle with berries and nuts, and freeze. Once frozen, break it into pieces, and you have a fun and refreshing treat.
Quick Tips for Busy Parents
- Prep Ahead: Take some time on the weekends to prep your snacks for the week. Cut up veggies and portion them out in snack bags so they’re ready to grab.
- Involve the Kids: Let your kids help you in the kitchen. They’re more likely to eat what they made! Promoting involvement really pays off during snack crunch times.
- Experiment: Don’t be afraid to try different fruits, veggies, and dips. We all know kids can be picky sometimes, but if you offer a variety, they might discover new favorites.
What Not to Do
While planning snacks, there are common pitfalls we should avoid:
- Don’t Rely on Processed Foods: They might be easy, but often they’re high in sugars and preservatives.
- Avoid Sugary Drinks: Stick to water or milk. Those sugary juice boxes might be appealing at first glance, but they really pack a sugary punch.
- Try Not to Skip Meals: If your child is consistently skipping meals, they may overindulge in snacks. Encourage balanced meals to prevent that cycle.
Conclusion
There you have it: a treasure trove of healthy snacks that are easy to whip up, fun for the kids, and better for their growing bodies. Every parent wants their child to eat well, and with the right tools and a bit of creativity, we can make snack time enjoyable rather than a battle.
If you’re on the lookout for more kid-friendly options, check out this collection of kid-friendly snacks. Additionally, when the afternoons roll around, having a go-to list like the best after-school snacks can be a huge help. And let’s not forget about those festive occasions—here’s some inspiration for kid-friendly Halloween snacks that can double as treats and healthy options.
Happy snacking!
Essential Skills to Teach Your 1 Year Old for Confident Growth
Imagine this: you’re in the living room, and your one-year-old is taking their first brave, unsteady steps. It’s an exciting moment, isn’t it? You’re bursting with pride, maybe even a little teary-eyed. But then reality hits. As they grow into a toddler, you might find yourself pondering how best to support their development. What can you do to help them stride confidently through this new phase?
When it comes to nurturing your one-year-old, there are some crucial lessons you can teach them. These lessons will not only aid their growth but also ensure they hit the essential milestones as they transition from babyhood to toddlerhood. Let’s dive into some of the most important skills you can encourage.
Encouraging Communication Skills
As your child turns one, fostering their communication skills becomes increasingly essential.
Talk, Talk, Talk: Always narrate your daily activities. "Look, we’re going to put on your shoes!" or "Now we’re going to eat some yummy bananas!" Your little one may not fully understand yet, but hearing your voice will help them connect words with actions.
Use Gestures: Along with words, use gestures to support their understanding. Wave goodbye or point to objects while naming them. It makes your interaction more engaging and gives them visual clues.
Read Together: Make reading a ritual. Even if it feels like they’re more interested in flipping the pages, this simple act builds their language skills. Look for colorful picture books that captivate their interest.
Are you already overwhelmed with a million things to do? I’ve been there! Just remember, every little bit you do now sets a foundation. Trust me; you won’t regret spending those extra moments reading or chatting.
Promoting Fine Motor Skills
At this age, your child’s hands are like little sponges, ready to soak up skills.
Stacking and Nesting: Simple toys like blocks or cups can do wonders for their dexterity. Encourage them to stack or nest these toys. You’ll see not only improvement in their hand-eye coordination but also their problem-solving skills.
Puzzles and Shape Sorters: Investing in puzzles and shape sorters can also be beneficial. They can help your child learn about shapes while sharpening their grip and finger coordination.
Artistic Endeavors: Consider introducing crayons or non-toxic finger paints. Let them scribble on paper (or even the walls if you’re adventurous!). This free expression is vital for their fine motor development.
Don’t underestimate the power of simple actions. Maybe your one-year-old can’t do a lot yet, but they’re absorbing everything. These activities are the building blocks for their skill set.
Building Gross Motor Skills
As they move, crawl, and begin to walk, focusing on gross motor skills is essential.
Safe Exploration: Create a safe space where they can explore. Set up soft obstacles for climbing over or crawling under. It’s like a toddler gym!
Dance Parties: Who doesn’t love a dance-off? Put on some upbeat music and encourage them to move their little bodies. It’s a fun way to build coordination while connecting with them.
Outdoor Adventures: If it’s sunny, take walks in the stroller, or let them toddle behind you when they’re up to it. Grass, sand, or a playground lets them engage and strengthen their muscles.
It’s absolutely normal if they fall more than get up. Trust me, those little tumbles are just part of the learning curve. Just be there to cheer them on!
Social Skills Development
As they grow, we want them to thrive in the social realm too.
Playdates: Organizing playdates or attending groups can help them learn how to engage and share with others. While it might be chaotic, peer interaction at this age is crucial!
Emotional Awareness: Start naming emotions during moments of joy or frustration. “You’re so happy with that toy!” or “I know you’re upset because you wanted that ball.” This helps normalize their feelings and teach emotional vocabulary.
Interactive Games: Simple games like peek-a-boo can enhance their understanding of social cues and reactions. It’s one of those beautifully simple ways to connect!
It can be daunting as a parent, but fostering these social interactions now sets them up for healthy relationships later. After all, we want them to grow into kind and considerate individuals, right?
Establishing Routine
Routines create a sense of security for your little ones.
Consistent Bedtime: Establish a calming bedtime routine. Maybe it’s reading a story followed by a gentle lullaby. Consistency here can lead to better sleep, which is vital for their development.
Meal Times: Try to keep meals at the same time each day. It teaches them about structure and signals what to expect throughout the day.
Play and Nap: Just as we thrive on routine, so do they. Balancing playtime with nap schedules can lead to happier kids and more relaxed parents!
You’re probably wondering how to balance this with the unpredictable nature of toddlerhood. Here’s the thing: it’s completely normal for things to go off course. Just stick to the routine as best as you can, and over time, they’ll adapt.
Encouraging Independence
While they’re still your tiny sidekick, it’s essential to let them learn independence.
Self-feeding: Even if it gets messy (and trust me, it will), encourage them to feed themselves. It builds confidence and fine motor skills.
Picking Clothes: Let them choose their clothes, even if it’s just picking out between two shirts. This empowers them and fosters decision-making.
Helping Out: Engage them in small tasks like putting away toys or wiping the table with a damp cloth. It’s surprising how much they want to help!
The messiness of this journey can be daunting, but remember, encouraging independence now serves them well later on. You may just find they surprise you with how much they can do!
Quick Tips
- Use positive reinforcement to encourage good behaviors.
- Mix in sensory play, like playing with water or sand, to expand their experience.
- Take note of their interests. If they gravitate toward cars, incorporate play with them!
Mistakes to Avoid
It’s easy to feel overwhelmed, but let’s try to sidestep these common pitfalls:
- Over-scheduling: Kids this age need free play as much as they need structured activities. Keep it balanced.
- Rushing Development: Every child develops at their own pace. Don’t compare yours to others. Trust their journey.
- Ignoring Their Signals: Pay close attention to signs of frustration or boredom; sometimes, they’ll communicate when they’ve had enough.
Conclusion
Supporting your one-year-old as they navigate this dynamic age is a journey filled with ups and downs. By teaching them essential skills, you’re setting them up for success as they grow. The little moments we spend guiding them can lead to big changes in their lives. Remember, you’re not alone in this. We’ve all had our share of challenges, and it’s completely normal!
Feeling inspired? For more activities to engage your little one, check out this list of learning activities. If you’re interested in teaching them essential life skills, consider this resource on alcohol education. Lastly, if you’re tracking milestones, the CDC has great resources on what to expect by age two.
So go ahead, soak up those snuggles, and watch your little one thrive! You’ve got this!

Toddler Friendly Dinner Ideas Your Whole Family Will Love
Imagine this: it’s 5 PM, your toddler just woke up from their nap, and your to-do list is still a mile long. Dinner is looming, and the idea of making a meal that’s quick, easy, and healthy seems almost impossible. You want your little one to eat well, but let’s be honest, cooking separate meals for picky eaters can feel like you’re running a small restaurant (without the tips!). Fortunately, you’re not alone in this — we’ve all been there.
I remember the chaos of mealtimes when my kids were toddlers. Trying to whip up something nutritious that they would actually eat was like trying to find a needle in a haystack. But over time, I discovered that with just a few simple, healthy toddler dinner ideas, our mealtimes became less stressful and more enjoyable. Here’s a collection of quick and easy dinners that your toddlers will love and that you’ll enjoy too.
Colorful Veggie Quesadillas
Quesadillas are a fantastic option because they’re so versatile and can be tailored to whatever you have on hand. Grab some whole-wheat tortillas, fill them with shredded cheese, and toss in some colorful veggies like spinach, bell peppers, or mushrooms.
- Prep Time: 10 minutes
- Cook Time: 5 minutes
Here’s the thing, you can cut them into fun shapes to make them more appealing. Trust me, in our house, dinosaur-shaped quesadillas are a hit every time! Serve them with a dollop of salsa or guacamole on the side for a little extra flavor (and healthy fats).
Quick Chicken and Veggie Stir-Fry
Stir-fries are not just for takeout nights. They’re incredibly easy to whip up at home and you can sneak in loads of veggies. Just sauté bite-sized pieces of chicken breast with whatever vegetables you have on hand, like broccoli, carrots, or snap peas, in a bit of olive oil.
- Prep Time: 10 minutes
- Cook Time: 10 minutes
Add some low-sodium soy sauce or sesame oil for flavor, and serve it over brown rice or quinoa. Picture this: dinner is on the table in under 30 minutes, and everyone is digging in happily!
Mini Turkey Meatballs with Sweet Potato Fries
If your child loves meatballs, this one’s for you. Mix ground turkey with breadcrumbs, an egg, and your choice of grated veggies (think zucchini or carrots). Bake them into small meatballs and pair them with sweet potato fries.
- Prep Time: 15 minutes
- Cook Time: 20 minutes
Sweet potato fries are as easy as cutting sweet potatoes into wedges and baking them with a drizzle of olive oil. Plus, they’re naturally sweet and packed with vitamins. What if I told you that you can prepare a batch of these meatballs ahead of time and freeze them? Simple meal prep at its finest!
One-Pan Veggie and Chicken Bake
Who doesn’t love a meal that requires minimal cleanup? Toss together chopped chicken, mixed vegetables, and some garlic in a baking dish. Drizzle with olive oil and season with your favorites (Italian herbs work wonders).
- Prep Time: 10 minutes
- Cook Time: 30 minutes
Pop everything into the oven and let it roast to perfection. You’ll come back to a home filled with delicious aromas, and your toddler can pick and choose what they want to eat. Trust me, they might surprise you!
Pasta with Spinach and Tomato Sauce
Pasta is usually a winner at dinner time. You can easily amp it up by adding spinach to store-bought tomato sauce.
- Prep Time: 5 minutes
- Cook Time: 10 minutes
Here’s a little hack: add some grated cheese on top while it’s still hot for a melty treat. You’re likely to see those little hands reach for seconds.
Breakfast for Dinner
Let’s flip the script — breakfast foods for dinner! Whip up some scrambled eggs with cheese and spinach, and serve with whole-grain toast or homemade pancakes.
- Prep Time: 5 minutes
- Cook Time: 10 minutes
Kids love the idea of breakfast for dinner, and it’s a great way to sneak in those proteins and greens without a fuss. Plus, it’s so simple!
Mini Pita Pizzas
How fun do mini pita pizzas sound? Take whole-wheat pita bread, spread some marinara sauce, and top it with shredded cheese and whatever toppings your child enjoys.
- Prep Time: 5 minutes
- Cook Time: 10 minutes
Bake them until the cheese is bubbly and golden. Your toddler can help decorate their own pizza, encouraging them to get excited about what they eat!
Spinach and Cheese Muffins
Imagine a savory muffin that’s packed with nutrients. These quick muffins can be made ahead of time with spinach, cheese, and whole wheat flour. Perfect for dinner or snacks!
- Prep Time: 10 minutes
- Cook Time: 20 minutes
Just toss everything into a bowl, mix, and bake! They can be easily frozen, making them a wonderful option for nights when you need meals on the fly.
Quick Fish Tacos
Don’t shy away from fish! Prepare lightweight fish fillets by seasoning and baking or grilling them. Serve in small corn tortillas with avocado and any toppings your toddler enjoys.
- Prep Time: 10 minutes
- Cook Time: 10 minutes
Just like that, you have a tasty meal that’s also high in omega-3 fatty acids. How about that for a health boost?
Vegetable Fried Rice
Turn leftover rice into a nutritious meal! Sauté a mix of frozen vegetables with a bit of soy sauce and completed fried rice by adding leftover cooked rice and an egg if you like.
- Prep Time: 5 minutes
- Cook Time: 10 minutes
It’s a fantastic way to clear out your fridge and ensure your toddler gets a variety of nutrients.
Quick Tips for Stress-Free Toddler Dinners
- Involve Your Child: Get your toddler involved in the cooking process. They are often more excited to eat something they helped make.
- Make Meals Fun: Use cookie cutters to create fun shapes with fruits and veggies to make them more enticing.
- Batch Cook: Consider batch-cooking meals that freeze well. You can pull out healthy dinners on busier nights.
- Keep It Simple: Most importantly, don’t overcomplicate things. Healthy meals can be simple and still delicious.
Conclusion
Dinner time doesn’t have to be a daily battle. By preparing these quick and easy toddler dinner ideas, you can enjoy delicious meals that everyone at the table will appreciate, even the picky eaters. Finding that sweet spot where healthy meets kid-friendly can be a challenge, but with a little creativity and preparation, it can turn mealtime into a fun, bonding experience with your little one.
If you’re looking for more inspiration, check out these fantastic resources: 25 Family Meals for Toddlers, A Week of Toddler-Friendly Dinners the Whole Family Will Love, and 44 Meals Your Toddler Will Devour. By keeping it simple and healthy, you’ll find that dinner can actually be a time you all look forward to together. Happy cooking!

Banana Oat Baked Donuts Your Kids Will Love and Moms Appreciate
Imagine waking up to the sweet aroma of freshly baked donuts wafting through your home. Your little ones dart into the kitchen, eyes wide, as they catch sight of the golden treats, their faces lighting up in joy. Now, here’s the best part: these aren’t just any donuts. They’re healthy, delicious, and packed with nutrients—banana oat baked donuts! Yes, you heard it right!
Making treats that your kids will love while also sneaking in some wholesome ingredients can feel like an uphill battle. But don’t worry; I’ve got your back. As parents, we all want our children to enjoy their food and get the nutrition they need. So let’s dive into how to create these delightful, healthy donuts that will have them asking for seconds.
Why Choose Banana Oat Baked Donuts
You might be wondering, “Why donuts?” Well, let’s face it: donuts are fun! They come in vibrant shapes and allow for a variety of toppings (think sprinkles or a drizzle of honey). But when you make them at home, you have complete control over what goes into them.
These banana oat baked donuts are not only a delightful treat but also a great way to incorporate healthier ingredients into your child’s diet. Bananas are a fantastic source of potassium and fiber, while oats add whole grains to their meals. Together, they create a tasty, nutrient-dense snack or breakfast option you can feel good about serving.
Ingredients You’ll Need
Here’s a simple list of ingredients that you’ll want to gather before we dive into the baking process:
- 2 ripe bananas
- 1 cup rolled oats
- 1/3 cup honey or maple syrup (or adjust to taste)
- 1 egg
- 1 teaspoon baking powder
- 1 teaspoon cinnamon
- A pinch of salt
- Optional toppings like chopped nuts, chocolate chips, or shredded coconut
Do you have everything? Great! Let’s jump into preparing these delights.
Step-by-Step Guide to Making Banana Oat Baked Donuts
Preheat Your Oven: Aim for 350°F (175°C). Preheating makes sure that your donuts rise evenly.
Prepare the Donut Pan: Grease your donut pan or use silicone molds (which are super easy for kids to help with and clean).
Blend the Ingredients: In a mixing bowl, mash the ripe bananas thoroughly. You can even let your little ones do some mashing—it’s a great sensory activity! Once they’re well mashed, add the rolled oats, honey (or maple syrup), egg, baking powder, cinnamon, and salt. Mix until well combined.
Fill the Donut Molds: Using a spoon or a piping bag, fill each mold about halfway. This prevents overflow and gives them that perfect donut shape.
Bake: Pop them in the oven for about 15–20 minutes. You’ll know they’re ready when they’ve risen and are golden.
Cool and Enjoy: Let them cool for a few minutes before transferring them to a wire rack. This step is where the magic happens—everyone can smell the deliciousness wafting through the air!
What If My Child Doesn’t Like Bananas?
You’re not alone in this. Many kids go through phases, and bananas might not be their favorite right now. Here’s the thing: you can easily swap the bananas for other fruits or purees. Applesauce or even pumpkin puree can be excellent substitutes.
Also, consider letting your kids participate in the donut-making process. Give them the chance to choose some mix-ins or toppings. They might feel more willing to try something they helped create!
Dealing with Picky Eaters
We’ve all been there—your child has a favorite food one week and suddenly refuses to eat it the next. The beauty of these donuts is that they can be a canvas for your little one’s preferences. Got a kid who loves chocolate? Add in dark chocolate chips. If they’re into sprinkles, why not let them decorate their donuts after they cool?
Also, being consistent and patient can lead to remarkable results over time. Sometimes it takes a few tries for them to become accustomed to new textures and flavors.
Storage and Serving Tips
These banana oat baked donuts are a fantastic make-ahead option. Pack them in an airtight container and store them in the fridge for up to a week. You can even freeze some batches for later use—just pop them in the microwave for a quick treat!
When serving, think outside the box. Pair them with yogurt for a nutritious breakfast or serve them as a snack with a little almond butter for a protein boost.
Quick Tips for Perfect Donuts
- Use overly ripe bananas: They’re sweeter and easier to mash.
- Experiment with spices: A dash of nutmeg or vanilla extract goes a long way.
- Add texture: Throw in some seeds or nuts for crunch.
- Customize toppings: Your kids can create their masterpiece!
Common Mistakes to Avoid
- Not mashing the bananas well: If there are chunks, it’ll change the texture.
- Skipping the cooling time: This can affect how they hold shape when you take them out.
- Adding too much liquid: Stick to the ingredient amounts for the best outcome.
FAQs About Banana Oat Baked Donuts
- Can I make these donuts gluten-free? Absolutely! Just use gluten-free oats.
- Are these donuts suitable for toddlers? Yes! They’re soft and easy to chew, but always watch for choking hazards with toppings or added nuts.
- Can I make them vegan? Sure! Replace the egg with a flaxseed mixture or applesauce.
Conclusion
Now you have everything you need to bake these delightful banana oat baked donuts with your kids! You’ll not only enjoy a fun activity together but also feel satisfied knowing you’ve built a healthier treat into your family’s diet. Kids love the fun shapes and flavors, and it’s a win when you can sneak in some nutrition.
Remember, parenting is about balance, and treats can definitely have a place in our kids’ diets. If you’re excited to expand your healthy baking repertoire, be sure to check out other delicious recipes like no sugar banana berry baked oatmeal, and banana oatmeal bars to keep those little tummies satisfied. For a special twist, try out 3-ingredient banana pancakes that are perfect for baby-led weaning!
Happy baking, and enjoy every sticky, sweet moment with your little ones!

Bluey Cakes, Cookies + Desserts Ideas for Fun Kids Parties
Imagine this: your little one wakes up, eyes sparkling with excitement because today is the day of their Bluey-themed birthday bash. You know, the one where all their friends gather to play and celebrate their favorite blue heeler. Now, you’re charged with creating a feast of fun, cheerful snacks that will make the party unforgettable. If you’re feeling a bit overwhelmed, don’t worry! I’ve got you covered with some delightful Bluey party food ideas that include cakes, cookies, and cupcakes that are not just adorable but also delicious.
Bluey Cakes That Steal the Show
Let’s kick things off with the star of any birthday party – the cake! Here are some creative ideas that will have kids and adults alike oohing and aahing:
Bluey Birthday Cake
You could create a simple yet stunning cake by opting for a tiered design. Just think—two or three layers decorated with blue frosting, some edible glitter, and topped with a few Bluey figurines. Not only is it visually captivating, but it’ll also serve as a perfect centerpiece for your party.
Bluey Rainbow Cake
What if you took it a step further? Picture a rainbow cake inspired by the vibrant colors from the show. Slice it open to reveal beautiful layers of blue, yellow, and green! Kids will love seeing the colors pop. Using a simple vanilla sponge and coloring the batter with safe food dyes can make this one happen.
Bluey Cupcake Cake
If you’d rather not deal with slicing, consider making a cupcake cake. Arrange your cupcakes in the shape of Bluey’s face and use icing to add the details. It’s a fun twist, and kids can grab their own cupcakes easily without needing a plate!
Delicious Bluey Cookies
Cookies can take on many shapes, and they offer great versatility for any Bluey party. Here are a few ideas that are sure to satisfy sweet cravings:
Bluey Cookies
Using a classic sugar cookie recipe, roll out your dough and cut it into shapes reminiscent of Bluey characters. Once baked, frost them blue, and add features with colored icing. They could even double as party favors!
Paw Print Cookies
Have you thought about adding a paw print cookie to the mix? Use a cookie cutter or mold to create paw shapes. Decorate them with milk chocolate or dark chocolate melted and piped into the shape of paw prints. They’ll be a hit with the kids and adults who can’t resist cookie treats.
Bluey Biscuit Sandwiches
What if you made cookies into sandwiches? Choose two of your Bluey-themed cookies and add a layer of your child’s favorite cream or frosting in the middle. These are bite-sized and will keep little hands busy!
Fun and Colorful Bluey Cupcakes
Cupcakes are such a great choice because they can be customized easily. Let’s look at some cupcake ideas that would fit right into your Bluey party theme.
Blueberry Cupcakes
How about blueberry-flavored cupcakes tinted blue? Top them with blue frosting and silly decorations like candy eyes or fun sprinkles. You might want to consider using paw-shaped sprinkles to match the theme!
Bluey Character Cake Pops
If you’re up for a little more fun, dip cake pops in blue chocolate, then decorate them to resemble Bluey or other characters. They’re easy for little hands to hold while running around having fun!
Cupcake Toppers
Don’t forget the cupcake toppers! You can create cute toppers using cardstock and toothpicks. Make small flags or picks with images of Bluey and Bingo, or use simple blue and yellow colors to stick with the theme!
Easy Bluey Snacks
No party is complete without savory options. Here are a few fun and easy ideas that will keep the kids fueled for playtime:
Bluey Veggie Platter
Create a colorful veggie platter that looks like Bluey using your veggies. You could use carrots, cucumber, and cherry tomatoes to form Bluey’s face or create a fun paw print shape! Serve them with a dip styled as a Bluey character.
Cheese Paw Prints
Use a cookie cutter to make cheese into paw prints, and pair them with whole-grain crackers. Children love finger foods, and you’ll have all those nutrients encouraged!
Fruit Kabobs
What better way to add some healthful snacks than with fruit kabobs? Use blue and yellow fruits like blueberries, pineapples, and bananas to create cheerful skewers that add color and sweetness.
Creative Bluey-Themed Desserts
Now for some final touches to wrap up the food offering:
Bluey Ice Cream Sundaes
How about a build-your-own ice cream sundae bar? Provide blue sprinkles and other themed toppings alongside vanilla and blue raspberry ice cream for some fun creativity. Kids can have fun making their own creations.
Bluey Jello Cups
Gelatin cups can be a vibrant addition to the table too! Use blue jello and add gummy fish or bear candies to make it fun.
Bluey Fruit Snacks
You can also prepare homemade fruit snacks using gelatin and fresh fruit purees to bring in a healthy treat that feels indulgent.
Quick Tips for Party Food Success
- Plan Ahead: Start baking a few days in advance. This way, you’ll reduce the stress on the big day and have everything ready.
- Get Your Kids Involved: Let them help with decorating. It’s a great way for them to feel part of the festivities, and you might discover hidden talents!
- Have Fun: This is all about your child celebrating with their friends. Keep the energy light and playful.
Mistakes to Avoid
When planning a party, we’ve all had those ‘oops’ moments. Here are a few pitfalls to dodge:
- Don’t overdo it. Fewer, themed items are often better received than a spread trying to cover too much.
- Stick to what you know. If you’re not a baker, maybe don’t try a complicated cake. Keep it simple with things you feel comfortable making.
- Forgetting dietary restrictions. Always ask parents about allergies beforehand to avoid accidental mishaps.
Conclusion
Throwing a Bluey-themed party can absolutely be a delightful adventure. With these fun cakes, cookies, and cupcakes at your disposal, you’re well on your way to creating an unforgettable experience for your little one and their friends. Remember, the goal is to have fun and enjoy these precious moments with your child. If you’re looking for more specific recipes or ideas, check out this incredible resource with Bluey cakes, cookies, and desserts. Don’t forget to stock up on those cute decorations, like some Bluey paw sprinkles, from your local stores or online shops for an added festive flair. And for convenience beyond the party, you can find delicious pre-made options at your local bakery like the ones available through Brookshire’s. Happy party planning!
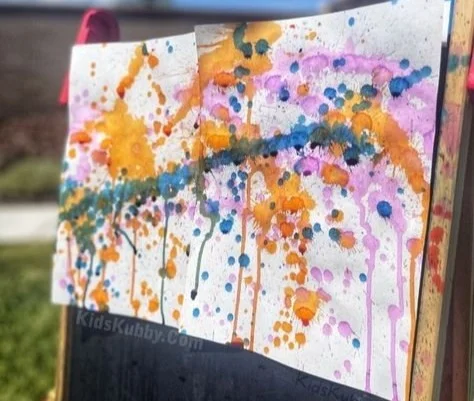
Fun Water Gun Painting Ideas That Ignite Creative Kids’ Confidence
Imagine this: it’s a scorching summer day. Your kids are bouncing off the walls, filled with energy and the need for something fun to do outside. You’ve tried the usual playdates, the park visits, and even that new inflatable pool that promised hours of fun. But nothing seems to hold their attention long enough. Sound familiar? Well, here’s the thing: I’ve found a delightful and colorful activity that might just change the game for you and your little ones—outdoor water gun painting!
Getting Ready for Water Gun Painting
Before we dive into the fun, let’s get a few things in order. Gather your supplies, and trust me, you don’t need much. All you’ll need are water guns (or squirt bottles if that’s more your style!), washable paints, a large sheet of paper or canvas, and perhaps some aprons—because, let’s be real, things are going to get messy. You’ll thank me later!
Water Guns: Small ones work great for younger kids, as they’re easier to handle.
Washable Paints: Choose bright and vibrant colors to make those creations pop! The washable kind is non-toxic and easy to clean up—huge win for parents!
Paper or Canvas: Depending on how big you want the masterpiece to be, you can use butcher paper or canvas. The kids will love seeing their imaginations come to life on a big scale!
Sunscreen and Hats: We’re going to be outside, so make sure everyone’s protected from the sun.
Setting the Stage
Set everything up outside in a space that you don’t mind getting a little paint on—because oh boy, it’s going to happen! Maybe it’s your driveway or a patch of grass that you’ve determined is ripe for creativity. Lay out the paper or canvas flat on the ground, and don’t forget to protect the area around with a drop cloth or some old newspapers.
Now, you might be wondering what the actual painting will look like. Picture this: your kids aiming their water guns loaded with different colors of paint, shooting vibrant streams that create an explosion of color on the canvas. The sheer joy on their faces as they watch the colors blend and swirl into something unique is priceless.
The Magic of Creating Together
This is where the real fun kicks in. While they’re painting, you might find yourself giggling along with them, desperately trying not to get splashed! It’s the perfect time for some family bonding. Instead of just overseeing the activity, why not join in? You can get your hands messy too! Plus, I can assure you; it’s a fantastic stress reliever.
Maybe they want to experiment with mixing colors, or perhaps they just want to fill the canvas with wild splatters. Encourage them to express themselves however they feel. You’re not just watching; you’re part of the process, fostering their creative spirit.
Quick Tips for a Successful Session
Prep First: Have everything organized before your kids come outside. If they see the paints and guns all ready to go, their excitement will soar.
Allow for Free Play: Give them the freedom to explore color mixing and design without the pressure of making something perfect.
Create Different Textures: Add sponges or brush tips to the mix. A water gun can create a unique look, but layering textures can elevate their creations.
Simple Clean-up: Encourage them to help clean up afterward. After all, part of being creative is learning how to take care of our messes.
What If Things Get Out of Hand?
Let’s be honest—kids are unpredictable. You might find paint everywhere, including on themselves (and yes, that means you too!). Don’t panic! It’s all part of the fun. Just remember to use washable paints, and a bit of soap and water will take care of most of the mess. We’ve all been there—your toddler encounters a paint explosion and suddenly resembles a colorful abstract piece of art themselves. Instead of stressing about it, I like to remind myself that this is creativity in its purest form!
Reflecting on Creativity
You might wonder what impact this kind of creative play can have on your child’s development. Here’s something to chew on: engaging in art activities enhances fine motor skills, boosts problem-solving abilities, and fosters self-expression—all fundamental aspects of early childhood development.
Moreover, the sheer joy and laughter that accompany such activities will help build lasting memories. When your kids look back, they won’t remember the perfectly organized playdates or the perfectly clean living room. They’ll remember those messy, colorful afternoons filled with laughter and love.
Conclusion
Outdoor summer water gun painting is more than just an art project; it’s a chance to foster creativity while enjoying quality time with our little ones. When they look back at those splattered canvases years later, they’ll remember the joy, the laughter, and the colorful mess! If you’re ready to get started, check out these inspiring resources: Thrill Your Kids with Colorful Squirt Gun Painting, Water Gun Painting (Fun Creative Art For Kids), and Squirt Gun Painting with Kids – Run Wild My Child. So grab those water guns, put on some old clothes, and let creativity spray all around you!

Reasons Blueberry Avocado Mini Muffins Make Mornings Easier
Imagine a sunny Saturday morning in your kitchen, the smell of something delicious wafting through the air. You hear tiny footsteps padding in. “What are we making today, Mommy?” your toddler asks, sporting a curious grin as they sleepily rub their eyes. You’re ready to make a batch of fan-favorite blueberry avocado mini muffins. It’s a sweet yet healthy treat loved by kids and parents alike, and the best part? It’s so easy to make, you might just find yourself whipping up a batch every week!
The Nutritional Benefits You’ll Love
Here’s the thing: we all want to ensure our kids are getting the best nutrition. It can feel overwhelming at times. Who hasn’t had those days when they’ve desperately tried to sneak in healthy foods quietly? These muffins will help you out. Pairing blueberries and avocados brings not just great taste but a powerhouse of nutrients.
Blueberries: They’re packed with antioxidants, vitamins C and K, and are known to boost brain health. Plus, who doesn’t love that beautiful pop of color?
Avocados: These creamy delights are loaded with healthy fats, which are crucial for child development. They contain fiber that keeps little bellies full and happy, too.
Imagine your little one biting into that muffin and realizing they’re getting a dose of health while enjoying a tasty treat. Sounds perfect, right?
Gathering Your Ingredients
Before we dive into the recipe, let’s ensure we can find everything we need. Having these ingredients ready might even become part of your weekend routine. Here’s a quick list:
- 1 ripe avocado
- 1 cup mashed bananas (about 2 bananas)
- 1/2 cup Greek yogurt
- 1/3 cup honey or maple syrup
- 2 eggs
- 1 teaspoon vanilla extract
- 1 teaspoon baking soda
- 1 teaspoon baking powder
- Pinch of salt
- 1 1/2 cups whole wheat flour
- 1 cup blueberries (fresh or frozen)
Once you’ve gathered everything, it’s time to start baking!
Step-by-Step: Making the Muffins
Getting everyone involved makes this not just another task but a fun activity to bond as you let them help mix and pour. Who knows, this might lead to a love for cooking that lasts a lifetime.
Step 1: Prep Your Oven
Preheat your oven to 350°F (175°C). Don’t forget to line your muffin pan with liners or spray it with a little cooking spray.
Step 2: Mash and Mix
In a large bowl, scoop out the avocado and mash it until smooth. Add in the mashed bananas, Greek yogurt, honey (or maple syrup), eggs, and vanilla extract. Give it a good mix until everything is combined.
Tip: If your kids want to help, let them take turns mixing! It’s a great way to get them engaged.
Step 3: Dry Ingredients Time
In another bowl, combine the whole wheat flour, baking soda, baking powder, and salt. Whisking these ingredients together ensures that the baking soda and powder are evenly distributed.
Step 4: Combine Wet and Dry Ingredients
Now, gently fold the dry mixture into the wet mixture. Be careful not to over mix; a few lumps are okay! Finally, fold in the blueberries. This is when you might want to sneak a few into your mouth (just to taste, right?).
Step 5: Pour Into Muffin Liners
Fill each muffin liner about two-thirds full. This is where you can sprinkle a few extra blueberries on top, just for a touch of flair.
Step 6: Bake
Pop those muffins into the oven and let them bake for about 18-20 minutes. You’ll know they’re done when you insert a toothpick and it comes out clean (or with just a few crumbs). The aroma drifting from your kitchen will have your kids hovering nearby in no time!
Storage and Longevity
Once cooled, if you have any leftovers (which is rare, let’s be honest), store them in an airtight container. They keep well in the fridge for a few days, or you could even wrap them individually and freeze them. Perfect for that emergency snack when you’re running late or in need of a quick breakfast!
Quick Tips for Making It Even More Fun
- Add-ins: Want to mix things up? Try adding some chopped nuts, a sprinkle of cinnamon, or even some mini chocolate chips for a sweeter treat.
- Muffin Combos: You could also explore other flavor combinations like apple-banana-carrot muffins. The options are endless!
- Portion Control: If you’re worried about portion sizes for your little ones, using a mini muffin tray could be just the trick. Plus, they might be more inclined to eat them if they’re in cute little sizes.
What If My Kids Don’t Like Avocado?
You may be thinking, “But my child won’t touch avocado!” Trust me, we’ve all been there. You might try introducing it in small doses first. Try mashing it up and mixing it into smoothies or even pancake batter.
Using it in these muffins is a sneaky way to integrate healthy fats without them even realizing it. Kids may surprise you with their openness when something is disguised as a yummy treat.
Mistakes to Avoid
- Overbaking: Keep an eye on the timer. Too long in the oven can make them dry.
- Not mashing well enough: Make sure the avocado and bananas are well mashed. Lumps can throw off the texture.
- Skipping Healthy Swaps: If you can, consider using whole wheat flour for a fiber boost. It’s a small change with big benefits!
Conclusion
Bringing nutritious food into your child’s diet doesn’t have to be a struggle, and these fan-favorite blueberry avocado mini muffins are proof of that. They’re not just delicious; they’re also packed with good stuff that nourishes your little ones while satisfying their taste buds.
So next Saturday, why not gather your ingredients and create some memories in the kitchen? Your little ones will appreciate the tasty muffins, and you’ll feel fantastic knowing you’re fueling them with nutritious food. For more delightful recipes like these, check out this amazing Blueberry Avocado Mini Muffins recipe. To inspire your next muffin adventure, don’t miss the lovely Blueberry Avocado Muffins. And if you ever wonder about incorporating other veggies, give this Broccoli Pasta a try for more innovative ideas!
Happy baking! Enjoy those muffin moments with your kiddos!
Life-Changing Systems for Stay at Home Moms to Stay Sane Today
Imagine this: it’s 8 AM, and your toddler has just poured a box of cereal all over the kitchen floor. The baby is crying because they’ve lost their favorite toy, and you can feel the coffee pot is a long way from giving you that much-needed boost. Sound familiar? We’ve all been there, haven’t we? It’s easy to feel overwhelmed as a stay-at-home mom, especially when we’re juggling naps, snacks, playdates, and housework. But here’s the thing: implementing simple routines and home management systems can make a world of difference.
Setting up effective routines doesn’t have to be complicated or time-consuming. The truth is, it’s about creating a structure that works for you and your family. When you have a game plan, it not only eases the chaos but also gives you back some time for yourself. So, let’s explore how you can establish these routines and systems that will ultimately help in beating that overwhelming feeling we sometimes get as busy parents.
Understanding the Power of Routines
Routines provide a sense of stability and predictability for our little ones. Kids thrive on knowing what comes next, and it can make their days feel more secure. But routines aren’t just beneficial for the kids; they can provide a solid foundation for us as parents too.
Start with the Basics
Start small. You don’t need to overhaul your entire day at once. Begin by picking one or two small routines. For instance, having a fixed morning routine can help set a positive tone for the day. Maybe it’s a simple checklist: Get up, have breakfast, and then play for a little while. That’s it!
Now you might be thinking, "But what if I completely lose track?" It’s completely normal. Just remember, it’s not about perfection; it’s about consistency. Over time, you’ll find your groove.
Incorporate Fun in Your Routines
Adding an element of fun can make routines feel less like chores and more like activities to look forward to. If you’re implementing a tidy-up time before lunch, turn on an upbeat song and make it a little dance party. Kids enjoy the music, and you get the cleaning done with a smile.
Simple Home Management Systems
An effective home management system doesn’t have to be elaborate. It can be as straightforward as a chore chart for the kids or a designated area for toys. Let’s look at a few systems you might find helpful.
Chore Charts for Kids
Creating a simple chore chart can help your kids learn responsibility while easing the burden on you. A few age-appropriate tasks could be:
- Picking up toys
- Helping to set the table
- Folding small laundry items
Be sure to keep it colorful and fun—kids are much more likely to engage with it when it looks appealing.
Meal Planning Made Easy
What if you had a plan for meals every week? Meal planning can save you time and stress. Choose a day (like Sunday) to sit down and figure out what you’ll eat that week. This can prevent the dreaded “What’s for dinner?” panic. Plus, you’ll lessen those frequent trips to the grocery store by buying everything you need for the week in one go.
Decluttering Systems
Clutter can feel like an anchor pulling you down, but creating a home for everything can lighten your load significantly. Consider setting aside 10-15 minutes each day for quick decluttering sessions. You can focus on one room or space at a time. Having a ‘donate’ bin ready-to-go makes parting with items easier too.
Crafting Daily Routines That Work for You
It’s essential to customize your routines to fit your family’s unique circumstances. Here are a few ideas to help craft daily routines that feel natural and effective.
Morning Madness
The morning routine sets the tone for the entire day. What if you arranged a set sequence to make mornings smoother?
- Wake-Up Time: Set a consistent time to wake up.
- Breakfast Together: Enjoy breakfast as a family. It’s a great time to chat about the day’s plans.
- Get Moving: Create a quick playtime or stretch routine after breakfast to energize everyone.
Afternoon Adventures
Nap time can sometimes feel like a miracle, but we can also use these times effectively. What if you used this block for personal time?
- Busy Box: Prepare a “busy box” filled with activities and toys that can keep the little ones occupied while you take a breather.
- Outdoor Play: Set aside time to go outside for fresh air. Whether it’s a walk around the block or simply some backyard play, this helps both you and the kids recharge.
Evening Wind Down
Evenings can often feel chaotic as well. Creating a calming routine can signal to your kids that it’s time to wind down.
- Dinner Together: Share a meal where everyone has a chance to participate in the conversation.
- Reading Together: Establish a reading time before bed. It not only calms everyone down but also nurtures a love of books.
Now you might be wondering how to keep track of these routines. A visual reminder like a family calendar can be priceless. You can color-code different family members or activities, keeping things organized and fun.
Mistakes to Avoid
While routines are beneficial, there are some pitfalls to watch out for. The biggest mistake is trying to do too much at once. Focus on one or two changes at a time. Also, avoid making your routines too rigid; children thrive with flexibility. If you miss a day or a routine, don’t stress; just pick up where you left off.
Quick Tips and Mom Hacks
- Use timers: Timing activities, like cleaning up or cooking, can make them feel less overwhelming and more like games.
- Involve the kids: Let your children have a say in contributing to little household chores or organizing activities.
- Reward System: Small rewards, like stickers or extra playtime, can make routines feel more rewarding for kids.
Conclusion
Finding the balance as a stay-at-home mom can be tough, but with a little effort in developing routines and home management systems, you can make your daily life feel more manageable. It’s all about starting small, being consistent, and showing yourself grace along the way. Remember, you’re not alone in this wild parenting journey. We’re all figuring it out, one cereal spill at a time.
If you’re looking for more advice on managing your parenting days, check out this insightful podcast series, Simplifying Mom Life. For practical tips on keeping a seamless laundry routine, don’t miss this daily laundry routine that changed my life as a SAHM. And for a deeper dive into creating life-changing routines, take a listen to The Routine Advantage. You’ve got this!

Simple Steps to Explore Cloud in a Jar Science with Your Kids
Spark a Little Magic with a Cloud in a Jar Experiment
Imagine it’s a rainy afternoon, and the kids are bouncing off the walls. You’re looking for something fun to do that’s not just another round of screen time (let’s be honest, we’ve all been there). How about whipping up a little science magic right in your kitchen? Seriously, I’m talking about creating clouds—in a jar! This simple yet captivating cloud in a jar science experiment can turn a dull day into a whirlwind of fun and learning. Let’s dive into how this works and why it’s such a fantastic activity for kids.
What You’ll Need
The great thing about this experiment is that it uses commonplace items you probably already have at home. You won’t need to make an emergency run to the store. Here’s your shopping list:
- A glass jar with a lid
- Hot water (not boiling, just hot enough to steam)
- Ice cubes
- A small spray bottle with water
That’s it! It doesn’t get much simpler than this.
Setting Up Your Experiment
Now that you’ve got your supplies, it’s time to transform your kitchen into a mini weather lab. Here’s how to do it step-by-step:
Fill the Jar: Start by pouring hot water into the jar until it’s about a third full.
Cover It Up: Quickly place the lid on the jar, keeping in mind that we’re aiming for a warm environment.
Add the Ice: On top of the lid, place a bunch of ice cubes. Feel free to experiment with different amounts, but about 5 or 6 should do nicely.
Make Some Clouds: Now, take your spray bottle and give the inside of the jar a quick spritz.
Watch Magic Happen: Most of the time, within seconds, you’ll see condensation forming – just like when you look up at the sky on a cloudy day. Voilà! You’ve created a cloud right before your eyes.
The Science Behind the Magic
Now you might be wondering, “What just happened?” Here’s the thing—this experiment is not just child’s play; it’s a mini-lesson in meteorology! As the hot water warms the air inside the jar, it creates steam. When you put the cold ice on top, it cools the air down quickly, causing that steam to condense into tiny water droplets—just like clouds form in the sky.
Isn’t it fascinating how the same process we see up above can happen right before our eyes in our own living room? This experiment doesn’t just entertain; it teaches valuable lessons about weather systems and condensation in an engaging way.
Why Kids Love This Activity
Kids love watching things come to life, especially when it’s as cool as a cloud appearing in a jar. As parents, we know how important it is to spark curiosity in our little ones. This cloud experiment practically begs for follow-up questions:
- “Can we make a bigger cloud?”
- “What if we change the temperature of the water?”
This activity not only promotes scientific thinking but also opens the door for discussions about weather and nature, which can be continued whenever you spot clouds in the sky.
A Perfect Fit for Any Setting
Whether you’re homeschooling, looking for a rainy-day activity, or need something interactive for the classroom, this cloud in a jar experiment fits the bill perfectly. It’s the sort of thing kids can do over and over again (and they will want to). If you’ve got a little engineer on your hands, encourage them to experiment with the amount of hot water or ice used and observe how those variables affect their mini clouds.
Quick Tips for Success
Make It a Challenge: After the first run, challenge the kids to modify the experiment. What do they think will happen if they use colder water or more ice?
Document the Experiment: Encourage them to keep a journal of their observations. What did they see happen each time? This practice nurtures writing and observational skills alongside their scientific curiosity.
Repeat for Fun: Turn it into a family game night. Get everyone involved and see who can create the biggest cloud.
Mistakes You Might Make Along the Way
As simple as it may seem, there are a few common pitfalls. Here are a couple I’ve learned from experience:
Too Much Heat: Make sure your water is hot but not boiling. Extreme heat can create too much steam and cause a mishap.
Rushed Cooling: If you don’t let the steam build long enough before adding the ice, you might not see as dramatic of a cloud.
Now that you know what to keep your eye on, you’re all set for success!
Bonus Ideas to Explore
Once the cloud experiment is done, maybe it’s time to explore more science activities together. Since you’re in this experimenting mindset, why not check out some additional cool ideas? A "Snowstorm in a Jar" is a perfect follow-up and also utilizes the power of water to showcase nature’s wonders. You can enrich your child’s learning by pairing this activity with a simple conversation about weather patterns or cloud types.
Explore Weather Further
Educational play isn’t just about having fun; it’s also about exploring concepts. Let’s think about the concepts of rain, snow, and even thunderstorms. Here are a few fun angles you could explore:
Make Your Own Rainbow: Use a flash light and a glass of water for a light refraction experiment to see how rainbows are formed.
Create Thunder: Use two pots—one with water on the stovetop and another for vapor. Discuss thunder and lightning while watching the steam connect with the lid.
Weather Journal: Turn observations into a daily routine where the kids can chart changes in the weather.
Conclusion
So there you have it! The cloud in a jar experiment is a perfect blend of excitement, education, and easy setup, and it’s sure to create memories your family will cherish. It’s a way to take one small idea and watch it blossom into a wealth of learning and curiosity. Let them explore further with more science activities and keep the spark of learning alive every day. For more ideas, check out this amazing resource or explore creative STEM activities at Little Bins for Little Hands. If you’re interested in incorporating this idea into a more structured lesson, take a look at Teacher Pay Teachers for engaging material. Happy experimenting!
Baby-Led Weaning Foods You Can Try, Spinach Waffles Included
Imagine you’re at the dining table, your little one sitting high in their chair, their eyes wide with wonder. You place a plate of brightly colored spinach waffles in front of them. Suddenly, the moment becomes magical. The vibrant green waffles are not just appealing to the eyes but packed with nutrients that you know they need for growth and development. You sit back, sipping your coffee, and watch as they explore this new texture and taste, unaware of the tiny victory you’ve just won as a parent. This scene might sound familiar because, let’s be honest, we all want our little ones to venture into the world of solid foods with curiosity and excitement.
Benefits of Spinach Waffles for Baby-Led Weaning
If you’re venturing into baby-led weaning, you’ve probably heard countless tips and tricks. But here’s the thing: the food you present plays a crucial role in making mealtime fun and nutritious. Spinach waffles aren’t just any food; they’re a superfood for toddlers that can bring several benefits to the table.
Nutrient-Dense: Spinach is packed with vitamins A, C, and K, as well as folate and iron. These nutrients are key for your child’s development, and blending them into waffles makes it tasty and fun.
Finger Food Friendly: As your baby learns to self-feed, finger foods that are easy to grasp are essential. Spinach waffles have a soft yet substantial texture, making them easy for little hands to hold.
Encourage Exploration: Kids are naturally curious, and introducing foods like spinach waffles can encourage them to explore new flavors and textures, reducing picky eating later on.
Customizable: You can mix in other ingredients like cheese or sweet potato to change things up. The options are endless!
Now, are you ready to dive into making these clever green delights? They’re simple, wholesome, and the best part is that you can whip them up in no time.
How to Make Spinach Waffles
Making spinach waffles is a breeze, especially if you have a few staple ingredients on hand. Here’s a straightforward recipe to guide you.
Ingredients
- 1 cup fresh spinach (or frozen, well-drained)
- 1 cup rolled oats (you can also use whole wheat flour)
- 1 ripe banana
- 1 egg (or a flax egg for a vegan option)
- 1/2 cup milk (dairy or plant-based)
- A pinch of baking powder
- Optional: cheese or seasonings like garlic powder for an extra flavor kick
Instructions
Prep the Spinach: If you’re using fresh spinach, wash it thoroughly. You can steam or sauté it slightly to make blending easier, but if you’re using frozen spinach, just thaw and drain it.
Blend the Ingredients: In a blender, add the spinach, oats, banana, egg, milk, and baking powder. Blend until smooth. You want a nice, thick batter.
Preheat the Waffle Iron: Lightly grease your waffle iron to prevent sticking.
Cook the Waffles: Pour the batter into the waffle iron, close the lid, and cook according to your waffle maker’s instructions (usually about 5-7 minutes). The waffles should be golden brown.
Cool and Serve: Let them cool for a few minutes before cutting them into quarters. This makes it easier for your baby to pick them up.
Storing: You can freeze any leftovers for those busy mornings when you want to spend less time in the kitchen.
Tips for Serving Spinach Waffles
When you’re serving these waffles, consider creating a fun and interactive meal:
- Pair with Dips: Kids love dipping! You can serve some yogurt or hummus on the side for them to dip their waffle pieces.
- Make It Colorful: Serve with a side of colorful fruits like berries or melon to make the meal visually appealing.
- Engage Them: Encourage your child to help you with the preparation. Allowing them to mix or add ingredients can foster a sense of investment in their meals.
Let’s be honest; mealtime can sometimes feel like a battlefield. With these engaging practices, you can turn it into a fun adventure!
Common Mistakes to Avoid
Even with the best intentions, we can make a few missteps. Here are some things to watch out for when introducing new foods like spinach waffles:
- Not Offering a Variety: Kids can be picky, and while spinach waffles are nutritious, it’s important to offer a variety of foods so they don’t tire of the same taste.
- Expecting Immediate Acceptance: Remember, it might take multiple tries before your baby warms up to a new food. Don’t be discouraged.
- Serving Foods Too Soon: Make sure your little one is ready for self-feeding and finger foods. Wait until they show signs of readiness to dive into this adventure.
Bonus Ideas for Spinach Waffles
Feeling creative? Here are some additions to personalize your spinach waffles further:
- Cheese: Grate some cheddar or mozzarella into the batter for a savory flavor-packed waffle.
- Fruits: Add applesauce to sweeten the batter, or fold in some chopped berries for a fruity twist.
- Herbs and Spices: Teaspoons of cinnamon, nutmeg, or even a bit of basil can change the flavor profile and allow you to experiment.
Other Food Pairing Suggestions
You’re probably brainstorming ways to integrate these waffles into your daily meals by now. Here are some pairing ideas that can complement your spinach waffles:
- Smoothies: A fruity smoothie can be nutritious and delicious alongside spinach waffles.
- Scrambled Eggs: Provide a protein boost with scrambled eggs to complete the meal.
- Guacamole: This creamy delight not only tastes great but packs healthy fats.
Conclusion
Ultimately, introducing spinach waffles into your little one’s diet can be a win-win for both of you. They’re nutritious, easy to prepare, and fun to eat. We’ve all been there, worrying about whether our kids are getting enough nutrients as they navigate the world of solid food. But with these delightful green pancakes, you can breathe easy knowing that you’re providing them with a balanced meal filled with goodness.
If you’re curious for more ideas for starting baby-led weaning adventures, check out this article on 125 baby led weaning foods which includes a range of delicious and nutritious recipes. Looking for more breakfast ideas? You might like this list of 30+ baby led weaning breakfast recipes. Lastly, for just the right feeding plans for different ages, visit this helpful resource for food for babies 6-9 months.
Here’s to the new flavors you and your baby will explore together. Happy cooking!
