
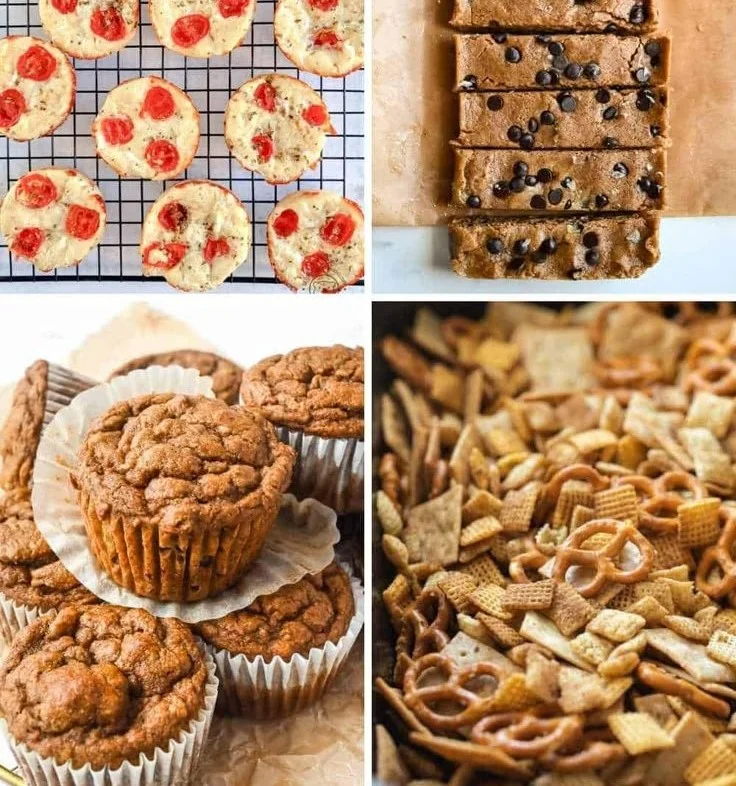
Healthy Snack Ideas for Kids That Boost Daily Energy and Focus
Imagine this: it’s 3 PM, you’ve just picked up your little ones from daycare, and the first thing they ask for is a snack. We’ve all been there, right? The tired day’s wear is showing, and you’re feeling that familiar rush of anxiety as you scramble to find something healthy that they’ll actually eat. Here’s the thing: having a stockpile of quick, healthy snacks can make all the difference in your afternoon routine. Let’s dive into some delicious homemade snack ideas for kids, along with a sprinkle of store-bought favorites, and the best containers to keep these goodies fresh and exciting.
Homemade Snack Ideas
Veggie Chips
Now, I know what you’re thinking—kids and veggies? You might be pleasantly surprised. Making veggie chips is as simple as thinly slicing sweet potatoes or zucchini, tossing them in a bit of olive oil, and baking them until crispy. You can experiment with spices too! A sprinkle of paprika or garlic powder can elevate these chips to a whole new level.
Energy Bites
These little gems are packed with nutrients and take no time at all to prepare. Here’s a basic recipe to get you started:
- 1 cup oats
- 1/2 cup peanut butter or almond butter
- 1/3 cup honey
- 1/2 cup mini chocolate chips or dried fruit (optional)
Mix everything together, form them into small balls, and voila! You’ve got a sweet, healthy bite that your kids will love.
Fruit Kabobs
Fruit kabobs are as easy as assembling your kid’s favorite fruits on a stick. Think grapes, strawberries, and banana slices. You can even add a little yogurt dip on the side for some extra fun. Plus, isn’t it more exciting to eat food that’s presented in a fun way?
Homemade Granola Bars
Store-bought granola bars can be surprisingly packed with sugar, so why not make your own? Mix oats, nuts, and a sweetener like maple syrup or honey, then bake them in a pan. You can cut them into bars or bite-sized squares, perfect for little hands.
Yogurt Parfaits
Layering yogurt with granola and fresh fruits in a mini cup is another hit. You can even involve your kids in the layering process. They’ll love creating their own parfaits and you’ll feel great knowing they’re eating something nutritious.
Peanut Butter Banana Toast
This snack is not only quick but also incredibly satisfying. Spread some peanut butter on whole-grain toast, add banana slices on top, and sprinkle with a bit of cinnamon. I swear my kids could eat this every day!
Oatmeal Cookies
Who says cookies can’t be healthy? By using oats, mashed bananas, and a bit of honey, you can whip up a batch of nutritious cookies that still satisfy that sweet tooth. Toss in some dark chocolate chips to make them even more enticing.
Cheese and Crackers
This classic snack always seems to hit the spot. Pair whole-grain crackers with slices of cheese for a protein-packed option. You can even slip in some fruit for an extra boost.
Homemade Frozen Fruit Pops
On those hot days, a fruit pop can be the perfect refreshing treat. Blend some yogurt with fruits like berries or peaches, pour the mixture into molds, and freeze. You’ll have a cool snack that your kids will think is pure magic.
Smoothie Packs
Prepare some smoothie packs by portioning out fruits and greens into freezer bags. In the morning, all you need to do is empty a bag into the blender, add some almond milk, and blend away.
Best Packaged Store-Bought Snacks
Even the best of us can’t always whip up homemade snacks, and that’s where trusty store-bought snacks come into play. Here are some options that I turn to when I’m in a crunch:
Whole-Grain Crackers
As a go-to, look for brands that offer whole grains and have minimal added sugars. Pairing them with some nut butter or cheese makes them an easy, healthy option.
Low-Sugar Granola Bars
When time isn’t on your side, grab some granola bars that are low in sugar. Look for ones that contain whole ingredients, like oats and nuts.
Yogurt Tubes
These are not only fun but also tasty. Opt for low-sugar versions, and make it a habit to have them handy for lunchboxes or a quick snack.
Freeze-Dried Fruit
These little treats feel like junk food, but they’re so good for your kids! They’re light, crunchy, and packed with flavor. Plus, they’re a great alternative to chips.
Nut Butter Packets
These portable nut butter packets are fantastic for on-the-go snacks. They can be paired with fruit or whole-grain crackers, making a wholesome snack that your kids will love.
Best Kids Snack Containers
Now that you’ve got a repertoire of fantastic snacks, let’s talk about how to keep everything fresh and easy to handle. Trust me, a good container can save your sanity.
Snack Boxes with Compartments
These are perfect for creating a variety of snack options in one container. You can mix fruits, veggies, cheese, and crackers, giving your child plenty of choices.
Reusable Snack Bags
These are often made with silicone or washable fabric and are great for on-the-go snacks. They’re eco-friendly, and you can pack anything from small sandwiches to cut-up fruits.
Leak-Proof Containers
Perfect for yogurt or dips, having a reliable leak-proof container can save you from messes in lunchboxes or bags. It’ll help keep the yogurt fresh and ready to enjoy.
Fun-Shaped Snack Containers
My kids love snacks that come in cool shapes! Whether it’s animal-shaped containers or ones with their favorite cartoon characters, it can make snack time feel special and fun.
Quick Tips for Snack Time
- Prep in Advance: Take a little time over the weekend to prep snacks for the week.
- Involve Your Kids: Let them help with choosing and preparing snacks. It encourages them to try new things.
- Keep Variety: Regularly switch up the snack routine to keep things exciting.
- Healthy Dips: Consider hummus or yogurt dips to make raw veggies or fruits more appealing.
Mistakes to Avoid
- Don’t rely solely on store-bought snacks. While they’re handy, it’s essential to balance them with homemade options.
- Avoid snack boredom by being predictable. Kids love surprises, so mix things up!
- Don’t dismiss the role of fun; presentation matters. Make snacks colorful and whimsical.
Conclusion
Navigating snack time with little ones can feel overwhelming, but it doesn’t have to be. With a few homemade recipes and some savvy store-bought options, you can keep your kids happy and healthy. Remember, there’s no perfect way to do things. If some days call for quick convenience, that’s completely okay. Just do your best, and enjoy these moments with your children. For more ideas on healthy snacks, check out 31 Healthy Snacks for Kids to Take to School, or get inspired with 31 Healthy Winter Recipes to Power You Through the Cold. And if you’re in search of delicious meals, check out these rotisserie chicken recipes to save time in the kitchen. Keep snacking smart, and you’re doing great!
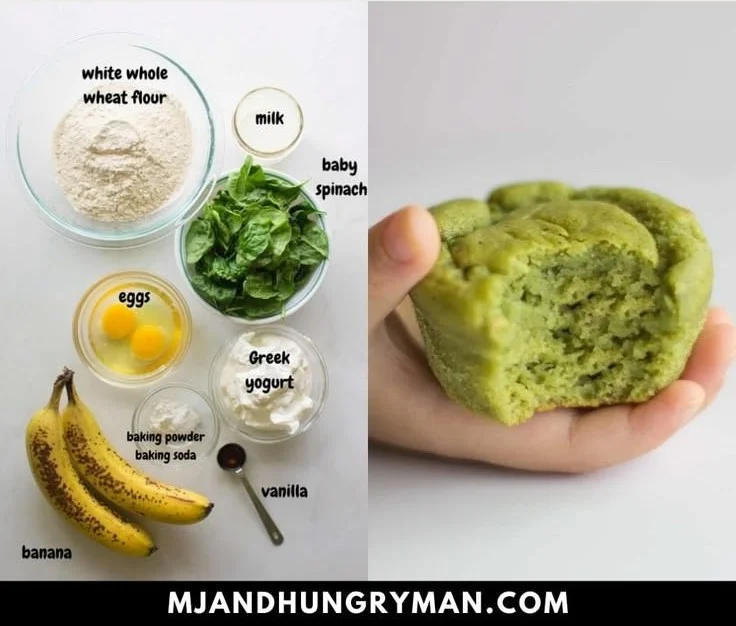
Kid-Approved Healthy Banana Spinach Muffins for Busy Moms Today
Imagine this: It’s a busy weekday morning, and your little one is screaming for breakfast while you’re still half-asleep. You’ve got about five minutes to whip something up before chaos ensues. We’ve all been there, right? This is why having a stash of healthy snacks or quick breakfast options like healthy banana spinach muffins in the fridge is a total game changer!
These muffins are soft, moist, and hide a generous amount of spinach in a sweet banana flavor that your kids will absolutely love. Plus, they’re perfect for on-the-go breakfasts or midday snacks for your little ones. Seriously, what parent wouldn’t want to sneak some greens into their child’s diet in such a delicious way?
Why Banana Spinach Muffins Are a Great Choice
You might be wondering, why use spinach in muffins? Well, here’s the thing: Spinach is packed with nutrients. It’s rich in iron, calcium, vitamins A and C, and antioxidants. When combined with bananas, which add natural sweetness and moisture, you create a snack that’s not just tasty, but also loaded with goodness. If you’re trying to introduce more veggies to your toddler’s diet, these muffins are a great first step.
Plus, they’re so easy to make! Trust me, if I can do it—with kids tugging at my legs—so can you. Let’s dive into this simple recipe, shall we?
Ingredients You’ll Need
Before we get started, let’s gather our ingredients. Here’s what you’ll need for your banana spinach muffins:
- 1 cup fresh baby spinach (washed and chopped)
- 2 ripe bananas (the riper, the better for sweetness)
- 2 large eggs
- 1/4 cup honey or maple syrup (for a refined sugar-free option)
- 1/4 cup applesauce (for moisture)
- 1 teaspoon vanilla extract
- 1 cup whole wheat flour
- 1/2 teaspoon baking powder
- 1/2 teaspoon baking soda
- 1/4 teaspoon salt
- Optional: chocolate chips or nuts for added texture
Step-by-Step Guide to Making Banana Spinach Muffins
Preheat Your Oven: First, preheat your oven to 350°F (175°C). This way, you’ll have a hot oven ready for those muffins to rise and bake perfectly.
Mix Your Wet Ingredients: In a large bowl, mash the ripe bananas until smooth. Add in the eggs, honey (or maple syrup), applesauce, and vanilla extract. Whisk until well combined. You want everything to blend nicely, so it becomes a creamy mixture.
Add the Spinach: Here’s where you get to sneak in the greens! Fold in the chopped spinach to the wet mixture. You might not believe it, but it’ll blend right in with all that banana goodness.
Combine Dry Ingredients: In another bowl, mix the whole wheat flour, baking powder, baking soda, and salt.
Mix Everything Together: Gradually add the dry ingredients to the wet mixture, stirring until just combined. You don’t want to overmix—let those muffins stay tender and fluffy! Optionally, fold in some chocolate chips or nuts for an added treat.
Pour into Muffin Tin: Line a muffin tin with liners or grease it well. Pour the batter into each muffin cup, filling them about 2/3 full. This is the perfect opportunity for your little helper to assist! Kids love pouring the batter, and it’s a fantastic way for them to feel involved in the kitchen.
Bake: Place the muffin tin in the preheated oven and bake for about 18-20 minutes, or until a toothpick comes out clean. Your kitchen will smell heavenly—just wait!
Cool and Enjoy: Let them cool in the tin for about 5 minutes, then transfer the muffins to a wire rack to cool completely. And there you have it—a healthy, delicious snack that your kids will love!
Storing Your Muffins
After baking your muffins, you’ll probably want to save some for later (if they last that long!). Store them in an airtight container in the fridge for up to a week. You can also freeze them! Just pop them in a freezer bag, and they’ll be ready to grab when you’re in a hurry.
Quick Tips for Parents
- Experiment with Add-Ins: What if your kids love peanut butter? Swirl in a little nut butter into the muffin batter for added protein and flavor.
- Share the Love: Get your kids involved in the cooking process. Kids are often more willing to try new things when they’re part of the making.
- Make It Fun: Create a muffin “tasting party” with different add-ins for your muffins, like blueberries, chocolate chips, or nuts.
Mistakes to Avoid
Sometimes in your rush to create healthy meals, you might forget the most crucial step: seasoning. While muffins are a sweet treat, balancing the flavors can make a huge difference in their overall taste. If they’re tasting a bit bland, a pinch of cinnamon can take those flavors to the next level!
FAQs About Banana Spinach Muffins
Can I use frozen spinach?
Absolutely! Just make sure to thaw it and squeeze out the excess water before adding it to your batter.
How do I make these dairy-free?
You can easily substitute cow’s milk with almond milk or coconut milk in this recipe if you want to keep it dairy-free.
What if my toddler is a picky eater?
We’ve all faced the picky-eater stage! Sometimes, it takes multiple exposures before they’re willing to try something new. Keep offering them, and consider pairing them with a favorite dip, like yogurt.
Final Thoughts
Making and enjoying these healthy banana spinach muffins with your little ones is such a rewarding experience. They’re not only delicious; they’re a practical way to include vegetables in your child’s diet without them even realizing it. Now, picture this: your toddler munching happily on a muffin, getting all those nutrients, while you sip your coffee in peace.
You’re not alone in the daily struggles of feeding tiny humans. The good news is, with a little creativity and some delicious recipes, you can make healthy eating fun and enjoyable for everyone involved.
For those who might need more inspiration for healthy snacks, check out this recipe for no-bake snacks, or if you’re interested in other muffin recipes, you might find this apple banana carrot muffin recipe appealing! And if you’re looking to mix it up a bit more, consider trying these other breakfast ideas for kids.
Conclusion
Incorporating healthy foods into your child’s diet can feel overwhelming, but these healthy banana spinach muffins make it simple and enjoyable. Plus, they’re totally adaptable, meaning you can make each batch a little different every time! If you need more muffin inspiration, check out this delightful recipe for sweet spinach muffins with banana, or if you’re in the mood for something easy to whip up, try these blender banana spinach muffins that are super kid-friendly. And for a sweeter take, these sweet spinach muffins are toddler-approved too! Happy baking, and enjoy those wholesome treats with your little ones!
Cozy Morning Basket Ideas to Start Your Day Calm and Connected
Imagine waking up to the gentle sound of little feet padding across the floor. The sun is just rising, casting a warm glow that invites a new day of discovery. You watch as your preschooler scuttles around, full of energy and curiosity. It’s those precious morning moments that set the tone for the day, right? But let’s be honest: as parents, we often want to harness that energy and channel it into meaningful learning experiences.
Here’s the thing: a homeschool morning basket can be a game-changer! It’s an organized way to incorporate various activities, books, and learning materials that can make your mornings both fun and educational. If you’re new to the concept, don’t worry! I’m here to guide you through creating a compelling morning basket that will spark enjoyment and engagement in your preschooler.
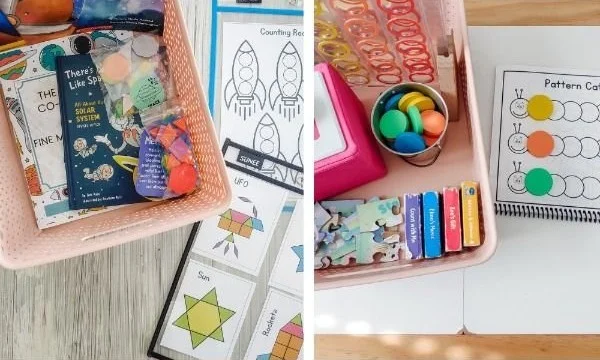
What is a Morning Basket?
A morning basket isn’t just a tote filled with random items; it’s a thoughtfully curated collection of educational and fun resources designed to foster learning and connection in those early hours. This approach can help you create a routine that flows, engages your little one’s interests, and aids in building a strong foundation for learning.
You might be wondering why this is important. Having a structured morning filled with activities can help your preschooler unleash their potential while keeping them engaged. It acts as a bridge from home life to play-based learning, which is especially crucial during those early years.
Step-by-Step Guide to Creating Your Morning Basket
Creating a morning basket doesn’t have to be overwhelming. In fact, I’d say it can be a delightful experience, allowing you to explore your and your child’s interests together. Here’s how to do it:
Step 1: Choose Your Basket or Container
First things first, pick a basket or container that speaks to you and fits your space. It should be big enough to hold a few books, toys, and other materials but not so large that it becomes overwhelming. Think of practicality but also style—this basket will be a part of your morning routine!
Step 2: Gather Learning Materials
Here’s where the fun begins! Think about what your preschooler is interested in. Here are some categories to consider:
- Books: Choose a few read-aloud favorites or educational books on topics your child is curious about.
- Puzzles & Games: Select engaging puzzles or games that will stimulate their critical thinking and problem-solving skills.
- Art Supplies: Include a couple of crayons, colored pencils, or a notepad for creative expression.
- Sensory Objects: Add items like textured balls, sensory toys, or clay to support kinesthetic learning.
- Music & Movement: Consider adding some musical instruments or a link to a favorite playlist for morning dance parties!
Step 3: Add Seasonal or Thematic Activities
Mixing in seasonal or thematic activities can create excitement! If it’s fall, think about including leaf crafts or pumpkin-themed books. In winter, you might want to explore snowflakes or holiday art. This approach not only keeps learning fresh but also invites discussions about your environment.
Step 4: Daily and Weekly Rotations
To maintain interest, consider rotating the materials every week. Each Sunday (or when it fits your schedule), swap out a few items. Think of it as a surprise element—for your child and for you! This keeps things dynamic and prevents the basket from becoming stale—or worse, ignored. You might even let your child help choose which items to include!
Step 5: Set a Morning Routine
Consistency is key! Once your basket is filled, establish a routine around it. Maybe you start each day by cozying up on the couch, sipping your coffee (or tea), and diving into a book from the basket together. Alternatively, you can pick a new puzzle to solve before breakfast. A morning routine creates a comforting structure that kids thrive within because they know what to expect.
Ideas for Activities to Include
Now that you know how to build your morning basket, let’s dive into specific ideas for activities and materials:
- Storytime Cards: Create cards with different story prompts or themes to inspire reading sessions.
- Nature Exploration Supplies: If you have a backyard or park nearby, consider including tools like binoculars or a magnifying glass for nature walks.
- Craft Projects: You can prep simple craft kits that only require materials that are easy to clean up.
- Flashcards: Add fun flashcards—letters, numbers, or sight words—to help establish early literacy skills.
- Mindfulness Activities: Introduce calming activities, like simple breathing exercises or a feelings chart.
Mistakes to Avoid
While creating your morning basket can be a joyful journey, there are a few common pitfalls to steer clear of:
- Overloading the Basket: It’s so tempting to fill it with everything! Keep it manageable or else it can feel overwhelming for both you and your child.
- Ignoring Interests: This basket is for your little one, so lean into what they find intriguing. Don’t force themes or subjects that don’t resonate.
- Neglecting Movement: Preschoolers are bundles of energy! Make sure some components of your basket encourage physical activity or movement to complement quiet time.
Bonus Tips for Success
- Personal Touch: Include something that represents your family—perhaps a family photo or memento. This personal touch can make your child feel more connected to the basket.
- Incorporate Technology: Consider adding a link to an educational app or informational videos that can complement the hands-on materials you’ve selected.
- Involve Family Members: If you have other children or family members nearby, get them involved in choosing items for the basket. It could turn into a family tradition!
Conclusion
Creating a homeschool morning basket for your preschooler is about more than just filling a container with activities; it’s about building memories and igniting a love for learning in those formative years. You’re not alone in navigating this journey, and it’s okay to make adjustments along the way. Your basket can be a unique reflection of your family’s interests and values.
To dive deeper, consider reviewing additional resources like what to include in a toddler morning basket, or check out ideas on how to create the perfect homeschool morning basket for your child. And if you want more themes to explore, take a look at morning baskets for preschoolers to inspire your next rounds of activities. Here’s to joyful mornings filled with laughter, learning, and endless possibilities!
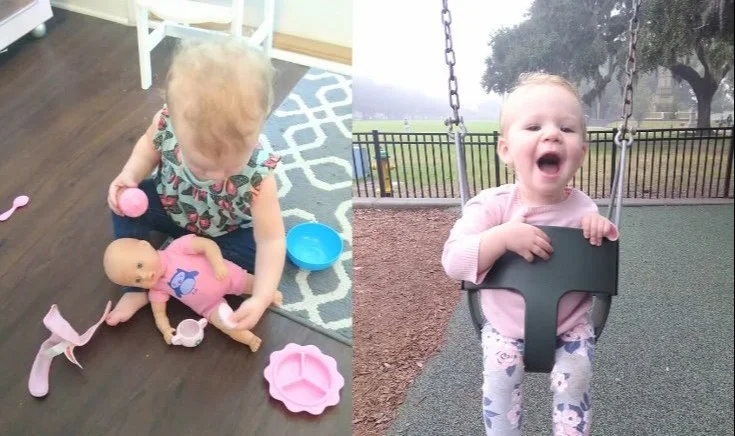
Daily Activities for 18 Month Old to Boost Play and Learning
Imagine this: It’s just another Tuesday, and your 18-month-old is up and ready to tackle the day. You’ve had your coffee (and maybe a snack or two), but now you’re staring at the clock, wondering what on Earth you’re going to do for the next several hours. Sound familiar? You’re not alone! Transitioning your toddler to a one-nap schedule can feel overwhelming, and the pressure to keep them engaged is real.
As they grow, toddlers need stimulation, exploration, and plenty of activities to keep their busy minds and bodies occupied. Here’s the thing: you don’t have to be an expert to create a fulfilling daily routine for your little one. With a little planning and creativity, you can fill your day with smiles, learning, and fun! Let’s dive into an ultimate guide for activities, mealtimes, and playtime that will beautifully balance your 18-month-old’s energy and curiosity.
Embracing a New Routine
Once your toddler approaches that magical age of 18 months and drops to one nap, it’s time to adjust your routine accordingly. Typically, toddlers at this stage are waking up relatively early, and if they’re like mine, they’re bursting with energy right from the get-go. So what does a typical day look like? Here’s a general overview you can use as a guide:
Morning: Rise and Shine!
7:00 AM – Wake Up and Breakfast: Start your day with a solid breakfast. Think about healthy and easy options like oatmeal, scrambled eggs, or yogurt with fruit. This sets the tone for a great morning. Plus, it fuels their little bodies for all the exploring ahead.
8:00 AM – Morning Activity: After breakfast, it’s time to engage in some low-key activities. You could introduce art supplies, which are perfect for this age. Crayons, finger paints, or even large paper for doodling allow for creativity! Just wait until you see those adorable masterpieces.
9:00 AM – Outdoor Exploration: If the weather is cooperating, get outside! This could be a walk around the neighborhood, a visit to a nearby park, or even a backyard adventure. Nature is a fantastic teacher for your toddler, with every leaf, flower, and rock offering lessons.
Midday: Learning and Play
10:30 AM – Child-Led Play: Let your toddler choose their play activities. Perhaps they want to stack blocks or build a fort from cushions. Imagine the joy on their face as they get absorbed in their own little world! This promotes independence and imagination.
11:30 AM – Snack Time: Always account for snack time! Healthy snacks like fruits, veggie sticks, or cheese cubes are nutritious options. Use this time to chat with them about their morning and what they’ve done so far.
12:00 PM – Lunch: Keep it balanced. Incorporate proteins, grains, and veggies. Little ones can be picky, so serving familiar favorites alongside new items can help. You might be surprised by what they like!
Afternoon: Quiet Time and More Fun
12:30 PM – Naptime: After all those activities, it’s crucial to offer a quiet time. Even if it means resting in their crib with a favorite stuffed animal, all toddlers need that downtime to recharge.
2:00 PM – Afternoon Play: Once they wake up, it’s playtime again! Engage them with interactive toys, puzzles, or even a fun activity together, like reading a story or listening to music. Picture this: snuggling on the couch with a book and watching their eyes light up during your exciting storytelling.
3:00 PM – Outdoor Play or Errands: Get out again! Maybe you’ll run some errands or take your toddler to the store. An outing doesn’t always have to be a grand adventure; even a simple trip can feel like an exciting journey for them.
Evening: Wind Down and Connect
5:00 PM – Dinner Prep Together: Involve your toddler in dinner prep. This is a great bonding time, and they might enjoy washing veggies or mixing ingredients. Sure, it can get messy, but it’s all part of the fun!
6:00 PM – Family Dinner: Share your meals together. Talk about the day and laugh—your toddler will soak it all in.
7:00 PM – Bedtime Routine: Wind down with a bath and gentle activities leading up to bedtime. Read a calming book, sing soft songs, and cozy them into bed.
Activities to Keep Your Toddler Engaged
Now that you’ve got a daily routine laid out, let’s get into specific activities that will keep your 18-month-old happy and engaged. Remember, variety is key!
Creative Activities
- Sensory Bins: Fill a bin with rice, pasta, or even sand. Add cups, spoons, and small toys for endless play.
- Water Play: A container with warm water and plastic cups or bath toys can provide splashing fun, even indoors!
- Simple Crafts: Get out some stickers and fun papers. Let them stick decorations wherever they want!
Learning and Development
- Alphabet Games: Sing the alphabet song or use flashcards to introduce letters gradually. Make it a game!
- Shape Sorting: Toys that allow toddlers to sort shapes can boost their cognitive skills while keeping them entertained.
Physical Activities
- Dance Party: Put on some music and have a little dance session! Not only will this burn energy, but it’s also a great way to bond.
- Obstacle Course: Set up a mini obstacle course in your living room with pillows to hop over and chairs to crawl under.
Quick Tips: Mom Hacks for the Day
- Plan Ahead: Choose a couple of activities the night before to give your day a bit of structure.
- Keep It Simple: Sometimes, the simplest activities are the most enjoyable.
- Be Flexible: It’s okay if things don’t go as planned. Roll with the punches!
Mistakes to Avoid
Don’t stress over perfection. Here are common pitfalls to dodge:
- Over-scheduling your day can lead to meltdowns. Leave plenty of time for free play.
- Not allowing for enough outdoor time. Fresh air can work wonders for moods!
- Forgetting to take care of yourself. A happy mom means a happy toddler, so don’t hesitate to take breaks when needed.
Conclusion
Transforming your routine for your 18-month-old can feel daunting, but with these tips and activities, you can create a warm, nurturing environment for exploration and fun. The days may feel long, but they’re often filled with delightful moments that you’ll cherish.
Looking for more ideas? Check out activity ideas for your little one or explore suggestions for learning activities suitable for 18-24 month-olds. If you’re looking for some toddler-specific activities, you might find the list on activities for toddlers helpful!
With love and patience, you got this! Remember, every moment is a learning opportunity, and these days will fly by before you know it. Embrace the chaos, enjoy the mess, and keep making beautiful memories together!
Easy Pins for Girl Scout Brownies That Build Confidence and Skills
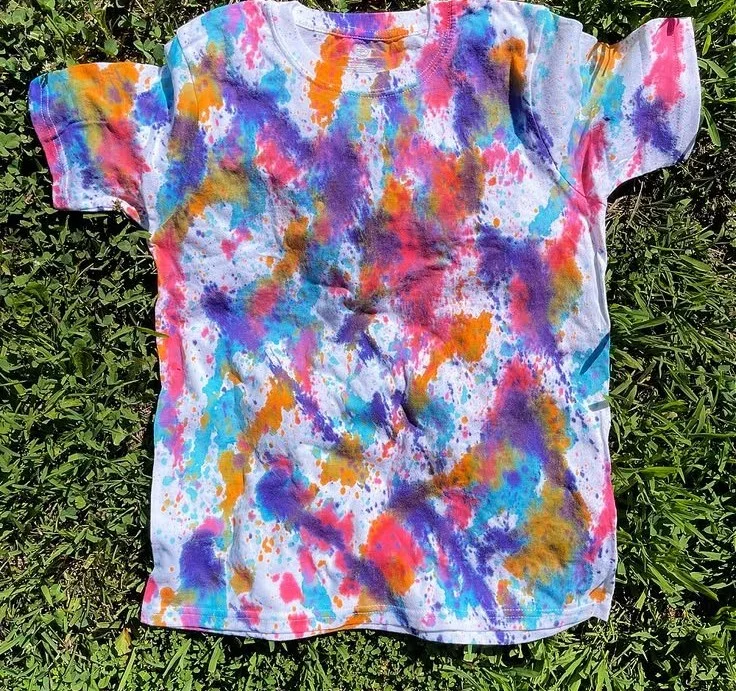
Imagine a sunny afternoon, the soft breeze playing with your hair as you watch your little one run around the yard with a big, contagious grin on their face. It’s that delightful time of year when outdoor activities beckon, and we all want to make the most of it. So, here’s the thing: what if I told you there’s a fun, creative activity you can do that engages your kids while keeping them cool in the summer heat? That’s right! Let’s talk about squirt gun T-shirt painting, a perfect blend of art and play.
The Magic of Squirt Gun Painting
Now, you might be wondering how a simple squirt gun can transform a plain old T-shirt into a unique masterpiece. Trust me, it’s easier than you think! Squirt gun painting combines splatter art with the thrill of water play, making it an appealing activity for children aged 0-5 (and let’s be honest, adults might enjoy it too!). The colorful chaos captured in vibrant T-shirts is not just visually stunning — it also encourages creativity, fine motor skills, and of course, a little bit of fun.
Getting Ready for the Adventure
Before diving into the squirt gun T-shirt painting, let’s make sure we have everything we need. Here’s a quick checklist to help you prepare:
Supplies You’ll Need
- Plain white T-shirts (the cheaper, the better!)
- Fabric paint or water-based food coloring (which is safer for little artists)
- Squirt guns (various sizes for versatility)
- Plastic drop cloths or trash bags (to protect the ground)
- Water (for filling the squirt guns)
- Old clothes (trust me, this gets messy!)
- Buckets or bowls (for mixing colors)
- Gloves (optional, but can keep little hands clean)
Having these items on hand will make the entire experience smooth and enjoyable. So, gather your supplies, and we can begin!
Setting Up the Scene
Alright, let’s picture this: you’re outside with your kiddos, the sun shining bright above, and excitement is in the air. Start by spreading out the plastic drop cloths to create a fun, designated work area. You want to give your little artists enough space to play without worrying about the mess – it’s all about the joy of creating!
Mixing Colors
Here’s where the fun starts! Pour different colors of fabric paint or water-based food coloring into buckets or bowls. Let your kids pick which colors they want to use. Mixing colors can become a mini science lesson! How do red and blue become purple? What happens when you add more yellow? Getting these artistic conversations flowing will enhance their learning experience.
The Painting Process
Now that everything is set, it’s time to break out the squirt guns! Fill them with the paint mixtures. Here’s a fun tip: you can dilute the paint with water to create a lighter spray if you want more of a pastel look.
Painting on the T-shirts
Give your kids their T-shirts and let them have at it! Encourage them to squirt, spray, and splash their colors onto the fabric freely. Here’s where you can step back and enjoy watching their creativity flourish.
- Tip: Remind your little ones that there’s no wrong way to make art. Each T-shirt will be a unique expression of their imagination!
What if they want to create a pattern? Show them how they can use the squirt gun to make different designs like swirls or even shapes.
Making the Most Out of the Fun
As we dive deeper into the activity, it’s essential to let them enjoy the process without too much direction. We’ve all been there — you want everything to look perfect. But guess what? The beauty of this project is in the spontaneity. When kids express themselves freely, that’s where the best creativity happens.
Clean-Up Tips
Of course, with creativity comes a bit of chaos. Make sure to keep some towels nearby for little hands and faces. And don’t forget: clean-up isn’t just about tidying up — it’s another bonding moment! Make it a game to pick up all the supplies while singing a silly song.
After the Paint Dries
Once the painting is done, it’s time to let those T-shirts dry thoroughly. Depending on the fabric paint you used, make sure to follow drying times as suggested on the packaging. Your kids will love wearing their masterpieces, showing them off to family and friends. It can be a family event, with everyone sporting their gallery of wearable art.
Bonus Ideas
Now, if you’re looking to spice things up a bit, consider these ideas:
Theme Days: How about a superhero or animal theme for the T-shirts? Your kids can paint their favorite characters or creatures, turning the activity into an imaginative story-telling session as they create.
Colorful Party Activity: If you’re hosting a gathering, why not set up a squirt gun painting station? Your kids can invite their friends, creating a mini art fest in your backyard.
Seasonal Variations: Shift your colors according to seasons. Imagine bright colors and warm shades for summer, or pastel colors for spring!
The Importance of Creative Play
You might be asking yourself why such activities matter. Let’s be real; creative play is crucial for development. It fosters imagination, supports cognitive growth, and enhances emotional expression. By allowing our children to explore their creativity, we open the doors for them to develop confidence and problem-solving skills.
In moments like these, we’re not just making art; we’re connecting with them and helping pave the way for their curiosity and exploration of the world.
Conclusion
So, there you have it—a wonderful, messy, and invigorating squirt gun T-shirt painting activity that’s sure to bring joy to your little ones. Next time you’re looking to fill a sunny afternoon, pull out those squirt guns and see their faces light up with excitement. Remember, it’s not just about the final product but the laughter and memories created along the way.
If you’re curious about more engaging and educational activities for your little ones, check out these resources from the Girl Scouts. And for those interested in recognizing achievements, don’t miss the opportunity to learn about the Girl Scout Brownie pins and how they can complement your child’s learning journey. Additionally, if you’re looking for more family bonding ideas, the Brownie Membership Pin is a fun way to encourage participation and a sense of accomplishment.
So go ahead, unleash the creativity, and happy painting!
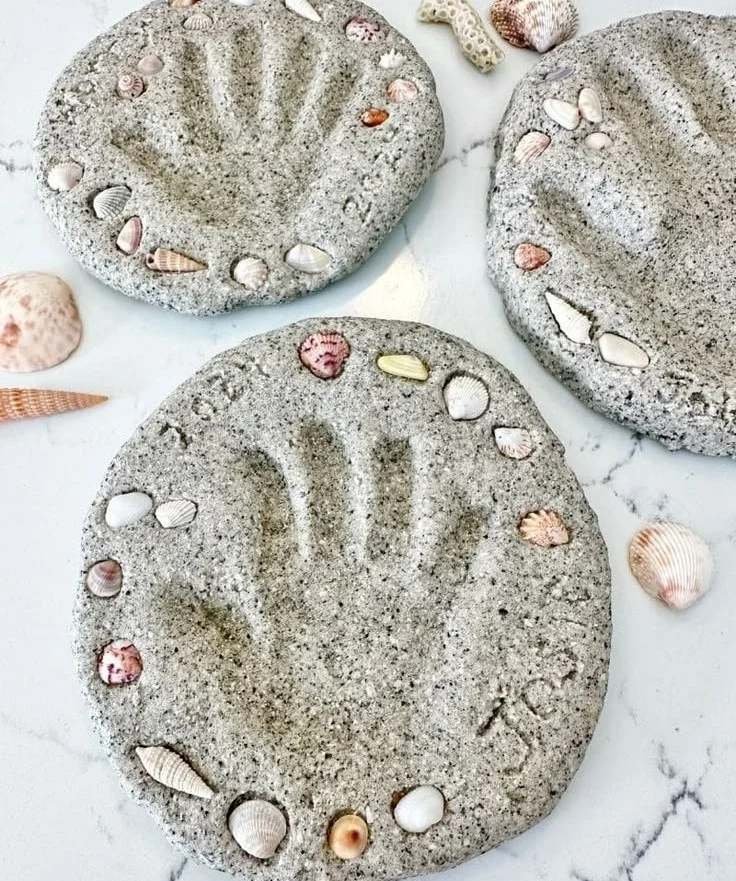
DIY Beach Sand Handprint Keepsake Ideas From Under a Palm Tree
Imagine this: You’re on a sun-kissed beach, kids squealing with delight as the waves crash against the shore. The scent of saltwater mingles with sunscreen. As your little ones play in the sand, you can’t help but think of how quickly time flies. This moment, as picturesque as it is, will one day feel just like a memory—unless you turn it into something tangible. That’s where the magic of a DIY beach sand handprint keepsake comes in!
Creating a sand handprint keepsake is not only an adorable way to commemorate your beach vacation, but it’s also a wonderfully engaging activity for you and your little ones. Let’s be honest, we all want to hold onto our kids’ tiny hands and the laughter that accompanies those beach days. This DIY project is simple, fun, and captures the essence of your family’s sun-soaked adventure.
Getting Started with Your Beach Sand Handprint Keepsake
Before we dive into the steps, let’s gather what you need. Don’t worry, you likely already have most of these items at home, or they’re easy to find at your local craft store.
Supplies You’ll Need
- Beach Sand: The star of the show! Make sure it’s clean and dry.
- Crafting Clay or Air-Dry Clay: This will be the base for your handprint. White clay works well for a clean look, or you could get a little creative with colors!
- A Rolling Pin: To flatten out the clay.
- A Rolling Pin: To flatten out the clay. Great for making those perfect handprints!
- A Baking Sheet: If you’re using air-dry clay, you might need this when it’s time to dry.
- Sealant (Optional): A clear sealant spray to preserve the finished product.
Step-by-Step Instructions
Let’s break this down so you can easily follow along with your little ones. Kids thrive in hands-on activities like this, plus, you’ll create lasting memories together. So, here’s how to make your DIY beach sand handprint keepsake.
Step 1: Collect Your Sand
On your beach outing, assign the kids a little mission. They’ll love gathering sand in a small bucket! Make sure to remind them to stick to cleaner areas, avoiding any debris. This will be the perfect material for your keepsake.
Step 2: Prepare Your Clay
Once you’re back from the beach, unwrap your crafting clay. If you’re using air-dry clay, knead it until it’s soft. It shouldn’t feel crumbly or dry. For a fun twist, consider mixing a little beach sand into the clay itself to infuse that ocean vibe.
Step 3: Roll Out the Clay
Use your rolling pin to flatten the clay to about half an inch thick. Don’t worry too much about it being perfect—nature isn’t perfect, and that’s what makes your keepake genuine.
Step 4: Make the Handprint
Now it’s time for the most exciting part! Have your child press their hand into the clay to create a handprint. Make sure they press down firmly but not too hard—just enough to leave a clear impression.
Step 5: Sprinkle the Sand
While the handprint is still fresh, sprinkle some of your beach sand over the impression. This adds texture and beauty to your keepsake. Kids will love seeing the connection between their hands and their sandy playtime.
Step 6: Let It Dry
If you’re using air-dry clay, carefully place the handprint on a baking sheet and let it dry. This usually takes about 24-48 hours, but always check the package instructions to be sure. You might want to remind your little ones that patience is key here!
Step 7: Seal the Keepsake (Optional)
Once dry, consider sealing it with a clear sealant. This will protect it from any wear and tear, preserving those sweet handprints forever. Just make sure to take this step outdoors or in a well-ventilated area!
Bonus Ideas to Enhance Your Keepsake
Now that you’ve got the basics down, let’s get creative! Here are some ideas to elevate your handprint keepsake:
- Add Dates or Names: Before sealing, use a toothpick or a small tool to engrave the child’s name and date of your beach trip around their handprint.
- Decorate with Beach Finds: Hot glue some small shells or pieces of sea glass around the edges to make it extra special.
- Create a Display: Once it’s complete, think about how you can display it. Frame it, or make a little stand if you’re feeling crafty!
Common Mistakes to Avoid
- Wet Sand: Using wet sand can lead to messy keepsakes; make sure it’s dry.
- Overly Thick Clay: It should be thin enough to dry evenly, so stick to around half an inch.
- Not Letting It Dry: I know it’s tempting to rush the process, but trust me—don’t skip the drying time!
FAQs About DIY Beach Sand Handprint Keepsake
Can I use regular playdough instead of clay?
- While it’s possible, regular playdough won’t hold its shape for long. It tends to crumble over time, especially if exposed to moisture. Clay is a much better option for lasting impressions.
What if my child won’t keep their hand still?
- Here’s a tip—try having them press their hand down quickly and then lift it off. Sometimes the anticipation of making a handprint makes them fidgety. Practice first on a piece of scrap clay!
How do I store the keepsakes?
- Keep them in a cool, dry place, away from direct sunlight. If you see any signs of damage, superglue might save the day.
Making Memories that Last
Crafting a DIY beach sand handprint keepsake is not just an arts and crafts project; it’s about making memories. You’ll laugh, share stories, and better yet, you’ll create something tangible from those precious beach moments. It’s a heartfelt way to remember your family’s time together and a perfect piece to display in your home.
Quick Tips to Make the Most of Your Keepsake
- Gather extra sand to take home for future projects.
- Include siblings for a fun DIY family activity.
- Capture a photo of the kids holding their finished product for an additional keepsake.
Conclusion
Creating a beach sand handprint keepsake can be a delightful adventure for parents and kids alike. It’s a beautiful way to capture a moment in time that you can cherish forever. If you’re interested in more ideas for keepsakes, check out this wonderful guide from From Under a Palm Tree. You might also love this Beach Sand Handprint Art for even more inspiration. And for tips on making sand clay recipes, don’t miss this collection from From Under a Palm Tree.
So, let’s get crafting! After all, memories are what family vacations are all about, and you’re about to make a lovely one. Enjoy your beach day and happy crafting!
Summer Snack Box for Toddlers Ideas to Delight and Energize
Imagine waking up to the sound of birds chirping, the sun beaming through your window, and that unmistakable warmth of spring in the air. It’s that magical time of year when we can finally trade in our heavy coats for light jackets and explore the great outdoors with our little ones. As parents, we know that nothing quite beats spending a morning at the park, picking fresh veggies at a local farm, or simply strolling through the neighborhood while soaking up the sun’s rays.
Here’s the thing: while these outings are delightful, they can also be challenging. When the kids are hungry after a day of play, you don’t want to rush home for lunch. Instead, why not pack something delicious to take with you? Let’s dive into some great ideas for creating the perfect outdoor meal that keeps everyone happy and satisfied, especially when you head to the pool afterward!
Essential Packing Tips for Outdoor Meals
Planning an outdoor meal isn’t just about what food to bring; it’s also about how you pack it. You want to keep everything fresh, appealing, and easy to handle—even with little hands around. Here are some tips to make your meal packing smoother:
Use Insulated Bags
A high-quality insulated bag can keep your food at the right temperature, ensuring things like chicken salad or yogurt stay cool until you’re ready for lunch. It’s especially crucial if you’re packing something that needs refrigeration. Trust me, there’s nothing worse than digging into a warm yogurt (yuck!).
Go for One-Handed Foods
When you’ve got little ones around, one-handed foods are a lifesaver. Think about things that don’t require forks or knives. Mini wraps, cut-up fruits, and cheese sticks can all be enjoyed while they splash around or play.
Plan for Clean-Up
If you’ve been a parent for a while, you’ll know that clean-up can make or break your experience. Bring along some biodegradable wipes or napkins, and pack foods that don’t leave a serious mess. Finger foods like veggie sticks and hummus or sushi rolls avoid some of that sticky chaos.
Delicious Ideas for Outdoor Meals
Now that we’ve got the packing basics covered, let’s talk about what to actually fill those bags with!
Refreshing Wraps
A wrap is versatile and easy to manage. You can fill it with lean turkey and cheese, a spread of hummus, and an assortment of veggies (think cucumbers, shredded carrots, and spinach). Cut them into bite-sized pieces for your little ones. These are not only easy to make but can also a great way to sneak in some healthy greens!
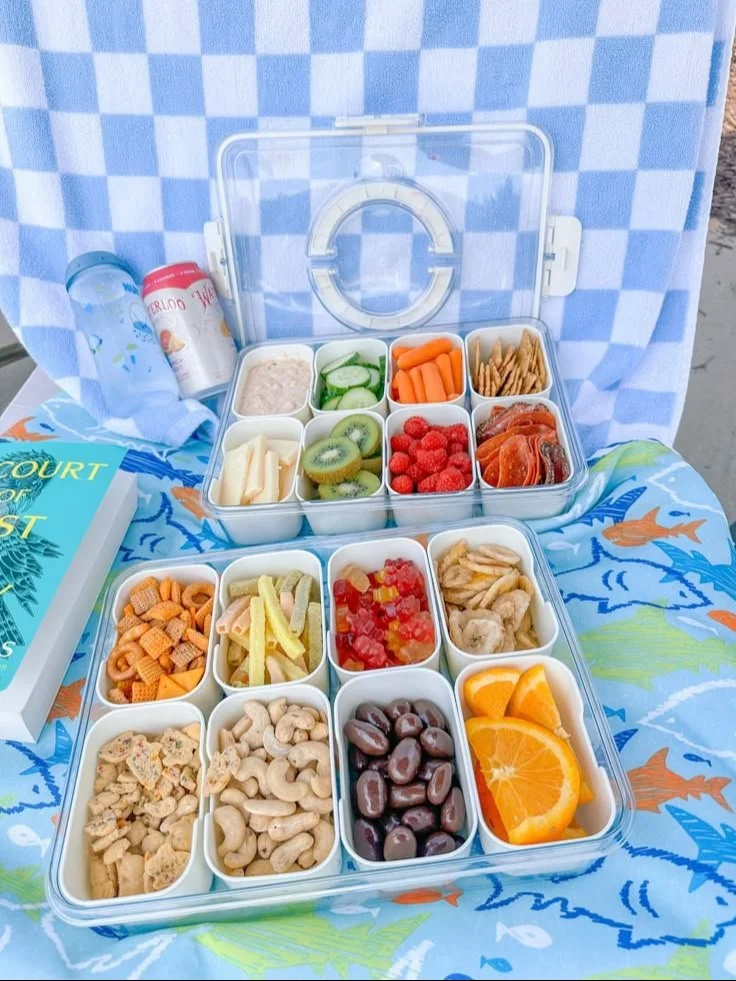
Homemade Snackle Boxes
The trending snackle box has officially taken over my summer outings! These boxes combine a variety of snacks into one fun package that your kids can pick at throughout the day. You can include items like boiled eggs, mini cheeses, sliced apples, nuts (if there are no allergy concerns!), and crackers. Plus, it’s a great way to let your kids participate in packing their own lunch.
If you’re looking for inspiration, you might want to check out this article on 20 Snackle Box Ideas—Why the Trending Snack is Perfect for Kids.
Healthy Pasta Salad
Pasta salad can be a great option, especially if you make it the night before. Just toss together some whole-grain pasta, fresh veggies, a squeeze of lemon, and olive oil. Add in some grilled chicken or chickpeas for protein. The best part? It tastes amazing cold, making it perfect for those pool days.
Fruit Kabobs
Don’t overlook the power of fun presentation! Fruit kabobs are simple: just skewer your children’s favorite fruits (think strawberries, melon, and grapes). It’s engaging for little hands and adds a splash of color to your meal. Bonus points if you pack a small tub of yogurt for dipping.
Sweet Treats
Every outdoor meal deserves a little something sweet, right? Instead of cookies that crumble, why not pack energy balls? They’re made with oats, almond butter, honey, and mini chocolate chips. They’re nutritious, delicious, and easy to carry around!
Yogurt Parfaits
Layer some Greek yogurt with granola and berries in a reusable container for a portable parfait. It’s tasty and a great source of protein and fiber—perfect for those long days filled with energy-sapping activities.
Practical Snack Options to Keep Everyone Happy
As much as I love prepping full meals, let’s be honest: sometimes you need easy snacks at the ready, especially when the kids are jumping in and out of the pool. Consider these fun options:
- Veggie Chips: These offer the crunch kids crave without a big mess.
- String Cheese: Always a winner with toddlers; it’s a great source of calcium.
- Dried Fruit: A sweet treat that won’t spoil quickly.
- Popcorn: Air-popped popcorn is a low-calorie snack that you can easily season to fit your family’s tastes.
Ensuring Hydration is Key
With all this food, remember one thing: hydration is crucial. Kids can get dehydrated quickly when playing outside. When packing, include plenty of water bottles or even some fun, flavored water (think lemons or berries) to encourage your kids to drink up.
Mind Your Timing
Timing can make a huge difference. You don’t want to be stuck at the park or pool, watching the little ones get restless just before lunch. Kids get grumpy when they’re hungry! I usually aim for a snack around mid-morning to keep energy levels up, followed by lunch somewhere around noon.
Also, taking breaks can help. If they’ve been splashing around for a while, call it a good time for lunch. This approach helps them refuel while also breaking up their fun.
Mistakes to Avoid
We’ve all been there, so here are a few common mistakes to steer clear from:
- Failing to Pack Enough: Kids can surprise you with their appetites. Always pack a little more than you think they’ll eat.
- Ignoring Allergies: If you’re heading out with other families, double-check any allergy concerns to avoid a headache.
- Forgetting the Essentials: Keep a checklist! Sunscreen, hats, the right utensils—these things matter!
Quick Tips to Make Life Easier
- Make It a Family Activity: Involve your kids in food prep. It teaches them about healthy eating and makes them more likely to enjoy the food.
- Label Everything: If you’re going with friends, use stickers or labels. It can help keep track of your stuff and avoid mix-ups.
- Be Flexible: Sometimes plans change. If the picnic gets interrupted or the pool is closed, think on your feet and have a backup plan in mind.
Conclusion
As the weather warms up, taking outdoor meal adventures can truly become one of the highlights of summer. From the park to the pool, it’s an opportunity to bond and make memories with our little ones, especially when we pack foods that are easy, healthy, and delicious. Plus, those precious moments by the water can bring us all a little joy during the hectic parenting days.
For some great inspiration, you can start with a Summer Snack Box for toddlers that’s sure to delight your little ones at the pool! You can check out the ideas available at this wonderful resource. And if you want to explore the trend further, here’s an interesting piece on the summer of the snackle box. Last but not least, don’t forget to explore these clever snack ideas that can keep your toddlers full and happy during all the fun outdoor activities. Here’s to a fantastic summer of adventures, laughter, and of course, delicious food!
60+ Baby Led Weaning Recipes for 6 Months Plus Delicious and Healthy
Imagine this: you’re sitting at the kitchen table, watching your little one nibble on a chunk of soft sweet potato, their tiny hands eagerly exploring new textures. It’s such a joy, isn’t it? But then it hits you—what’s next on your baby’s menu? You’ve already tried a few recipes, but you want to keep things exciting and healthy. Don’t worry; you’re not alone in this. Many of us are on the hunt for new and delicious baby-led weaning options to keep our little ones engaged at mealtime.
The beauty of baby-led weaning is that it encourages your baby to explore food independently, enhancing their motor skills and promoting a lifetime of healthy eating habits. Plus, it allows you to take a break from spoon-feeding and let your baby discover flavors and textures on their own. So, if you’re ready to expand your baby’s menu, I’ve got some fantastic healthy baby-led weaning recipes for you. These recipes are not only nutritious but also easy to prepare, some even make-ahead options for those busy parents.
Healthy Baby-led Weaning Recipes
Here’s a collection of mouth-watering recipes that will have your baby reaching for more. Let’s roll up our sleeves and dive in!
Sweet Potato Wedges
Sweet potatoes are not just delicious; they’re also packed with vitamins.
Ingredients:
- 1 large sweet potato
- 1 tablespoon olive oil
- Pinch of cinnamon (optional)
Instructions:
- Preheat your oven to 425°F (220°C).
- Peel the sweet potato and cut it into wedges.
- Toss the wedges in olive oil and sprinkle with cinnamon, if using.
- Place them on a baking sheet lined with parchment paper and roast for 25-30 minutes until they’re tender and starting to caramelize.
These sweet potato wedges are perfect finger food. Your baby will love the sweet flavor, and you won’t believe how easy they are to make. Now, you might be wondering about the mess—trust me, the mess is part of the fun!
Broccoli Florets
Broccoli might not be the first vegetable that comes to mind for your baby, but it can be a hit!
Ingredients:
- 1 head of broccoli
- 1 tablespoon olive oil
- Optional: garlic powder for a little extra flavor
Instructions:
- Steam broccoli florets until they’re tender (about 5-7 minutes).
- Toss the cooked broccoli in olive oil, and if you wish, sprinkle a bit of garlic powder on top.
- Let them cool down before serving.
Broccoli’s small florets are perfect for little hands to grab, and they love the tender texture. What if your little one doesn’t seem excited about green veggies? Pair it with a yogurt dip made from plain yogurt and a splash of lemon juice for added fun!
Banana Oat Pancakes
Breakfast can’t get any easier than these three-ingredient pancakes.
Ingredients:
- 1 ripe banana
- 1 egg
- 1/2 cup rolled oats
Instructions:
- Mash the banana in a bowl.
- Add the egg and oats, mixing until well combined.
- Heat a non-stick skillet over medium heat and pour small amounts of the batter to form pancakes.
- Cook for 2-3 minutes on each side until golden brown.
These pancakes are a win-win. They’re healthy, filling, and packed with nutrients. Plus, you might find yourself sneaking in a bite or two.
Cauliflower Tots
These make a great addition to lunch or dinner.
Ingredients:
- 1 cup steamed cauliflower florets
- 1/2 cup shredded cheese
- 1/2 cup breadcrumbs
- 1 egg
Instructions:
- Preheat your oven to 400°F (200°C).
- In a mixing bowl, mash the steamed cauliflower and combine it with cheese, breadcrumbs, and egg.
- Form small tots and place them on a baking sheet lined with parchment paper.
- Bake for 15-20 minutes or until golden.
Your little one will hardly know they’re eating veggies. These cauliflower tots can easily be made in advance and frozen. Just pop them in the oven when you need a quick meal!
Soft Cooked Carrots
Nothing beats the vibrant color of carrots!
Ingredients:
- 2 large carrots
Instructions:
- Peel and cut carrots into sticks.
- Steam or boil until fork-tender (about 10-15 minutes).
- Let them cool before serving.
Carrots can be an excellent source of beta-carotene, and babies usually enjoy the sweet flavor. And, let’s be honest, who doesn’t love the crunchiness of carrots?
Quinoa Cakes
Protein-packed and flavorful, these cakes are a great dinner option too.
Ingredients:
- 1 cup quinoa, cooked
- 1/2 cup grated zucchini
- 1 egg
- 1/2 teaspoon cumin
Instructions:
- In a bowl, mix all the ingredients until well combined.
- Form the mixture into small cakes.
- Heat a skillet over medium heat and cook the cakes for 3-4 minutes on each side until golden.
These quinoa cakes are filling and can be enjoyed by the whole family. They also freeze well, making them perfect for meal prep.
Make-Ahead Tips
Let’s be real—life can get chaotic. Here are a few tips for meal prepping to make baby-led weaning easier:
- Batch Cooking: Pick a day each week to cook large quantities of the above recipes. Store them in portions and freeze them for later.
- Mix and Match: Feel free to combine ingredients from different recipes, ensuring variations to keep it exciting.
- Labeling: Don’t forget to label your meals with the date. It helps you keep track of freshness, especially if you’ve got several different items stacked in the freezer.
Mistakes to Avoid
While baby-led weaning is pretty straightforward, here are a few pitfalls to dodge:
- Skipping Textures: Avoid only offering pureed foods. Your baby needs to experience different textures to develop their palate.
- Salt and Sugar: Now is not the time for added salt and sugar. Babies’ bodies don’t need them, and you can introduce those flavors later.
- Choking Hazards: Be mindful of food sizes and shapes. Always ensure food is cut right for your little one’s developmental stage.
Quick Tips
- Get your baby involved. Let them explore different foods; it’s all part of the learning process.
- Don’t stress over mess! Messy meals often lead to great learning and exploration.
- Always supervise your baby during mealtime. Safety first!
Conclusion
Finding healthy options for your little one may feel overwhelming sometimes, but it doesn’t have to be complicated. With these healthy baby-led weaning recipes, you can introduce your baby to a world of flavors while making mealtime fun and interactive. Remember, you can always get creative and mix it up, and don’t shy away from experimenting with new ingredients. And if you want more inspiration, check out this resource for over 60 recipes, or explore this collection for easy meal ideas. If you’re looking for a comprehensive app to help track your baby’s meals, take a look at this one that offers over 100 ideas!
So, go ahead and try these recipes; your baby (and you) will enjoy delicious mealtime adventures! You’ve got this!
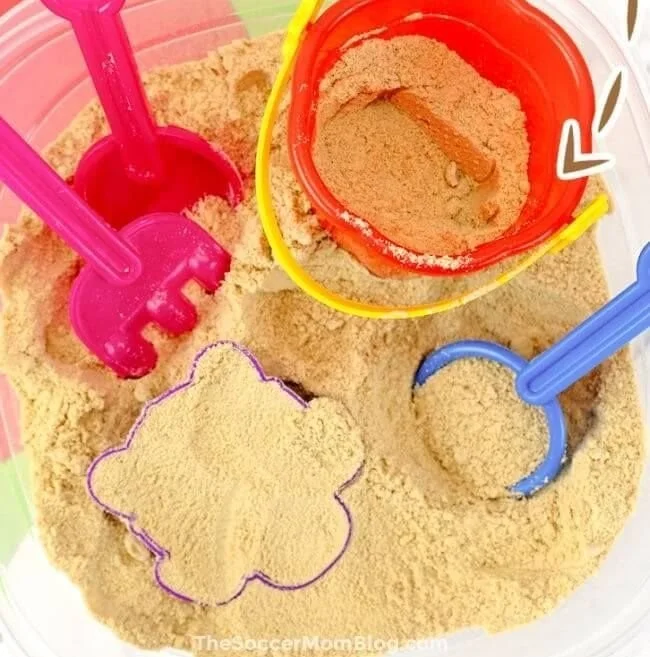
Edible Play Sand Ideas Using Cheerios for Safe Mess-Free Fun
Your Kids Will Love This Easy Summer Sensory Activity Using Cereal
Picture this: it’s a scorching summer day, the kind that makes you want to dive headfirst into a pool, but the kiddie pool in your backyard doesn’t seem to excite your little ones anymore. Sound familiar? We’ve all been there, right? Kids can get restless when they can’t run around outside due to the heat, leaving many parents scratching their heads on how to keep the fun alive indoors. Well, let me share a delightful solution that can turn your ordinary day into an extraordinary sensory experience using something you probably have in your pantry—cereal!
Imagine creating a soft, delightful, and safe sensory play sand that kids can explore, dig in, and even taste. Yes, I said taste! With just a couple of simple ingredients, you can transform regular cereal into a play sand that sparks their imagination and keeps them engaged for hours.
What Makes This Homemade Play Sand So Amazing?
Hands-on activities are essential for kids. When they engage with different textures, they’re not just having fun; they’re also learning! This homemade cereal play sand offers a fantastic sensory experience that encourages creativity and exploration. Plus, it’s an activity that promotes bonding and laughter without the need for screens—something we all crave in our busy, tech-driven lives.
Benefits of Homemade Cereal Play Sand
- Taste-Safe: This is a game-changer! Using cereal means it’s completely safe if your little ones decide to take a taste. No worries about harmful materials found in traditional play sand.
- Quick and Easy: All you need is a blender and a few ingredients, making this a go-to activity on a whim.
- Encourages Creativity: Kids can use their imaginations to build sand castles, dig tunnels, or create entire worlds with their toys.
- Budget-Friendly: No need to make a trip to the store. You likely have everything you need right in your kitchen.
- Screen-Free Fun: A refreshing break from tablets and TVs, leading to more quality family time.
How to Make Your Own Taste-Safe Play Sand
Now, let’s get down to the nitty-gritty of making this sensory play sand! Trust me; it’s as simple as it gets.
Ingredients
- 2 cups of cereal (Cheerios, Rice Krispies, or any similar cereal)
- 1 cup of flour (optional, for added texture)
Instructions
Gather Your Supplies: Get a bowl, a blender, and your two ingredients ready. You might even want to set up your play area with some mats to catch any flying cereal bits.
Blend the Cereal: Toss the cereal into the blender and pulse until it resembles a fine powder. Think of how sand feels between your fingers—aim for that texture! This usually takes about 30 seconds.
Optional: If you’re looking for a coarser texture, gradually mix in the flour until it gets to the feel you want. It’s like crafting your unique blend of sand!
Sensory Play Time: Pour your homemade play sand into a sensory bin or a large tray. Add scoops, small toys, or molds to elevate the fun factor! Watch as your kids dive into the world of creativity and sensory exploration.
Clean Up: Don’t overlook this part! Have a plan for easy clean-up. Doing this activity on a mat or outside will save you time later.
Quick Tips for Successful Play Time
- Supervision is Key: Keep an eye on younger kids during their sensory adventure—safety first!
- Choose Brightly Colored Cereal: Not only does this make the sand visually appealing, but it also enhances the sensory experience with vibrant colors.
- Use Molds and Tools: Providing cups, shovels, and cookie cutters can help fuel creative play and keep them engaged longer.
Bonus Ideas to Enhance Play
Now, how can we make this activity even more exciting? Here are a few ideas:
- Add a Theme: Get creative! Incorporate toy animals or beach-themed items for a day at the beach vibe.
- Use Coloring: Want to amp up the fun? Add safe powdered food coloring or natural colors to the cereal before blending. Watch your kids react to the vibrant sand!
- Interactive Storytime: While your kids play, read a story that complements their sensory experience. It’s a great way to tie in learning with play.
Mistakes to Avoid
Even the best plans can have hiccups. Here’s what to watch out for:
- Using Too Much Liquid: Remember, we’re aiming for sand here! Keep liquids to a minimum so the texture remains just right.
- Not Blending Enough: Ensure the cereal is finely blended; otherwise, you’ll end up with chunky play sand, which could be less enjoyable.
- Skipping Supervision: Always keep an eye on younger children to ensure they stay safe while having fun.
Conclusion
Creating your homemade play sand is a simple yet magical way to engage your children in tactile, sensory play. It opens up worlds of creativity while promoting fine motor skills and imaginative thinking—all without screens. So why wait? This summer, take a moment to whip up a batch of cereal play sand. You’ll laugh, create, and maybe even sit back and watch your little ones dive deep into their imaginations, asking for “just five more minutes” of playtime.
And remember, you can always adapt and customize the activity to your family’s style. Feel free to share your own variations and ideas with friends or on social media. It’s all about making joyful, playful memories that your children will cherish for years to come. Happy playing!
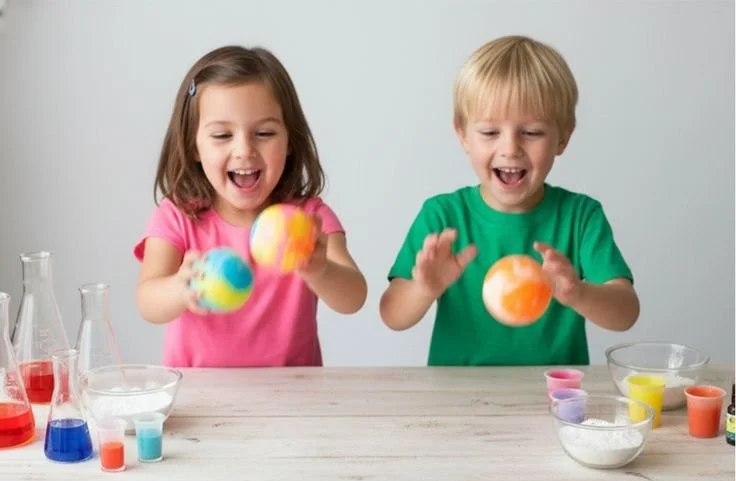
Fun DIY Bouncy Balls for Kids to Make at Home Chemistry Experiment
Make Bouncy Balls at Home for Fun Science Learning
Imagine this: it’s a rainy Saturday afternoon, and the kids are bouncing off the walls—not exactly the best scenario when you’re trying to keep the peace at home. You look around, and all you see are half-finished puzzles, abandoned toys, and that endless pile of laundry. Sound familiar? As parents, we’ve all been there, desperate for activities that keep our littles occupied while also sneaking in a bit of learning. That’s where the magic of science comes in!
What if I told you that you could turn a dreary day into a whirlwind of fun and education with a simple kitchen experiment that transforms into a new toy? It’s time to dive into the world of chemistry and create homemade bouncy balls! This delightful project isn’t just a blast—it’s a perfect blend of STEM learning, hands-on creativity, and tons of bouncing once the experiment is complete.
Why Bouncy Balls?
You might be asking yourself, why bouncy balls? Well, here’s the thing: not only are these colorful, squishy toys incredibly engaging for kids aged 6-12, but they also provide a hands-on way to understand polymers and chemical reactions. By combining common household ingredients, kids can witness science in action and then enjoy their creations afterward.
Now, let’s get into the nitty-gritty!
Supplies You’ll Need
You don’t need to make a special trip to the store for this project. Here’s a quick list of supplies you probably already have at home:
- White school glue (like Elmer’s)
- Cornstarch
- Baking soda
- Water
- Food coloring (optional but highly recommended for added fun)
- Mixing bowl
- Spoon
- Measuring cups
- Rubber gloves (optional but keeps the mess in check)
Step-by-Step Instructions
Now that we’ve got our supplies ready, let’s jump into making those bouncy balls!
Step 1: Gather the Ingredients
In a mixing bowl, combine 1 tablespoon of school glue with 1/2 teaspoon of cornstarch. If you’re feeling adventurous (and let’s be honest, who doesn’t want a little extra color?), add a few drops of food coloring. Kids love choosing their favorite colors for a personal touch!
Step 2: Mix the Magic
Next, mix these ingredients together using a spoon until you have a uniform consistency. It should feel somewhat thick and sticky—the perfect mixture for our next step!
Step 3: Time for the Reaction
Now it’s time for some chemistry! In a separate bowl, combine 1 tablespoon of baking soda with 1 tablespoon of water and mix it until it’s well combined. Then, pour the baking soda mixture into the glue mixture and stir it up. This is where the magic happens! Kids will be amazed as they see the ingredients react.
Step 4: Get Your Hands Dirty
Once the mixture thickens up, it’s time for kids to dive in! (Remember, rubber gloves can help keep things clean.) They can use their hands to knead the mixture until they form a ball. This may take a minute or two, so don’t rush this step. It’s all part of the experience!
Step 5: Let It Bounce
Let the freshly made bouncy balls sit for about 10 minutes. This waiting game is part of the anticipation (and let’s face it, kids are experts at waiting when it’s for something exciting!). Once they’re ready to go, kids can test their creations and see how high they can bounce them indoors or outdoors.
Embedding Learning in Play
What’s really exciting about this experiment is how it hits multiple learning notes. As your kids mix and create, they’re learning about how polymers work.
What Are Polymers?
Polymers are large molecules made up of smaller units called monomers. In simple terms, think of them as chains of links. The glue has some polymers, and they create bubbles when you mix with baking soda and cornstarch. This reaction holds vital lessons in chemistry without sounding too much like a textbook! Kids will naturally be curious, asking questions like, “Why does it bounce?” or “What makes it stretchy?”
When they see their bouncy balls not only come to life but bring joy during playtime, it reinforces the connection between learning and having fun.
Quick Tips for a Successful Experiment
- Get Messy: Embrace the mess—it’s part of the fun! Let your kids explore textures and combine colors as they wish.
- Ask Questions: Keep the conversation flowing. Ask questions about what they think will happen with each step. This starts a dialogue that engages their minds.
- Experiment with Recipes: Once you’ve made the basic bouncy ball, why not tweak the recipe? Try adding glitter for sparkle or using different types of glue to see if that changes the outcome.
Mistakes to Avoid
It’s easy to feel overwhelmed with science projects, but there are a few common hiccups to watch out for:
- Not Mixing Enough: Ensure all ingredients are thoroughly mixed. Sometimes the fun can lead to shortcuts, and that might mean no bounce!
- Skipping Waiting Time: Patience is a virtue here. Give those balls time to firm up before bouncing.
Bonus Ideas for Extended Learning
After you’ve made and played with your bouncy balls, why not extend the fun and learning even further?
- Design Challenge: Challenge your kids to create the highest bouncing ball. Use different materials, colors, or sizes and see which one reigns supreme.
- Bounce Tests: Conduct bounce tests using a scale to measure how high each ball bounces. It brings math into the picture without the kids even realizing they’re learning!
FAQs About Homemade Bouncy Balls
Can we store the bouncy balls?
Absolutely! After you’ve made them, store them in a container at room temperature. They can last a few weeks but keep an eye on them—they might get a little dry over time.
Is this project safe for younger kids?
If you have younger kids (under the age of 6), be cautious with this experiment, as they might put things in their mouths. However, it can be supervised in a safe environment with older siblings demonstrating.
Wrapping It Up
You know, when I first stumbled upon this idea of creating homemade bouncy balls, I was skeptical. Would my kids actually enjoy it? Would it really be fun? Here’s the truth: they not only loved making them, but they also played proudly with their creations for weeks!
So if you’re looking for an engaging activity that mixes playtime with pivotal learning experiences, give these homemade bouncy balls a go. You’ll get to flex those science muscles while your little ones bounce into happiness. So grab your supplies and dive into this fun experiment. Trust me, you won’t regret it!
