
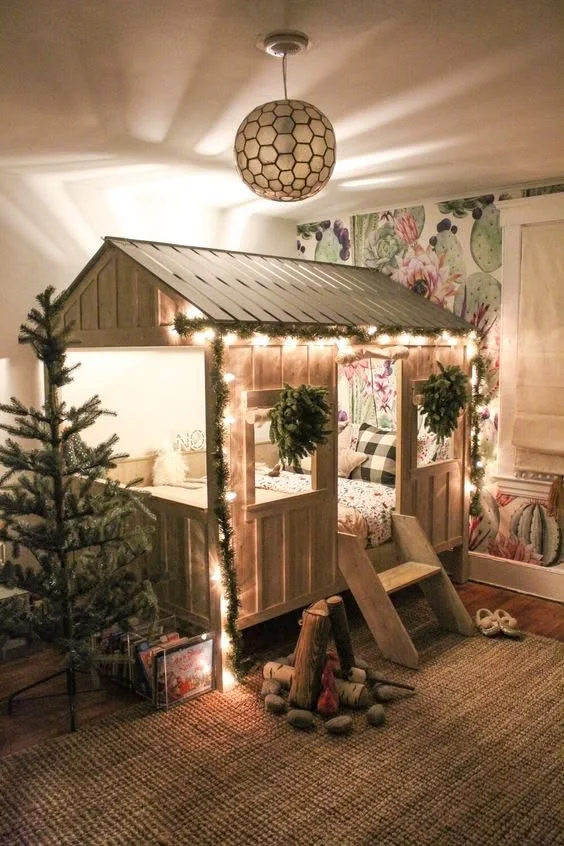
Amazing Kids Room Design Ideas That Grow With Your Child Today
Imagine this: your little one bursts through the door after a long day, eyes wide with excitement. They run to their room, and you can practically hear their imaginations firing on all cylinders. Now, picture their bedroom—a vibrant sanctuary that reflects their personality and sparks creativity. That’s the magic of an amazing kids room design that speaks to both functionality and fun.
As parents, we all want our children’s rooms to be more than just a place to sleep. It’s about creating a space where they feel safe, inspired, and cherished. But let’s be honest, fitting all those aspirations into the confines of a few square feet can feel like trying to do a puzzle with missing pieces. I’ve been there, and you’re not alone if you sometimes feel overwhelmed.
So how do we turn your kid’s room into a dreamy retreat? Let’s explore some fantastic ideas that will not just fill the space but also fill their hearts with joy.
Embrace Colorful Palettes
Here’s the thing: color can transform a room entirely. Whether you’re going for a soothing atmosphere or an exhilarating vibe, the right hues can set the tone.
Pastels for calm: Light blues, soft pinks, and mint greens can create a peaceful oasis for your tiny tot. These are great choices for nursery or toddler rooms, helping promote relaxation and sleep.
Bright and bold: If you have an adventurous spirit, why not let those walls pop with vivid colors like sunny yellows, fiery oranges, or electric blues? As they grow, these colors can be complemented with fun wall decals or thematic bed linens.
Creative Wall Decor
Now, you might be wondering how to incorporate those colors creatively. Wall art and decorations can serve as unique focal points.
Gallery wall: Create a fun gallery wall with their artwork or favorite prints. You can change them up as their tastes evolve, keeping it fresh and exciting.
Washi tape designs: For a no-commitment alternative, washi tape can be a fun way to create geometric patterns or shapes on the wall. If they change their mind, simply peel it off—no paint damage!
Multifunctional Furniture
With kids, you know that every space counts. Multifunctional furniture might just become your best ally. Think beds with built-in storage, desks that double as a play area, or ottomans that open up to reveal toys. Not only does this maximize space, but it also keeps things organized.
Storage solutions: Consider under-bed storage boxes or stylish baskets to keep toys in check. Children can easily learn to tidy up when everything has a designated spot.
Convertible furniture: Kids grow quickly, and their needs change just as fast. Look for beds that can be converted as they age or desks that adjust in height.
Play Areas for Imagination
Let’s be honest. Kids learn and grow through play. Their room can be a canvas for their imaginations.
Reading nook: A small corner with a cozy bean bag, colorful cushions, and a bookshelf can invite them to dive into the wonderful world of stories. Set up a little tent or canopy to make it even cozier!
Art space: If your child loves to create, dedicate a section of the room for arts and crafts. A small table with supply bins can foster their creative side while keeping the mess contained.
Themed Rooms
This might sound like a challenge, but incorporating themes into your child’s bedroom can be both fun and rewarding. Consider their current favorites—be it unicorns, space, or dinosaurs—and use those interests in your design choices.
Subtle touches: You don’t have to go full throttle with a theme. Sometimes, just a few key elements, like bed linens or a colorful rug, can convey the spirit of their favorite theme without overwhelming the space.
Mix and match: As they get older, their interests will change, and that’s perfectly normal! Stick with a versatile base and update the themed accessories as needed.
Personal Touches
Kids thrive on a sense of belonging. Adding elements that reflect their personality can make all the difference.
Name signs: A customized name sign can serve as a delightful feature, making the space feel uniquely theirs.
Photos and memories: Hang up snapshots of cherished moments, or create a memory wall that they can add to as they grow. It reminds them of their journey while adding a live element to the decor.
Quick Tips for a Beautiful Kids Room
So, to wrap this up, let’s discuss some quick tips to ensure the design process remains enjoyable and productive:
- Involve your child: Let them have a say in the process. After all, it’s their sanctuary, and their input can be invaluable!
- Prioritize safety: Ensure that furniture is anchored, and sharp edges are minimized. A safe space is a happy space.
- Regular updates: Set a reminder to refresh the decor every couple of years. Kids change their tastes faster than we can keep up!
- Experiment with textures: Incorporate a variety of textures with rugs, cushions, and curtains to create a cozy ambiance.
Mistakes to Avoid
Even the most well-intentioned designs can hit a snag. Here are a few common pitfalls to watch out for:
- Overly trendy items: Kids can be fickle about their interests. Steer clear of super trendy decor that might quickly go out of style.
- Ignoring functionality: While it’s tempting to focus solely on aesthetics, consider how the space will function daily. Functionality will always trump looks if you want a harmonious environment.
- Underestimating the mess: Kids can be messy—it’s part of the adventure! Always plan for easy-to-clean surfaces and ample storage.
Concluding Thoughts
Creating an amazing kids room design isn’t just about aesthetics; it’s about fostering an atmosphere where your child can dream, play, and learn. By adding colorful palettes, multifunctional furniture, and personal touches, you can elevate their space into something truly magical.
As you embark on this decorating journey, remember to have fun! This is an exciting opportunity to bond with your child while tailoring a space that reflects their unique spirit. If you’re looking for even more inspiration, check out some incredible ideas like kid’s bedroom ideas or engage with designs that boast imaginative details at this amazing resource.
You can explore stylish approaches towards chic children’s rooms at Wearstler World. Here’s to creating a room that is freely theirs—full of love, vibrant colors, and joyful memories!
20 Screen-Free Activities for Toddlers That Keep Them Happy All Day
Imagine this: It’s a rainy Saturday afternoon, and your toddler is getting restless. You look around the room, and all the toys seem uninspiring. You reach for your phone, scrolling through screen-time ideas. But wait! What if I told you that there are countless engaging activities that don’t involve screens?
As parents, we all want our little ones to thrive, explore, and use their imaginations. You might be wondering how to keep them entertained without deploying the usual electronic gadgets. Trust me, I’ve been there—those moments when I felt like I needed to channel my inner creative genius to keep my energetic toddler engaged.
Let’s be honest, sometimes it’s just easier to turn on a show. But offering screen-free fun can spark creativity and provide essential developmental benefits for kids aged 2 to 4. So, put that device down, because here are 20 fun activities that will have your toddlers laughing, learning, and exploring in the most delightful ways!
Imaginative Play
- Fort Building
- Gather blankets, cushions, and pillows. Encourage your toddlers to create their own fort. Not only is it a fun physical activity, but it also stimulates their creativity and imagination. It can become anything—a castle, a spaceship, or simply their secret hideout!
- Dress-Up Time
- Raid your closet! Let your toddler explore different outfits. Maybe it’s a firefighter today or a princess tomorrow. This is perfect for imaginative play. You could even create a little mini fashion show for some extra giggles.
- Puppet Show
- Get some old socks or paper bags and help your little ones create quirky puppets. Then, set the stage for a delightful puppet show. You’ll be amazed at how creative their stories can be!
Sensory Play
- Playdough Creations
- Making homemade playdough is easier than you think! Involve your toddler in the process, and then let their imaginations run wild molding shapes and figures.
- Nature Sensory Bin
- Head outside to collect leaves, rocks, and other natural treasures. Fill a bin with your finds, and add some sand or rice. Your toddler will enjoy exploring the textures and sounds.
- Water Play
- Fill a shallow tub with water, and let your toddler splash around with cups, toys, and even kitchen utensils. Watch as they experiment and discover buoyancy.
Arts and Crafts
- Collage Making
- Gather magazines, scissors, and glue. Let your little one cut out pictures they love and create a collage. This activity is not only creative but helps improve fine motor skills.
- Coloring Fun
- We all know toddlers love coloring! Set them up with crayons, markers, or even finger paints. Get creative and join in—you might just enjoy it as much as they do!
- Nature Art
- Using leaves, twigs, and flowers, help your toddler create beautiful artwork. When they’re done, you can hang their masterpieces around the house.
Physical Activity
- Obstacle Course
- Create an obstacle course using household items. With some creativity, chairs can turn into tunnels, and pillows can act as stepping stones. Your child will love this physical challenge, plus it’s great for their gross motor skills.
- Dance Party
- Crank up the music and let loose. Dancing is a fantastic way for your toddler to express themselves and get some energy out. Added bonus: it lifts your spirits too!
- Follow the Leader
- Play a game of “Follow the Leader” where your toddler mimics your actions, whether it’s jumping, spinning, or crawling. It’s a fun way to bond while they practice listening skills and coordination.
Learning through Play
- Story Time Theater
- Grab a favorite book and act out the story together. Use different voices for the characters; let your child add their own twists. It promotes language skills and builds literacy in a fun, engaging way.
- Sorting Games
- Gather a variety of objects (blocks, toys, or even snacks). Have your toddler sort them by color, size, or shape. It’s a fun way to learn categorization while keeping them busy.
- Counting Stones
- Collect pebbles from outside and help your little one learn to count by stacking them in groups. It’s simple yet effective in teaching early math skills.
Culinary Fun
- Mini Chefs
- Let your toddler help in the kitchen. Simple tasks like washing vegetables, stirring batter, or arranging snacks can make them feel involved and teach them about food.
- Snack Art
- Create edible art! Use fruits, veggies, or crackers to make creative faces or animals on a plate. Not only is it fun, but it also encourages healthy eating.
- Baking Together
- Not all toddlers can resist the allure of baking. Let them help you mix ingredients or sprinkle toppings. You’ll create sweet treats and lasting memories!
Quiet Time Activities
- Reading Nook
- Create a cozy reading corner with pillows and blankets. Encourage your child to pick out books and “read” independently or have a quiet cuddle while you read to them.
- Jigsaw Puzzles
- Introduce age-appropriate puzzles to your toddler. Not only is it a way to keep them engaged, but it’ll also enhance their problem-solving skills.
Conclusion
Finding ways to engage your toddlers without turning to screens can be fun and fulfilling. These activities not only spark creativity, but they also promote essential developmental skills. It’s all about making memories and having those special moments together, isn’t it?
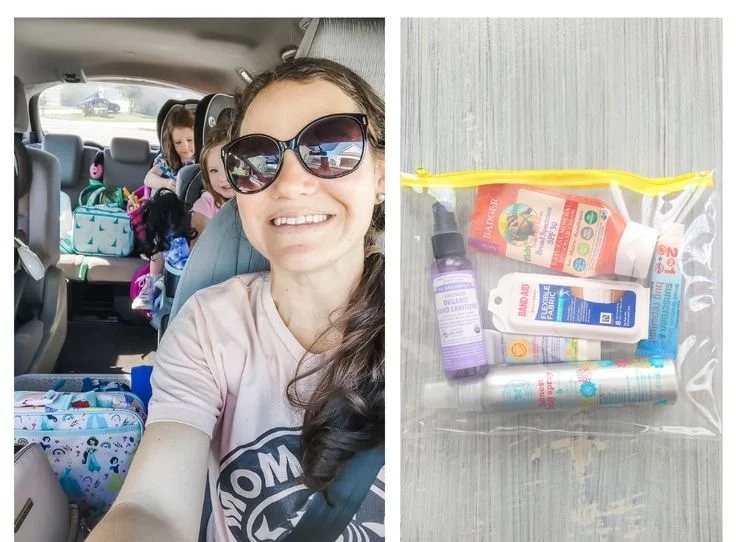
And hey, as you’re navigating the highs and lows of parenting, remember that screen-free time is a wonderful gift you can give your kids. To explore even more ideas, check out this collection of screen-free activities for kids or dive into tips for surviving evenings without screens. For those long road trips, don’t miss these toddler activities that are great on the go.
So, roll up your sleeves, and let’s create some special moments with our little ones! Remember, we’re all in this parenting journey together, and finding joy in simple, screen-free activities can make a world of difference.

No Bake Classroom Recipes Your Kids Will Actually Love Today
Imagine you’re a parent trying to whip up a fun activity for your child’s classroom party. You’ve got limited time, your little one is cranky, and the thought of using the oven feels overwhelming. Sound familiar? We’ve all been there, frantically searching for ways to create something delightful without turning the kitchen into a chaotic mess. That’s where no bake classroom recipes come in, and they’re an absolute game changer!
Why Choose No Bake Recipes?
Here’s the thing: no bake recipes are not just a time-saver; they’re also incredibly easy and versatile. You can have your kids involved in the process without worrying about burns or spills. Plus, they can often be made with pantry staples, which means you don’t have to make a special trip to the store. No bake recipes can nurture creativity, and let’s be honest, it’s fantastic to see that proud smile when they present a tasty treat to their friends.
Kid-Friendly No Bake Recipes for the Classroom
Now, you might be wondering what specific recipes work best for a classroom environment. The key is to keep it simple, fun, and of course—delicious! Here are some ideas to consider:
1. Chocolate Peanut Butter Rice Crispy Treats
These chewy treats are always a hit! Mix together melted chocolate, peanut butter, and rice cereal. Press into a pan and let them cool. Once set, cut them into squares.
2. Fruit and Yogurt Parfaits
Layered desserts look fancy but are super easy to make. Just stack yogurt, granola, and diced fruits in clear cups. Kids will love creating their own combinations.
3. No Bake Cookies
These classic cookies are a favorite, requiring just oats, cocoa powder, peanut butter, and a bit of milk. They come together in under 30 minutes. You can find even more ideas in this no bake cookies for 5-year-olds article.
4. Energy Bites
Combine oats, peanut butter, honey, and chocolate chips. Roll into small balls, and voilà! You’ve got a nutritious snack kids will love.
5. Simple S’mores
Utilize graham crackers, marshmallows, and chocolate. Kids can assemble their own and enjoy a no-cook version of this camping classic!
Tips for Success
- Involve the Kids: Let them measure, mix, and layer ingredients. Not only does this keep them engaged, but it also builds their confidence in the kitchen.
- Clean as You Go: The kitchen can easily become a disaster zone. Encourage your little ones to help with cleanup, making it a team effort.
- Get Creative with Decorations: Sprinkles, mini flags, or themed cupcake liners can take even the simplest treat and make it feel special for a classroom event.
6. Veggie and Dip Cups
Place assorted veggies in cups with a bit of ranch dressing at the bottom. It’s healthy, colorful, and oh-so-cute.
7. Chocolate Avocado Pudding
Can you believe avocado can be turned into a dessert? Blend ripe avocados with cocoa powder, honey, and a splash of vanilla. It’s a creamy, nutritious snack that will wow the kids.
8. Decorated Pretzel Rods
Dip pretzel rods in melted chocolate and let them harden. Your kiddos can add sprinkles or crushed nuts for extra flavor and crunch.
9. No Bake Cake Pops
Blend cake crumbs with frosting, roll them into balls, and coat them in chocolate. Kids can help decorate them with sprinkles, turning a simple treat into a festive masterpiece.
10. Yogurt Covered Raisins
These little bites are easy to make by coating raisins in yogurt and letting them dry. They’re sweet, chewy, and a healthier option for snack time.
Creative Presentation Ideas
Here’s a thought: presentation can make a huge difference! Using fun plates, colorful wrappers, or even little boxes can transform a simple treat into a holiday sensation.
You might think it’s all about flavors, but don’t overlook the visual appeal. What if you set up a mini buffet table for the kids to serve their own sweet creations? It could turn into a fun social event in the classroom!
Mistakes to Avoid
As you delve into no bake recipes, a couple of things can make the process smoother:
- Not Reading the Recipe Thoroughly: This can lead to confusion, especially when it comes to measurements or timing.
- Choosing Recipes Beyond Their Skills: Stay within the realm of their abilities. Simple tasks make for happy kids (and a happy you!)
Conclusion
No bake classroom recipes can turn hectic moments into memorable experiences, fostering creativity and fun, all while providing your kids with delicious snacks. Whether you opt for energy bites, s’mores, or yogurt parfaits, you’re sure to create something your child will proudly take to school.
The next time you need a quick solution that allows for a bit of creative bonding, consider reaching for these easy recipes. For even more inspiration, check out this page with easy no bake healthy snack recipes, or explore this collection of easy no-bake recipes for kids. And if you’re feeling festive, might we suggest some adorable no bake gingerbread ornaments for Christmas gifts? Happy cooking!
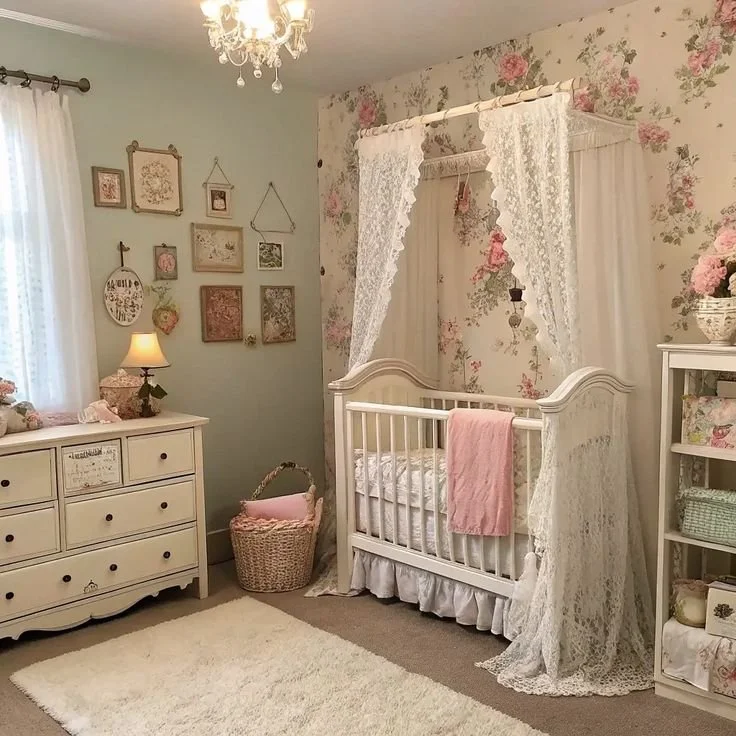
Stylish Girl Nursery Ideas for Modern and Elegant Rooms for Moms
Imagine this: you walk into a room that feels so perfectly curated that you can’t help but pause and breathe it in. The colors harmonize beautifully, soft textures invite you to sink in, and you think, “Wow, I could live here forever.” That’s exactly what happened to me last month when I visited my friend’s new nursery for her little one. I was totally taken by the thoughtfulness of the design, the careful details, and the warm atmosphere. It got me thinking—how do we create that feeling in our own homes for our kids?
Creating a nurturing space for your little ones can have a profound impact on their development and well-being. It’s not just about aesthetics; it’s about crafting an environment where they can play, learn, and grow. Here’s the thing: the first five years of a child’s life are incredibly formative, and the spaces they inhabit can support or hinder this growth. So how can we ensure these spaces are just as magical as that nursery?
Crafting a Cozy Space
Let’s be honest—getting your home ready for a new baby or toddler can feel overwhelming. From finding the right colors to choosing safe furniture, you might be thinking, “Where do I even begin?” Start with a cozy, inviting atmosphere. This doesn’t have to mean spending a fortune or adopting the latest trends.
Consider Your Color Palette
Choosing the right colors can set the mood for the space. Soft pastels can create a calming environment, while vibrant colors can stimulate creativity and playfulness. Think about what feels good to you because you’ll be spending a lot of time in this room too.
Lighting Matters
Picture this: a dimly lit room with a soft glow from a nightlight. This can be the perfect setting for bedtime stories. Installing some adjustable lighting can do wonders. Natural light is also essential—window treatments that let in daylight without being too harsh can create a happier environment for your little one.
Comfort is Key
You’ll want soft surfaces for your baby to explore. Investing in a plush rug, comfortable seating, and enough pillows can transform the room. And don’t forget about storage; it’s all about keeping the space tidy! Toy bins or stylish baskets can make a world of difference.
Engaging with Play
Let’s explore some inspiring ideas to make playtime exciting! After all, children spend a lot of their time in their own space, so it should be both engaging and nurturing.
Interactive Play Zones
Creating different zones for various activities helps children explore and engage. You can have a cozy reading nook filled with books or a craft corner stocked with materials. This not only fosters creativity but also encourages independence as they navigate their playtime.
Sensory Play
Have you ever noticed how kids love to touch and feel different textures? Incorporating sensory elements—like a bin filled with rice or a small water table—can make for an enriching playtime experience. This is especially important for babies and toddlers, as they learn through exploration.
Nature Elements
What if you brought some nature indoors? Whether it’s a small indoor garden or simply some potted plants, incorporating greenery can create excitement and teach kids about nature. It could be a fun project to care for a plant together—just make sure they’re safe for little hands!
Choosing Baby-Friendly Furniture
When it comes to furniture, it’s crucial to consider safety and functionality.
Safety First
Look for sturdy furniture that’s low to the ground to prevent any dangerous tumbles. Rounded edges can help keep those little heads safe as they explore their surroundings.
Multipurpose Pieces
Items like a convertible crib or a storage ottoman can help maximize the space and utility of the room. Versatile furniture will see you through various stages of your child’s growth, meaning less waste and more value for your investment.
Decor That Inspires
Decor can truly bring a room to life and set the tone for the atmosphere you’re aiming to create.
Personalized Touches
Incorporating your child’s name or initial into the decor adds a personal touch. This could be a custom piece of art or even a DIY project. It’s a lovely way to make the space feel uniquely theirs.
Inspiring Artwork
Hang artwork or photographs that inspire joy and creativity. Bright colors, playful animals, or calming landscapes can stimulate their imagination. You might even consider swapping things out periodically to keep it fresh.
Home Activities That Bond
Let’s not forget about those activities you can do together that also help deepen the connection between you and your child.
Craft Time Together
Set aside a little corner for arts and crafts where both you and your little one can create together. This can be as simple as coloring or as complex as creating a scrapbook. The important thing is to encourage creativity while spending quality time together.
Storytime Adventures
Reading isn’t just about the words; it’s about making connections. Create a cozy reading nook with pillows and blankets where you can snuggle up and delve into different worlds. You’re not just building their vocabulary; you’re also making memories!
Culinary Fun
Now, you might be wondering how cooking fits into this. Getting your little ones involved in preparing simple meals can be a fun bonding experience. Let them help with stirring, sprinkling, or even washing produce. Cooking can encourage a healthy relationship with food, and hey, it builds essential life skills!
Quick Tips for Designing a Nurturing Environment
Here are some quick hacks that can help you create that perfect space without running around in circles:
- Stick with Natural Materials: Look for organic cottons and natural woods for a healthier atmosphere.
- Opt for Neutral Base Colors: This allows you to play with bolder accessories that are easier to change as your child’s taste evolves.
- Incorporate Soft Textures: Think comfy blankets, cushions, and rugs that invite relaxation and play.
Mistakes to Avoid
As we embark on this journey of design and nurturing, let’s also look at some common pitfalls parents often face:
- Overcrowding the Space: Too much furniture or clutter can overwhelm young children. Aim for a balance.
- Ignoring Safety Standards: Always research and ensure your furniture and toys meet safety guidelines.
- Forgetting About Growth: Designs that are too specialized for a specific age might not grow with your child. Choose timeless and adaptable furnishings.
Conclusion
Designing a nurturing environment for your little one can feel like a monumental task, but remember, it’s all about creating a space that feels right for both of you. Whether you’re leaning towards a theme or looking for practical nursery decor, the most important thing is to make it your own.
To find inspiration, check out these wonderful ideas: for those like me who love a good aesthetic, here are some fantastic options like baby girl nursery ideas and decorative wallpaper options that can transform the room. If you’re leaning towards a clean, calming aesthetic, don’t miss these white nursery ideas that offer style without overwhelming your space.
At the end of the day, creating that magical feeling you experienced in your friend’s nursery starts with you. Trust yourself, get inspired, and most importantly, enjoy the process. You’ve got this!
kids room decor
Imagine this: It’s a rainy afternoon, and your little one is curled up under a soft blanket in their room, surrounded by the magical world you’ve created just for them. That cozy nook, filled with dreamy colors and whimsical decor, has officially become their fortress of imagination. Just the thought of a beautiful kids’ room brings joy, doesn’t it? We’ve all been there, feeling that urge to transform our child’s space into something enchanting yet functional.
Decorating a nursery or a toddler’s room is no small feat, but it can be an incredibly rewarding journey. Here’s the thing: striking the right balance between style and practicality doesn’t have to be a chore. So, let’s dive into some creative kids’ room decor ideas that blend functionality and fairy-tale charm. Whether you’re leaning toward calming pastels or vibrant accents, there’s something here for everyone.
Magical Pastel Palettes
When it comes to nurseries and toddler rooms, soft pastel colors are like a gentle hug. Think of pale yellows, mint greens, and soft blues. Not only do these colors create a soothing environment, but they also inspire a sense of calmness—a must for those late-night feedings or early morning wake-ups.
- Powder Blue and Cream: A stunning combination to create an airy feel. Add a plush cream rug and fluffy cushions for a cozy touch. This setup works great for both playtime and nap time.
- Mint Dreams: Imagine mint green walls with pops of light pink and white. You might add cloud-shaped shelves to display stories, while a starry night sky mobile hangs above the crib, creating a celestial haven.
Now, you might be wondering about the best way to incorporate these soft tones. Use textiles like bedding and curtains to introduce subtle colors, and don’t forget about wall art! A simple print of whimsical creatures in soft tones can tie the whole room together.
Bold Accents for Creative Play
What if you want to inspire your little one’s adventurous spirit? Bold accents and colorful elements can energize a room while providing practical functions. Let’s think outside the box.
- Accent Walls: A single wall painted in a vibrant hue, such as sunshine yellow or deep teal, can serve as a playful backdrop for shelves filled with toys or books. A fun wallpaper border featuring their favorite characters can also be an easy, impactful addition.
- Colorful Furniture: Consider a bright red toy chest or a quirky green rocking chair. Not only do these pieces brighten up the space, but they also serve a dual purpose—function and flair.
Parents often overlook how functional furniture can also bring creativity into a child’s room. To really incorporate that playful aspect, you could opt for multifunctional furniture that grows with your child, such as a crib that converts into a toddler bed, ensuring durability and style.
Cozy Reading Nooks for Imagination
Every child deserves a cozy reading corner where their imagination can run wild. Picture this—you’ve set up a small nook stuffed with cushions, a soft throw, and a few fairy lights for ambiance. This becomes their favorite spot to dive into fantastical worlds.
- Cushion Fort: Stack colorful cushions in a corner for a fun and inviting space. You could even use a tent to cover it for that ultimate adventure vibe.
- Bookshelf Bounty: Install a low bookshelf filled with a variety of storybooks. This not only encourages reading but also allows your little one to easily select their favorites.
Creating a reading nook can be a great bonding opportunity. Choose storytime titles together, and soon enough, you’ll find yourself lost in tales.
Functional Storage Solutions
Let’s face it: kids come with a lot of stuff. The solution isn’t just to hide it all away. With thoughtful storage solutions, you can keep that enchanting look while maintaining order.
- Baskets and Bins: Use stylish baskets to store toys, books, or art supplies. They’re perfect for keeping things tidy and can be beautiful decorative pieces on their own.
- Under-bed Storage: Maximize space with bins that slide under the bed to keep things out of sight but still within reach. This is a great way to stash seasonal clothing or extra bedding as they grow.
Integrating storage into the decor not only enhances functionality but teaches kids about organization. As they grow, a well-organized space will make it easier for them to take ownership of their environment.
Enchanting Lighting Options
The right lighting can instantly transform a space from ordinary to extraordinary. Imagine the soft glow of a whimsical night light, or the sparkle from fairy lights draped across shelves.
- Star Projector: Create a starry sky on the ceiling with a night-sky projector. It’s sure to fascinate little ones and encourage relaxation at bedtime.
- Dimmable Lights: Install dimmable options so you can adjust the brightness depending on the time of day—bright for playtime, soft for bedtime.
Lighting isn’t just practical; it sets the mood for each part of your child’s day, making a huge difference in how they feel in their space.
Eco-friendly Options for a Healthier Space
Now, let’s talk about being eco-conscious. As parents, we want to create not only beautiful rooms but also healthy environments for our little ones.
- Sustainable Materials: Look for furniture made from responsibly sourced wood or organic fabrics. It’s an investment in both style and safety.
- Non-toxic Paints: Opt for low-VOC or no-VOC paints to keep the air in your child’s room fresh and clean.
Making eco-friendly choices is easier than ever, and it adds a layer of peace knowing you’re creating a safe space for your little explorer.
Conclusion
As we wrap up these inspiring kids’ room decor ideas, I hope you feel empowered to create that enchanting haven for your little one—an inviting blend of style and functionality. Remember, it’s not about adhering to trends but choosing elements that speak to you and your child’s unique personality.
If you’re looking for a bit more inspiration, I highly recommend checking out stunning options for nursery and kids room decor at Pottery Barn Kids. You can also find playful designs at Target’s kids’ bedroom and playroom section. And if you’re on the hunt for convenient finds, browse Amazon’s kids’ room décor options for tons of creative ideas.
Transforming your child’s room isn’t just about aesthetics—it’s about creating a safe space where they can grow, learn, and dream. So, keep those ideas handy, and happy decorating!
Simple Ways to Get the Family Organized for a Stress-Free Summer
Imagine this: it’s a sunny Monday morning, and your three little ones are bursting with energy, each one vying for your attention while reminding you that “I’m bored!” as you sip your lukewarm coffee. Sound familiar? As parents, we all know the mix of excitement and dread that summer brings. With the kids home all day, the thought of keeping them entertained (without losing your sanity) can seem daunting. So, here’s the thing: an organized summer isn’t just a nice idea; it’s a necessity! By putting systems in place, we can reduce stress and maximize fun. Today, I’m going to share my tips on how I create an organized, joyful summer with my kids.
Create a Weekly Schedule
One of the best ways to keep our summer days organized is by establishing a flexible weekly schedule. You don’t need to have everything planned down to the minute, but having a general idea of what each day looks like can be a game changer.
Here’s how I do it:
Morning Routine: Outline a simple morning routine that includes breakfast, getting dressed, and a quick tidy-up.
Daily Themes: Assign themes to each day. For example, “Art Day,” “Outdoor Adventure Day,” and “Science Experiment Day.” This gives kids something to look forward to while simplifying planning for you.
Time Blocks: Divide the day into time blocks. For instance, mornings can be for activities, afternoons can be for quiet time or nap, and evenings can be family time.
Now, you might be wondering how to keep your kids engaged during that sacred “quiet time.” You can stock up on puzzles, books, or even set up a sensory bin (have you considered letting them explore rice, beans, or water beads?).
Prepare Fun Activity Kits
Think of activity kits as your secret sauce! They can be customized to match your kids’ interests, and preparing them in advance will save you countless "What should we do today?" moments.
Here’s what to include in your kits:
- Arts and Crafts: Gather items like colored paper, crayons, stickers, and glue.
- Nature Exploration: Pack a magnifying glass, a small notebook, and some crayons for leaf rubbings.
- Science Fun: Include basic supplies for simple experiments, like baking soda and vinegar volcanoes.
- Outdoor Games: Toss in a frisbee or a jump rope for some energetic play.
Creating these kits together can also be a fun pre-summer activity. Let your kids help you assemble the kits; it gets them excited about what’s to come!
Set Up a Color-Coded System
Recognizing that each child has different needs and interests can help in organizing their activities. One effective method is a color-coded system.
- Assign a color to each child for their activities and supplies.
- Use colored bins (I love clear bins!) for toys, art supplies, and even clothes.
- Label areas in your playroom or living room based on these colors.
This way, if a meltdown occurs over whose turn it is to play with the red dinosaur, you’ll have your color system to fall back on. It gives kids ownership over their things and also helps in teaching sharing.
Design a Chore Chart
I know, the very mention of chores might make our little ones groan. However, incorporating a kid-friendly chore chart fosters responsibility while keeping things tidy. It doesn’t have to be overwhelming.
Here’s a simple example:
- Ages 2-3: Tidying up toys, emptying small trash cans, or helping with dusting.
- Ages 4-5: Setting the table, making their bed, or sorting laundry.
Make the chore chart colorful and engaging—stickers, stars, or even small rewards can keep them motivated. Just think of it as a game; kids thrive on positive reinforcement and fun!
Plan Family Outings
Let’s face it, summer is the perfect time for family adventures. Planning outings not only breaks the monotony but also creates cherished memories.
You might want to consider:
- Nature Walks: Visit local parks and nature reserves. It’s a chance for exploration and free play.
- Beach Days: Pack your beach essentials, and let the kids dig in the sand.
- Museum Visits: Check out your local children’s museum. Many offer special summer programs.
Always keep the unexpected in mind! Weather can change your plans. Having a few backup indoor activities (like viewing fun educational shows or providing group crafts) can come in handy if our outdoor adventures get rained out.
Incorporate Learning
Let’s be honest—summer learning loss is real. To keep our kids engaged, I love blending fun with learning.
Reading Time: Create a mini library at home with books appropriate for their reading level (there are countless resources online for great summer reading lists!).
Learning Apps: There are tons of educational apps available that offer fun games. Choose ones that focus on math, reading, or science.
Cooking Together: Involve your kids in meal prep, teaching them basic cooking skills while keeping it fun (and delicious!). Try making healthy snacks together. For more ideas on family-friendly snacks, check out this great list of snack ideas.
Foster Independence
Here’s a tough love moment: our kids need to learn independence, especially as they grow. Summer is the perfect time to delve into that.
- Playdates: Encourage kids to play with friends without hovering.
- Quiet Time Alone: Set them up in a safe area where they can engage in independent play. It gives you a breather and helps them develop creative thinking.
- Encourage Decision Making: Allow them to choose some of their activities or what to wear. This gives them a sense of control and responsibility.
You’re not alone in this journey, and you might find that creating caring independence can lead to less stress for everyone involved.
Develop a Reward System
Kids love rewards, and positive reinforcement makes everything feel like a fun game. Think sticker charts for chores, or even a “Summer Fun Jar” where they get to draw a fun activity or outing for completing their tasks.
- Weekly Goals: Set simple, achievable goals—like being kind or completing chores on time.
- Creative Rewards: Offer fun rewards like a family movie night or letting them pick dinner one night.
This kind of structure keeps the kids motivated and engaged, plus it feels rewarding for you as a parent.
Conclusion
Creating an organized summer doesn’t mean you need to stick to rigid schedules or eliminate spontaneity. It’s about finding a balance that brings joy to your days while minimizing stress. By implementing these strategies—like establishing a weekly schedule, creating adventure kits, and fostering independence—you’ll set the stage for a summer filled with laughter, learning, and a lot less chaos.
Do bear in mind that every family is unique, so adapt these ideas to fit your family’s needs. And if you’re looking for additional organization tips, check out Let’s Get Organized! by Hi Sugarplum! or consider printing a simple chart like the one illustrated in Let’s Get Organized: Babysitter Printout. Lastly, you can take a look at Let’s get Organized! for more fabulous ideas tailored to your family’s needs.
Let’s embrace a summer filled with joy, creativity, and organization—we’ve got this!
Epic Kid Rooms That Inspire with Alphadorable Custom Nursery Decor
Imagine walking into your child’s room and being greeted by a burst of color, creativity, and inspiration. Sounds fun, right? We all want to create that magical space for our little ones where they can grow, play, and let their imaginations run wild. But how do you turn that dream into reality? Whether you’re setting up a nursery or redesigning a toddler’s retreat, the right decor can make all the difference.
Here’s the thing—we want our kids’ rooms to reflect their personalities while also being practical for everyday use. The good news? There are some truly epic ideas out there to get you inspired! I’ve rounded up some of the most fantastic children’s rooms that not only look stunning but also embrace functionality and creativity. So, grab your favorite cup of tea (or coffee—we know how important that is for us parents) and let’s dive into these six epic kid’s room designs.
The Themed Adventure Zone
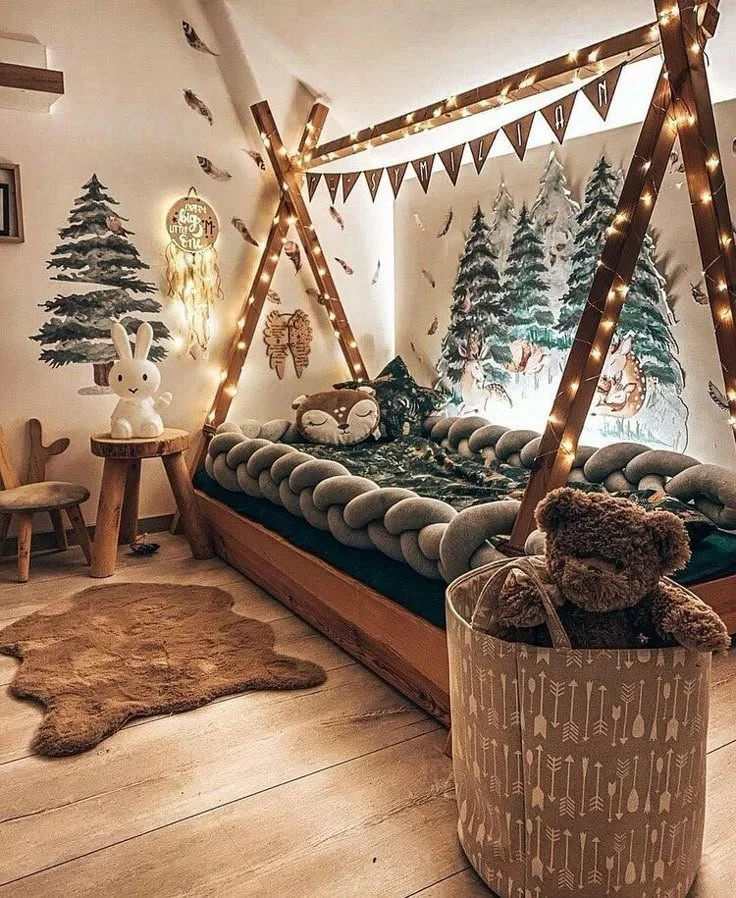
Picture this: a room designed like an enchanting forest. Trees are painted on the walls, there’s a cozy nook that resembles a treehouse, and the bedding features adorable woodland creatures. This kind of themed adventure zone can spark your child’s imagination. For instance, you can hang custom nursery art adorned with animals or nature scenes that bring the outside in.
Creating a themed room doesn’t just make it visually appealing; it also provides an environment that encourages imaginative play. If your child loves the outdoors, consider themes that resonate with their interests, like marine life or outer space. Enlightened parents know that personal touches—like their favorite books or toys integrated into the decor—can make a tremendous difference. You’re not just decorating a room; you’re constructing a narrative that your child can live out every day!
Bright and Whimsical
When it comes to color, you can never go wrong with cheerful and bright hues. A rainbow-themed room, for example, can create an uplifting atmosphere. Think vivid wall colors, a colorful rug, and fun wall decals. This way, the space feels alive. You might even incorporate some personalized name wall vinyl sticker decals in complementary colors that can really tie the room together.
Now, you might be wondering how to keep things from becoming too overwhelming. While vibrant colors can energize a space, balance is crucial. Instead of splashing every wall with bold colors, consider accent walls or unique decor elements that add variety without chaos. Keeping the furniture and large items more neutral allows those bright colors to stand out without becoming visually exhausting.
Cozy Reading Nook
Let’s be honest—every kid needs a cozy corner to curl up with their favorite books. Designing a reading nook in your child’s room can encourage a love of reading from an early age. You can use a teepee tent or a cushy bean bag surrounded by shelves filled with books. I personally love the idea of creating a small gallery wall with framed page extracts or quotes from children’s literature to add a literary flair.
What if you don’t have a lot of space? No problem! Even a corner with a cute little chair and some cushions can serve as a reading haven. Adding a decorative lamp can also enhance the coziness, making it a perfect little hideaway for your child during storytime or quiet hours.
Bold Wall Murals
Now, let’s talk about making a statement with wall murals. Imagine having an entire wall dedicated to a giant, colorful mural of their favorite cartoon character or a fantastical landscape. It sounds exciting, right? Murals can instantly elevate the decor, transforming any room into a captivating world.
Thinking about murals can also lead to some eco-friendly options. If you’re concerned about repainting as your child grows, removable wall decals could be a less permanent option. This way, as your little one’s tastes change—because we know how quickly that can happen—you won’t be left with a mural of a character they’ve outgrown.
Functional and Stylish Storage Solutions
We’ve all been there, digging through piles of toys to find that one elusive stuffed animal. A well-organized room is a happy room, and that’s where creative storage solutions come in. Stylish storage options can help keep clutter at bay while adding to the room’s aesthetic.
You can use woven baskets for toys, a decorative trunk at the foot of the bed, or even whimsical shelves that make organizing fun. Consider teaching your kids to pick up after playtime with labeled bins—it’s a great life skill and helps promote a sense of responsibility. Trust me; they’ll thank you later when they’re able to find their favorite puzzle or building blocks without a fuss.
Interactive Art Spaces
Imagine having a dedicated wall or space in your child’s room specifically for their artistic endeavors. Having an interactive art wall not only invokes creativity but also gives them a sense of ownership over their space. You can use chalkboard paint or a magnetic board for a place where they can express themselves.
Encouraging creative expression through art fosters your child’s development and emotional growth. It makes the room feel more alive and personalized. Just think about how exciting it would be for them to get to change their art on display whenever they want!
Conclusion
Creating a magical space for your little one doesn’t have to be an overwhelming task. These epic kids’ room ideas are designed to inspire creativity, playfulness, and warmth. Remember, every child is unique, so don’t hesitate to integrate their interests and personality into the décor.
For additional inspiration, check out 6 of the Most Epic Kid’s Rooms. If you’re looking to explore the latest trends in nursery decor, you might want to see what’s hot with the best-selling new & future releases in Nursery Wall Décor. And don’t forget to personalize their space with stylish elements like Personalized Name Wall Vinyl Sticker Decal that beautifully integrates with their room’s theme.
So, as you embark on this design journey, remember that what truly matters is creating a space where your child feels loved and inspired every single day. You’ve got this, and their joyful reaction will make every effort worthwhile!
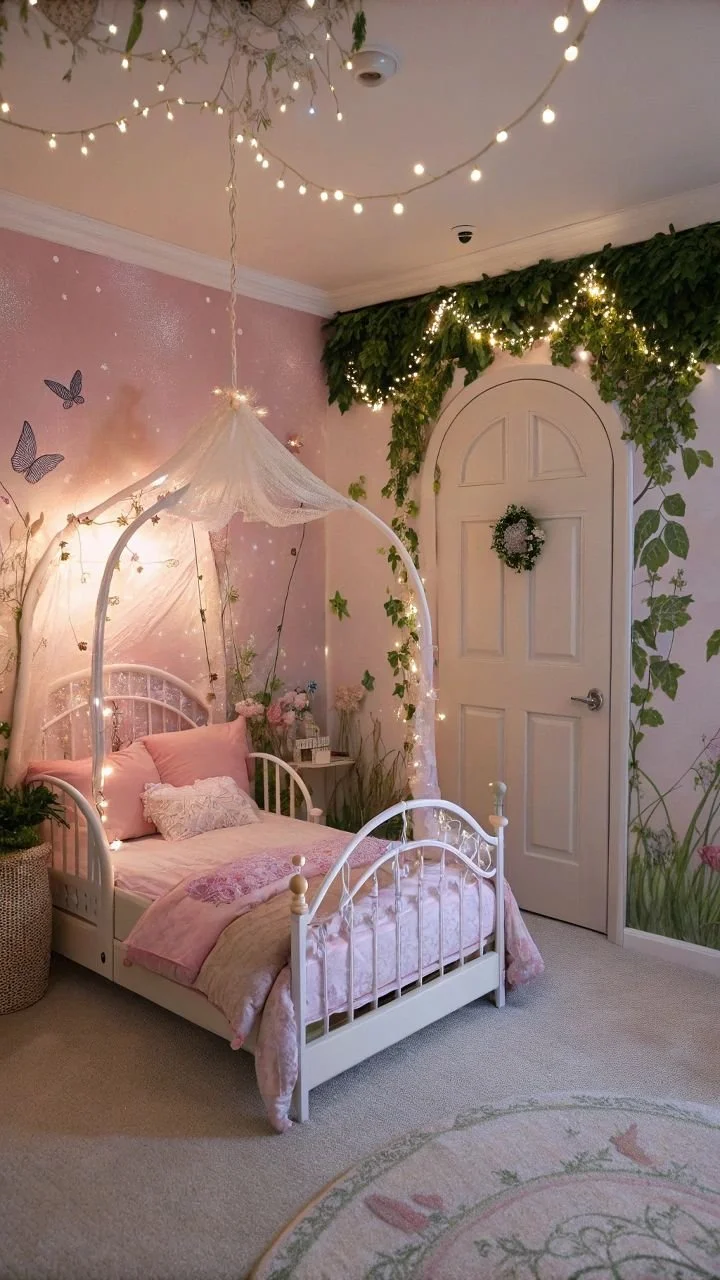
Magical Baby Bedroom Ideas for Cozy Kids Rooms That Spark Joy
Imagine stepping into a room filled with soft colors and whimsical designs, where every corner seems to whisper joy and creativity. That’s what you want for your little one’s space, right? We’ve all been there, dreaming of the perfect nursery or toddler room that feels cozy, organized, and just downright magical. Honestly, it can sometimes feel overwhelming to find the right décor that combines charm, playfulness, and functionality. But fear not! Let’s dive into how you can transform your baby’s space into a delightful haven with charming wall decor, playful colors, and clever layouts that are so kid-friendly, you might just feel the urge to leap into it yourself.
The Power of Dreamy Wallpapers
When it comes to setting the tone of a room, nothing quite captures a child’s imagination like a beautifully designed wallpaper. Picture this: You walk into a room where the walls are adorned with soft pastels or vibrant, playful patterns that transport you to a world of fun and adventure. From clouds and stars to animals and fairy tales, the options are practically endless. Here’s the thing — wallpapers don’t just enhance visual appeal; they also spark creativity.
Consider these ideas:
Nature-Inspired Themes: Think enchanting forests, dancing butterflies, or even serene beaches. Nature-themed wallpapers can create a calming effect while inspiring your little explorer’s imagination.
Interactive Designs: Some wallpapers include elements that children can engage with, like chalkboard walls or removable stickers. This allows for play and creativity without damaging the decor.
Mix and Match Patterns: Don’t feel restricted to one pattern. If you love a floral design, consider pairing it with a striped or polka-dotted accent. Just remember to keep a balance so the room doesn’t become overwhelming.
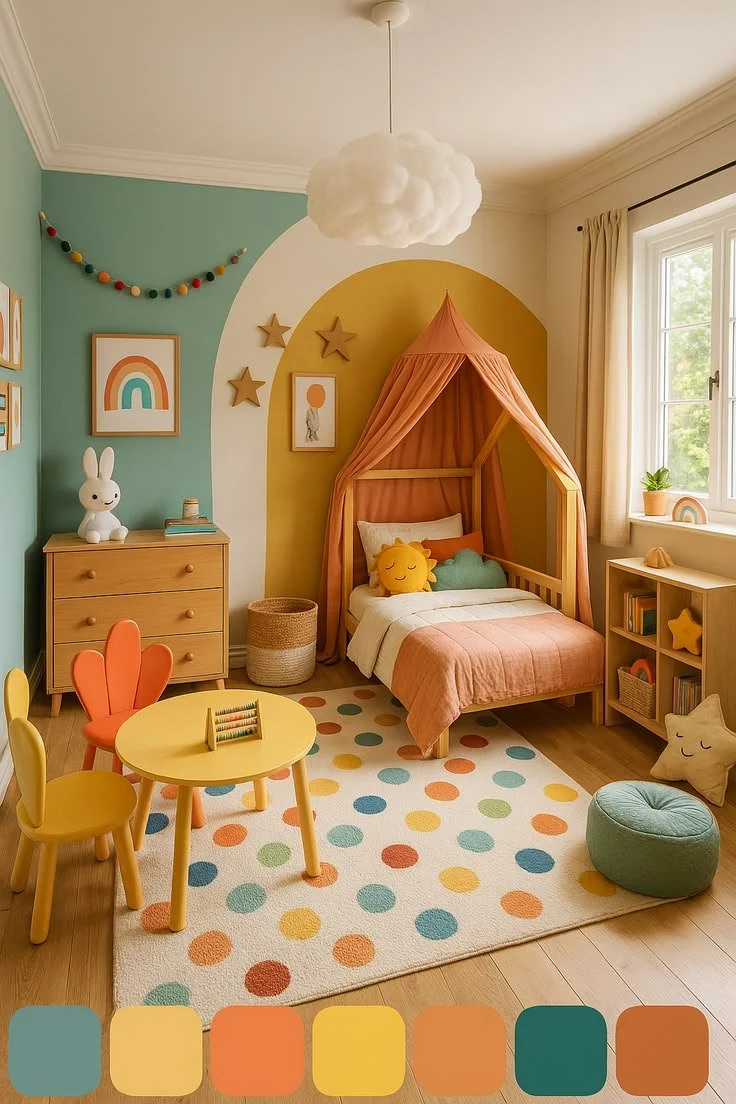
Embracing Playful Colors for Joyful Vibes
Now, let’s chat about color. It’s amazing how much a splash of color can change the mood of a room. For our little ones, bright and playful colors can invigorate their spirit and foster a sense of joy. However, it’s important to find a balance. Too much brightness can be overstimulating.
Here are some tips for choosing colors:
Soft Pastels for Tranquility: If you prefer a serene environment, softer shades like mint green, blush pink, or lavender can provide a calm backdrop for your child’s activities.
Bold Accents for Pops of Fun: While a neutral base offers calm, consider adding bold-colored elements through furniture, accessories, or even a feature wall. Think of a bright yellow bookshelf or a fun red toy chest.
Combining Colors Wisely: Use the 60-30-10 rule — 60% of the room in a primary color, 30% in a secondary color, and 10% for accents. So, your walls might be a soft color, your bedding could be in a contrasting hue, and your playful accessories (like stuffed animals or pillows) can bring in that third pop.
Remember, your child’s mood can be influenced by color, and what they see around them contributes to their overall development. So why not make it vibrant and engaging?
Clever Kid-Friendly Layouts
Let’s be honest — kid spaces can quickly turn from a cozy hideaway to a chaotic jungle. Keeping it organized while ensuring it feels spacious and inviting is key. Have you ever built a fort with couch cushions? That kind of imaginative play needs space, and a well-thought-out layout can encourage creativity.
Try these layout strategies:
Create Zones for Activities: Designate specific areas for different activities. For instance, a corner with soft cushions and a small bookshelf can become a reading nook, while another area with a mini table could be perfect for arts and crafts.
Choose Multi-Functional Furniture: Look for furniture that does double duty. A storage ottoman can serve as seating and hide toys, while a crib that converts into a toddler bed will last for years.
Opt for American Floor Plan: An open layout can invite light and give the illusion of space. Arrange furniture to ensure easy movement, like keeping crates or storage boxes at arm’s reach for toy clean-up.
Soft Lighting for a Cozy Atmosphere
Lighting plays a crucial role in how a room feels. Imagine walking into your child’s room on a warm evening — gentle light filters in, creating a soft, cozy atmosphere. That’s what you want.
Incorporate Dimmer Switches: These can help manage the intensity of light, allowing you to create a soothing ambiance for storytime or a magical space for their little adventures.
Layer Your Lights: Combine overhead lighting with floor lamps or wall sconces, perhaps with whimsical designs that fit the charm of the room.
Use Fairy Lights or Night Lamps: Soft night lights or fairy lights can add a touch of whimsy. Hang them in a way that creates a canopy effect above the bed, inviting your child into their little escape.
Functional Storage Solutions
With all the fun that comes with kids, let’s be real — keeping things tidy can sometimes feel like a full-time job. But with clever storage solutions, organizing can be a breeze.
Utilize Vertical Space: High shelves can hold toys that are not frequently used. Remember, out of sight, out of mind. Leave more accessible areas for daily use toys to encourage your child to help with tidying up.
Clear Bins for Visibility: Choose storage bins that are transparent or labeled. This way, your little one can spot their favorite toys without unnecessary mess.
DIY Storage Options: If you’re feeling crafty, why not transform an old dresser into an art station or repurpose shoe organizers for art supplies? It’s a fun project that keeps things tidy and can even allow your child to personalize their storage!
Quick Tips and Mom Hacks
Here are some bite-sized gems to keep in mind as you embark on this transformation journey:
Involve Your Child: Ask your little one what themes or colors they love. It’s their space, after all!
Switch It Up Seasonally: Just like outfits, rooms can have a seasonal change, bringing in accents related to fall, winter, spring, or summer.
Create a Rotation System for Toys: Limit the toys accessible to your child to encourage creativity. Rotate them every few weeks — it’s like a brand-new surprise!
Use Art as Decor: Frame your child’s art. It’s inexpensive but adds a genuinely personal touch to their space.
Seamless Clean-Up: Make it a game! Turn organizing into a fun activity. Tossing toys into the bins within a time limit can be thrilling.
Conclusion
Creating your child’s dream space might feel overwhelming at times, but with charming wall decor, playful colors, functional layouts, and a sprinkle of imagination, it all starts to come together beautifully. Remember, you are crafting not just a room but a nurturing environment that will support their growth, creativity, and learning.
By transforming their space, you’re creating a joyful and organized atmosphere that really inspires. If you’re looking for specific ideas to kickstart your decorating journey, check out these resources: adorable nursery wall art, ways to create a cozy reading corner, and an inspiring modern bedroom makeover.
So go ahead, unleash your creativity, and enjoy this beautiful process of creating a magical space for your little one!

Delicious Back-to-School Lunch Recipes Your Kids Will Love
Fun and Filling Lunchbox Recipes for School
Imagine this: it’s the first week of school, and your little one is bursting with excitement, ready to see their friends and dive back into learning. But there’s one challenge you face—lunches. You know how important it is to pack something that not only fuels them but also makes them smile. Let’s be honest, packing the same old sandwich can get pretty dull. You want to create lunches that are fun, colorful, and most importantly, totally lunchbox-approved.
We’ve all been there—frantically searching for ideas that will satisfy picky eaters while keeping the prep work manageable for those busy weekday mornings. That’s why I’m thrilled to share a collection of 29 back-to-school lunch recipes. Whether your child loves sweet or savory, there’s something here for every appetite. And trust me, they’ll be the talk of the cafeteria with these delicious options.
Colorful Wraps
Rainbow Veggie Wraps
Picture this: vibrant bell peppers, fresh spinach, and sweet carrots all rolled up in a whole wheat tortilla. A spread of cream cheese or hummus adds a tasty touch. Your little one won’t even realize they’re eating veggies!Turkey and Spinach Pinwheels
This one’s super easy to prepare. Just spread some cream cheese on a tortilla, layer with turkey and spinach, roll it up, and slice. These pinwheels look great and taste even better!Fruit and Nut Butter Wraps
A soft tortilla spread with your favorite nut butter, filled with sliced bananas and strawberries, rolled tight, and cut into bite-sized pieces. It’s like a smoothie, but in wrap form!
Fun Bento Box Ideas
Mini Quiches
Bake mini quiches in muffin tins filled with cheese, vegetables, and any leftover meats. They’re easy to pack, and you can mix and match ingredients for variety.Sushi Rolls without Raw Fish
Create your own sushi rolls using rice, avocado, and cucumber wrapped in seaweed. It’s a fantastic way to introduce fun flavors without the fuss of traditional sushi.Mini Pita Pockets
Fill mini pitas with chicken salad or falafel. Add some grape tomatoes on the side, and voilà—healthy, bite-sized goodness ready to go.
Sweet Treats
Yogurt Parfaits
Layer yogurt with granola and your child’s favorite fruits in a container. Not only does it look beautiful, but it’s a delicious treat that feels a bit like dessert.Homemade Trail Mix
Mix nuts, seeds, dried fruits, and a few chocolate chips. Kids love this customizable treat, and it’s easy to throw together.Banana Muffins
Whip up a batch of banana muffins over the weekend. They make a great side snack for any lunchbox, and they’re a perfect way to use overripe bananas!
Savory Goodness
Baked Chicken Nuggets
You can even make them ahead of time and freeze them! Serve with a side of sweet potato fries and some dipping sauce.Vegetable Fried Rice
This is a great way to use up leftover rice and vegetables. Toss them together in a skillet with some egg for protein, and you have a warm, filling dish.Cheesy Quesadillas
Cheese and beans packed into a tortilla and grilled until toasty. Slice and serve with salsa for a crowd-pleaser that’ll have your kid begging for more.
Quick and Easy Favorites
Peanut Butter and Jelly Sushi
Flatten slices of bread, spread peanut butter and jelly, roll them up, and slice into bite-sized pieces. It’s a twist on a classic that kids find exciting!Cottage Cheese Cups
Pair cottage cheese with diced fruits or veggies for a protein-packed option that kids can personalize.Grilled Cheese Bites
Instead of a full sandwich, cut grilled cheese into small squares. Pair with tomato soup in a thermos, and it’s a hit!
Seasonal Celebrations
Caprese Skewers
Thread cherry tomatoes, mozzarella balls, and basil leaves onto skewers for a fresh, bite-sized treat that’s packed with flavor.Sweet Potato and Black Bean Bowl
Combine roasted sweet potatoes, black beans, and a sprinkle of cheese in a reusable container. It’s nutritious, filling, and tastes great cold.Zucchini Fritters
Grate zucchini, mix it with eggs, and a bit of flour for a healthy fritter that’s easy to make and freeze. Your kids will love them!
For Picky Eaters
Veggie Sticks and Dip
An assortment of colorful veggies like carrots, cucumbers, and bell peppers served with hummus or ranch dressing. Sometimes simplicity is key!Egg Muffins
Combine eggs with your child’s favorite ingredients (think cheese, diced ham, or even spinach) and bake them in muffin tins. This mini breakfast is great for lunch too.Pasta Salad
Cooked pasta mixed with olives, cherry tomatoes, and some Italian dressing. Make it a bit jazzy by adding mini pepperoni or cheese cubes.
Make it Special
Cheeseburger Sliders
Small sliders with cheeseburger patties, perfect for tiny appetites. Pack with a little side of pickles for an extra kick.Fruit Kabobs
Skewer an assortment of fruits on wooden sticks for a colorful lunchbox treat that feels like fun on a stick!Homemade Pizza Rolls
Roll dough filled with cheese and pepperoni (or veggies) and bake for delicious pizza bites that are easy to eat on the go.
Treats to Share
Chocolate Dipped Pretzels
A sweet and salty snack that’s perfect for lunch. Kids love them as a treat, and they’re super easy to make!Energy Balls
Combine oats, honey, peanut butter, and chocolate chips in a bowl. Roll them into balls for a quick energy boost that’s great for snack time.Frozen Yogurt Bark
Spread yogurt on a parchment-lined baking tray, sprinkle with fruits and nuts, freeze, and then break into pieces. It’s a refreshing treat for warm days!
Sustainability
Leftover Frittata
Make use of last night’s dinner by turning leftovers into a frittata. Your kids won’t even notice they’re eating veggies when it’s served this way!Bento Box Leftovers
Don’t discard those dinner leftovers; pack a small portion into a bento box. Kids are often excited when they see their favorite dinner repurposed into lunch!
Quick Tips for Packing Lunches
Prep Ahead: Use weekends to prep fruits, cut veggies, or bake snacks, making mornings less hectic.
Mix It Up: Rotate lunches weekly to keep things exciting. Even small tweaks can make a big difference.
Involve Your Kids: Let them choose what they’ll have for lunch. They’ll be more excited to eat what they helped create.
Conclusion
As we gear up for another school year, it’s the perfect time to rethink our lunch packing strategies. These 29 back-to-school lunch recipes can make lunchtime more enjoyable for everyone. Remember, it’s about nourishing our little ones while also making meals an adventure. If you’re looking for even more inspiration, you might find ideas in sources like 29 New Lunchbox Ideas, or check out Back to School Lunchbox Ideas for additional inspiration. Lastly, for healthy options, explore this collection of Child-friendly Back to School Healthy Lunch Ideas. Let’s make this school year the best one yet!
Budget-Friendly Baby Nursery Theme Ideas for a Cozy, Dreamy Space
Imagine it’s the end of a long day, and you finally sit down to think about the nursery for your soon-to-arrive little one. You’ve sifted through countless Pinterest boards, dreaming of whimsy, charm, and that perfect cozy vibe. But then the reality sinks in — you don’t want to break the bank pulling it all together. Sound familiar? Don’t worry, you’re not alone in this hunt for budget-friendly nursery ideas that still pack a punch of personality.
Let’s dive into some dreamy nursery themes that bring comfort and charm without making your wallet weep. Here are 11 affordable baby nursery room themes you can easily achieve and create a cozy, inviting space for your little one.
Whimsical Woodland Wonder
What if I told you that a woodland-themed nursery could evoke a sense of tranquility and adventure? Think soft greens, gentle browns, and reminders of nature all around.
- Decor Elements: Use tree decals, plush woodland animals, and earthy fabrics.
- DIY Projects: Consider crafting your own art using twigs, leaves, and even moss. A handmade mobile featuring cute critters can rotate serenely above the crib.
By opting for natural materials and playful designs, you can create a nursery that feels both fresh and serene — perfect for those sleepyhead days.
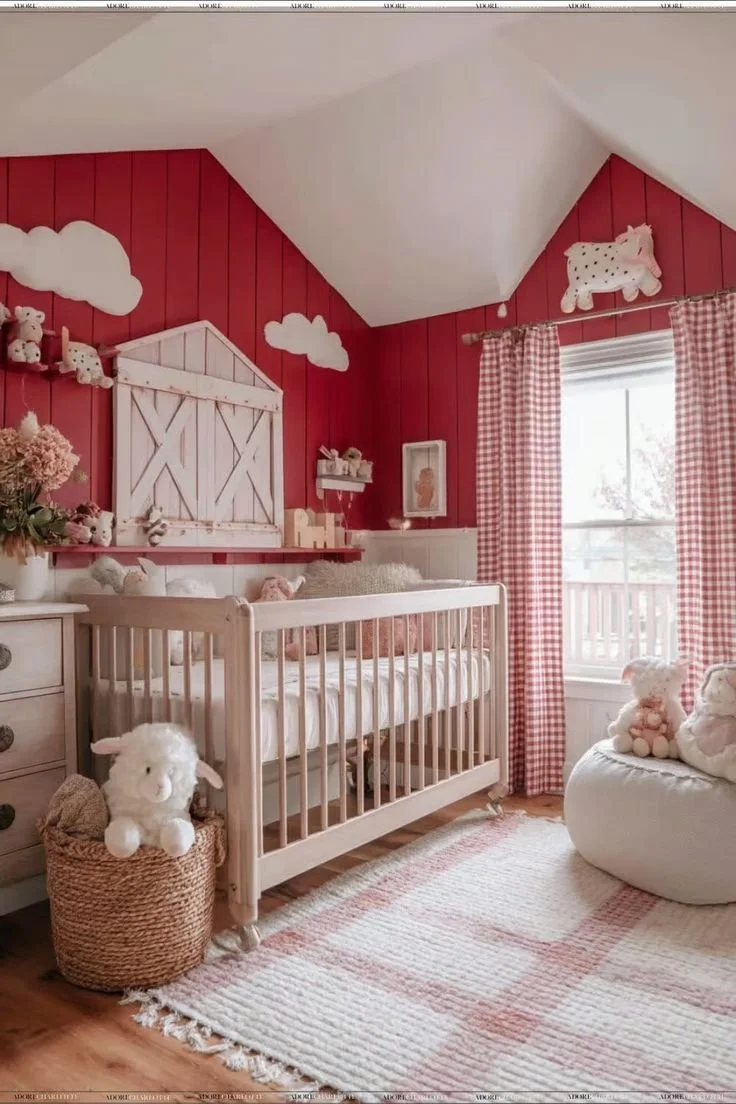
Vintage Charm
Retro aesthetics can create a sense of nostalgia paired with modern sensibilities. Picture pastel colors, floral patterns, and classic toys.
- Decor Ideas: Scour thrift stores for vintage frames and toys. Consider a vintage crib that adds character instead of cost.
- Fabrics: Use retro prints for curtains or bedding that reflect the charm of yesteryears.
This theme speaks to those who love a touch of the old with their new.
Under the Sea
Bring the magic of the ocean into your baby’s room without spending a fortune.
- Color Palette: Soft blues, corals, and sandy tones can give your nursery an underwater vibe.
- Accessories: Add fish-themed mobile DIYs and wall art made from recycled paper for a playful touch.
Consider a few simple marine elements, and your nursery can become a gentle underwater haven.
Cozy Bohemian
For the free-spirited parent, a bohemian nursery is perfect for embracing warmth, layered textures, and eclectic charm.
- Textiles: Layer rugs, hang drapery, and choose comfy cushions.
- Decor Items: Mix and match plants, feathers, and dreamcatchers.
You can often find inexpensive items at local markets or even online that align beautifully with the bohemian aesthetic.
Playful Primaries
Why not rotate around bright primary colors for a fun, stimulating nursery?
- Walls: Paint one wall in a bold primary shade — red, blue, or yellow will do perfectly!
- Fun Decor: Opt for colorful furniture and bold art pieces to tie the theme together.
With lots of striking colors and interactive items, your little one will find endless joy in every nook.
Travel Adventures
How special would it be to inspire wanderlust from day one?
- Decor Ideas: Use maps, globes, and travel-themed prints as wall decor. You can even pick a few countries to highlight on your map — your child’s future destinations!
- Textiles: Incorporate luggage or travel-themed elements in fabric prints.
This theme not only personalizes the space but sets the stage for future adventures together.
Magical Fairytales
What if your little one’s nursery was a gateway to another world? Fairy tales offer endless opportunities for creativity.
- Decor Ideas: Use storybook illustrations, enchanting color palettes, and twinkling lights.
- DIY Touches: Create story-themed corners or murals of favorite characters, igniting imagination.
With a sprinkle of magic, you’ll have a dreamy, fairytale-inspired nursery.
Sleek Scandinavian
The minimalist Scandinavian style emphasizes simplicity and functionality while creating a soothing atmosphere.
- Color Palette: Focus on soft, neutral shades complemented by warm woods.
- Decor Essentials: Use clean lines, functional furniture, and natural accents to create a clutter-free space.
This look is not just chic; it’s also practical, making it a hit among parents.
Adorable Animal Safari
Safari-themed nurseries are inviting and playful, creating an enchanting environment.
- Decor Elements: Wall decals of animals, safari-themed toys, and plush cushions add a cozy vibe.
- DIY Projects: Craft art pieces that feature your child’s favorite animals.
This theme can transport you and your baby to a world of adventure right from the comfort of home.
Serene Spa Retreat
Creating a calming atmosphere is essential, especially during those late-night feeds and diaper changes.
- Color Choices: Soft pastels or earthy tones can promote relaxation.
- Accessories: Incorporate scented elements like lavender or chamomile for soothing vibes.
Imagine a space that not only cradles your baby but calms your mind.
Practical Tips for a Budget-Friendly Nursery
Now, as you embark on your nursery journey, remember a few practical tips that can save your budget while bringing charm:
- DIY Projects: Embrace your craftside; simple DIY wall art can transform the room at minimal cost.
- Swap Items: Consider swapping decor pieces with friends who also have babies, which can provide fresh styles without the expense.
- Sales and Thrift Stores: Shop during sales or explore thrift shops for unique additions.
Conclusion
Creating a dreamy nursery on a budget is entirely achievable! By mixing and matching these affordable themes and incorporating your unique flair, you can craft a space filled with warmth, joy, and personality. Whether you lean toward elegant bohemian touches or opt for playful primary colors, there’s no one-size-fits-all.
You might also want to check out more inspiration through styles like beautiful yellow nursery ideas, explore ideas to bring nature indoors with green themes, or if you’re loving the outdoors, discover rustic woodland elements. Enjoy the journey of designing your little one’s space; the love that fills the room is what truly makes it magical!
