
Dump-and-Go Crockpot Dinners Kids Actually Eat and Love Every Bite
Imagine this: It’s 5 PM after a long day of work, playdates, and endless toddler negotiations. You walk into the house, tired and frazzled, only to be greeted by kids who are more than a little hangry. Sound familiar? You’re not alone in this struggle, and that’s where the magic of the crockpot comes in!
Crockpot meals are a lifesaver, especially for busy parents navigating the unpredictable world of picky eaters. The beauty of these dump-and-go slow cooker meals is in their simplicity. You toss in the ingredients, set it, and forget it. By dinnertime, you’ll have a delicious meal that your kids will actually request—yes, you heard that right!
Let’s explore some easy family dinners that not only require minimal prep but also pack maximum flavor. I can’t wait to share some kid-approved recipes that might just become staples in your home.
The Allure of Crockpot Cooking
Have you ever stopped to think about how many parents are in the same boat as you? We’ve all been there, trying to juggle dinner preparation while managing tiny melt-downs and snack requests. The crockpot transforms what can be a chaotic dinner time into a more serene experience. You can finally enjoy sitting down together as a family without the stress of last-minute cooking.
The Win-Win of Slow Cooker Meals
Here’s the thing: slow cooker meals are a huge win for both parents and kids. With just a little planning, you can create a variety of meals that appeal to even the pickiest of eaters. When we think about curating meals that are not just nutritious but also tasty, slow cookers allow us to enhance flavors in a way that is simply unbeatable.
You might be wondering how to choose the right recipes. Well, let’s dive into some fantastic options that your little ones will love.
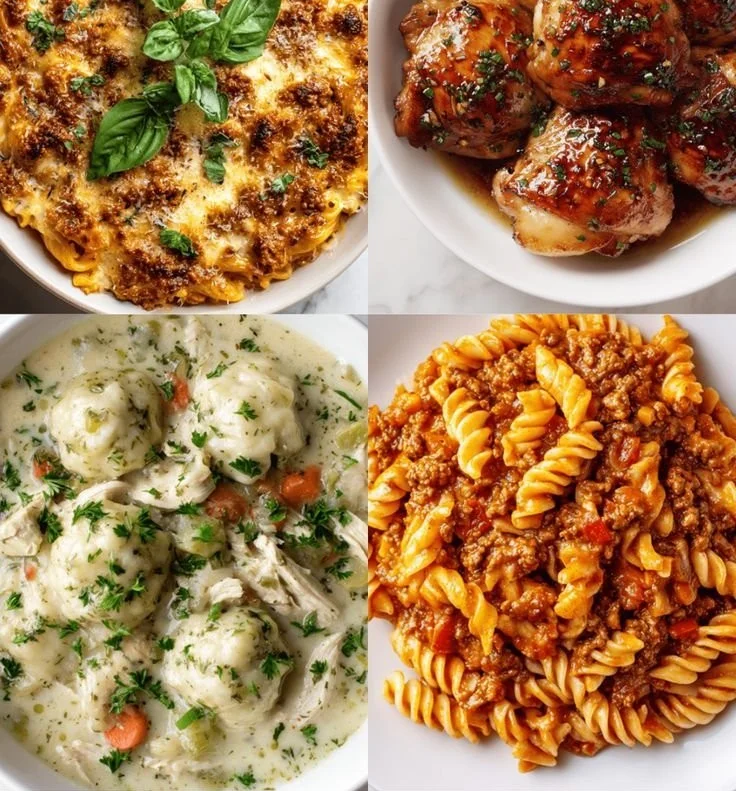
Kid-Approved Crockpot Recipes
1. Cheesy Chicken and Rice
Picture this: creamy, cheesy goodness enveloping tender chicken and fluffy rice. This dish is a no-brainer! Toss chicken breasts, cream of chicken soup, cheese, and rice into the crockpot. Cook on low for about 5-6 hours, and voilà! You’ve got a meal that your kids will devour.
2. Classic Beef Stew
Now, you might think beef stew is too hearty for kids, but trust me on this one. Little ones often love the tender meat and soft vegetables. Just mix beef chunks, carrots, potatoes, and your choice of broth. Imagine coming home to a warm, inviting smell that has everyone eager for a taste!
3. Meatball Subs
Make homemade or store-bought meatballs and toss them in marinara sauce. Serve them on soft bread rolls topped with cheese. It’s like a party in your mouth, and your kids will be asking for seconds—this is a fun way to introduce them to new flavors!
4. Taco Chili
Here’s a dish to spark joy in any household. Mix ground turkey, beans, corn, and taco seasoning for a hearty chili. Serve it with toppings like cheese, sour cream, and maybe even some avocado slices for an extra treat. You’ll be pleasantly surprised at how quickly your kids take to it!
5. BBQ Pulled Pork
Who doesn’t love BBQ? This dish is as easy as can be! Place a pork roast in the slow cooker, cover it with BBQ sauce, and let it work its magic for 8 hours on low. Shred the pork and serve it on buns with coleslaw. Instant hit!
6. Vegetable Soup
If your child is a little hesitant about veggies, this soup is a game changer. Throw in any vegetables you have on hand along with some broth and spices. It’s oh-so-simple and a great way to sneak in those nutrients. Add a side of grilled cheese, and you’re golden.
7. Sweet and Sour Chicken
Take a page from takeout menus and whip up a sweet and sour chicken meal. Just combine chicken pieces, pineapple, bell peppers, and sweet and sour sauce in the crockpot. Serve with rice and watch as your kids dive in!
8. Breakfast for Dinner
How about some breakfast for dinner? Toss eggs, sausage, cheese, and diced veggies into the slow cooker for a filling frittata. It’s perfect for those who love all-day breakfast vibes, and your kids will be thrilled by the fun twist!
9. Chicken Tacos
Another taco-inspired creation that’s easy to pull together. Simply season chicken breasts with taco seasoning, add salsa, and let the crockpot do its thing. When ready, shred the chicken and serve in taco shells with all their favorite toppings.
10. Apples and Cinnamon Oatmeal
Let’s not forget about dessert! Make oatmeal in your slow cooker by combining oats, diced apples, and cinnamon. This sweet dish can be enjoyed at breakfast or as an evening treat, something your kids will definitely request again and again.
Tips for Crockpot Success
To truly make the most out of your crockpot, keep these tips in mind:
Prep Ahead: Chop up ingredients the night before. Trust me; it saves you time in the morning!
Layer Wisely: Place denser vegetables at the bottom and proteins on top to ensure everything cooks evenly.
Use Quality Ingredients: Fresh veggies and quality meats make all the difference in flavor.
Adjust Seasonings: Sometimes, it’s about the little tweaks. Don’t hesitate to add spices or herbs at the end to bring out those flavor profiles.
Explore Freeze-Ahead Meals: Consider preparing meals in freezer bags, then defrosting and dumping them in the crockpot. It’s efficient and doubles as a time-saver on hectic evenings!
Mistakes to Avoid
While crockpot cooking is generally foolproof, here are some common pitfalls to sidestep:
Overfilling the Crockpot: Too much food can lead to uneven cooking. Stick to guidelines based on your crockpot’s size.
Ignoring Cooking Times: Set a timer and resist the urge to keep the lid off too much. Keeping the lid on helps things cook properly.
Not Browning Meat: While it’s not always necessary, browning meat beforehand can add depth of flavor to certain recipes. A little effort goes a long way!
Conclusion
Crockpots are a parent’s best-kept secret for easy, kid-approved meals. They’re the ultimate time-savers that deliver comfort food with minimal effort. So the next time you’re feeling the weight of dinner prep, remember that you have a trusty crockpot at your fingertips!
By incorporating some of these simple yet delicious recipes into your weekly meal plan, you’re setting yourself up for success. For more ideas, check out kid-friendly slow cooker recipes or consider these actually easy freezer meals to keep the dinner stress levels down. You’ve got this, and your family will thank you for it!

Delicious Vegan Snacks for Busy Moms with Guilt-Free Goodness
Snack Smarter with These Vegan Snacks Made from Plant-Based Ingredients
Picture this: it’s 3 PM, and you’re in the midst of another busy day at home with your little ones. Everyone’s feeling that familiar grumble in their tummies. You dive into the pantry, hoping to find something that’s not only quick to grab but also healthy and satisfying. Sound familiar? We’ve all been there! As parents, we want the best for our kids, and that includes what they munch on between meals. So, let’s talk about snacks—delicious, nutritious vegan snacks that will not only satisfy those cravings but also keep your family fueled with good-for-you ingredients!
Now, you might be wondering what vegan snacks can really bring to the table. Aren’t they all boring and tasteless? Well, I’m excited to break that myth! When made from plant-based ingredients, snacks can be a burst of flavor while providing essential nutrients. Whether you’re at home, at work, or on the go, these vegan options are your ultimate companion for healthy munching.
The Benefits of Vegan Snacking
Snacking smart is all about making choices that keep you energized and your body happy. Embracing plant-based snacks can have numerous benefits, including:
- Rich in Nutrients: Most plant-based snacks are high in vitamins, minerals, and antioxidants. They can be beneficial for you and your kids’ wellbeing.
- Low in Processed Sugars: While some snacks are laden with refined sugars, many vegan options use fruits or natural sweeteners instead, keeping energy levels steady.
- Environmentally Friendly: Plant-based choices tend to have a lower carbon footprint compared to animal-derived products, which is great for our planet and future generations.
- Versatile and Flavorful: Vegan snacks can be savory, sweet, crunchy, or chewy. There’s something out there for every palate!
Delicious Vegan Snack Ideas
Now that we’re sold on the benefits, let’s dive into some of my favorite vegan snacks. I’m all about keeping things simple and realistic, so these options are great no matter if you’re at home with the kids, sneaking away to work, or heading out for a family outing.
Fruit-Infused Energy Balls
These little bites are packed with energy and super easy to make. Combine oats, nut butter, chia seeds, and any dried fruits you love. Roll them into bite-sized balls and keep them in the fridge. They’re perfect for before nap-time or after playtime!
Vegetable Chips
Love chips but want something healthier? Try making your own baked vegetable chips. Sweet potatoes, kale, or even zucchini can be sliced thin, lightly salted, and baked until crispy. They’re crunchy, flavorful, and a fabulous alternative to traditional chips.
Hummus and Veggies
This classic snack is a must-try! A scoop of hummus paired with colorful carrot sticks, cucumber slices, or bell pepper strips can make a wonderful afternoon crunch. Plus, it’s loaded with protein and fiber.
Nut and Seed Bars
Whip up a batch of homemade nut and seed bars, and you won’t regret it! They’re easy to make using oats, almonds, pumpkin seeds, and a dash of maple syrup for sweetness. Cut them into bars, and you’ve got a grab-and-go snack that’s both hearty and satisfying.
Avocado Toast Bites
Avocado toast isn’t just for brunch. Spread some mashed avocado on whole-grain crackers, sprinkle with herbs or chili flakes, and you’ve got a flavor-packed snack. The healthy fats in avocados are perfect for keeping little tummies full!
Energy-Boosting Smoothies
When you want something refreshing and filling, smoothies are a great choice. Blend up some spinach, banana, almond milk, and a spoonful of nut butter for a nutritious drink that your kids will love. Sneak in some flaxseeds for an extra boost!
Whole-Wheat Banana Muffins
Muffins can be a fantastic snack as long as they’re made right. Use whole-wheat flour, ripe bananas, and toss in some walnuts or chocolate chips for a treat. They’re easy to bake in bulk and freeze beautifully.
Berry Coconut Chia Pudding
Transform your chia seeds by mixing them with coconut milk and letting them sit overnight. Layer with fresh berries for an indulgent yet healthy parfait. It’s a delicious, creamy snack that feels like dessert.
Trail Mix
Create your own trail mix using a combination of nuts, seeds, and dried fruits. It’s perfectly portable, making it an ideal snack for family road trips or school-day lunches. Not to mention, you can control the ingredients and avoid any unwanted additives.
Rice Cakes with Nut Butter
Topping rice cakes with nut butter and sliced bananas or strawberries creates a quick, satisfying option. It offers a lovely crunch and a delightful mix of textures that’s appealing to both kids and adults.
Quick Tips for Smart Snacking
As we’re working toward being better snackers, here are a few quick hacks to make your life easier:
- Prep Ahead: Dedicate a little time each week to prepare snacks in advance. Portion out servings for grab-and-go convenience.
- Involve the Kids: Let your little ones help pick out fruits or mix ingredients. They’ll be more excited to eat snacks they helped create!
- Mindful Snacking: Encourage everyone to slow down and enjoy their snacks rather than munching mindlessly. It can turn snack time into a fun bonding moment.
- Stay Seasonal: Use seasonal fruits and vegetables to keep things fresh and delicious. The flavors change with the seasons!
Mistakes to Avoid
Before you take off to stock up on snacks, let’s chat about some common pitfalls to watch out for:
- Assuming all snacks labeled “vegan” are healthy: Just because something is vegan doesn’t mean it’s automatically a healthy option. Always check the labels for added sugars and preservatives.
- Neglecting portion control: Even the healthiest snacks can be overindulged. Keep portions in check, especially for calorie-dense nuts and seeds.
- Choosing convenience over nutrition: Pre-packaged vegan snacks can sometimes hide unhealthy ingredients. Aim for whole food snacks whenever possible.
FAQs About Vegan Snacking
Are vegan snacks suitable for toddlers?
Absolutely! Many vegan snacks can provide a solid introduction to a variety of flavors and textures. Just be sure to tailor them to your child’s chewing abilities.
What if my kids don’t like vegetables?
It happens! Experiment with different dips or toppings to make veggies more appealing. Sometimes, it just takes a few tries for kids to get used to new flavors.
How do I store homemade snacks?
Most homemade snacks store well in airtight containers in the fridge for about a week. Or you can freeze them for longer freshness.
Conclusion
In the world of parenting, finding healthy snacks for our little ones shouldn’t feel like the impossible task we often make it out to be. With these simple yet flavorful vegan options, you can elevate your family’s snacking game without sacrificing nutrition. Trust me, snack time will become something to look forward to.
So what are you waiting for? Grab those ingredients and get creative in the kitchen! For more insights on the rise of plant-based snacks, check out this article on the trend of vegan snacks. And if you’re looking for additional recipe ideas, be sure to check out these 8 healthy vegan meal ideas for some wholesome inspiration. Remember, you’re not alone in this journey—let’s snack smarter together!
Amazing Toddler Recipes To Make Together for Fun and Bonding
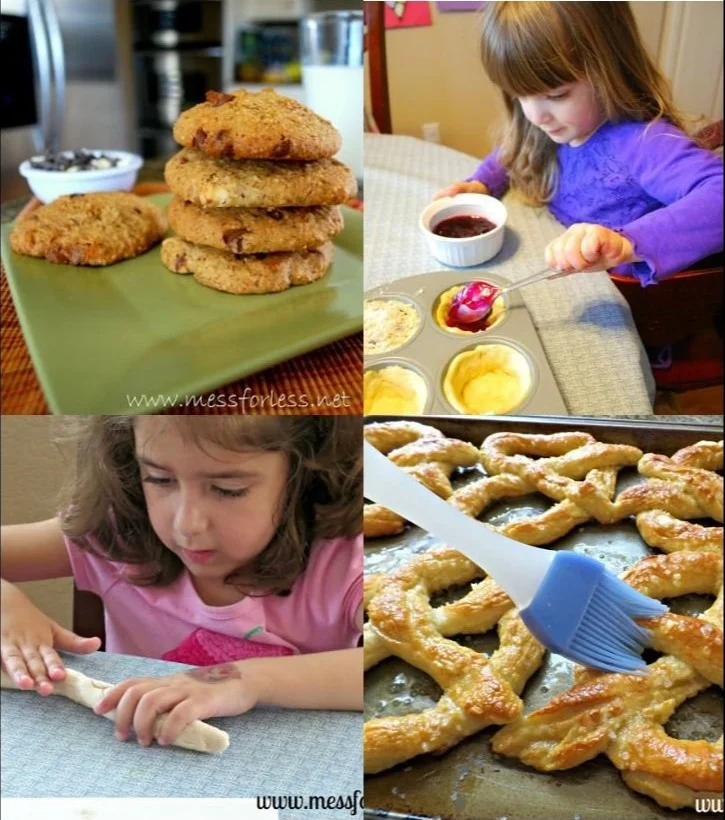
Imagine you’ve just returned home after a long day, and your little one is bursting with energy, ready to whip up something magical in the kitchen. It’s a scene we all know too well, right? Cooking with toddlers can be both a delight and a challenge. But here’s the thing—you don’t have to be a culinary wizard to cook up some fun and nutritious meals with your child. In fact, cooking together can be an incredible bonding experience, filled with laughter, learning, and of course, a bit of mess. So, if you’re ready to embrace the chaos and joy, let me share with you 15 fantastic toddler recipes perfect for making together.
Fun with Fruit Smoothies
Fruit smoothies are not only delicious but also a great way to sneak in some vitamins. Start by gathering your favorite fruits—bananas, berries, and spinach are all great options.
What You’ll Need:
- 1 banana
- 1 cup of mixed berries (fresh or frozen)
- 1 cup of spinach (optional)
- 1 cup of yogurt or milk
- Honey or maple syrup to taste (optional)
Directions:
- Let your toddler peel the banana (they’ll love this part!).
- Add all ingredients into the blender.
- Secure the lid and blend until smooth.
Now, you might be wondering—what if they don’t like spinach? Don’t worry, they can help pick out flavors and learn what they enjoy.
Colorful Veggie Pizza
Pizza making can be a wonderful way to get your toddler involved in the kitchen and teach them about different veggies.
What You’ll Need:
- Pre-made pizza dough or English muffins
- Tomato sauce
- Shredded cheese
- Colorful vegetables like bell peppers, mushrooms, and olives
Directions:
- Preheat your oven to 425°F (220°C).
- Spread the pizza sauce on the dough and allow your toddler to sprinkle cheese on top.
- Let them arrange the veggies as they see fit—encouraging creativity!
This recipe can lead to discussions about their favorite colors and shapes. And trust me, seeing their own creation will bring them tons of joy.
Easy Banana Pancakes
Pancakes are a weekend staple, right? This simple recipe requires only a few ingredients that you probably already have!
What You’ll Need:
- 1 ripe banana
- 2 eggs
- A pinch of baking powder
Directions:
- Mash the banana in a bowl and then whisk in the eggs and baking powder.
- Heat a pan over medium heat and pour in small amounts of the batter.
- Flip when bubbles appear, and watch those pancakes rise!
Picture this: your toddler flipping the pancakes with a spatula while giggling at their own cooking skills. It’s a sight that’ll warm your heart!
Super Simple Fruit Salad
Fruit salad is refreshing and encourages your little one to taste new fruits.
What You’ll Need:
- An assortment of fruits (strawberries, apples, kiwi, etc.)
- A squeeze of lemon juice
- Honey (optional)
Directions:
- Help your toddler wash the fruits.
- Let them choose which fruits to include and help chop them (with kid-safe knives).
- Toss everything in a bowl with a dash of lemon juice and honey.
This is a great way for them to practice sharing and teamwork!
Cheesy Quesadillas
Quesadillas are quick, tasty, and easy to make. Plus, you can sneak in veggies!
What You’ll Need:
- Tortillas
- Shredded cheese
- Cooked chicken or veggies (like spinach or bell peppers)
Directions:
- Allow your toddler to sprinkle cheese and chosen fillings over one half of the tortilla.
- Fold it over and press slightly.
- Cook in a skillet until golden and gooey—cut into triangles for easy handling.
You’ll find they’ll want to try different fillings, turning it into a fun experiment.
Dipped Banana Bites
Now let’s face it, bananas alone can be boring. But add some chocolate or yogurt, and watch them disappear!
What You’ll Need:
- Bananas
- Melted chocolate or yogurt
- Toppings like crushed nuts or sprinkles
Directions:
- Slice the bananas—your toddler can help here!
- Dip the slices in chocolate or yogurt.
- Roll them in fun toppings and freeze for a cool treat.
This giant sweet treat can transform into a game of “what topping should we try next?”
Yogurt Parfaits
Yogurt parfaits can be a delightful snack or dessert, and your toddler can put their assembly skills to the test!
What You’ll Need:
- Greek yogurt
- Granola
- Fresh fruit
Directions:
- In a cup or bowl, let your toddler layer yogurt, then granola, and repeat.
- Top with their favorite fruit.
With each layer, discuss why you chose that fruit and what makes it special. It’s a quick way to introduce healthy eating!
Mini Meatballs
This one might become a family favorite! Kids love making little balls.
What You’ll Need:
- Ground beef or turkey
- Breadcrumbs
- Egg
- Seasoning
Directions:
- Mix everything in a bowl.
- Your toddler can roll the mixture into balls.
- Bake or pan-fry until cooked through.
They’ll feel like real chefs creating their own meat masterpieces!
Breakfast Wraps
These breakfast wraps are portable and can be personalized by your child’s taste.
What You’ll Need:
- Tortillas
- Scrambled eggs
- Cheese
- Any toppings (avocado, salsa, etc.)
Directions:
- Your toddler can help scramble the eggs (with supervision!).
- Lay out the tortillas and let them fill them with eggs and toppings.
- Roll them up and enjoy!
Encourage the conversation—what’s the best part of the wrap?
Chocolate Chip Oatmeal Cookies
What’s better than baking cookies on a lazy afternoon? Not much, right?
What You’ll Need:
- 1 cup oats
- 1 ripe banana (mashed)
- 1/2 cup chocolate chips
Directions:
- Preheat the oven to 350°F (175°C).
- Mix everything in a bowl and spoon dollops onto a baking sheet.
- Bake until golden.
You can even chat about sharing cookies—after all, they’re meant to be shared!
Homemade Popsicles
Summer days call for popsicles! Why not make them together at home?
What You’ll Need:
- Fruit juice or blended fruits
- Optional add-ins like yogurt or chopped fruit
Directions:
- Help your toddler pour the juice into popsicle molds.
- Add any extra fruit for a fun surprise.
- Freeze overnight and enjoy!
This activity leads to endless excitement when tasting their creations!
Avocado Toast
Here’s a trendy and nutritious breakfast idea your little chef can help with!
What You’ll Need:
- Bread
- Ripe avocado
- Toppings like tomatoes or cheese
Directions:
- Let your toddler smash the avocado on toasted bread.
- Help them sprinkle on toppings.
This dish encourages creativity while also introducing avocados as a healthy option!
Cheesy Broccoli Muffins
These savory muffins are not only tasty but also a great way to add veggies to your toddler’s diet.
What You’ll Need:
- 1 cup of flour
- 1 cup of shredded cheese
- 1 cup cooked broccoli (finely chopped)
- 1 egg
Directions:
- Preheat oven to 375°F (190°C).
- Let your toddler mix all ingredients in a bowl.
- Spoon into muffin tins and bake for about 20 minutes.
They might surprise you with how much they enjoy these veggie-packed delights!
Breadstick Twists
These are fun to make and can be a great side for any meal.
What You’ll Need:
- Store-bought pizza dough
- Garlic powder and cheese
Directions:
- Let your toddler help twist pieces of dough and sprinkle with garlic and cheese.
- Bake as directed on packaging.
It’s fun to hear them laugh over how silly the twists look!
Conclusion
Cooking with your toddler is an adventure filled with creativity, laughter, and the joy of spending quality time together. These 15 toddler recipes not only teach essential cooking skills but also provide excellent opportunities to discuss nutrition, teamwork, and creativity—all while creating delicious meals and memories.
Looking for more inspiration to cook with your little ones? Check out The Best Recipes for Cooking with Toddlers for even more engaging ideas. If you’re wondering about more kid-friendly recipes, 20 Easy Recipes for Kids to Cook with You will surely help you keep the fun going. Remember, it’s not just about the food; it’s about the moments that nourish our hearts and souls. Enjoy the joy of cooking together!
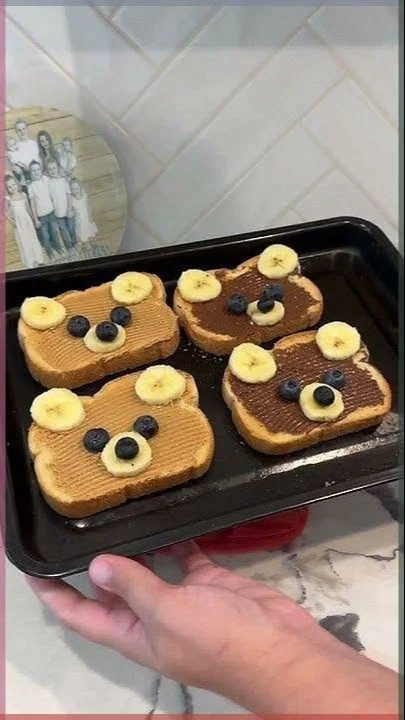
Healthy bear toast ideas for kid breakfasts that fuel mornings
Imagine this: it’s another busy morning, the clock is ticking, and your little one is giving you those “I’m hungry” eyes. We’ve all been there, frantically searching for a breakfast option that’s not only quick to prepare but also healthy and appealing to our kids. Here’s the thing—what if I told you that you could turn a simple piece of toast into a delightful breakfast masterpiece that brings smiles all around? Enter fun bear toast!
This creative twist on breakfast doesn’t just look adorable; it’s also packed with nutritious toppings and quick to assemble. Let’s dive deeper into how you can transform your mornings with these bear-tastic toasts that are sure to make your little ones giggle with delight.
Understanding the Basics of Bear Toast
To set the stage, bear toast is simply a piece of toast artfully topped with healthy ingredients to create a bear face. The best part? You can customize it however you like! With simple toppings like banana slices, blueberries, and peanut butter, you can whip up a breakfast that’s both easy and scrumptious.
Now you might be wondering why toast? Well, toast is versatile, it’s easy to make, and let’s be honest—it’s a blank canvas just waiting for your creativity. You can use whole grain, sourdough, or gluten-free bread, depending on your family’s preferences.
Simple Ingredients for a Bear-iful Breakfast
Here’s a quick rundown of the ingredients you’ll need to create your fun bear toast:
- Bread: Choose your favorite kind—whole grain, multigrain, or even a fun shape if you’re feeling adventurous.
- Peanut Butter or Nut Butter: This will be the base, adding healthy fats and protein to start the day on a strong note.
- Banana: Slices create adorable ears and a great source of potassium and fiber.
- Blueberries: For the eyes, plus they pack a punch of antioxidants.
- Honey or Maple Syrup: Optional, but a little drizzle can add sweetness without the guilt.
You can also throw in other fruits like strawberries or raspberries for extra fun.
Step-by-Step: Creating the Ultimate Fun Bear Toast
1. Toast the Bread
Start by toasting your chosen bread to a nice golden brown. This will give your bear toast a solid base and add that satisfying crunch.
2. Spread the Nut Butter
Once toasted, spread a generous layer of peanut butter or your kid’s favorite nut butter on top. This not only tastes amazing but also helps hold the toppings in place.
3. Add the Banana Slices
Cut two banana slices and place them at the top of the toast to create adorable bear ears. Depending on the mood, you could even use a circular cookie cutter to shape the ears out of the banana for an extra touch.
4. Create the Face
Now, it’s time for the fun part! Use two blueberries for the eyes and a slice of banana (or a small dollop of nut butter) for the nose.
5. Finishing Touches
If your little one enjoys a sweet kick, drizzle a bit of honey or maple syrup over the top to finish it off.
Why This Breakfast Rocks
Let’s take a moment to appreciate why this bear toast isn’t just a pretty face. Treating our kids to fun food can make a difference in their eating habits. A colorful, engaging meal can spark interest in trying new foods. Plus, you’re mixing in plenty of fruit, healthy fats, and protein, which we all know are essential for our kiddos’ growth and energy levels.
Quick Tips for Creating Fun Bear Toast
Make Ahead: You can prep some components, like slicing bananas or having your nut butter ready to go, the night before.
Involve the Kids: Let your little ones help create their bear toast! Whether it’s spreading the nut butter or choosing their toppings, the involvement will make them more excited to eat.
Mix it Up: Don’t be afraid to experiment! Try different combinations of fruits, or replace the nut butter with avocado spread for a twist on flavors.
Presentation is Key: Serve the toast on colorful plates or add funny face features with whipped cream or yogurt to spark creativity.
Mistakes to Avoid
While making bear toast is straightforward, there are a few common missteps to watch out for:
- Using Too Much Nut Butter: While nut butter is healthy, too much can make the toast overly heavy. Aim for a light but even layer.
- Choosing Hit-or-Miss Fruits: Not all fruits hold up well; for instance, bananas can brown quickly. If you’re crafting a bear toast in advance, opt for fruits that are more stable.
- Not Having Fun: The point of this bear toast is to have fun and engage your child. Don’t stress too much about making it perfect; the silliness is what counts!
Fun Variations to Try
Variety is the spice of life, right? After you’ve mastered the classic bear toast, here are some variations you may want to explore:
- Animal Faces: Expand beyond bears! Use different fruits to create other animal faces, like cats or owls.
- Themed Days: How about a "Colorful Monday" where you incorporate different colored fruits?
- Savory Versions: Try using avocado as a spread and decorate with slices of cherry tomatoes and radish for a savory twist.
FAQs About Bear Toast
Can I use a different type of bread?
Absolutely! Sourdough, gluten-free, or even pita bread can work wonderfully.
Is it ok for my child to eat nut butter if there are allergy concerns?
If allergies are a concern, consider sunflower seed butter or soy nut butter as alternatives. Always check with your pediatrician.
Can I make bear toast without bananas?
Sure, you can use any round fruit, such as kiwi or apple, to create those bear ears.
Conclusion
Ultimately, fun bear toast is more than just a nutritious breakfast—it’s a way to start the day with creativity and laughter. By combining simple, healthy ingredients in such a fun and engaging way, you’re not just filling little tummies; you’re building happy memories.
So, as you set about your busy mornings, remember that breakfast can be a delightful ritual rather than a rushed chore. If you’re looking for more ideas, check out this list of breakfast ideas for kids. And for some additional inspiration, you might find the popular Animal Face Toast page helpful for even more creative breakfast ideas. Enjoy your bear toast adventures!
Easy Toddler Veggie Recipes to Make Veggies Delicious for Busy Moms
Imagine this: you’ve set the table for dinner, your little one sits down, and you watch with bated breath as you present a colorful plate of veggies. But what happens next? They scrunch up their nose like they’ve been served broccoli-flavored ice cream. Sound familiar? We’ve all been there. Getting toddlers to eat their veggies can feel like an Olympic event, complete with tears and drama. But don’t lose hope just yet; I’ve got your back!
In my journey as a parent, I’ve discovered some fun and easy toddler vegetable recipes that turn those bright colors on the plate into delightful mini meals. From sweet potato mash to cauliflower tots, I’ve put together 26 veggie-loaded recipes that can transform even the pickiest eaters into enthusiastic veggie munchers. Let’s dive into this adventure together!
Sweet Potato Mash
Sweet potatoes are a lifesaver in my home. Creamy, sweet, and oh-so-nutritious, they’re the ultimate comfort food.
- Basic Sweet Potato Mash: Just boil, mash, and add a splash of milk for creaminess. You can sneak in spices like cinnamon for extra flavor, which makes it even more appealing to toddlers.
- Sweet Potato & Apple Mash: Combine sweet potatoes with apples for a naturally sweet treat. It’s like dessert without the added sugars!
Cauliflower Tots
Let’s be honest, tots are always a hit with kids, and these cauliflower versions are no exception.
- Baked Cauliflower Tots: Grate cauliflower or use a food processor. Combine it with breadcrumbs, cheese, and your favorite herbs, then bake until golden. They resemble real tater tots and are perfect for dipping!
- Cauliflower & Cheese Fritters: Mix cauliflower with eggs and cheese, shape into patties, and pan-fry. Kids will love the cheesy goodness.
Sneaky Spinach Recipes
Spinach is another powerhouse veggie that can be sneaky about its entry into your toddler’s diet.
- Spinach Pancakes: Blend baby spinach with eggs and a little flour for vibrant green pancakes. Top with fruit for a delightful breakfast.
- Spinach & Cheese Stuffed Shells: Cook pasta shells, stuff them with ricotta, spinach, and marinara sauce, and bake. It’s an easy dinner that’s packed with greens!
Zucchini Wonders
Zucchini is another friend of busy parents, as it’s versatile and easy to prepare.
- Zucchini Fritters: Grate zucchini, mix with flour and egg, and fry until crispy. These little gems are perfect with yogurt or sour cream for dipping.
- Zucchini Noodles (Zoodles): Spiralize zucchini and use them as a base for a pasta dish. Top them with any sauce your little ones love!
Carrot Magic
Carrots can be transformed into surprisingly mouthwatering dishes.
- Honey Glazed Carrots: Sauté carrots in a bit of butter and honey for a naturally sweet side dish. Kids will devour them!
- Carrot Muffins: Bake muffins with grated carrots mixed into the batter. They can be a delightful snack that’s full of hidden veggies.
Peas Please
Peas can be tiny, but they’re mighty when it comes to nutrition and taste.
- Mashed Peas: Simply steam and mash. Adding a touch of mint can elevate this simple dish and make it more appealing.
- Pea & Brown Rice Patties: Mashing peas and mixing them with rice, egg, and breadcrumbs creates great little patties that can be baked or fried.
Creative Broccoli Dishes
Broccoli is often labeled as the “bad guy,” but it doesn’t have to be!
- Broccoli Cheese Bites: Blend cooked broccoli with sharp cheddar and bake. They come out golden and cheesy, perfect for toddlers.
- Broccoli Pesto: Blend cooked broccoli with nuts, Parmesan cheese, and olive oil for a vibrant pesto. It’s great on pasta or as a dip!
Fun Recipes with Bell Peppers
Bell peppers are colorful and full of flavor.
- Stuffed Bell Peppers: Hollow out mini peppers and fill them with quinoa, beans, and cheese. Bake until the cheese is bubbly.
- Bell Pepper Strips with Hummus: Slice bell peppers into strips and serve them with hummus. Kids love dipping!
Hidden Veggie Smoothies
Picture this: a smoothie that’s not only delicious but also packed with nutrients!
- Spinach & Banana Smoothie: Blend a banana with a handful of spinach, yogurt, and almond milk. It’s bright green and sweet — kids never suspect a thing.
- Berry Beet Smoothie: Beets add natural sweetness (and a stunning color!). Blend with berries and yogurt for a vitamin-packed drink.
Edges of Fun with Eggplant
Many kids give eggplant a hard pass, but you can win them over.
- Eggplant Pizza: Slice and roast eggplant slices topped with sauce and cheese. Bake until the cheese melts for a fun twist on pizza.
- Eggplant Nuggets: Cut eggplant into sticks, bread with panko, and bake for a crispy treat. Serve with a side of marinara for dipping.
Other Veggie Ideas
- Veggie Quesadillas: Load up with beans, cheese, and your kid’s favorite veggies and grill until crispy.
- Veggie Sushi Rolls: Use rice and nori to wrap up colorful veggies, a fun hands-on meal.
Bonus Ideas for Picky Eaters
Sometimes, the variety helps. Offer a rainbow plate of raw veggies with different dips. It can create an engaging sensory experience that encourages the munching of everything from carrots to cucumbers. Use cookie cutters to create fun shapes out of veggies — because sometimes all it takes is a little imagination to eat healthy.
Involving your toddlers in cooking can also spark their interest. Let them wash veggies, stir, or mix. Little hands love being part of the action!
Quick Tips to Make it Easier
- Start small with bites of veggies mixed into their favorite foods.
- Offer different dips! Kids love dipping, so hummus, yogurt, or even ranch dressing can make all the difference.
- Be a role model! If they see you munching on veggies, they might be more inclined to try them.
Mistakes to Avoid
- Don’t force it. Kids will pick up on your frustrations. Offer veggies without pressure.
- Avoid the same vegetables repeatedly. Keep trying new recipes and techniques to keep it fresh!
Conclusion
Getting little ones munching on healthy veggies doesn’t have to be a struggle. By slipping in delightful recipes that offer flavor and fun, you can make mealtime a joyful adventure. Don’t forget to be patient and consistent—your efforts will pay off! And if you’re looking for even more meal ideas, check out these kid-friendly veggie-loaded breakfast recipes or explore the high-protein vegetarian recipes for toddlers for inspiration.
Happy cooking! Your little veggie munchers will thank you (eventually)!
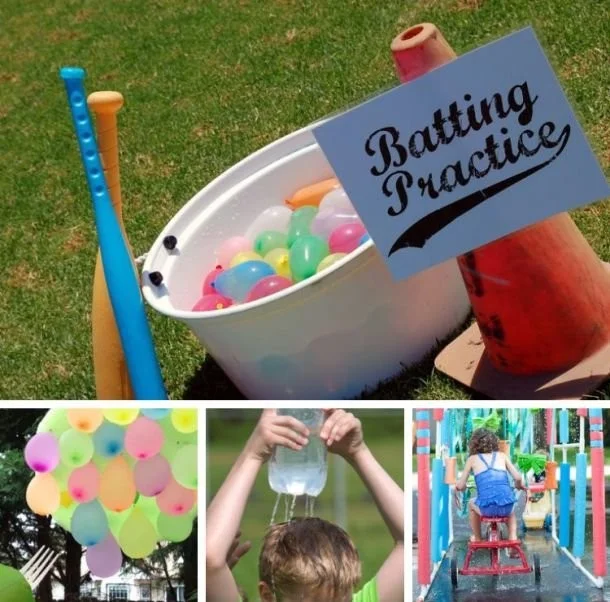
Fun DIY Outdoor Water Games For Kids to Spark Backyard Fun
Imagine it’s a blazing hot summer day, and your kids are bouncing off the walls, looking for something to do. You might find yourself saying, "Can we just go to the pool?" But let’s be honest, packing everyone up and heading out can feel like a monumental task. The truth is, you don’t have to leave your backyard to create a magical summer experience. Here’s the thing: with just a few simple supplies, you can host your very own water extravaganza right at home. Let’s dive into 20 super fun DIY outdoor water games that promise to keep your little ones cool and entertained for hours!
Fun Water Games That Spark Joy
Water Balloon Toss
A classic for a reason! Fill up some water balloons and split the kids into pairs. They’ll start close together, toss the balloon back and forth, and take a step back with each successful catch. It’s a blast, but beware—once they break, it’s an all-out splash fest!
DIY Sprinkler
Do you have a garden hose? Perfect! Just poke some holes in an empty two-liter bottle, attach it to the hose, lay it on the ground, and turn on the water. Your kids will have a blast dodging and racing through their very own DIY sprinkler!
Water Relay Race
Set up a series of stations in your yard with cups filled with water and some empty ones. The goal? Transfer water from one cup to another using sponges. This not only keeps them cool but encourages teamwork and a bit of friendly competition!
Slip ‘N Slide
Remember those glorious summer days slipping and sliding across the yard? You can easily recreate that with a plastic tarp, some baby soap, and a hose. Just lay the tarp out, lather it up with soap, and let the fun begin!
Water Gun Painting
Now here’s a creative twist! Fill some squirt guns with washable paint and let your kiddos spray their masterpieces on a large canvas or old sheet. It’s a beautiful way to mix art with water play, and clean-up is a breeze with just a hose!
DIY Water Obstacle Course
Set up a series of challenges, like crawling under a sprinkling hose, jumping over buckets, and running around a water balloon station. This is not only fun but helps develop their motor skills. Just picture them giggling and competing with each other!
Ice Treasure Hunt
Fill a bucket with small toys and cover them with water. Freeze the bucket overnight. On a hot day, give your kids some tools (like kiddie shovels) to excavate their frozen treasures. It’s like a mini archaeology dig with a refreshing twist!
Water Pinata
Fill a pinata with water balloons and small treats. Hang it up and let the kids take swings at it until it bursts, showering them with goodies. It’s guaranteed to be the hit of the summer!
Ocean in a Bottle
Grab some empty plastic bottles and fill them up with water, glitter, and small toy sea creatures. Seal the bottles tightly and let your kids shake and swirl the "ocean." It’s a soothing sensory activity that entertains without too much mess.
Water Balloon Fight
This one’s simple yet effective. Just fill a bunch of balloons, split the kids into teams, and let them have a blast. This one brings joy to kids of all ages—trust me!
Sprinkle Painting
This one is a combination of art and water play. Lay out big sheets of paper, hand your kids some spray bottles filled with diluted paint, and let them spray away! Bonus: they’ll stay cool while making some wonderful artwork.
Pool Noodle Races
Cut pool noodles in half and have the kids race them across a kiddie pool. Sort of like a mini boat race, they’ll get to practice coordination while enjoying a splashy good time.
Duck, Duck, Splash!
It’s like "Duck, Duck, Goose" but with a water twist. The person who is "it" gets to pour a little water on the heads of their chosen ducks. It’ll add some laughter and excitement while keeping it refreshingly cool!
Bubble Fun with a Twist
Create a bubble station using dish soap, water, and cookie cutters. On a hot day, blowing and popping bubbles keeps them entertained while cooling them off. Bonus points if you can create a bubble tunnel!
Water Balloon Painting
You’ll need some thick paper or canvas. Each kid gets a water balloon filled with colored water. They throw the balloons at the paper and watch colored splashes explode. How awesome is that?
DIY Water Zorbs
If you’re feeling especially adventurous, try filling large inflatable balls with water — just make sure you’re outside! Kids can get inside and roll around in them for a hilariously slippery experience.
Wash the Car
It’s not just fun; it’s productive too! Give your kids sponges and buckets of soapy water and let them wash your car. It’s a great way to beat the heat while teaching them responsibility.
Sensory Water Play
Set up a few bins filled with water, different cups, and kitchen tools. Encourage your kids to explore different textures and tools. They won’t even realize they’re learning while they play!
Water Limbo
Create a water limbo by using a hose to spray water in an arch. Kids have to bend back and go under without getting too wet. It’s hilarious to watch and super fun to do!
Water Volleyball
Put up a makeshift net and let the kids play water volleyball in a pool or with a kiddie pool. It adds a competitive edge to the cooling fun. Nothing like a bit of teamwork and laughter to keep the spirit high!
Bonus Ideas for Water Fun
If you’re feeling creative, why not create your own water sensory bins? Fill them with sea creatures, colorful toys, and various sponges for endless exploration.
To keep the fun going year-round, check out our indoor birthday party games for when the weather turns.
Conclusion
Creating summer fun doesn’t have to mean packing everyone into the car. By using a little creativity and simple supplies, your backyard can become the ultimate summer retreat for your kids. These 20 super fun DIY outdoor water games are just the beginning. Remember, making memories is what it’s all about. You’ll cherish these moments for years to come. So, grab your sunglasses, get wet, and dive into fun this summer!
For even more ideas, check out the best water games for kids or explore backyard water games that will keep everyone cool and happy!
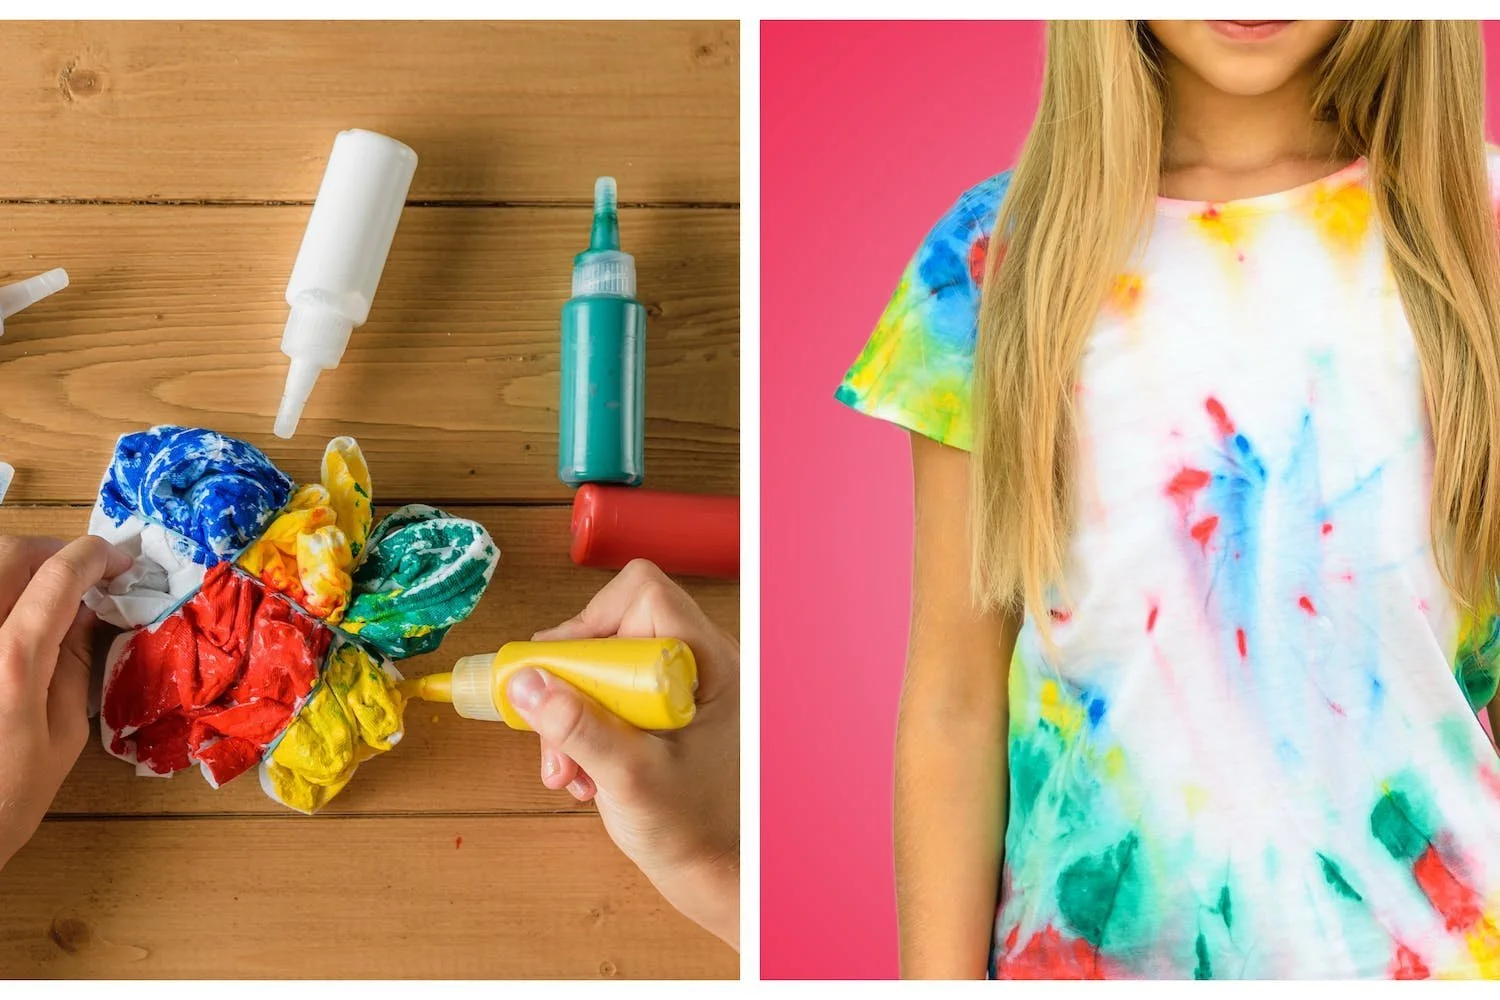
Simple Tips for Tie Dye Art with Baby Wipes That Really Pop
Imagine this: it’s one of those rainy afternoons, the kind where your little one seems to have an endless supply of energy but you’re fresh out of fun ideas to keep them engaged. It’s completely normal to hit the creative wall sometimes. Now, you might be wondering what you can whip up in a pinch that’s both fun and easy. Well, I have just the idea for you!
Let’s explore the delightful world of tie dye—but here’s the twist. Instead of using the traditional method that can be messy and complicated, we’re going to dive into a simple and safe approach using baby wipes. Yes, you read that right! With a few basic supplies, we can create some beautiful tie-dye creations that will leave your toddler thrilled and you feeling like the ultimate parenting hero.
What You Need for Your Tie Dye Adventure
Before we get into the crafting, let’s gather our materials. I love how simple this is! You don’t need to head to an art supply store. Just look around your home. Here’s the short list:
- Baby wipes: These serve as our canvas. They’re absorbent and easy to work with.
- Washable fabric markers: Non-toxic and perfect if you’re working with little ones who tend to nibble on everything!
- Rubber bands: These will help create those beautiful tie-dye patterns.
- Spray bottles with water: This is for activating the colors.
- Plastic table cover or old newspapers: To protect your work surface. Let’s be honest, you don’t want a vibrant splatter of color on your dining table!
The beauty of this project is that you likely have most of these items already at home.
Crafting the Gorgeous Bunting
Now that we’ve gathered everything we need, let’s kick things off with our bunting! This colorful garland is not just visually appealing but also special because it’s something you and your child can create together.
Step 1: Setting Up Your Space
Find a clean space to work. Cover it with your plastic table cover or newspapers—this is where the magic happens, and we want to keep things tidy.
Step 2: Preparing the Baby Wipes
Take a couple of baby wipes and lay them flat. With your child, discuss different patterns you can create. If your toddler is a bit older, encourage them to come up with their own designs.
Step 3: Decorating with Markers
Here’s where the fun really begins! Let your little one use the fabric markers to color the wipes. You can swirl colors together or make distinct patterns. You might want to join in the fun by adding your own flair!
Step 4: Shaping the Wipes
Once the wipes are colored, use rubber bands to secure them in different sections. This inhibits some colors from bleeding into each other and creates those beautiful tie-dye effects when they’re sprayed with water.
Step 5: Spritzing for the Effect
Fill the spray bottles with water and give those prepared wipes a light spritz. You’ll see the colors deepening and blending beautifully.
Step 6: Drying and Decorating
Now, hang your colorful creations out to dry. You can utilize string or clothespins to creatively display them. Once dry, cut them into triangles or other shapes to create your bunting. Simply string them together using more string or tape!
Bonus: Display your Creation
Hang your bunting in your child’s room or play area. It’s so rewarding to see something you’ve created together come to life. Each glance at it will remind you of your creative afternoon spent together.
Quick Tips for Success
- Use Color Sparingly: Less is often more. If you load the wipes with too many colors, you might end up with a muddy result.
- Embrace the Mess: Kids can be messy, and that’s part of the fun! Just relax and enjoy the process.
- Involve Your Child: Talk to them and let them guide some of the decisions in the design. It makes the project that much more meaningful.
Mistakes to Avoid
- Don’t oversaturate the wipes with water. Just a light spritz is enough. Too much water can lead to colors running together uncontrollably.
- Be mindful of the markers. Always choose washable options to avoid permanent stains.
Exploring Further Creations
Now, if your little artist enjoyed this project, why stop at just bunting? We can explore endless opportunities for tie dye creativity together! Here are a couple of ideas to expand on:
- Tote Bags: Experiment with the same technique on fabric tote bags, perfect for your next trip to the grocery store.
- Joyful T-shirts: Make personalized shirts to wear! You can even convert old plain white shirts into stunning tie-dye masterpieces. If you need a guide for this, check out this helpful resource on how to tie dye an old white shirt.
If you’re looking for even more fun activities that stimulate creativity, head over to our article on easy home activities for inspiration!
Conclusion
Creating simple tie-dye projects with baby wipes is more than just a craft; it’s a chance to bond, nurture creativity, and make memories with your little ones. These colorful creations don’t just brighten up a room—they brighten our hearts. Next time you’re faced with a gloomy day indoors, remember that creativity is just around the corner. With just a few materials, a sprinkle of patience, and a splash of fun, you can inspire your child’s imagination and create something beautiful together.
And hey, don’t hesitate to branch out and try more art ideas too! If you’re interested, check out more fun artistic endeavors like painting ideas for kids through this wonderful article on Painting Ideas for Kids. Happy crafting!
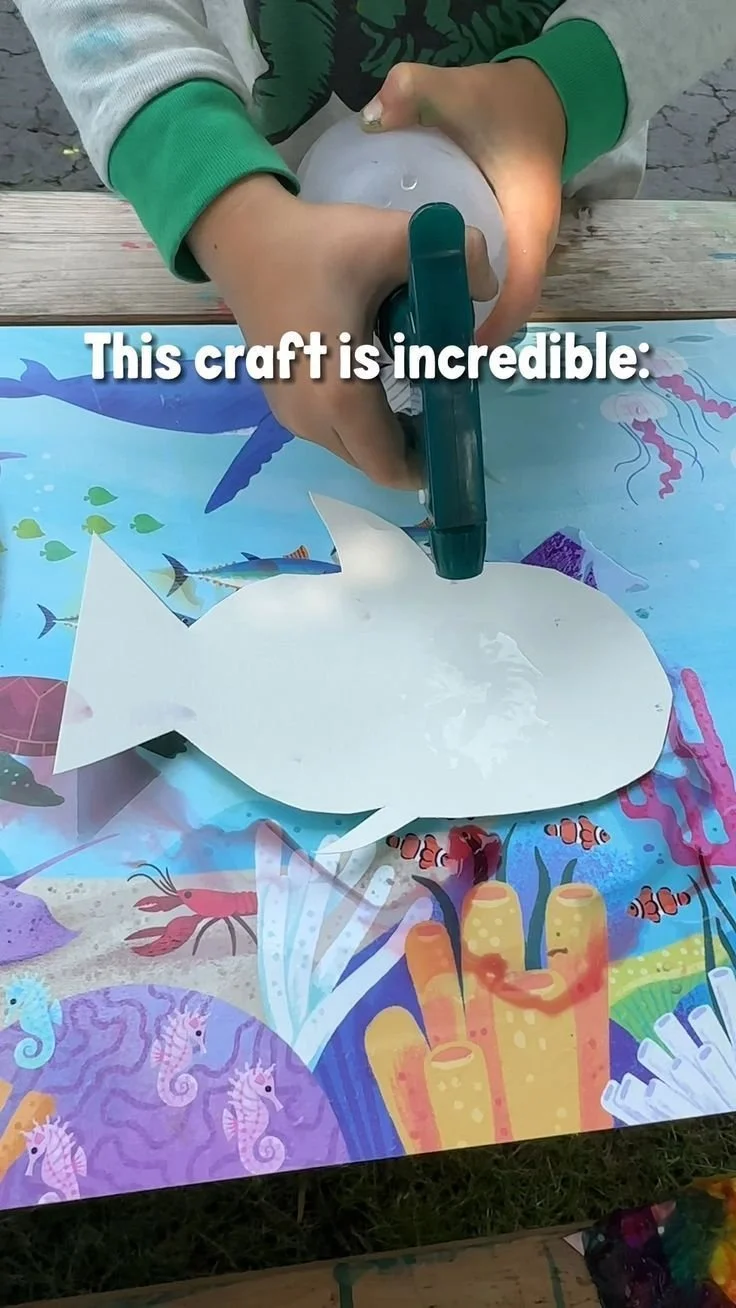
Fun Ways Under the Sea Ocean Animals Placemat Sparks Kids’ Learning
Exploring Craft Fun with Crepe Paper
Imagine this scenario: It’s a rainy day, and your little one is bouncing off the walls with energy. We’ve all been there, right? The challenge is to find an activity that not only keeps them entertained but also sparks their creativity. Here’s the thing: I recently experimented with soaking tissue paper for a crafting project and decided to switch it up with crepe paper. Spoiler alert: it was simply fantastic!
The Benefits of Crafting Together
Crafting isn’t just about keeping our kids busy; it’s a wonderful opportunity for them to develop essential skills. When we engage in activities involving tearing, cutting, and arranging paper, our children are honing their fine motor skills. Plus, it’s a sneaky way to incorporate fun learning into their day. Did you know that these activities also enhance hand-eye coordination? You’ll find that they’re more confident with scissors and glue after a few fun sessions.
Now, let’s dive deeper into this specific project: an ocean-themed crafting adventure that completely transformed our rainy day.
Getting Started with Your Ocean-themed Craft
Before you dive into this crafty journey, ensure you have the following materials at hand:
- Crepe paper in various colors
- Scissors
- Spray bottles filled with water
- Fish templates (you can easily find these online or draw your own)
- A workspace that’s easy to clean (trust me, you’ll want this)
As we set up, I realized that the process of soaking the crepe paper before using it adds a special dimension to the activity. The colors become vibrant and ready to be used in exciting ways.
Creating Your Ocean Masterpiece
Soak the Crepe Paper: Start by soaking strips of crepe paper in water. This not only intensifies the colors but makes the paper easier to tear apart, which is perfect for younger kids who might find it challenging to use scissors.
Cut or Tear: Allow your child to either cut or tear the paper into small pieces. Here’s a fun tip: if they choose to tear, encourage them to use their fingers rather than scissors. It’s a great way to build those little muscles!
Arrange the Pieces: Once you have a pile of colorful paper bits, let your child arrange them on the fish template. This part is all about creativity! I loved watching my child set up the colors; it was like watching a tiny artist at work.
Spray and Stick: Here comes the most exciting part—take the spray bottles filled with water and lightly mist the paper pieces after they’re arranged. This not only helps the paper stick but also gives it a unique, water-colored effect that resembles the ocean’s surface. Just be ready to embrace the splashes!
Why This Works Beautifully
This activity is wonderful for a few reasons:
Fine Motor Skills: As kids tear, cut, and arrange the paper, they’re strengthening their finger muscles, which are essential for writing and other skills.
Creativity: There’s no right or wrong in this craft. Children can express themselves freely, connecting the dots between their imagination and the colorful ocean landscape before them.
Learning Themes: The project aligns beautifully with an ocean theme, creating a perfect opportunity to blend art and learning. You could complement this with a discussion about ocean animals, which ties in wonderfully with the Domino & Juliette Under the Sea Placemat we have at home.
Making It Even More Engaging
What if you take this a step further? You could:
- Incorporate a storytelling element. After creating their fish, ask your child to come up with a story about their underwater adventure.
- Include other materials such as shells or sparkles to add texture. This not only enriches the experience but also introduces them to different crafting materials.
Tips for Success
Make it a Family Activity: Don’t hesitate to join in the fun! When you craft together, you’re not just making art; you’re creating memories.
Be Prepared for Mess: Let’s be honest; crafting can get messy. Cover the workspace with newspapers or a plastic sheet if you’re doing this indoors.
Celebrate Uniqueness: Every piece will look different, and that’s a huge part of the fun! Encourage your child to appreciate their work and talk about what they love about it.
Repeat and Reinvent: Don’t feel pressured to limit this craft to one session. You can change the theme, colors, or even the shapes you’re using. The possibilities are endless.
Mistakes to Avoid
But let’s chat about things that can trip us up along the way.
Not planning for drying time: Remember that the wet paper can take time to dry. Ensure you have a designated drying area, so you don’t end up with soggy artwork all over the place.
Overdoing it: It’s easy to get carried away with color and creativity, but a few vibrant pieces often stand out better than a mix of ten colors. Don’t overwhelm your child; let them pick their favorites!
FAQs About Crafting with Kids
What age is appropriate for this craft?
While toddlers can participate with supervision, preschool-aged kids (3-5 years) will likely love this activity most.
How can we incorporate learning?
You can easily extend the activity by discussing ocean life, teaching colors, or even introducing concepts of buoyancy with different materials.
What if my child is reluctant to participate?
You’re not alone in this! Sometimes, starting with a simpler version of the project can help. Set up a small example to inspire them, and soon enough, they might get into the flow of things.
Bonus Ideas
For those looking to extend the fun even further, why not try:
Underwater Sensory Bins: Fill a bin with water and add plastic sea creatures, and let your kids explore. This approach fits wonderfully with your ocean theme while delighting their senses.
Storytime with a Twist: After crafting, read books about the ocean or sea life. Adding that storytelling element often brings everything full circle, reinforcing their learning experience.
Conclusion
Crafting with our kids is such a rewarding experience, both for them and for us. It nurtures creativity, builds essential skills, and creates lasting memories. If you haven’t already joined the crafting revolution with crepe paper, I encourage you to try it out—your little ones will thank you! For further exploration of family-friendly activities, you might also enjoy checking out Baby Suction Cup Toys as a fun addition to your craft supplies. Additionally, consider looking into how Royal Caribbean Enhances Family and Youth Offerings for family vacations, which could inspire even more creative ideas!
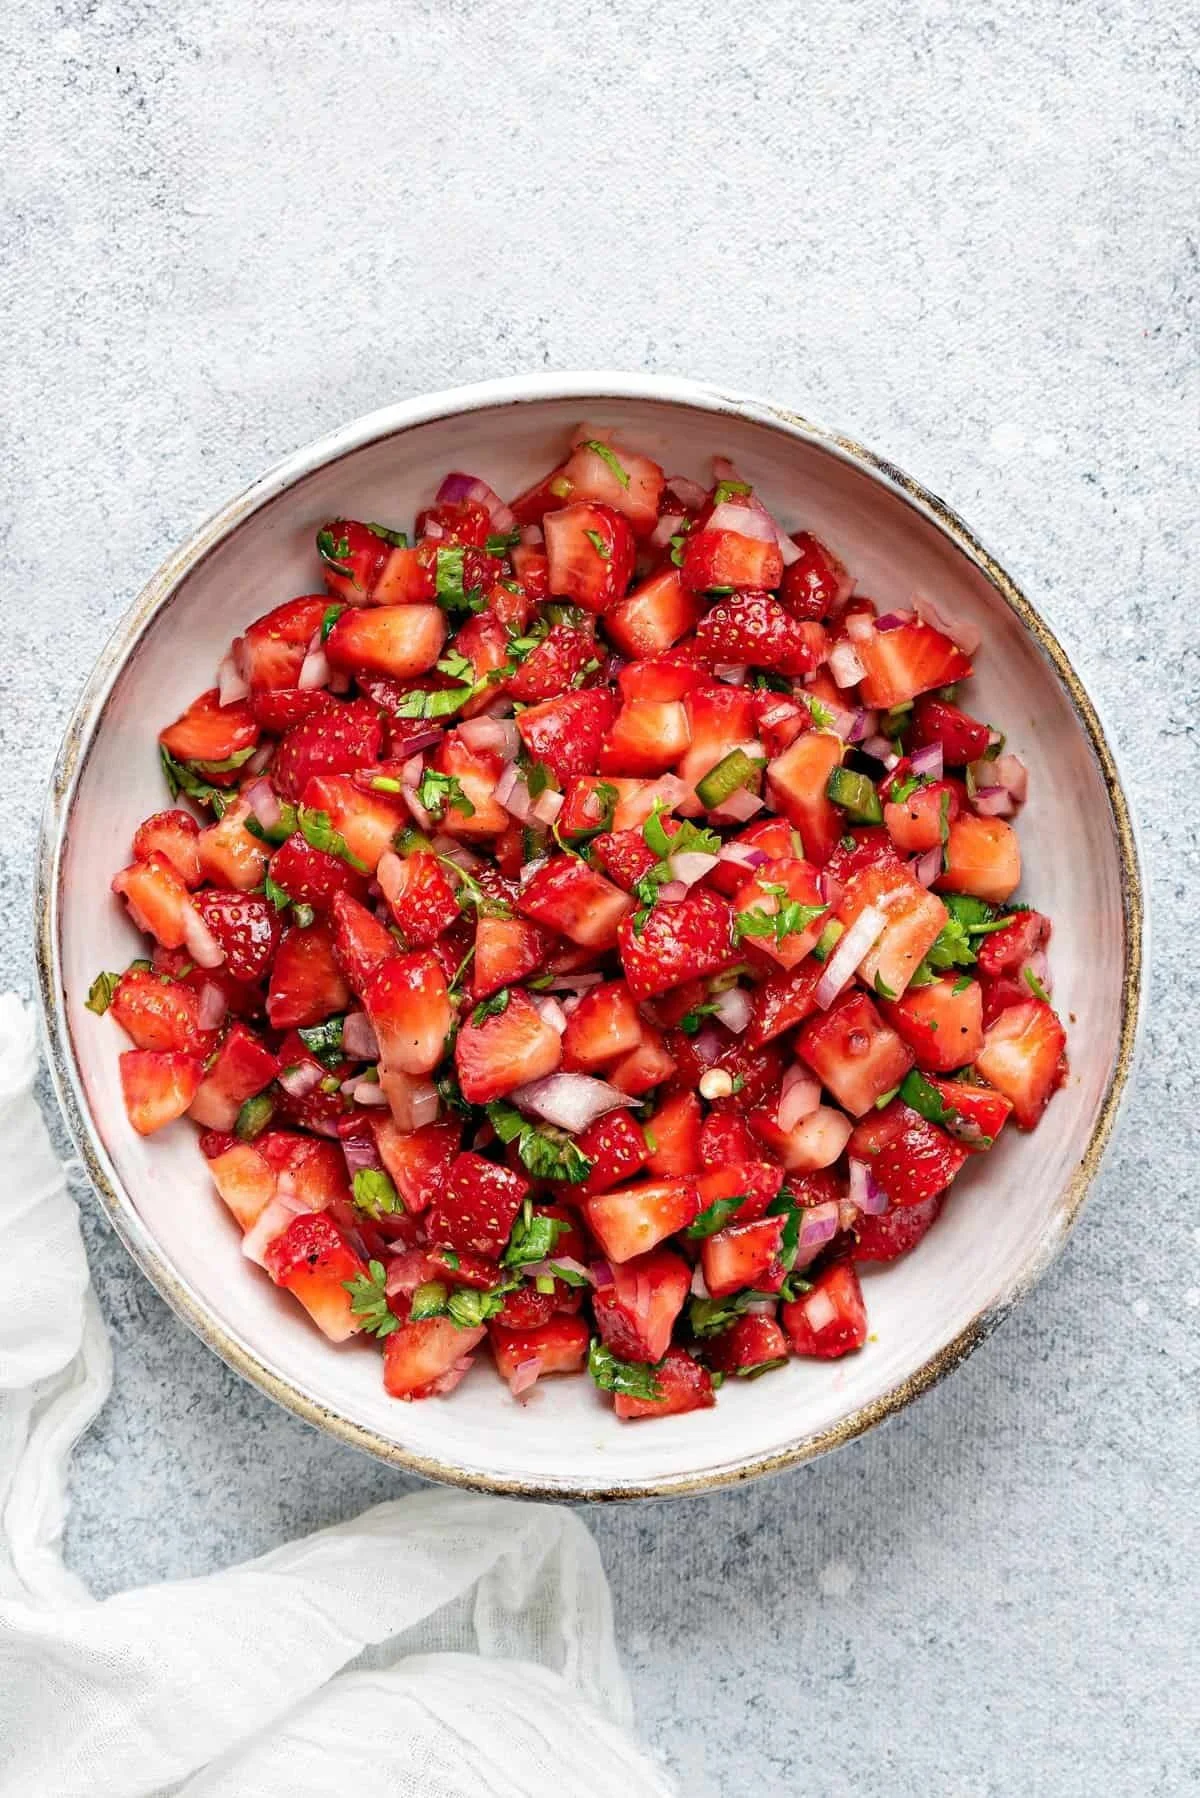
Quick Strawberry Salsa Ideas Your Family Will Love and Share
Imagine this: it’s a warm summer day, and you’re sitting on your patio watching your little ones play in the yard. The sun is shining, and you have a craving for something fresh and delicious. Maybe something fruity that the kids will love too. Sound familiar? That’s where strawberry salsa comes in—it’s vibrant, flavor-packed, and perfect for snacking or dressing up those boring meals!
What Makes Strawberry Salsa Special
Now, you might be wondering what the big deal is about strawberry salsa. Here’s the thing: it’s not just a dip; it’s a versatile condiment that can turn everyday meals into something extraordinary. Fresh strawberries mixed with cilantro, lime, and a hint of jalapeño create a balance between sweet and tangy. Plus, it’s a great way to sneak some fruits into your toddler’s diet without them even realizing it.
The Perfect Recipe for Strawberry Salsa
Let’s dive into how to make this delightful dish. The good news is, it’s super easy and doesn’t require any fancy kitchen skills. Here’s what you’ll need:
Ingredients
- 2 cups fresh strawberries, hulled and chopped
- 1/4 cup red onion, finely diced
- 1/4 cup fresh cilantro, chopped
- 1-2 tablespoons jalapeño, seeded and minced (adjust based on your spice preference)
- Juice of 1 lime
- A pinch of salt
The beauty of this recipe is how adjustable it is. Don’t have jalapeño? No problem, you can make a mild version just for the kids! Want it a bit sweeter? Add a teaspoon of honey or agave syrup.
Steps to Make Strawberry Salsa
Prep Your Ingredients: Chop up your strawberries, onion, cilantro, and jalapeño. It’s a fun task to get the kids involved, so maybe let them help with the washing and hulling of the strawberries. They’ll feel like little chefs in no time!
Combine Everything: In a medium bowl, mix all the ingredients. The lime juice brings everything together, and you want to make sure every piece is coated.
Taste and Adjust: Give your salsa a little taste. If it’s too tangy, add a touch more sweetener. If you want more zing, squeeze in more lime juice or toss in another jalapeño.
Chill: For the best flavor, let your salsa sit in the fridge for about 30 minutes. It allows the flavors to meld beautifully. Your house will smell heavenly!
Serve: Enjoy your strawberry salsa with tortilla chips or on top of grilled chicken or fish. You could even use it as a topping on your favorite pancakes for a breakfast twist!
Fun Ways to Enjoy Strawberry Salsa
There are so many ways to incorporate this fresh salsa into your meals. Here are a few ideas to get you started:
- Tacos: Use it as a topping on fish tacos for a refreshing kick.
- Grilled Chicken: How about serving it over grilled chicken? It will elevate your weeknight dinners in a flash. If you want to check out a delicious recipe for grilled chicken with strawberry salsa, take a look at this balsamic chicken recipe.
- Side Salad: Mix it into a simple green salad for a pop of color and flavor.
- Breakfast Bowls: Use it in yogurt or oatmeal for a delightful morning surprise.
Benefits of Strawberries for Little Ones
Let’s be honest, getting your children to eat fruits can sometimes be a challenge. We’ve all been there! But strawberry salsa can be an enticing way to get kids excited about fruits. Here are a few reasons why strawberries are a fantastic addition to your child’s diet:
- High in Vitamin C: They help boost the immune system and contribute to overall health.
- Dietary Fiber: Helps with digestion, especially for those little tummies.
- Antioxidants: Great for fighting free radicals, promoting healthy growth.
By turning strawberries into a fun salsa, you’re not only enhancing their meal experience but also fostering their love for fresh produce.
What If Your Kids Are Picky Eaters?
If your little ones are notoriously picky eaters, it can feel daunting to introduce new foods, even something as enticing as strawberry salsa. Here’s a little insight from my own journey—don’t get discouraged. One trick is to engage them in the process. Let them help wash and prep the strawberries, or even let them taste each ingredient as it goes in. Sometimes, just being part of the process can make them more open to trying new flavors.
And remember, it’s completely normal for kids to need several exposures to a new food before they accept it. One day they might declare they hate strawberries, and the next they’ll be asking for more of that "red stuff" on their chicken. Keep offering without pressure, and their tastes may surprise you!
Mistakes to Avoid When Making Strawberry Salsa
Making strawberry salsa seems straightforward, but here are a couple of common pitfalls to watch out for:
- Overripe Strawberries: While they might look tasty, overly ripe strawberries can turn mushy and affect the texture of your salsa. Aim for perfectly ripe but firm berries.
- Too Much Lime: It’s tempting to squeeze in a lot of lime juice for a zesty kick, but too much can overpower the natural sweetness of the strawberries. Start with a small amount and taste!
Quick Tips for Strawberry Salsa Lovers
- Batch It Up: Why not make a bigger batch? It keeps well in the fridge for about 2-3 days.
- Freeze: If you’re overwhelmed with strawberries, chop and freeze them. They’ll still work well in the salsa—but the texture may be different.
Bonus Ideas
Feel free to get creative! You can substitute strawberries with other berries like raspberries or blueberries. You can also add fruits like mango for a tropical twist or even mix in some diced apples for added crunch.
Conclusion
Incorporating well-balanced and nutritious foods like strawberry salsa into your family’s meal plan isn’t just about feeding your kids. It’s about creating joyful moments around food, exploring new flavors, and encouraging healthy habits from a young age. As you serve your strawberry salsa with grilled chicken or use it creatively in different meals, watch your children flourish with excitement. The journey of instilling good eating habits starts with fun, and strawberry salsa is a fantastic way to kick things off! If you’re looking for more delicious dinner ideas, be sure to check out these toddler-friendly dinner ideas. Plus, for a delightful grilled chicken recipe, see this healthy chicken option, and enjoy the deliciousness that awaits!
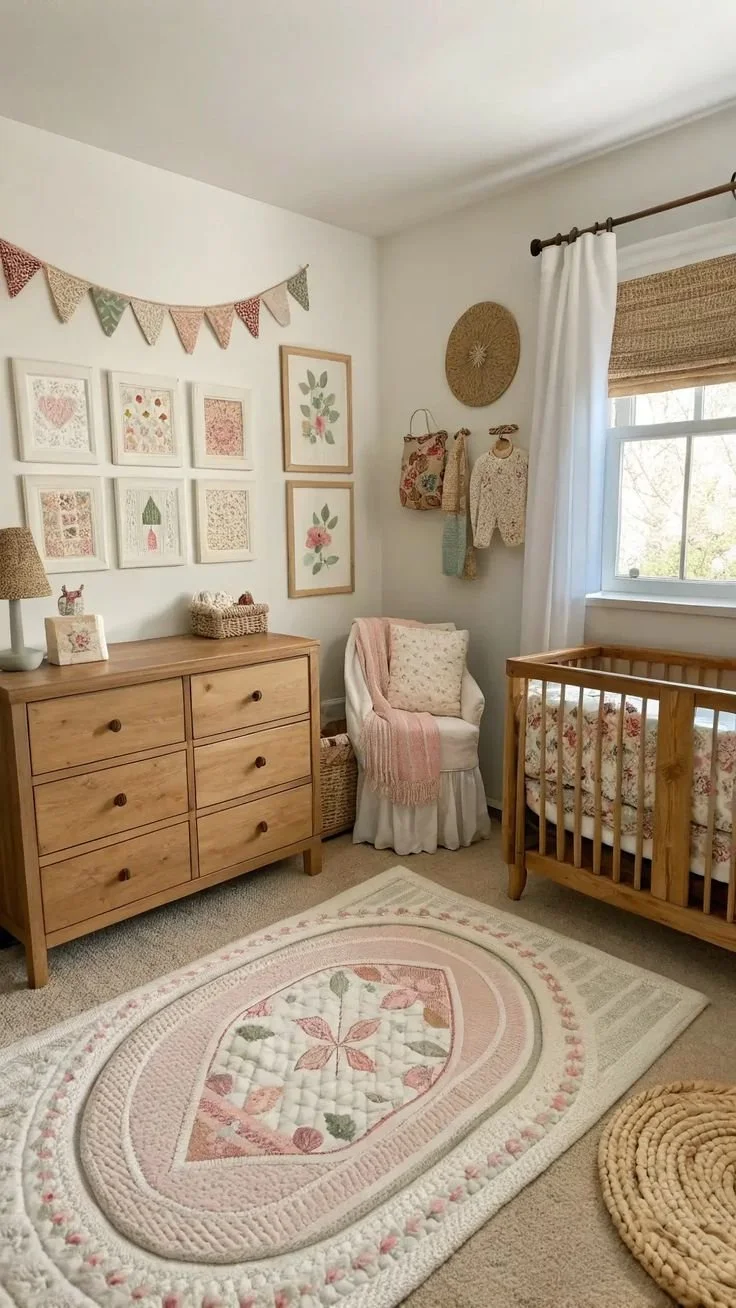
Woodland Themed Cottagecore Nursery Ideas for a Whimsical Touch
Imagine stepping into a nursery that feels like a warm, inviting hug. Picture soft pastel colors dancing on the walls while handmade touches breathe life into every corner. Sounds delightful, doesn’t it? If you’ve recently become a parent, maybe you’re feeling the pressure to make your nursery not just functional but also a cozy sanctuary that feels like home. You’re not alone in this. Transforming your baby’s space into a cottagecore haven is not only achievable but can also be done affordably, with love and creativity at the core of every decision.
Cottagecore decor, characterized by its vintage charm and artisanal flair, is all the rage these days—especially among parents who want to create an enchanting and nurturing atmosphere for their little ones. The best part? You can achieve this look on a budget through simple, handmade touches that add rich character and warmth. Let’s dive into how you can weave the essence of cottagecore into your nursery, creating a space that’s both adorable and functional.
Embracing Soft Colors for a Calming Ambiance
Colors play a crucial role in setting the mood of any room, and a nursery is no exception. Don’t stress about picking the perfect palette—embracing soft, muted tones like gentle greens, blush pinks, and mellow yellows can create a serene environment. These colors reflect the natural world, instilling peace and comfort.
Now, you might be wondering how to incorporate these colors affordably. One great tip is to paint just one accent wall or use removable wallpaper with botanical patterns to add interest without overwhelming the space or going over budget. You might even choose fabric in delightful old-world florals to drape over a changing table or to create curtains. This personal touch not only enhances the theme but can really set the tone.
Elevating the Space with Handmade Touches
Here’s the thing: there’s something special about handmade decor. It tells a story and gives the nursery a unique character that mass-produced items can’t replicate. Think of personalized items like a quilt stitched with love by a family member or a mobile created from repurposed natural materials like twigs and yarn.
You might consider adding a hand-knitted blanket draped over a rocking chair or an art piece created by you or your child, highlighting their very first scribbles. These touches show not just style but also thoughtfulness and connection. They can help foster a sense of belonging and comfort for your little one as they grow.
DIY Craft Projects to Get You Started
Feeling crafty? Despite our busy lives as parents, we can carve out a little time for some fun DIY projects. Here are a few creative ideas that can seamlessly fit into your cottagecore nursery design:
- Framed Artwork: Use pages from vintage books or old botanical prints, frame them, and place them around the room.
- Woven Baskets: These can be used for storage and add a rustic touch. You can create your own using natural fibers or even upcycle old baskets with some paint.
- Hand-painted Signs: Try your hand at calligraphy for a special sign that says something personal, like ‘Dream Big’ or your little one’s name.
- Soft Cushions: Sew cushions from soft fabric. You can use floral patterns or even patchwork from your child’s old clothes for a personal touch.
- Natural Elements: Collect pine cones, twigs, and leaves from your walks with your little one and incorporate them into tabletop displays.
The Power of Woven Elements
Adding woven elements to your nursery can significantly elevate its warmth and texture. Think cozy rugs, handmade baskets, or even woven wall hangings that tie all your color choices together. These elements not only enhance the look but also create inviting textures for your baby to explore.
When selecting woven items, consider natural materials like jute, cotton, or wicker. You might even want to try your hand at weaving a small mat or wall art! It’s a lovely, meditative process that can ultimately become part of your nursery’s charming aesthetic.
Simple Touches That Make a Difference
Sometimes, the smallest touches can make the biggest impact. Here are a few finishing touches that can add warmth and character without breaking the bank:
- Vintage Finds: Scour thrift stores or online marketplaces for vintage books, toys, or frames. These items can tell a story and spark your child’s imagination.
- Plants: Incorporate soft, easy-to-care-for plants like string-of-hearts or snake plants. They add a burst of life and beauty to any corner and are beneficial for air quality.
- Soft Lighting: Use fairy lights or a vintage lamp with a soft shade to create a dreamy atmosphere during naps and nighttime.
- Personalized Items: Have your child’s birth date embroidered onto a pillow or add their handprints to a wall canvas—it’s the perfect way to celebrate their early days.
Planning Your Artisanal Touches
To make your dream nursery a reality, it’s essential to plan ahead. Start by mapping out your projects. Whether it’s a weekend workshop with friends to create personalized decor or tackling one DIY project every few weeks, breaking it down can make the process enjoyable and less daunting.
- Create a Mood Board: Gather inspiration from various sources—think Pinterest, home magazines, or even walks in nature. Lay out colors, textures, and styles that speak to you.
- Shop Local or Online: Look for local artisans or online shops that sell handmade goods. You’d be surprised by the lovely finds that embody that cottagecore aesthetic.
- Involve Your Kids: As they grow, let them help with projects that are age-appropriate. Kids love being involved, and it teaches them the value of creativity and kindness.
Conclusion
Creating a cottagecore nursery filled with handmade beauty is a heartwarming journey that can enrich both your child’s space and your family life. We all want our little ones to feel cherished and nurtured in a cozy haven. From soft colors and artisanal crafts to woven touches and delightful DIY projects, the possibilities are endless.
So, as you embark on this decor adventure, remember, the love you pour into your child’s space will surely reflect in the warm atmosphere you cultivate. Start your handmade transformation today—select your craft projects, plan your artisanal touches, and let your creativity flow.
And if you’re looking for further inspiration or ideas, check out resources like My Dream French Country Nursery or explore stunning visuals with Framed 3D Textured Vintage Wall Art. Additionally, for a dose of whimsical charm, take a look at Dreamy Whimsical Girls’ Bedroom Ideas. Happy decorating!
