
Ridiculously Fun Outdoor Games for Kids to Boost Summer Fun
Imagine a sunny Saturday morning, the birds are chirping, and your kids are bouncing off the walls with boundless energy. You’re starting to feel that familiar tug of mom or dad guilt—those screen-time hours have been creeping up, haven’t they? We’ve all been there, especially during the long summer days when it’s easy to slip into lazy habits. But what if I told you there’s a world of fun that awaits just outside your door? Let’s get those kiddos outside this summer with some awesomely fun and incredibly easy outdoor games!
Outdoor games are perfect for family bonding, summer birthday parties, or just relieving those summer vacation boredom blues. So, grab some sunscreen, your favorite summer beverage, and let’s dive into a list of ten fun games that’ll keep your kids active and entertained.
Classic Relay Races
Who doesn’t love a good relay race? It’s simple, adaptable, and loads of fun! You can split into teams, or just race against the clock. Whether you’re hopping on one leg, balancing a spoon and a ball, or carrying a water balloon, everyone gets to join in. Just make sure you choose a safe space—maybe your backyard or a local park.
Why It Works
Relay races encourage teamwork, improve coordination, and, let’s be honest, offer a chance for some hilarious moments. You might just find that your little one has a knack for running with a water balloon without popping it!
DIY Obstacle Course
Here’s the thing: kids are naturally drawn to challenges. Setting up a DIY obstacle course can be as simple or as complex as you like. Use cones, hula hoops, jump ropes, and anything else lying around to create an exciting course. You can even throw in some “frozen” sections where they have to balance on one foot!
Tips for Success
- Start small. If your kids are younger, a few cones to weave through might be perfect.
- Time them for added competition—who doesn’t love a little friendly rivalry?
- Change up the course regularly to keep the excitement going.
Nature Scavenger Hunt
Let’s be honest: do your kids ever tire of scavenger hunts? Probably not! Create a simple list of natural items (like a pine cone, different types of leaves, or a specific flower) and let them search around your yard or a nearby park.
Making It Special
You could even set up small prizes for who finds the most items. Not only are they exercising, but they’re also learning to appreciate the nature around them.
Water Balloon Toss
With the heat rising, water balloon games are an absolute must! Grab a pack of water balloons and have a good old-fashioned toss. Start close together and take a step back after each successful catch. The giggles that will ensue as balloons burst are pure joy.
Safety Precautions
Be careful! This game can get a bit slippery, so keep it on grass or somewhere safe for little feet.
Sidewalk Chalk Creations
Never underestimate the power of sidewalk chalk. Allow your kids to unleash their creativity by drawing their favorite dinosaurs, superheroes, or even hopscotch designs.
The Learning Curve
You could incorporate learning into this game by challenging them to spell out their names or draw shapes. It’s an artsy way to get their brain gears turning while enjoying the fresh air.
Capture the Flag
Ah, the nostalgic game of Capture the Flag. This one really gets the heart pumping! Split the kids into two teams, give them flags (or even just a bright cloth), and set boundaries for your “battlefield.”
Why It’s Fun
This classic game promotes teamwork, strategy, and all-out fun! Plus, it can be played anywhere, ensuring your kids will have a blast no matter where you are.
Freeze Tag
A tried-and-true favorite in our household! In this energetic twist on the classic tag, the person who’s “it” must freeze anyone they tag. Friends can unfreeze players with a high-five.
Getting Creative
To mix things up, try themed freeze tags like “animal freeze” (players freeze like their favorite animal) or “ice and fire” (freezing while making sure to avoid being too slow).
Nature Bingo
Create bingo cards filled with different nature items (like bugs, leaves, and trees). Take the kids on a nature walk and see who can spot the most items.
A Fun Twist
If you’re feeling crafty, use real leaves or flowers to make bingo cards. It’s a fun way to get creative and enjoy a day outside!
Family Olympics
What if your backyard became the venue for the Family Olympics? Set up different stations with activities like mini golf, sprints, and frisbee tossing.
Make it Memorable
Don’t forget to create medals or certificates! Kids love recognition, and it adds a little extra spice to the competition.
Bonus Ideas
Need even more inspiration? Here are a few extra games to keep the fun rolling:
- Bubble Blowing Contest: Who can blow the biggest bubble?
- Frisbee Golf: Set up targets and see who can hit them the most often.
- Kite Flying: Nothing like a breezy summer day with kites soaring high!
Conclusion
So there you have it—ten incredibly fun and easy outdoor games that’ll get your kids outside and engaged this summer. Whether it’s the thrill of a relay race or the creativity of sidewalk chalk, these activities can turn any ordinary day into an extraordinary one filled with laughter and memories.
As we dive into summer, it’s essential to make the most of those beautiful sunny days. You’ll not only create lasting memories but also foster a love for the outdoors in your little ones. If you’re looking for additional inspiration, check out these ridiculously fun outdoor games for kids or explore these backyard ideas to keep kids playing outside all summer. So, gear up, step outside, and let the adventures begin!
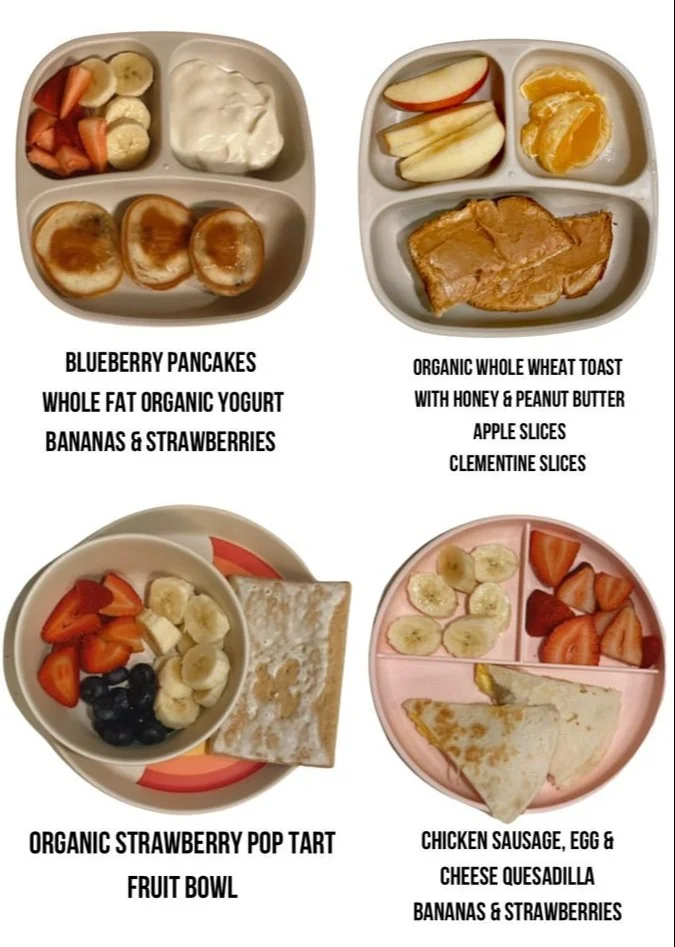
Easy Toddler Breakfast Inspiration Ideas for Busy Mornings
Imagine this: It’s a weekday morning, the sun peeks through the window, and you’ve got a busy day ahead. You’ve got just enough time for a quick breakfast before diving into the morning routine with your little ones. Sound familiar? We’ve all been there! Getting toddlers and kids to eat a nutritious breakfast can feel like a battle sometimes. They may surprise you by refusing food they loved yesterday! But don’t worry, I’ve got your back with some quick and easy breakfast ideas that even the pickiest eaters will love. Let’s dive in!
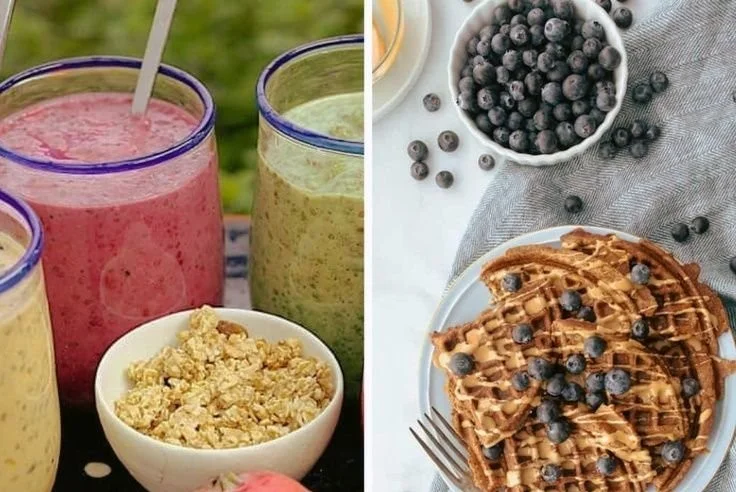
Breakfast Smoothies That Pack a Punch
Smoothies are not only quick to whip up but also a fantastic way to include fruits and vegetables in your child’s diet. Here’s the thing: you can tailor them to include your child’s favorite flavors.
Berry Banana Delight
- Ingredients:
- 1 banana
- 1 cup of mixed berries (fresh or frozen)
- 1 cup of yogurt or milk
- A spoonful of honey (optional)
- Instructions: Blend everything until smooth. Serve in a fun cup with a colorful straw to make it exciting!
Now, if your little one is feeling adventurous, you can even sneak in a handful of spinach. They won’t even taste it!
Quick Oatmeal Options
Oatmeal is a classic breakfast choice and can be prepared in just a few minutes. Plus, it’s super versatile!
Overnight Oats
- Ingredients:
- 1/2 cup rolled oats
- 1 cup milk or yogurt
- A dash of cinnamon
- Toppings like strawberries, bananas, or nuts
- Instructions: Combine all ingredients in a jar, stir well, and refrigerate overnight. In the morning, it’s ready to go!
Overnight oats can save you time in the morning rush. You can even prepare different flavors for the week ahead.
Microwave Oatmeal
- Ingredients:
- 1/2 cup quick oats
- 1 cup water or milk
- Toppings: fruits, nuts, or a drizzle of maple syrup
- Instructions: Microwave for about 1-2 minutes. Stir and let it cool slightly before serving.
I like to let my little ones choose their own toppings. It makes them feel involved, and then they’re more likely to eat it!
Egg-citing Breakfast Ideas
Eggs are packed with protein and can be prepared in numerous ways. Here are a couple of methods that take mere minutes.
Scrambled Eggs with Veggies
- Ingredients:
- 2 eggs
- A handful of spinach or diced veggies
- Instructions: Scramble the eggs in a non-stick skillet and toss in veggies as they cook. Serve with toast.
It’s quick, nutritious, and you can sneak in those greens without a fuss.
Egg Muffins
- Ingredients:
- 6 eggs
- Diced vegetables (like bell peppers and spinach)
- Cheese (optional)
- Instructions: Whisk the eggs together, add vegetables and cheese, pour into a muffin tin, and bake at 350°F for 15-20 minutes.
These are fantastic to prepare in advance for those busy mornings. Just pop one in the microwave, and you’re set!
Toast Variations
Let’s be honest, toast doesn’t have to be boring. It can be a blank canvas for all sorts of tasty toppings.
Avocado Toast
- Ingredients:
- 1 ripe avocado
- Whole-grain bread
- A pinch of salt and pepper
- Instructions: Mash the avocado onto the toast and sprinkle with a bit of salt and pepper. Add a slice of tomato on top for some color and flavor!
Kids love the creamy texture, and it’s full of healthy fats to keep their energy up.
Peanut Butter and Banana Toast
- Ingredients:
- Whole-grain bread
- Peanut butter
- Banana slices
- Instructions: Spread peanut butter on your toast, top with banana slices, and even drizzle a bit of honey for sweetness.
This one is a crowd-pleaser! Plus, it’s super filling for busy toddler mornings.
Homemade Pancakes and Waffles
Who says pancakes and waffles are just for weekends? With a little prep, you can enjoy them any day!
Freezer-Friendly Pancakes
- Ingredients:
- 1 cup flour
- 1 cup milk
- 1 egg
- 1 tsp baking powder
- Instructions: Mix all ingredients and cook on a skillet. Once cooled, you can freeze them!
On busy mornings, just pop them in the toaster for a quick, warm breakfast.
Waffle Dippers
- Ingredients:
- Waffle mix or store-bought waffles
- Instructions: Make waffles, cut them into strips, and serve with a small bowl of yogurt or syrup for dipping.
Waffle dippers turn breakfast into a fun activity. Kids love having that hands-on experience!
Fruit and Yogurt Parfaits
If you’re looking for something a bit more visually pleasing, fruit and yogurt parfaits are a hit. They look fancy but are incredibly simple to make!
Build Your Own Parfait
- Ingredients:
- Yogurt (any flavor)
- Granola
- Fresh fruits
- Instructions: Layer yogurt, fruits, and granola in a clear cup or bowl.
Not only do kids love the colors, but it also encourages them to explore different flavors!
Quick Tips for Breakfast Success
- Prep Ahead: Spend a little time on Sundays preparing breakfast staples for the week. This includes chopping fruits or pre-measuring dry ingredients.
- Keep It Simple: Sometimes, all they need is a piece of fruit or toast. We tend to feel pressure to make breakfast ‘perfect,’ but a simple meal is often all they need.
- Get Them Involved: Letting kids help with breakfast can make them more excited to try new foods. Whether it’s stirring a bowl of oats or picking out their fruit, involvement is key.
Mistakes to Avoid
- Rushing the Morning: A chaotic breakfast can set the wrong tone for the day. Give yourself some buffer time.
- Ignoring Preferences: Just because one breakfast is a hit one day doesn’t mean it’ll be a slam dunk the next. Pay attention to what your child enjoys and adapt accordingly.
- Overcomplicating Breakfast: Sometimes less is more. Stick to the basics when time’s tight.
Bonus Ideas
Feeling adventurous? Here are a few more quick ideas:
- Peanut Butter Banana Smoothie Pops – Blend, pour into molds, and freeze for later.
- Mini Breakfast Burritos – Fill tortillas with scrambled eggs and cheese, roll them up, and they’re ready to eat on the go.
- Fruit Salad Cups – Mix your child’s favorite fruits together for a refreshing start.
Conclusion
Feeding toddlers can be a journey filled with ups and downs, and sometimes, breakfast is where the magic happens (or not!). Just remember, it’s about finding what works for your family and making mealtime enjoyable rather than stressful. Whether you choose a quick smoothie, hearty oatmeal, or avocado toast, the main goal is to kickstart their day with something nutritious and delicious.
If you’re looking for even more ideas, I highly recommend checking out 12 Days of Unprocessed Toddler Breakfast Ideas for some fresh perspectives. You can also explore the extensive list of recipes at 30+ Healthy Toddler Breakfast Ideas that can inspire your morning routine. Remember, you’re not alone in this parenting adventure—let’s make breakfast a delightful experience together!
Easy Nutritious Meal Ideas for Breastfeeding Moms You Can Make
Imagine this: It’s the middle of the day, you’re caring for your little one, and suddenly, hunger pangs hit. You know you need to nourish yourself, not just for you but for your baby too. We’ve all been there. As a new mom, your energy levels can dip faster than you can say "breastfeeding," and preparing healthy meals might feel like climbing a mountain. But here’s the deal—eating well is crucial for maintaining your milk supply and overall energy.
What if I told you that you can whip up delicious meals without spending all day in the kitchen? I’m talking about meals that are not just healthy but also easy to prepare and perfect for busy breastfeeding moms. By rotating through a list of quick and nutritious meals, you can simplify your mealtime and keep both you and your little one happy.
Breakfast Ideas to Kickstart Your Day
Let’s start with breakfast, the most important meal of the day (as they say, right?). It’s critical to fuel up, especially since you’re doing the incredible work of breastfeeding.
Overnight Oats
- Combine rolled oats, yogurt, and your favorite fruits in a jar.
- Refrigerate overnight and grab it in the morning.
Tip: Add nuts and seeds for healthy fats.
Smoothie Bowl
- Blend spinach, banana, and almond milk.
- Pour into a bowl and top with granola and berries.
Scrambled Eggs with Spinach
- Whisk eggs and sauté with a handful of fresh spinach.
- Serve on whole-grain toast for added fiber.
Pro Tip: You can even prepare a batch of scrambled eggs and keep them in the fridge for quick breakfasts throughout the week.
Snack Time Boosters
You know those days when you need a little something to keep you going? Healthy snacks are key.
Nut Butter and Apple Slices
- Slice up an apple and serve with almond or peanut butter.
Why It Works: This combination is full of healthy fats and protein to keep you full.
Greek Yogurt with Honey and Nuts
- Scoop some Greek yogurt into a bowl, drizzle with honey, and toss in your favorite nuts.
Hummus and Veggies
- Pair hummus with carrot sticks, cucumbers, or bell peppers.
Hearty Lunch Ideas
Lunchtime can sometimes feel like a race, especially with a toddler on your hands. But these meals are not only nutritious but also quick to prepare.
Quinoa Salad with Chickpeas
- Cook quinoa and mix it with canned chickpeas, diced tomatoes, and cucumber.
- Drizzle with olive oil and lemon juice.
What if you make a big batch? You’ll have lunch ready for several days!
Chicken Wraps
- Use whole wheat tortillas filled with grilled chicken, avocado, and leafy greens.
- Add a splash of your favorite dressing to tie it all together.
Lentil Soup
- A big pot of lentil soup can last for several meals.
- Throw in some carrots and spinach if you have them—bonus nutrients!
Dinner Delights for Energy
At the end of a long day, you need a meal that’s fulfilling yet easy to prepare.
Baked Salmon with Sweet Potato
- Simply season salmon fillets and bake them in the oven alongside sweet potato wedges.
One-Pan Veggie Stir-Fry
- Toss your favorite veggies and protein (like tofu or chicken) in a pan and stir-fry.
- Serve over brown rice or quinoa.
Pasta Primavera
- Cook your preferred pasta and add sautéed seasonal veggies.
- Toss in some olive oil and fresh herbs for flavor.
Time-Saving Meal Prep Tips
Let’s be real; meal prep can feel daunting. But not with these practical hacks.
- Batch Cooking: Spend one day preparing large quantities of your favorite meals.
- Invest in Containers: Use clear containers to store prepped meals so you can easily see what’s ready to go.
Quick Tips for Staying Nourished
You might be wondering what other quick tricks can help you keep your plate colorful and nutritious:
- Keep It Simple: Use simple recipes that require minimal ingredients. Think of dishes that have a mix of protein, carbs, and healthy fats.
- Focus on Variety: Rotate proteins and vegetables each week. This not only keeps meals exciting but also ensures you’re getting a range of nutrients.
Mistakes to Avoid
In our busy lives, even the best-laid plans can go awry. Here are a couple of things to watch out for:
- Skipping Meals: I know, it can be easy to forget to eat while chasing a toddler, but skipping meals can lead to low energy and reduced milk supply.
- Relying on Processed Foods: While they can be a quick solution, processed foods may lack the nutrients breastfeeding moms need.
Bonus Ideas for Busy Parents
These might not fit into the traditional meal categories but are perfect for quick bites.
- Energy Bites: Combine oats, nut butter, honey, and mini chocolate chips. Roll them into bite-sized balls for an on-the-go snack.
- Chia Seed Pudding: Mix chia seeds with coconut milk and let it set in the fridge overnight. Top with fresh fruit.
Conclusion
Feeding yourself well is just as important as feeding your baby, and it can truly be done without slaving away in the kitchen. With these 55 healthy meals for breastfeeding moms at your disposal, you’re well-equipped to nourish yourself and keep your energy levels high. Let’s face it, being a new mom is exhausting, but that doesn’t mean meal times have to be!
If you’re looking for more inspiration, check out these easy meal ideas specifically for breastfeeding. Additionally, for some more general insights on a breastfeeding diet, you might find the BBC Good Food guide helpful. Remember, each meal counts, and you’ve got this!
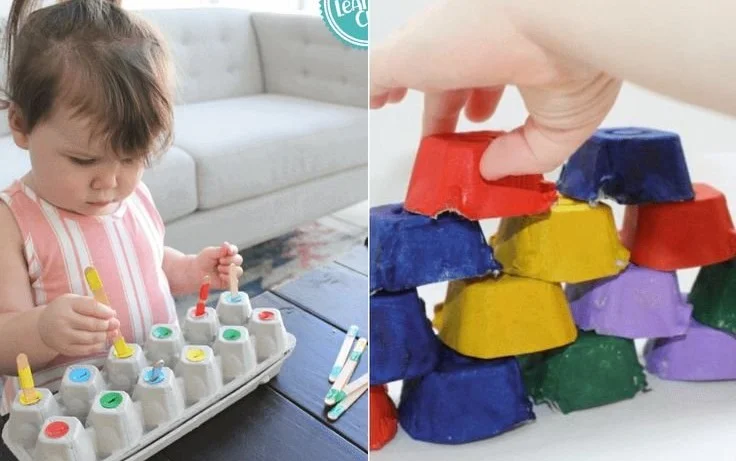
Creative Egg Carton Activities for Kids That Spark Fun & Learning
Imagine this: it’s a rainy day, and your toddler is bursting with energy, while you’re staring at a pile of empty egg cartons that you’ve been meaning to recycle. Sound familiar? Instead of letting them go to waste, you can transform these everyday items into fun, engaging activities for your little ones. It’s amazing what you can create from something as simple as an egg carton, and I’m excited to share all the delightful possibilities with you. Let’s explore the wonderful world of egg carton crafts!
Encouraging Imagination
Egg cartons are a fantastic medium for sparking creativity. They’re versatile, easy to manipulate, and perfect for little hands. Toddlers and preschoolers will love getting their hands sticky with glue, painting, and creating fun characters or objects. Here’s the thing, engaging in crafts like this can also help develop fine motor skills, promote imaginative play, and even build connections with you, their favorite playmate.
Egg Carton Animals
One of the first things that come to mind is creating animals using egg cartons. Think about it. The shape and compartments of an egg carton lend themselves perfectly for crafting adorable critters!
- Bunny Ears: Cut the carton to shape a bunny face and paint it white. Then, cut out two triangular shapes from the top other side for those cute long ears.
- Ladybug: Cut the carton in half, paint it red, and add black dots for a classic ladybug look. Add pipe cleaners for antennae.
- Caterpillars: Use sections of the egg carton to create a colorful caterpillar. Each segment can be painted a different color. It’s a fun way to discuss colors, too!
Fun Sorting Games
If your child is starting to understand colors and shapes, you can use egg cartons to create sorting games. This does wonders for their cognitive skills, and you might find yourself having just as much fun!
- Color Sorting: Grab some paint or colored paper and let your child decorate the sections of the egg carton in different colors. Once they’ve dried, have them sort colored objects (like buttons or pom-poms) into the respective compartments.
- Shape Matching: Cut out different shapes from colored cardboard. Ask your toddler to match them to the right section in the egg carton. This helps with both shape recognition and hand-eye coordination.
Creative Art Projects
Art is an essential outlet, isn’t it? Use egg cartons as a canvas for your kid’s artistry!
- Paint Palettes: Use the sections of an egg carton as paint palettes. The dividers can hold different colors, making clean-up easy.
- Miniature Gardens: Have your child paint the carton green and fill each section with soil and small flowers or succulents. It’s a cool way to teach them about nature while keeping them busy.
Playtime Ideas
Let’s be honest, busy kids need plenty of playtime, and egg cartons can help with that too!
- Egg Carton Phone: Turn one half of the carton into a fun pretend phone. Add some string for a handle, and watch as your child engages in imaginative play, pretending to chat away.
- Mini Bowling: Use empty egg cartons as bowling pins! Set them up and give your kiddos a soft ball to roll. It’s a fantastic way to promote gross motor skills and healthy competition.
Sounds and Music
Music time is so much fun! You can bring some rhythm into your home with simple egg carton musical instruments.
- Shakers: Fill sections of an egg carton with rice or beans, and seal them up. Your child will love shaking them to make music.
- Drums: If you have a full carton, you can use it as a makeshift drum, tapping away with wooden spoons.
Seasonal Crafts
The creativity doesn’t have to stop with basic items. Why not create seasonal crafts?
- Halloween Spiders: Paint the carton black and attach pipe cleaners for legs. A few googly eyes, and you have a creepy little spider perfect for Halloween decor.
- Christmas Ornaments: Cut the cups of the carton into sections, paint them festive colors, and hang them from your tree. They’ll give you that homemade touch that everyone loves.
Everyday Uses
Egg cartons are not just for crafting; they’re practical too.
- Seed Starters: If you’re like me and love gardening, use the cartons to start seedlings. It’s a great way to teach your child about gardening and patience as they watch plants grow.
- Organizers: Repurpose them to store small items, from small toys to art supplies, helping you keep the chaos to a minimum.
Bonus Egg Carton Ideas
The sky’s the limit when it comes to creativity! Here are a few more suggestions to fuel your imagination:
- Paintbrush Holders: Create holders for your art supplies by cutting the egg carton and keeping brushes upright.
- Animal Masks: With some cutting, gluing, and painting, egg cartons can turn into whimsical masks for dress-up play.
Quick Tips for Success
Now, you might be wondering how to make the most out of these projects. Here are a few handy tips:
- Preparation is Key: Get the materials ready before the activity, so your little one can dive right into the fun without getting distracted.
- Let Them Lead: Encourage your child to express their ideas and take the lead in the project. It boosts their confidence and creativity.
- Be Open-Ended: Don’t stress if the final product doesn’t turn out “perfect.” The process is what matters most where memories are made.
Common Mistakes to Avoid
Don’t worry, we all make mistakes along the way! Here are a couple of things to keep in mind:
- Avoid Overcomplicating: Sometimes we think projects need to be intricate when the best creations are simple.
- Be Mindful of Supplies: Make sure to have scissors and other tools that are safe for your child’s age to prevent any accidents.
Conclusion
Crafting with egg cartons is such an enjoyable activity that opens a world of creativity for both you and your children. From making animals to engaging in sensory play through music, the possibilities are endless. And the best part? You’re recycling, which is fantastic for our planet!
If you’re looking for more inspiration, check out these easy egg carton matching activities or explore creative play ideas to keep the fun going. Remember, these moments spent creating together enrich not just their development but your bond as well. You’re giving them tools to explore their imagination—what could be more rewarding? Happy crafting!
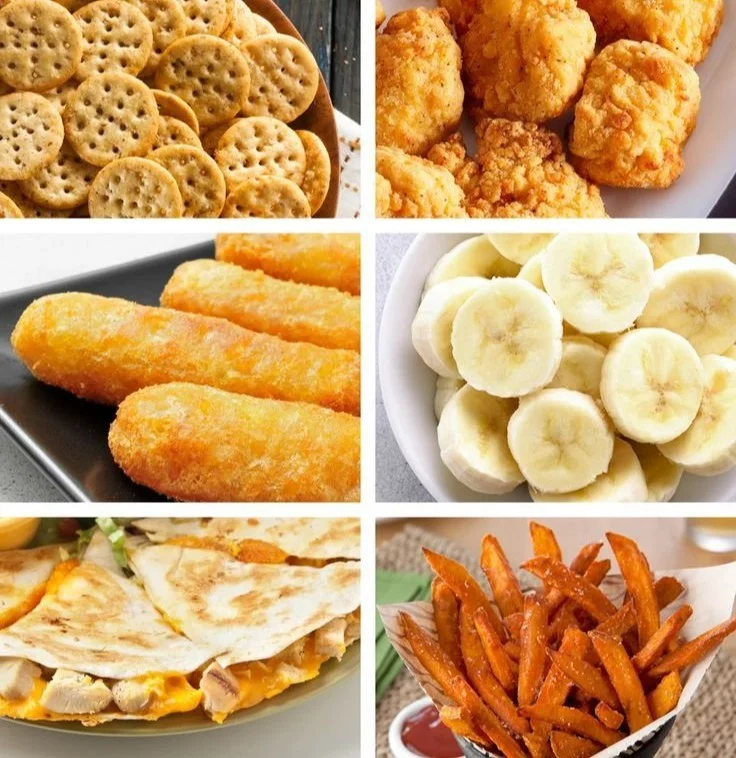
Handheld Finger Foods for Toddlers and Kids Easy, Tasty, Mess-Free
Imagine this: it’s lunchtime, and your toddler is sitting in their high chair, casually throwing their food on the floor while you stressfully try to find something they might actually eat. Sound familiar? It’s a scene we’ve all been in, and it can be frustrating. Finding new and exciting finger foods for your little ones that are also nutritious feels like an ongoing quest. The good news is that I’ve got some simple and delicious toddler finger foods that even the pickiest eaters are likely to enjoy!
These finger foods are designed to be easy to grab and hold in those little hands, and they’re perfect for curious little ones who love to explore new flavors. Let’s dive into these 49 tasty bites that will keep the mealtime stress at bay and help your child expand their palate!
Simple Toddler Finger Foods
Fruits
Banana Slices: Soft and sweet, bananas are a classic finger food. Try cutting them into thin discs or small strips.
Apple Wedges: Peel and slice apples into manageable wedges. Serve them raw for a crunch or lightly steam for softness.
Berries: Raspberries, blueberries, and strawberries are vibrant and bite-sized. Just rinse them off, and they’re ready to go.
Grapes: Cut grapes in half to make them safer and easier for toddlers to chew. They’re naturally sweet and juicy.
Melon Cubes: Cubed cantaloupe or watermelon are hydrating and delicious. Plus, they’re easy to grasp!
Dried Fruits: Apricots or raisins can be a hit—just watch out for potential choking hazards!
Vegetables
Steamed Broccoli Florets: These little trees are an excellent source of vitamins. Just steam them until they’re soft enough for munching.
Carrot Sticks: Slice cooked or raw carrots into sticks for easy handling. They can also be dipped in hummus for extra fun!
Cucumber Slices: These refreshing bites are hydrating and crisp. Pair them with a little dip for an added flavor kick.
Sweet Potato Wedges: Roast wedges until soft for a naturally sweet option that fits perfectly in tiny hands.
Avocado Slices: Soft and creamy, avocado is nutrient-dense and can be served plain or with a sprinkle of lime juice.
Grains
Cheesy Broccoli Quinoa Bites: These tasty bites pack nutrition in a fun, finger-friendly format. They’re great to introduce quinoa to your toddler! Check out these Cheesy Broccoli Quinoa Bites for a recipe.
Mini Sandwiches: Use whole grain bread, and fill them with nut butter or cream cheese and thin slices of fruit.
Pita Triangles: Cut whole wheat pita bread into triangles and serve with yogurt or hummus for dipping.
Rice Balls: Mold sticky rice into balls (add a bit of peas or carrots inside for color!), which are fun to eat and easy to grab.
Cereal Clusters: Mix whole grain cereal with melted peanut butter and form them into small clusters for easy snacking.
Proteins
Chicken Nuggets: Bake or pan-fry small chicken pieces that are easy to dip and chew. Make them extra appealing with various sauces.
Egg Muffins: Whisk eggs with spinach, cheese, or diced veggies, pour into muffin tins, and bake. These are perfect bite-sized portions.
Mini Meatballs: Roll ground meat (beef, turkey, or chicken) into small balls and bake them. They’re perfect for dipping in sauce.
Tofu Cubes: Soft, scrambled tofu can be a fantastic protein source. Spice it up with a little turmeric or mild seasonings.
Cheese Cubes: Mild cheese options like cheddar or mozzarella can be cut into fun shapes for a quick snack.
Snacks and Sweets
Nut Butter and Banana Wraps: Spread nut butter on whole grain tortillas, place banana on top, roll it up tight, and slice into pieces.
Yogurt Parfaits: Layer Greek yogurt with some crushed cookies or fruits in a cup. Your child will love digging into this treat!
Oatmeal Cookies: Bake cookies filled with oats and ripe bananas or applesauce for a sweet yet wholesome snack.
Homemade Fruit Rolls: Blend fruits, spread them on a sheet, and dehydrate to make tasty fruit leather—an excellent portable snack.
More Ideas
Veggie Chips: Bake thinly sliced kale or sweet potatoes for crispy finger foods.
Pasta Shapes: Cook and cool small pasta shapes. Serve with a bit of olive oil or a light sauce.
Rice Crackers: They’re light, crispy, and easy for toddlers to munch.
Chocolate-covered Pretzels: A fun treat for special occasions, providing a combo of sweet and salty that kids love.
Pancake Bites: Make small pancakes and cut them into bite-sized pieces; they’re versatile and can be filled with berries or bananas.
Frozen Fruit Pops: Puree fruits and freeze them into molds for a refreshing treat on hot days.
Veggie Muffins: Bake muffins with hidden veggies like zucchini or carrots for a healthier twist on a classic snack.
Hummus and Veggie Sticks: A great way to introduce new veggies, kids can dip cucumber sticks or carrot sticks into smooth hummus.
Smoothies in a Cup: Pour smoothies into a sippy cup. This gives toddlers a chance to try different fruits and veggies flavor combinations.
Egg Salad on Cucumber Rounds: A nutritious twist—egg salad on bite-sized cucumber slices makes for a refreshing finger food.
Quick Tips for Mealtime Success
- Experiment with Shapes and Textures: Kids are often more inclined to eat food that is cut into fun shapes or has interesting textures.
- Let Them Help: Getting toddlers involved in meal prep (like tearing lettuce or mixing ingredients) can spark their interest in eating those foods.
- Be Patient: If they refuse something, try again later. Taste buds change, and repetition can help them become familiar with new foods.
Conclusion
Feeding toddlers can be a fun adventure when you have the right finger foods on hand. From nutrient-dense vegetables to satisfying proteins, these options will help you encourage even the pickiest eaters. So, next time you find yourself in the heat of a mealtime battle, try whipping up a few of these ideas. Remember, it’s all about creating a positive experience around food. You’ve got this! If you want to explore more options, check out this list of finger foods for toddlers. And for an easy, delicious snack, don’t miss these mouth-watering Sweet Potato Zucchini Muffins!
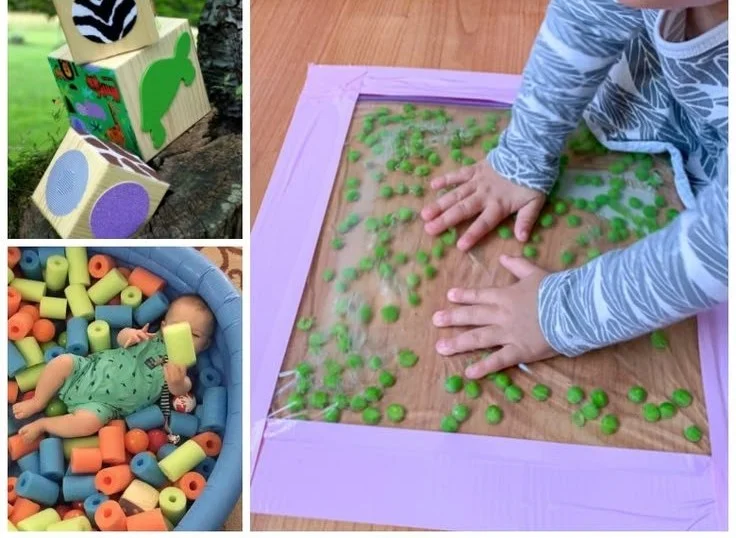
Fun and Easy Activities for Babies That Boost Playtime and Bonding
Imagine this: your little one is lying on their tummy, those tiny fingers reaching for a bright red ball just out of reach. Their giggles fill the room as they wiggle, trying to crawl but totally focused on achieving that goal. Here’s the thing, they’re not just playing — they’re learning. Each little movement helps with their development, and by engaging them in various fun activities, we can enhance those skills while creating beautiful memories together.
If you’re browsing for activities that can entertain and educate your baby, you’re in the right place. I’ve compiled an extensive list of over 29 fun activities that are perfect for babies, promoting growth and bonding time between you and your little one.
Sensory Play
Sensory play is all the rage for a reason. Babies learn about the world through their senses, so here are some stimulating ideas.
Water Play
Fill a shallow tub with a few inches of warm water. Add in some plastic toys for interaction. Let your baby splash and feel the water. Just be sure to keep a close eye on them!
Sand Play
If you have access to a sandbox or a safe beach area, letting your baby explore sand can be quite an adventure! Just scoop some sand in a shallow container and watch them dig their fingers in.
Messy Finger Painting
You might cringe at the thought of cleanup, but trust me, seeing their creations is worth it. Lay down some large paper, squirt some non-toxic paint in splashes, and let your baby go wild exploring textures and mixing colors.
Feel and Explore Bags
Fill a small bag with various textures: smooth pebbles, soft feathers, and crinkly paper. As your baby touches each item, it’ll spark their curiosity and develop their sense of touch.
Indoor Activities
You don’t need to venture outside to engage your baby in fun activities. Here are some indoor options.
Blanket Forts
Create a cozy blanket fort and crawl inside with your baby. You’ll both enjoy the change of scenery and the warmth of being together in a snug spot.
Mirror Play
Babies love looking at their reflections. Set them up in front of a safe mirror and watch their delight as they interact with their own smile.
DIY Ball Pit
Fill a small inflatable pool with colorful balls. Your little one will have a blast bouncing around and throwing them everywhere.
Music and Movement
Music and movement go hand in hand, providing not only entertainment but also significant developmental benefits.
Dance Party
Put on your favorite tunes and have a mini dance-off with your baby in your arms. Feel free to boogie down to some nursery rhymes or upbeat pop. They’ll love the movement and the connection!
Instrument Exploration
Introduce your baby to simple instruments like rattles or tambourines. The sounds will fascinate them, and they can start learning how to create music from a young age.
Baby Yoga
There are plenty of simple yoga stretches you can do with your baby. Lay them on a mat and guide them through gentle movements. It’s a calming and bonding experience.
Creative Storytelling
Story time can be an enchanting experience and boils down to the wonderful world of imagination.
Interactive Books
Get books with textures and pop-ups. As you read, engage your baby by having them touch the pages, which can spark their curiosity and keep them engaged.
Puppet Play
Use simple puppets to tell a story. Babies love movement, and your silly voices combined with the puppets will surely bring giggles.
Family Photo Album
Create an album filled with pictures of family members. As you flip through, tell stories about each person, which helps your baby bond with relatives even if they’re not physically present.
Outdoor Fun
Fresh air does wonders for both you and your baby. Here are some activities to enjoy outside.
Nature Walks
Strolling through a park is a wonderful way for your little one to experience the sights and sounds of nature, from rustling leaves to chirping birds.
Bubble Fun
Blowing bubbles is a classic activity. Watch your baby’s eyes light up as they try to catch them. You might want to film the giggles!
Treasure Hunt
Hide colorful toys or other objects in your garden or yard. Guide your baby to find them, and celebrate each “discovery” with claps and cheers.
Imaginative Play
This type of play often involves role-playing, which is crucial for cognitive development.
Toy Play Kitchen
Set up a toy kitchen and let your baby “cook.” Give them safe, soft utensils to explore. You’ll enjoy watching their imagination flourish as they mimic real-life cooking skills!
Dress-Up Box
Consider creating a box of soft hats, scarves, and fabric. Let your baby explore these textures and feel as if they’re becoming different characters!
Baby Doll Time
Give your little one a doll to hold and care for. This activity encourages nurturing behavior and empathy from a young age.
Quick Tips for Engaging Your Baby
Here’s a quick rundown of some essential tips to keep in mind:
- Keep it Simple: Babies enjoy simple activities. They don’t need elaborate setups.
- Follow Their Lead: Pay attention to what your baby seems excited about, and follow their cues.
- Be Patient: It’s completely normal if your little one doesn’t seem interested. Just try again later!
- Create a Routine: Incorporate these activities into your daily routine, making them something to look forward to.
Mistakes to Avoid
Sometimes, we might accidentally make activities less enjoyable. Here are a few common pitfalls to watch out for:
- Overstimulation: Too many toys or activities can overwhelm your baby. Simplicity is key.
- Ignoring Safety: Always think about safety first. Remove small items or harmful objects from reach.
- Comparing with Others: Each baby develops at their own pace. Focus on your child’s interests and milestones.
Conclusion
Engaging your baby in fun activities is a wonderful way not only to foster their development but also to create lasting bonds. Remember, these moments together are precious and will form the foundation for their growth and learning.
We’ve all been there, juggling naps, feedings, and playtime, but focusing on these enriching experiences can make our parenting journey all the more rewarding.
For even more inspirations and ideas, don’t forget to check out the helpful resources like 29 + Fun & Easy Activities for Babies – Messy Little Monster or discover some fun and engaging activities at What to Do With Your Nanny Kids: Fun, Easy Activities Using KIDZ BOP.
Let your adventures in parenting continue, and here’s to many more giggles and joyful moments ahead!
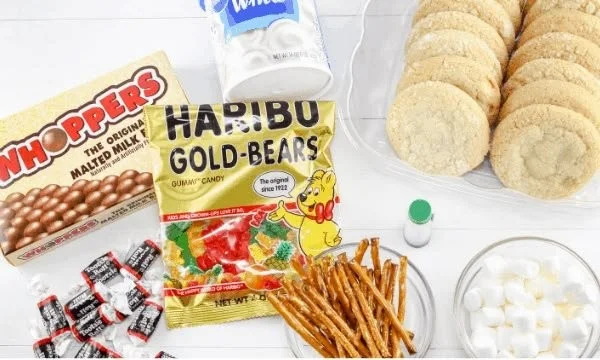
Cozy Campfire Cookies Your Kids Will Love for Family Campouts
Imagine this: it’s a sunny Saturday morning, and the excitement in your house is palpable. Your kids are buzzing around, gathering their gear for a day in the great outdoors with their Trail Life USA troop. As you watch them zip up their backpacks, you can’t help but feel a mix of pride and nostalgia. You’ve seen them grow from tiny toddlers into adventurous little explorers who are not just active but thriving.
If you’re a parent like me, finding activities that channel your children’s energy while nurturing their growth can sometimes feel like a tall order. I mean, let’s be honest: how often have you found yourself torn between the myriad of options available? Between sports, music classes, and playdates, deciding where to invest your time—and your children’s energy—can be overwhelming. But here’s the thing: getting involved with organizations like Trail Life USA can be a game changer.
Why Active Engagement Matters
Kids today are more plugged in (literally) than ever. Whether it’s screen time or organized activities, our little ones often seem to have endless energy. Studies have shown that regular physical activity is essential not just for their physical health, but also for developing social skills and emotional well-being. When my children jumped into Trail Life USA, I quickly noticed a positive shift not just in their activity levels, but in their attitudes too. That’s something I think many parents would love to experience.
Now, you might be wondering how exactly becoming active in groups like Trail Life supports not just children but parents too. Here’s where it gets interesting.
Benefits of Trail Life USA for Kids
Connection with Nature
Trail Life encourages outdoor adventures, which means my kids get to explore nature firsthand. Think about it: there’s nothing quite like seeing your child marvel at a butterfly or navigate a small stream. It’s a joy that can’t be replicated indoors!Building Lifelong Skills
From knot tying to outdoor cooking (hello, campfire cookies!), the skills they learn are practical and applicable in various scenarios. I still remember the first time my son successfully built a small fire; you could see the pride washing over him.Friendship and Teamwork
The friendships that have blossomed from their involvement have been wonderful to witness. By working on group projects and participating in activities, they learn the importance of teamwork and communication.
Benefits of Trail Life USA for Parents
Shared Family Adventures
Being involved means I get to spend quality time with my husband and kids while experiencing the great outdoors together. Taking part in campouts and events has drawn us closer as a family—bonus time with no screens!Community Support
Let’s face it: parenting can be isolating sometimes. Trail Life USA provides a network of families who share similar values, allowing us to connect and support one another. You’re not alone in this parenting journey, and finding your tribe can be incredibly uplifting.Updates on Developmental Milestones
When you have children involved in organized activities, it’s interesting to observe how they tackle new challenges. It allows us as parents to witness their growth in real-time, giving us strategies to nurture their development at home.
What to Expect from Trail Life Activities
If you’re considering letting your kids join Trail Life USA, you might wonder what types of activities are typically involved. Here’s a sneak peek at what you and your family could get involved in:
Camping trips
These are usually more than just overnight stays. They’re about learning skills like setting up tents, cooking over an open fire, and appreciating the environment.Service projects
Trail Life emphasizes giving back to the community. Your kids will not only learn about generosity, but they’ll also experience the joy of helping others.Outdoor skills development
From hiking to survival skills, each outing is an opportunity to equip them for real-life scenarios.
Managing Your Time Effectively
If your schedule already feels packed (and whose doesn’t?), you might be concerned about how much time it takes to fully engage in Trail Life USA. Here are a few tips I’ve found helpful to manage that influx of family activities:
Plan Ahead
At the beginning of each season, review the calendar and note the key dates for meetings and events. This way, you can arrange your family schedule around these exciting outings.Create a Healthy Routine
You might incorporate some activities into your weekly routine, making it easier to stick with it. For example, a Saturday hike once a month can become something the entire family looks forward to.Communicate with the Troop Leader
Staying connected with the troop leader about your family’s commitments can ease scheduling concerns. They often have tips on how families manage balanced schedules while still participating fully.
Healthy Snacking for Outdoor Adventures
Speaking of outdoor trips, let’s chat about snacks! We all know how active kids can get, and keeping them fueled is vital. You’d be amazed at how a well-timed snack can rejuvenate their spirit and keep the fun going.
Some of my favorite go-to snacks include:
Trail mix: Quick, easy, and packed with energy. You can even customize it according to your kids’ preferences.
Nut butter & fruit: Apple slices with nut butter not only taste great, but they also provide lasting energy.
Healthy cookies: Did you know you can make cookies healthier? Check out this fantastic recipe for baby cookies that are also great snack options for your adventures.
Conclusion
It’s incredible to see how being active in Trail Life USA has transformed our family dynamics for the better. I’ve cherished the moments spent outdoors, learned new skills alongside my children, and enjoyed sharing in their triumphs. If you’re seeking a way to connect with nature, foster lifelong friendships, and enrich your children’s lives, Trail Life USA is truly worth considering.
As a final thought, if you’re looking for an easy treat to whip up for your next outdoor excursion, why not try making some campfire cookies? They’re perfect for sharing around the fire, and you can find delicious recipes like this one or explore this fantastic version from Cookies and Cups. Happy parenting, and here’s to many more adventurous days ahead!
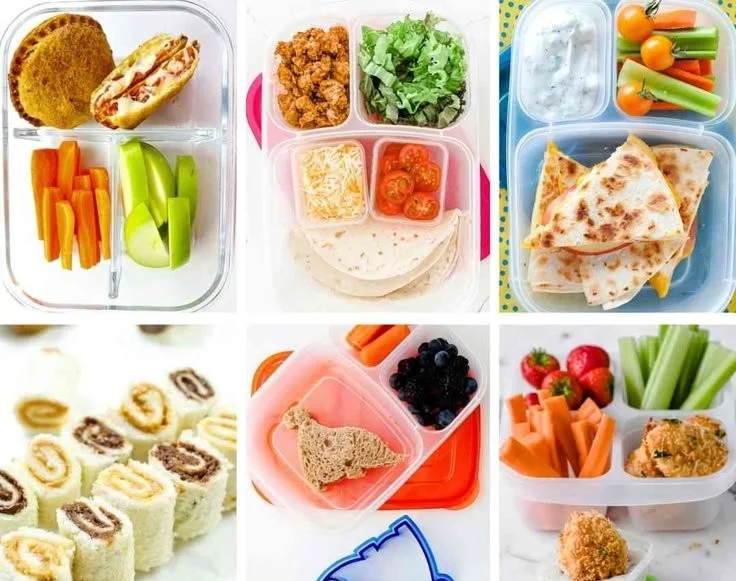
Picky Eater Friendly Healthy Lunches for Kids That Really Work
Imagine this: It’s a crisp Monday morning, and you’ve got the school lunch hustle on your mind. You’ve already armed yourself with a good dose of coffee and a smile, ready to tackle the day, but then you hear it. “I don’t want THAT for lunch!” Your heart sinks just a little. You know how important it is for them to eat well, but getting your picky eater to actually ENJOY their lunch? Yeah, that can be a whole other ball game. You’re definitely not alone in this struggle, and I get it wholeheartedly.
Here’s the thing: Kids can be, well, incredibly particular about what lands on their plates. But fear not! I’ve discovered some fantastic kid-approved healthy school lunch ideas that focus on just a couple of nutritious ingredients. These simple combos are not only nutritious, but they’ll also satisfy those picky palates without a fight.
Easy Wraps That Rule the Lunchbox
Wraps can be a fantastic solution. They’re versatile, easy to eat, and give you the freedom to mix and match ingredients.
Turkey and Cheese Wrap
Ingredients:
- Whole-grain tortilla
- Sliced turkey
- Cheese slices (cheddar is a hit)
How to Assemble:
- Lay the tortilla flat and place turkey slices and cheese in the center.
- Roll tightly, slice into pinwheels, and add a few cherry tomatoes on the side.
Now, picture this: Your kid opens their lunchbox, the colorful pinwheels catch their eye, and before you know it, they’re munching away happily!
Hummus and Veggie Wrap
Ingredients:
- Whole grain tortilla
- Hummus
- Sliced cucumbers and carrots
How to Assemble:
- Spread a layer of hummus over the tortilla.
- Place thinly sliced cucumbers and carrots on top.
- Roll it up like a burrito.
You might think that introducing veggies could be a tough sell, but pair them with hummus? It’s like magic!
Fun with Bento Boxes
Bento boxes can make lunchtime fun and visually appealing. It’s all about creating a variety of textures and flavors.
Sushi Rolls for Kids
Ingredients:
- Sushi rice
- Nori sheets
- Cucumber and avocado
How to Assemble:
- Cook the sushi rice and let it cool.
- Place a nori sheet on a bamboo mat, spread a layer of rice on it.
- Add a strip of cucumber and avocado, then roll tightly.
- Cut into small pieces and pack with a side of soy sauce.
This is a great way to introduce your child to new tastes in a familiar format.
DIY Mini Pizzas
Ingredients:
- Whole-wheat pita bread
- Tomato sauce
- Shredded cheese
- Toppings like pepperoni or bell peppers
How to Assemble:
- Spread tomato sauce on the pita.
- Sprinkle cheese and your kiddos’ favorite toppings.
- Bake until the cheese is melted and the pita is crispy.
Let’s be honest, who doesn’t love pizza? This way, they get to have that beloved flavor without all that grease.
Protein-Packed Options to Keep Them Full
We all know how important protein is for our little ones, but sometimes it can feel like a battle to get them to eat enough.
Chicken Salad on Crackers
Ingredients:
- Diced chicken breast
- Greek yogurt or mayo
- Whole grain crackers
How to Assemble:
- Mix diced chicken with Greek yogurt or mayo for a creamy texture.
- Serve it alongside whole-grain crackers, letting your child make their own mini sandwiches!
Kids love things they can build themselves – it gives them a sense of control and makes mealtime more interactive.
Egg Muffins
Ingredients:
- Eggs
- Chopped veggies (spinach, bell peppers, etc.)
- Cheese
How to Assemble:
- Preheat your oven and whisk eggs with chopped veggies and cheese.
- Pour the mixture into muffin tins and bake until they’re set.
- Pack a couple of muffins for a protein-packed treat!
These mini muffins are easy to make ahead and can even sneak in those veggies you hope they’ll eat.
Sweet Treats That Are Actually Healthy
Even picky eaters usually have a sweet tooth! It’s possible to create treats that feel indulgent but are still good for them.
Yogurt Parfait
Ingredients:
- Low-fat yogurt
- Granola
- Fresh berries
How to Assemble:
- Layer yogurt, granola, and berries in a small container.
- Pack a spoon and watch them dig in!
This gives a fun twist to typical fruit combinations and a great opportunity to sneak in some calcium.
Banana Oatmeal Cookies
Ingredients:
- Mashed ripe bananas
- Quick oats
How to Assemble:
- Mix mashed bananas with oats until it forms a dough.
- Scoop onto a baking sheet and bake until golden.
What if your kids could whip up their own cookies? They’ll love being included in the kitchen process!
Snacks That Hit the Spot
Snacks can make or break a lunch. Keep them simple yet exciting to ensure your little ones stay fueled through the day.
Apple Slices with Nut Butter
Ingredients:
- Apple slices
- Almond or peanut butter
How to Assemble:
- Slice apples and pack them with a small container of nut butter for dipping.
This classic combo is always a crowd pleaser and packed with healthy fats.
Trail Mix
Ingredients:
- Whole grain cereal
- Dried fruits
- Nuts (if no allergies)
How to Assemble:
- Mix all ingredients in a small container.
Let’s face it, kids love to munch! Trail mix is a fun and healthy way to keep hunger at bay.
Let’s be honest; finding meals and snacks that meet your child’s picky eater standards while staying healthy can feel like a daunting task. But with these ideas, you’ll be well on your way to packing delightful lunches and snacks that not only meet nutritional needs but are also kid-approved!
Conclusion
As parents, we want the best for our children, and that includes making sure they eat well while keeping things fun. Embracing simple, nutritious ingredients can really make lunchtime a breeze. If you’re looking for more inspiration, check out resources like Picky Preschooler Lunch Ideas Kids will Actually Eat! and 23 Easy Toddler Lunch Ideas For School and Home. Remember, you’re not alone in this journey, and with a little creativity, you can turn even the pickiest eaters into healthy lunch enthusiasts!
Free Aldi Meal Plan for Busy Moms Spend Just $50 a Week on Dinners
Imagine this: It’s 5 PM on a weeknight, and you’re staring blankly into your fridge, wondering what on earth you can whip up for dinner that your little ones will actually eat. I’ve been there, believe me. After a long day of juggling toddler tantrums, playdates, and laundry, the last thing you want to do is engage in an epic battle with your cooking skills and picky eaters.
But here’s the thing: Eating well on a budget doesn’t have to be a Herculean task. In fact, I recently discovered a fantastic resource that can help you transform your weekday meals without breaking the bank—this free $50 Aldi Meal Plan! This plan isn’t just about saving a few bucks; it’s about providing nourishing meals your family will love while keeping grocery shopping stress-free.
What’s Included in the Aldi Meal Plan?
So, what can you expect from this $50 Aldi Meal Plan? Let’s break it down.
7 Simple Dinners
These aren’t your gourmet, fancy-pants meals that require 20 ingredients you’ve never heard of. We’re talking about simple, healthy recipes that you can throw together in a pinch. Whether it’s pasta night or a hearty soup, each dinner caters to the taste (and nutrition) requirements of your kiddos.Shopping List
Gone are the days of aimlessly wandering the grocery store. The plan comes with a handy shopping list, making it ridiculously easy to know exactly what to grab when you head out the door. This list is designed to minimize waste and save you time.Helpful Tips
Alongside the meal recipes, you’ll find parent-tested tips that make meal prep easier. For instance, preparing some ingredients in advance can save you precious time later in the week. We all know how valuable those extra moments are when you have toddlers around!
Let’s dive a bit deeper into a few of the meals and some helpful tips for getting the most out of your Aldi Meal Plan.
Easy Dinner Ideas Included in the Meal Plan
If you’re a parent to kids aged 0-5, you know how essential it is to get creative with meals. Here are just a couple of highlights from the plan that your little ones are likely to enjoy:
One-Pot Cheesy Broccoli Rice
Sound familiar? Most kids love anything cheesy, right? This one-pot dish can be ready in about 30 minutes and is packed with nutrients, thanks to the broccoli. Toss in some chicken (or leave it out for a vegetarian option) for extra heartiness.
Ground Beef Tacos
What if I told you that taco night could cost less than a fancy takeout meal? This meal is not just simple, but you can set up a taco bar right in your kitchen! Think toppings like shredded cheese, diced tomatoes, and avocado. Kids love building their own meals, and it’s a sneaky way to get them involved in the kitchen.
Tips for Shopping at Aldi
If you’re new to Aldi, you might be curious about how to navigate this store efficiently. Here are a few tips based on my own shopping experiences:
Bring a Quarter: You’ll need a quarter to unlock a shopping cart. This helps to promote a little discipline around not losing carts in the parking lot!
Plan Your Trip: Try to go at off-peak hours to avoid the crowds. Early mornings or late afternoons during the week are generally the best.
** Stick to the List**: With this $50 Aldi Meal Plan, staying on budget will be easier as long as you stick to that shopping list. It’s tempting to throw in a few snacks or treats, but let’s be honest—those impulse buys can really add up.
Make the Most Out of Your Meal Plan
Now that we’ve highlighted the benefits, let’s chat about how to maximize these meals.
Batch Cooking
What if you could prepare multiple meals in one go? Batch cooking can be a total game changer. You can make a double batch of the cheesy broccoli rice and freeze half for those extra-busy nights. It’s like having your very own frozen food aisle at home!
Involve the Kids
Many parents have found that letting their children help with meal prep can turn dinner into a fun family activity. Get them to wash the veggies or help set the table. It also exposes them to cooking in a way that’s interactive—making them more likely to try new foods.
Mix and Match
Don’t be afraid to mix and match the ingredients in the meal plan. If the recipe calls for sweet potatoes but your kiddos prefer regular potatoes, swap them out! Flexibility is key when dealing with little ones who can be quite particular about their food preferences.
Make It Fun
During mealtime, make it a bit more engaging! Maybe turn taco night into a family fiesta or have a themed dinner based on a favorite cartoon or story your child loves. When meals are fun, kids are more likely to clean their plates.
Mistakes to Avoid
While diving into a budget meal plan, we can make some common missteps. Here’s what to keep an eye on:
Ignoring Prepping Time: Failing to prep ingredients beforehand can lead to a lot of stress right before dinner. Make it a weekly ritual to set aside 30 minutes for this.
Neglecting Leftovers: Many of us think leftovers are a hassle, but they can be a tremendous benefit. Don’t let good food go to waste. Discover ways to transform leftovers into new meals.
Sticking Only to the Plan: While it’s fantastic to have a plan, allow yourself the freedom to improvise. Cooking is an art! Sometimes, the best meals come from spontaneity.
Conclusion
Overall, this free $50 Aldi Meal Plan is not just a lifeline for your dinner table; it’s a healthy way to save time and money while nurturing your family’s eating habits. If you want to learn more about creating nutritious meals for your little ones, be sure to check out the nutritionist-approved meal guide and explore the many options available on essential freezer meals for new parents. You’ll find plenty of additional inspiration to keep mealtime exciting and nutritious. Remember, you’re not alone in this journey, and with the right resources, you can make mealtime a fun and stress-free experience. Happy cooking!
40+ Best Water Table Ideas for Summer with Toddlers and Busy Moms
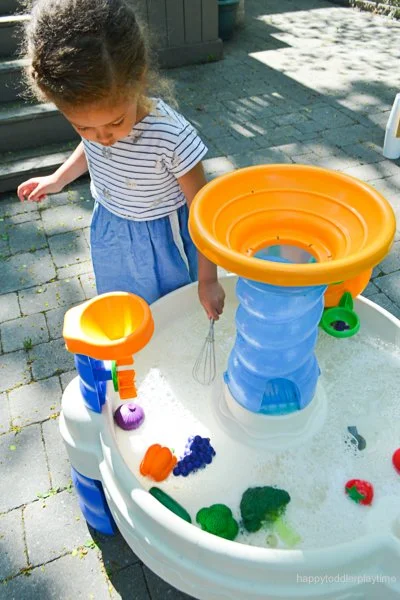
Imagine it’s a hot sunny day, and you’re looking for ways to keep your little ones entertained while also letting them cool off. You know how it goes: kids have a magical ability to turn even the simplest activity into an adventure. That’s when water tables come into play, perfect for splashing, pouring, and countless hours of exploration!
As a parent, I can tell you that water tables are more than just a fun toy; they offer an amazing opportunity for sensory play and learning. Plus, they can be customized in endless ways. Sound familiar? If you’re curious about how to elevate the classic water table experience, you’re in for a treat! I’ve gathered over 40 incredible water table ideas that’ll have your toddlers excited to play outside all summer long. Let’s dive in, shall we?
Creative Themes for Your Water Table
- Ocean Adventure
- Fill your water table with blue water, add sea creatures, and include ocean-themed toys like boats and shovels. Your kids can pretend they’re underwater explorers!
- Dinosaur Dig
- Combine water with sand for a dino dig. Add small dinosaur figures and excavation tools. This is a great way to play while also learning about these fascinating creatures.
- Rainbow Colors
- Use colored water to create a vibrant rainbow theme. Add cups, spoons, and buckets for your toddlers to mix colors and create their own artistic masterpieces.
- Sensory Science
- Add ingredients like cornstarch to water for a fun slime effect. This non-Newtonian fluid captivates young minds and is a fantastic way to introduce basic science concepts.
- Mini Pool Party
- Create a mini pool atmosphere with plastic fish and pool toys. Surprise your kids with some floating balls, allowing them to engage in games like “keep the ball afloat.”
- Garden Theme
- Use water to “water” your garden toys or plants. Add cups, watering cans, and small garden tools, encouraging imaginative play while teaching them about nature.
- Construction Zone
- Include small trucks, shovels, and assorted tools. Your toddlers can build and demolish structures while engaging in imaginative play and developing motor skills.
- Pirate Treasure Hunt
- Bury plastic coins and treasures in the water. Kids can embark on a quest to find them, adding a thrilling scavenger hunt aspect to the play.
- Bug Bonanza
- Fill your table with plastic bugs and insects. Pair it with magnifying glasses for exploration on a whole new level. Kids love finding the hidden critters!
- Fishing Fun
- Add magnetic fish and fishing poles for a catch-and-release fishing scenario. It’s a fun way to improve hand-eye coordination and teach patience!
Simple Yet Engaging Water Table Accessories
- Sponges and Washcloths
- Incorporate some sponges for kids to soak up the water and squeeze it out, developing fine motor skills.
- Measuring Cups
- These are perfect for pouring and transferring water, which adds an element of math to their playtime.
- Plastic Boats
- These can add an extra layer of nautical fun, allowing for imaginative play while they race against each other.
- Funnels and Tubing
- Provide a variety of funnels and some tubing to create water channels, enhancing the experience while they experiment with flow.
- Ice Cubes
- Add colorful ice cubes that can slowly melt, introducing concepts of temperature and change.
Activities to Enhance Water Play
While playing with a water table can absolutely be entertaining on its own, there are some creative activities you can incorporate to foster learning and engagement:
- Color Mixing
- Let your kids mix primary colors to create new ones. It’s an educational yet super fun trick.
- Measurement Challenge
- Use different-sized containers to create learning moments around volume and measurement. “How many cups does it take to fill this bucket?”
- Nature Exploration
- Collect leaves, flowers, and twigs to explore how they float or sink. It’s an easy science lesson disguised as fun!
- Story Time
- Incorporate storybooks related to water, such as “The Pout-Pout Fish” or “The Rainbow Fish,” to spark their imagination while they play.
- Music & Dance
- Set the mood with summer tunes. Kids can dance around the table while splashing. It’s a great way to get them moving!
Making Water Play Safe and Easy
Now, let’s be honest here; as fun as water play is, you’ll want to keep safety and cleanup in mind. We’ve all been there—when the fun turns into a slippery mess! Here are some tips:
- Set Boundaries
- Lay out towels or a small mat around the table. This can help soak up any excess water and provide a clear play area.
- Supervision is Key
- Always keep an eye on your little ones while they’re engaged in watery adventures. Accidents can happen in the blink of an eye!
- Rotate Play Themes
- To keep interest high, change up the themes every week. A fresh experience can reignite excitement and keep your kiddos engaged!
- Clean-Up Routine
- Involve your children in the cleanup process. It’s a good habit to teach them and keeps things from feeling overly burdensome for you.
- Be Prepared for Wet Clothes
- Let them wear swim diapers or old clothes (we all have some that are past their prime). This keeps the fun stress-free!
Additional Water Play Tips
You may be wondering how to keep the water table experience fresh beyond these ideas. Well, here are some final ideas to enhance the play:
- Incorporate Seasonal Items
- Change the play items based on the season—think pumpkins in the fall or pine boughs and snowflakes in winter!
- Invite Friends
- Having playdates can enhance the experience, allowing kids to learn from each other while having a blast.
- Create Artworks
- Let them splash around with washable paints in the water for an artistic flair that isn’t just messy but creates an art piece too!
Conclusion
There you have it—40+ amazing water table ideas that’ll keep your toddler engaged and entertained this summer! Watching your child play and explore will not only provide joy but also invaluable learning experiences. Feel free to mix and match these concepts, make them your own, and most importantly, enjoy those sweet moments together. After all, summer play is all about creating memories that last a lifetime.
If you’re looking for more inspiration, check out 40+ of The BEST Water Table Ideas for Summer 2025 or for low-prep activities, explore 50 Low-Prep, Low-Mess Ideas to Engage Your Toddler. Happy splashing!
