
First Grade Back to School Activities and Ideas for the First Week of School
First Grade Back-to-School Activities and Ideas for the First Week of School
The first week of first grade sets the tone for the entire year: routines are introduced, community is built, and curiosity is awakened. Begin with warm, simple activities that balance structure and fun. For instance, consider tying a short snack-time discussion to an apple-themed lesson and the benefits of apples for young children as a way to model healthy habits and connect classroom learning to everyday life.
This guide offers ready-to-use activities, quick lesson starters, and classroom management tips to make those first five days smooth, memorable, and academically purposeful.
Day-by-day activity plan (first week)
Day 1 — Welcome and routines
- Morning meeting with a name game: students share their name and one favorite thing (color, animal, or food).
- Tour the classroom and practice key routines: lining up, bathroom procedures, and turning in work.
- Read a short picture book about school to prompt conversation and ease nerves.
Day 2 — Community-building and expectations
- Create a class "We Are" poster: each student draws a self-portrait and writes one strength with teacher assistance.
- Establish classroom rules together; turn them into positive statements (e.g., “We listen when others speak”).
- Play a movement-based icebreaker to burn energy and get acquainted.
Day 3 — Literacy launch
- Quick phonics stations (15–20 minutes each): letter recognition, sound sorting, and a blending game.
- Shared writing: compose a class sentence about the morning and practice finger spacing and capitalization.
- Independent read-to-self time with partner reading for confidence-building.
Day 4 — Number sense and hands-on math
- Counting walks: students collect small classroom items (e.g., erasers) and count them into groups.
- Introduce math centers with concrete materials (counters, ten-frames, number cards).
- Short assessment games to gauge students’ number recognition and one-to-one correspondence.
Day 5 — Centers and choices
- Rotate through literacy, math, art, and maker-space centers to observe stamina and interests.
- Reflective circle: students share one thing they learned and one goal for next week.
- Send a positive note home or an invitation to a parent-teacher check-in.
Icebreakers that actually work
- "Find Someone Who…" bingo: give simple prompts (find someone who has a pet, someone who likes soccer) and let kids mingle. It’s an energetic way to practice speaking and listening.
- Partner interviews: students ask two simple questions and then introduce their partner to the class. This models respectful listening and public speaking in a low-stakes way.
- “All About Me” foldable books: students write or draw their favorites and what they hope to learn this year. These become classroom displays and conversation starters.
Quick academic starters that teach routines
- Morning message routine: leave a short, teacher-written note with a predictable format (greeting, two sentences, a question). Students circle letters they know or answer the question to practice comprehension.
- Ten-minute mini-lessons: keep whole-group instruction short and clear, followed by immediate practice at centers.
- Exit tickets: one quick prompt (draw a number bond, write one sight word) to informally assess understanding and shape the next day’s lesson.
Classroom centers and schedules
Design centers that are simple to run and repeatable so routines solidify quickly:
- Literacy center: word building with magnetic letters.
- Math center: number matching and manipulatives.
- Listening center: short audio stories with follow-up coloring or sequencing.
- Maker-space: open-ended materials for fine-motor development and creativity.
Clearly posted visuals and a consistent rotation chart help students transition independently. Use picture cues for first graders who are still mastering reading.
Behavior expectations and positive reinforcement
- Teach and model 3–5 essential expectations (e.g., be safe, be respectful, be responsible).
- Use specific praise (“I like how Maya lined up quickly and quietly”) and tangible class rewards like a sticker chart or a class material choice day.
- Practice calm-down strategies: deep breaths, a quiet corner with sensory tools, or a short mindfulness moment before transitions.
Family communication and at-home connections
Start the year with a welcome letter that outlines routines, supplies, and the best way to contact you. Invite families to share short bios about their child and to contribute one photograph for a classroom family board. Simple, consistent home routines (reading 10 minutes, practicing sight words) strengthen school-home partnerships.
Incorporate activities families can do at home by sharing a rapid “home activity” list that includes reading aloud, counting objects, and a short science observation. If you need examples of creative indoor activities that adapt well for small spaces, check the indoor activity ideas that translate well to early elementary classrooms.
Materials checklist for the first week
- Name tags and a name-tracing activity
- A few reliable read-aloud books and big-picture texts
- Manipulatives: counters, ten-frames, magnetic letters
- Visual routine charts and a class calendar
- Simple sensory materials for a calming corner
Tips for a calm teacher start
- Prep as much as possible the day before: stations ready, welcome materials organized.
- Keep lessons short and student-centered. First graders need frequent movement and concrete experiences.
- Observe more than you correct at first — note who struggles with transitions, who needs language support, and who needs extra challenge.
Conclusion
For more ready-made activities tailored to first graders, take a look at this collection of favorite first grade back-to-school activities that includes printable templates and simple routines. If you want extra inspiration for making the first day feel magical and stress-free, these 16 simple ideas for the best first day of school offer practical, fun touches that build community from day one.
21 Amazing Ideas For Activities On The First Day Of School
First Day Magic: Fresh, Engaging Activities to Start the School Year
The first day of school sets the tone for the entire year. With thoughtful activities, you can turn jitters into curiosity, build relationships, and create routines that students will remember. Below are creative, classroom-tested ideas organized by goal: community building, routines and expectations, active learning, and low-prep favorites. If you’re also planning celebrations beyond the classroom, you might enjoy browsing unique first-birthday party ideas for boys for inspiration on simple, child-centered fun.
Warm-ups for Community and Connection
- Name and Movement Circle
- Students say their name and do a simple movement (jump, clap, spin). The class repeats both name and movement to build recognition and energy.
- Two Truths and a Dream
- Each child shares two true things about themselves and one hope for the year; peers listen for common interests.
- Classroom Passport
- Give each student a “passport” sheet to collect signatures or stickers from classmates who share a hobby, favorite food, or birthday month.
- Partner Portraits
- In pairs, students draw quick portraits of each other and present one positive thing they learned about their partner.
Establishing Routines with Low-Stress Practice
- Morning Routine Relay
- Turn routines into a playful relay: line up tasks (hang backpack, sign in, choose reading spot) and have students practice the order while teacher models expectations.
- Signal Scavenger Hunt
- Hide classroom signal cards (for quiet, pair talk, help) and let small groups find and practice responding to each one.
- Visual Schedule Creation
- Have students help craft the day’s visual schedule with pictures and short phrases to anchor expectations.
Creative Center Ideas to Observe and Guide
- Literacy Snapshot Center
- Include name cards, alphabet puzzles, and a favorite-book share. Circulate and note early literacy strengths.
- Math Discovery Table
- Provide manipulatives (counters, pattern blocks) and open-ended prompts like “What can you build with five blocks?”
- Maker Corner
- Recycled materials, tape, and markers encourage experimentation and reveal fine motor and collaborative skills.
- Calm Corner Setup
- Invite students to help arrange a cozy spot with sensory tools and “calm-down” cards they can use throughout the year.
Movement and Play to Break the Ice
- Classroom Obstacle Course
- Short courses that require following instructions and taking turns show how students can cooperate and manage transitions.
- Simon Says Team Edition
- Play classic Simon Says but with team challenges (e.g., “Simon says find someone who likes pizza and high-five them”).
- Alphabet Body Challenge
- Call out letters and have students form the letter shape with their bodies—great for kinesthetic learners.
Quick Creative Projects That Show Personality
- Self-Portrait Balloons
- Students draw a self-portrait on paper and tape it to a balloon; those balloons decorate the room and provide later discussion prompts.
- “I Am” Poem
- A simple template helps students express interests, feelings, and goals in a short, shareable poem.
- Class Quilt Squares
- Each child decorates a paper square about themselves; assemble into a classroom quilt to highlight diversity and unity.
Reflection and Goal-Setting
- One-Word Hopes
- On sticky notes, students write one word describing their hope for the year and post it on a “growth” board to revisit later.
- Feedback Fortune Tellers
- Use origami fortune tellers for students to anonymously share what they enjoyed and what they’d like more of.
- Compliment Chain
- Start a paper chain where each new link contains one genuine compliment a student received—watch it grow over days.
- Exit Ticket Snapshot
- Quick, three-question exit tickets help teachers gauge attention, comfort, and immediate needs after the day’s activities.
Practical Tips for a Smooth First Day
- Keep directions short and model everything once before asking students to try.
- Mix teacher-led and student-centered activities to manage energy levels.
- Use lightweight, reusable materials that can transition into center work later.
- Build in transition cues and short brain breaks to maintain focus.
Throughout the day, observe interactions and note students who may need extra support or those ready for leadership roles. Small adjustments now prevent bigger disruptions later and help create a classroom where routines feel natural and relationships flourish. For thematic inspiration that blends celebrations and classroom tasks, consider exploring resources on first-birthday themes and party planning to spark playful decor and activity ideas in early grades; a helpful starting point is a collection of baby girl first birthday themes.
Conclusion
If you want a ready-made list directly focused on those first-day activities, you can review a curated selection at 21 Amazing Ideas For Activities On The First Day Of School for quick printable options and step-by-step directions. For families and educators working with very young children, the collection of 21 learning activities for babies and toddlers | UNICEF Parenting offers developmentally appropriate play ideas that translate well into early classroom routines.
22 Awesome First Grade Anchor Charts That We Can’t Wait to Use
Fresh Ideas for First Grade Anchor Charts: Simple, Bright, and Ready to Use
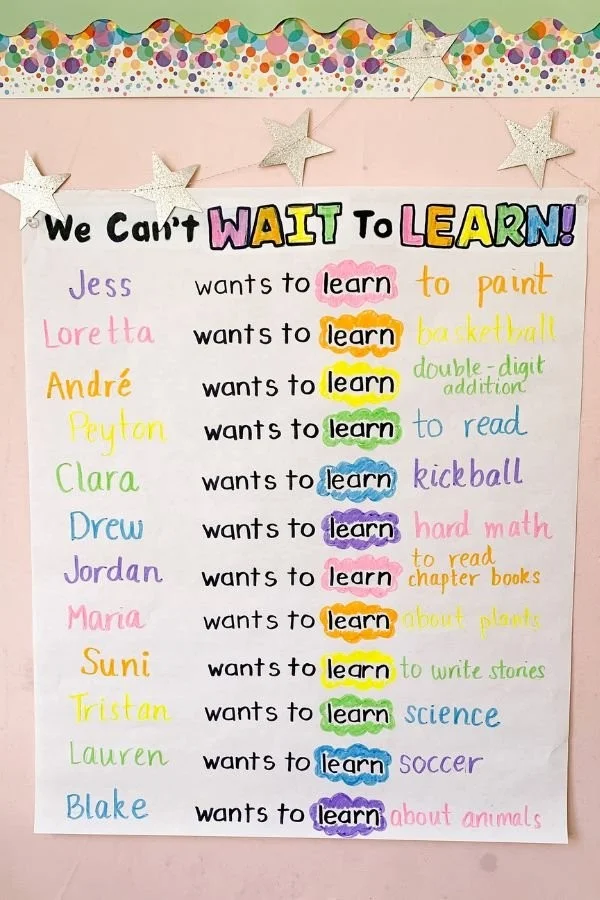
Anchor charts are classroom superheroes: they make abstract ideas concrete, support independence, and turn routines into visible, reusable tools. For first graders—who are just building independence and literacy foundations—the right anchor chart can make a lesson stick for weeks. Below are fresh, practical ideas and tips for creating anchor charts that are developmentally appropriate, student-centered, and classroom-ready.
Why anchor charts matter in first grade
- They turn temporary instruction into a lasting visual reference students can use during work time.
- They support language development by showing vocabulary, sentence frames, and examples.
- When students help create them, anchor charts reinforce ownership and memory.
- Anchor charts make transitions smoother: a quick glance can remind students of expectations and steps.
If you’re planning classroom celebrations or planning home-school connections, consider pairing charts about routines with ideas for easy classroom-friendly snacks like these healthy sweet treats for toddlers that translate well to early-elementary tastes.
Design principles for first-grade anchor charts
- Keep it uncluttered: one big idea per chart. Young learners need focus.
- Use large, neat handwriting and bold colors to separate headings from examples.
- Add icons or simple drawings to support emergent readers.
- Include a “look-for” column: what excellent work looks like vs. common mistakes.
- Laminate or place charts in a pocket for repeated reference; make smaller versions for student desks if possible.
Anchor chart ideas and how to make them work
- Reading Response Chart: Simple sentence stems (I noticed…, I wonder…, This reminds me of…) with small illustrations for each stem. Refer to it during guided reading groups.
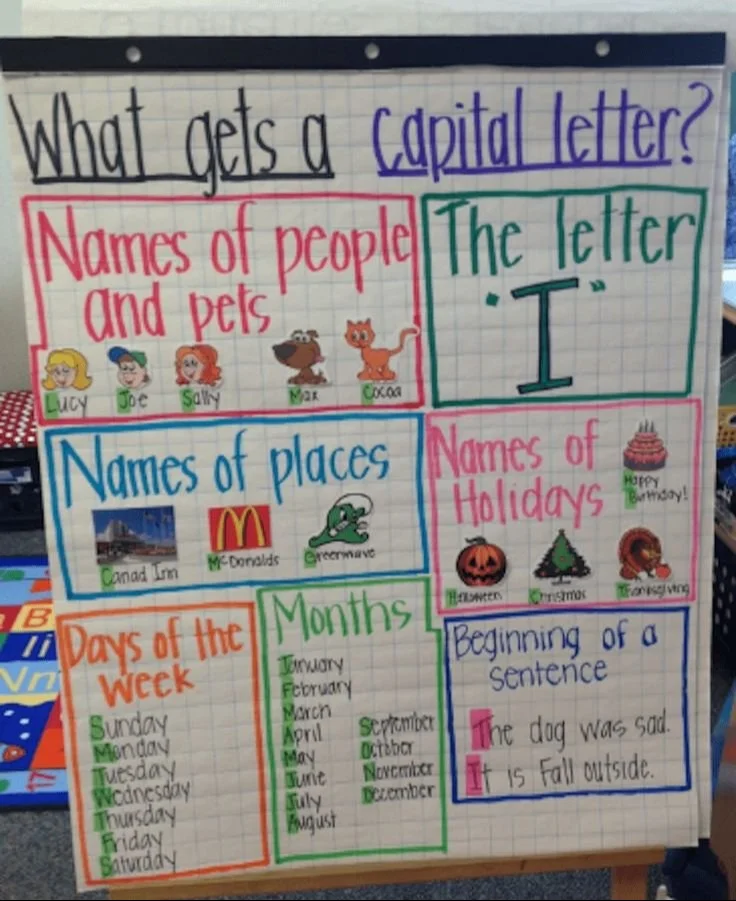
- Super Sentences Chart: Visual reminders for capital letters, spaces, punctuation, and using a reread to check meaning.
- Math Problem Solving Steps: “Read the problem,” “Draw or act it out,” “Write an equation,” “Check your answer.” Use arrows or footsteps to show sequence.
- Word Work Wall: Sort words by vowel sounds, word families, or tricky sight words with sticky-note examples that rotate weekly.
- Classroom Jobs and Routines: Draw each job, list responsibilities, and add a small student photo to reinforce ownership.
- Behavior Visuals: Use a color-coded scale or character-based prompts (e.g., “Quiet Voice,” “Hands to Yourself,” “Ask for Help”).
- Writing Checklist: Simple checklist students can use to self-edit (capitalization, spaces, finger spaces, punctuation).
- Science Inquiry Chart: Question starters, steps for experimenting, and a spot for drawing observations.
Making anchor charts interactive
- Student-created sections: Leave space to add student examples or illustrations after a lesson.
- Sticky-note ideas: Allow students to add sticky-note responses to the chart during independent work.
- Mini-anchor cards: Give each student a pocket-sized version for centers to reduce trips to the wall.
Integrating anchor charts into daily routines
- Morning Meeting Launch: Use a calendar or greeting chart to center routines and language practice.
- Transition Prompts: Create a short, illustrated anchor chart for lining up, sharing materials, or cleanup.
- Snack and Choice Times: Post clear steps for washing hands, where to put belongings, and how to return items—pair these with short classroom recipes or snack routines such as simple granola options that can be adapted from common pantry ingredients like oats and sunflower seeds; try exploring recipes that include oats and sunflower seeds for inspiration to keep snack time consistent and healthy.
Tips for longevity and reuse
- Photograph charts at the end of each week and compile a digital binder for subs or parent volunteers.
- Re-purpose charts year to year by erasing examples and swapping vocabulary for the next cohort.
- Rotate charts by theme—literacy, math, social skills—so the wall stays fresh and relevant.
Encouraging student ownership
- Let students pick chart titles or contribute artwork.
- Use student work samples on the anchor chart to celebrate progress.
- Revisit charts frequently: short, targeted mini-lessons that connect back to the chart help cement learning.
Quick printable-friendly approach
If time is tight, create a template with space for a title, three bullet points, and two kid-drawn examples. Print and laminate these templates; during the lesson, jot the key points and invite two students to illustrate. You get a neat, consistent set of charts that still includes student voice.
Conclusion
For more concrete examples and ready-to-use visuals, browse this collection of anchor-chart ideas to spark your designs: 22 Awesome First Grade Anchor Charts That We Can’t Wait to Use. If you want to deepen how you involve students in discussions as you build charts together, explore this practical resource for classroom talk strategies: the big list of class discussion strategies.
You Are My Sunshine Baby Shower Ideas
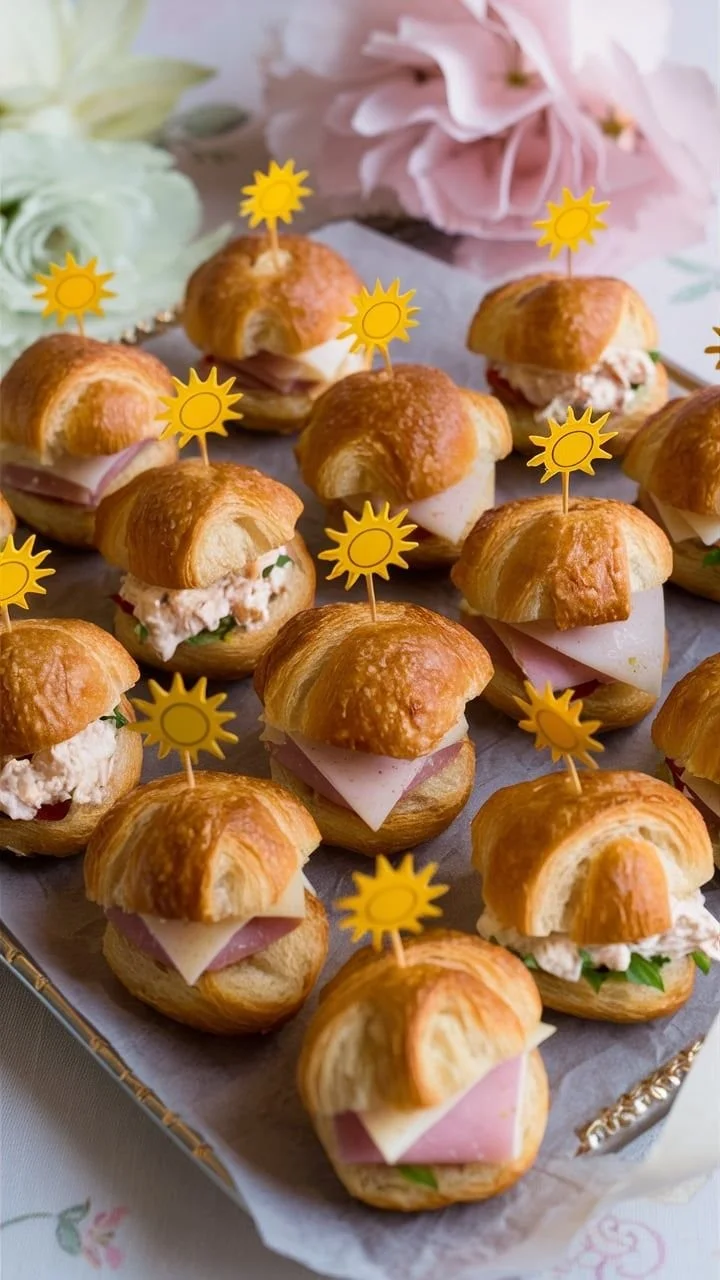
You Are My Sunshine Baby Shower Ideas
Planning a "You Are My Sunshine" baby shower is a joyful way to celebrate the new arrival with warmth, bright colors, and playful details. This guide collects fresh theme takes, decoration tips, menu suggestions, games, favors, and a simple timeline so you can create a memorable sunny celebration. If you need inspiration tailored for a baby girl, consider these creative baby girl shower ideas to help shape colors, florals, and invitation wording.
Theme & Color Palette
- Primary colors: sunny yellow, soft cream, and white.
- Accent colors: pale gray, mint, or blush for soft contrast.
- Textures: linen runners, rattan baskets, and gauzy fabric to keep the vibe light and breezy.
Design tip: choose one bold yellow element (balloon arch, backdrop, or table runner) and balance it with muted pieces so the room feels cheerful, not overwhelming.
Invitations & Guest Messaging
- Wording ideas: “You are my sunshine — please join us to celebrate baby [Name]!” or “A little sunshine is on the way.”
- Format: digital RSVP with a printed envelope insert or a postcard-style invitation with rounded corners and sun illustrations.
- Include practical details like parking, gift registry, and suggested attire (e.g., “spring-bright” or “yellow accent encouraged”).
Decorations & Atmosphere
- Focal backdrop: a fringe curtain in yellow and white with a sun-shaped wreath center. Add a simple script sign reading “Hello, Sunshine.”
- Balloons: cluster white and yellow balloons with a few metallic golds; consider a balloon garland framing the dessert table.
- Tablescapes: small mason jars with sunflowers or daisies, and place cards shaped like clouds.
- Lighting: string lights or warm paper lanterns create a soft glow for indoor or evening gatherings.
Food & Drink
- Brunch-friendly spread: mini quiches, lemon ricotta pancakes, fresh fruit skewers, and a yogurt parfait station. If you’re planning a midmorning celebration, these sunny baby shower brunch ideas offer great menu structure and serving tips to keep the meal light and festive.
- Signature drinks: a “Sunshine Spritz” (sparkling lemonade with mint) and a nonalcoholic citrus punch for guests who prefer zero-proof options.
- Cake and desserts: a lemon layer cake with buttercream suns, sunshine sugar cookies, and honeycomb-shaped macarons for an elegant touch.
Games & Activities
- Sunbeam Advice: guests write one bright wish or parenting tip on a “sun ray” card to hang on a wishing tree.
- Baby Predictions: have guests guess baby stats (weight, date, hair color) and record on a sunny-themed board.
- Keepsake craft: decorate onesies or bibs with fabric markers and sun stamps so guests leave a handmade gift and memory.
Favors & Packaging
- Small honey jars with customized “Thanks for sharing our sunshine” tags.
- Seed packets (sunflower or wildflower) in small organza bags so guests can plant a reminder of the day.
- For a luxe option: small citrus-scented candles wrapped in yellow tissue and tied with twine.
Cake, Dessert Table & Display
- Centerpiece cake: two-tier lemon or vanilla cake with a fondant sun topper or buttercream sunburst.
- Dessert table layout: place the cake slightly off-center, flank it with layered treats at different heights, and use a mirrored or wooden base to reflect natural light. Add a backdrop of paper fans and a “You Are My Sunshine” banner.
Timeline & Checklist (Simple Day-Of)
- 2–3 weeks before: finalize guest list, send invitations, and order cake.
- 1 week before: confirm menu, prepare favors, and print any game materials.
- Day before: set up decor and dessert table staging.
- Day of: arrange flowers, chill beverages, and designate a gift station and selfie/photo spot.
Budget-Friendly & DIY Ideas
- DIY centerpieces: use thrifted vases painted in ombre yellow tones.
- Printable decor: create sun-shaped garlands and pennants with downloadable templates you can cut at home.
- Rent or upcycle: borrow chairs and linens or use a neutral base and add yellow napkins and runners to transform the look affordably.
Final Tips for a Smooth Shower
- Delegate one person to manage gifts and one to handle games so the host can enjoy the party.
- Create a small “quiet corner” for nursing or calming a fussy baby if many guests bring infants.
- Keep a checklist on your phone for timeline events (welcome, food service, games, cake cutting) so the schedule stays relaxed and fun.
Conclusion
For a step-by-step theme walkthrough with inspirational photos and styling suggestions, see Peachfully Chic’s You Are My Sunshine baby shower theme guide. If you want to shop one place for coordinated plates, banners, and décor, browse available You Are My Sunshine baby shower products on Amazon.
33 Genius Hacks Guaranteed To Make A Parent’s Job Easier
33 Genius Hacks Guaranteed to Make a Parent’s Job Easier — Practical Tips That Actually Work
Parenting is a nonstop job of meals, naps, messes and moments that make you grin and groan in equal measure. This article collects practical, low-stress hacks you can adopt today to reduce friction, save time, and preserve your sanity. If you ever need a quick strategy to calm a meltdown, see this helpful guide on how to calm an upset child for a few gentle, tested approaches.
Below are grouped, action-oriented hacks you can implement immediately — from morning wins to bedtime rituals and travel tricks. Pick a handful that match your family’s rhythm and try them for a week before deciding whether they stick.
Morning and Routine Hacks
- Prepare outfits the night before using a hanger-per-day system: hang a full set (top, bottom, socks) and rotate through the week.
- Create a “launch checklist” taped by the door with 4-5 picture icons for younger kids (shoes, coat, backpack, snack).
- Keep breakfast simple and portable — overnight oats or pre-made egg muffins in the fridge let you eat while packing lunches.
Mealtime and Snack Shortcuts
- Serve a “build-your-own” station: bowls with fruits, proteins, and carbs make meals interactive and reduce picky eating battles.
- Freeze single-serving smoothie cubes: blend fruit, pop into molds, freeze, then whiz with milk for a quick breakfast.
- Use pancake batter dispensers or squeeze bottles for mess-free weekend pancake art.
Sleep and Naptime Strategies
- Establish a short, consistent wind-down routine: dim lights, a single book, and a soft song. Repetition signals sleep time.
- Pack a “sleep kit” for travel with the child’s blanket, white-noise app, and a familiar sleep toy to ease transitions.
- If nap resistance is common, institute quiet time with books and soft music even when they don’t sleep — the break helps you recharge too.
On-the-Go and Travel Fixes
- Store a “car kit” with wipes, a few toys, chargers, and a spare change of clothes in a clear pouch for quick access.
- Use a visible snack rotation (clear containers labeled by day) to cut decision time and keep choices novel.
- Pack a thin folding play mat that doubles as an instant clean play space at parks or rest stops.
Safety, Organization, and Clean-Up Tricks
- Keep a small basket at a child’s height for toys they’re allowed to fetch, encouraging self-cleanup.
- Use colored bins for rotating toys: put half away to reduce clutter and reintroduce rotated items as “new.”
- Pre-sort laundry into labeled hampers (colors, whites, delicates) so laundry becomes a one-step swap.
Learning, Play, and Developmental Hacks
- Turn chores into games: time the tidy-up, use a “beat the timer” challenge, or reward with sticker charts for consistency.
- Use everyday moments as learning opportunities: count steps, name colors during dressing, or narrate actions for language growth.
- Make art time low-stress by using washable markers and a designated “creative sheet” taped to the table to protect surfaces.
Tech, Screen Time, and Media Balance
- Use a single shared device for specific shows or apps; set timers so expectations are clear and consistent.
- Curate a playlist or queue of short educational videos rather than letting autoplay take over.
- Keep tech-free zones (dining table, bedrooms) to protect mealtime conversation and sleep hygiene.
Emotional and Behavioral Shortcuts
- Offer two acceptable choices instead of asking an open question — this gives control while you steer the outcome.
- Use “when/then” language: “When your shoes are on, then we can get the snack,” which frames cooperation as the pathway to reward.
- Validate feelings first — a brief acknowledgment (“I see you’re upset”) lowers intensity and opens the door to problem solving.
Quick Fixes for Common Small Emergencies
- Magic marker hack: Use a dry-erase marker on a stained shirt to soak up grease before laundering (test first on an unseen spot).
- Ice pack alternatives: A frozen sponge sealed in a bag is flexible and can soothe bumps without chemical packs.
- Portable shoe hack: Keep a roll of elastic hair ties in your stroller — they double as emergency shoe fasteners or to secure items.
Memory-Making and Celebrations
- Capture short daily “one-liner” notes in a jar — one sentence about a highlight each day becomes a treasure trove by year’s end. If you’re expecting and want ideas for making photos special, explore these creative maternity photoshoot ideas to inspire memory-making sessions.
Simple Household Time-Savers
- Label common cupboards with icons for kids to locate dishes, snacks, or cups independently.
- Use mesh laundry bags for small items (socks, hair ties) so they stay contained through washes.
- Set a 15-minute “family reset” timer each evening to tidy communal spaces together — short, consistent effort prevents weekend overwhelm.
Minimalism and Wardrobe Efficiency
- Adopt a capsule approach for kids’ clothing: a small selection of versatile pieces reduces laundry and decision fatigue.
- Keep a “ready-to-go” outfit drawer for quick swaps during growth spurts or spills.
Parent Self-Care Hacks (You Matter Too)
- Tag-team short breaks with a partner or friend: 20–30 minutes of uninterrupted time can reset patience and energy.
- Batch-cook one meal for the week and freeze in portions — decision fatigue fades when dinner is already staged.
- Keep a small “joy jar” with uplifting notes or moments you want to remember; pick one when you need a mood lift.
Bonus: Quick Organization Tools That Work
- Reuse clear shoe boxes for toy and craft storage so kids can see what’s inside.
- Sticky hooks by the door for bags and masks make departure smoother.
- Use photo labels on toy bins so pre-readers can participate in cleanup.
How to Adopt Hacks Without Overwhelm
- Pick 1–3 hacks that match a current pain point (mornings, mealtimes, sleep).
- Try them consistently for at least two weeks.
- Adjust or drop what doesn’t work — the goal is fewer friction points, not perfection.
Parents often need simple, repeatable systems more than clever one-offs. The best hacks are those that reduce your decision load and create predictable structure for kids. Try integrating one small change each week and notice the cumulative benefit.
Conclusion
If you want a light-hearted take on how food and lifestyle hacks intersect with parenting creativity, this piece from Amy’s Gluten Free Pantry paying homage to clever kitchen hacks offers fun inspiration. For a concise explanation of what constitutes a parenting hack and how small changes can make a big difference, see this helpful overview on what a parenting hack is and why they matter.
🐞 The Ultimate Love Bug Baby Shower Guide with DIY and Budget Tips
The Ultimate Love Bug Baby Shower Guide with DIY and Budget Tips
Planning a Love Bug-themed baby shower is a sweet, cheerful way to celebrate an incoming little one. Whether you’re aiming for an all-pink/polka-dot girly vibe or a gender-neutral garden of ladybugs, this guide gives you DIY ideas, budget hacks, and a timeline to pull everything together without breaking the bank. For more themed inspiration for girls, check out these baby girl shower theme ideas, which can be adapted to a Love Bug aesthetic.
Theme and Color Palette
- Classic Love Bug: red, black, white, and soft green accents.
- Pastel garden: blush, mint, soft yellow, with tiny ladybug motifs.
- Rustic outdoor: kraft paper, burlap, and pops of red and black.
Tip: Pick one accent (red or blush) and two neutrals to keep decorations cohesive and inexpensive.
Decorations (DIY-friendly)
- Paper lantern ladybugs: paint inexpensive round paper lanterns or balloons red, add black paper spots and pipe-cleaner antennae.
- Centerpieces: mason jars with faux moss, miniature potted succulents, and a cluster of small plastic or felt ladybugs.
- Photo backdrop: use red and black crepe paper streamers over a leafy garland or faux boxwood panel for an instant focal point.
For additional theme variations and how to adapt floral concepts for a shower, consider browsing the Baby in Bloom theme inspiration for ideas that translate well into a Love Bug garden party.
Invitations and Printables
- Digital invites: use a free template, add a ladybug illustration, and save on printing costs.
- DIY favor tags: punch holes in cardstock, add twine, and stamp or draw a small ladybug for a handmade touch.
- Printable games: set up a download station where guests can print games at home or you can print in bulk at a discount store.
Food, Cake, and Drinks
- Ladybug cupcakes: bake vanilla or chocolate cupcakes and top with red frosting and black fondant dots. A single larger “ladybug” cake can double as the centerpiece.
- Bite-sized snacks: red velvet cake pops, strawberry skewers, and tomato-and-mozzarella bites look thematic and keep portions small.
- Themed mocktails: create a “Bug Juice” punch with cranberry and ginger ale, garnished with mint leaves.
Games & Activities
- “Guess the Baby Item” jar: fill a jar with baby socks or small pacifiers and have guests guess the count.
- Ladybug craft station: provide felt, glue, and dot stickers to make tiny ladybugs — great for guests who love hands-on fun.
- Advice jar: ask attendees to write baby tips on pretty stationery and drop them into a decorated jar.
DIY Favors on a Budget
- Seed packets: give guests packets of flower seeds with a personalized label that ties into the garden-love bug theme.
- Homemade jam or honey: small jars with handmade labels are charming and affordable when bought in bulk.
- Edible favors: wrap chocolate ladybug candies in cellophane and tie with ribbon.
Budget Tips and Shopping Hacks
- Dollar-store wins: many decorative items like faux moss, small jars, and ribbon can be sourced affordably.
- Buy generic and personalize: plain favors and décor can be upgraded with a stamp, ribbon, or sticker to match the theme.
- Borrow large items: tables, faux greenery, or even a backdrop frame may be available from friends or community groups.
Timeline & Checklist (4–6 weeks)
- 4–6 weeks out: set date, guest list, theme, and budget.
- 3 weeks out: send invitations (digital or mailed), order cake if needed.
- 2 weeks out: finalize menu, buy non-perishables, assemble printables.
- 1 week out: finalize decorations, assemble DIY favors, confirm RSVPs.
- Day before: decorate main areas and prepare food that can be chilled or reheated.
- Day of: set up games and photo area, arrange food and drinks, relax and enjoy.
Safety and Accessibility Notes
- If hosting around plants or small décor pieces, make sure small children are supervised around choking hazards.
- Provide seating for guests who may need it and label dietary options clearly for attendees with allergies.
Conclusion
A Love Bug baby shower is charming, flexible, and easy to adapt to nearly any budget with simple DIY touches and strategic shopping. For seasonal décor ideas and cost-conscious approaches to hosting, consult this collection of Spring baby shower themes & ideas for every budget, and for inspiration on garden-themed favors and plant choices that work well in many regions, see this practical guide to gardening and vegetable varieties. Enjoy planning your Love Bug celebration—small details and thoughtful DIYs make it memorable.
The 47 Best Parenting Hacks You Need to Learn
The 47 Best Parenting Hacks You Need to Learn
Parenting is a marathon, not a sprint. Whether you’re a new parent or a seasoned pro, small strategies can save time, reduce stress, and help your family thrive. If you’re organizing a celebration for a new arrival, you might appreciate curated recommendations — for example, check out the thoughtfully chosen venues in Austin that make hosting a baby shower a breeze: top Austin baby shower venues. Below are 47 practical, tested parenting hacks arranged for quick reading and easy implementation.
Quick wins (Everyday life)
- Diaper station in every main living area — keep diapers, wipes, and a spare outfit together.
- Use a baby monitor app on a spare tablet for an extra camera view.
- Pre-measure formula portions into airtight containers for fast night feeds.
- Keep a snack basket in the car for impromptu stops.
- Pack outfits in zip-top bags by day to streamline morning dressing.
- Use a mesh laundry bag for small toys in the washing machine.
- Invest in a convertible stroller with easy folding — saves garage fights.
- Color-code water bottles and sippy cups to avoid mix-ups.
- Turn chore time into a two-minute dance party to get cooperation.
- Use a pegboard in the nursery for rotating daily activity supplies.
Sleep and bedtime hacks
- Establish a wind-down ritual (bath, book, cuddle) to signal sleep time.
- If you’re unsure about safe sleeping positions, review expert guidance on the most comfortable and secure ways to place infants: recommended baby sleeping positions.
- White-noise machines double as sleep cues and sound buffers.
- Use blackout shades to lengthen naps on sunny days.
- Keep a dim night-light for middle-of-the-night feeding changes.
- Try the “dream feed” (a late-evening feed while the baby is still drowsy) to extend overnight sleep stretches.
- Create a consistent room temperature checklist for optimal sleep comfort.
Feeding and mealtime hacks
- Freeze portions of purees in muffin tins for quick meals.
- Use silicone bibs with snack-catching pockets for less mess.
- Let toddlers help prep simple foods to boost appetite and interest.
- Keep a magnetic board of weekly meals to manage picky-eater expectations.
- Offer a small plate of new foods alongside favorites — less pressure, more exposure.
- Use an over-the-sink drying rack to save counter space while washing bottles.
Out and about hacks
- Keep a compact, pre-packed “go” kit with spare clothes, wipes, and a blanket.
- Use stroller hooks and a lightweight backpack instead of a diaper bag for balance.
- Snap a quick photo of your child before outings in case you get separated.
- Bring a small sensory toy kit for restaurant waits (sticky notes, clothespins, soft ball).
- Use shoe tags or uniform color clothing for quick group identification on field trips.
Safety and health hacks
- Keep a small first-aid kit in the car and one at home.
- Childproof one room as a safe play area for moments when you need to focus.
- Teach a simple, fun emergency phrase (like “Find Mom!”) for older toddlers.
- Label allergy- and medication-info inside your phone lock screen for caregivers.
- Use a mesh door anchor to prevent drawn curtains from falling on grabby hands.
Learning, play, and behavior hacks
- Rotate toys weekly to keep interest high without buying more.
- Create a “yes” box: safe, surprising items kids can freely explore.
- Use timers to visualize transitions (three-minute sand timers or phone timers).
- Celebrate effort with small tokens or stickers to reinforce persistence.
- Make learning tactile — sensory bins, rice scoops, and pasta threading teach motor skills.
- Sing instructions (like cleanup songs) to make routines predictable and fun.
- Use everyday moments (cooking, shopping) as mini-lessons to teach counting and language.
Organization and household hacks
- Label bins with pictures for pre-readers to stay organized.
- Keep a family calendar visible with color-coded appointments.
- Use command hooks on the back of doors for frequent-use items.
- Create a “drop station” near the entry for backpacks and shoes.
- Batch-cook and freeze meals for busy weeks.
- Delegate age-appropriate chores early to build responsibility (toy sorting, table clearing).
- Schedule a weekly 20-minute tidy time where everyone participates — consistency beats perfection.
Implementation tips
- Start small: pick two or three hacks to try this week and build from what works.
- Share the load: teach partners and caregivers the systems so they become habits.
- Adjust to personality: some kids love structure, others need more gentle routines — tweak, don’t force.
Conclusion
Parenting hacks are most useful when they fit your family’s rhythm and values. For creative strategy ideas that translate across projects and time-management contexts, consider this concise growth-hacking checklist with practical tips for inspiration on simplifying systems. If you’re balancing home life and remote work with parenting responsibilities, these remote work tips and routines can help you set boundaries and boost productivity while caring for children.

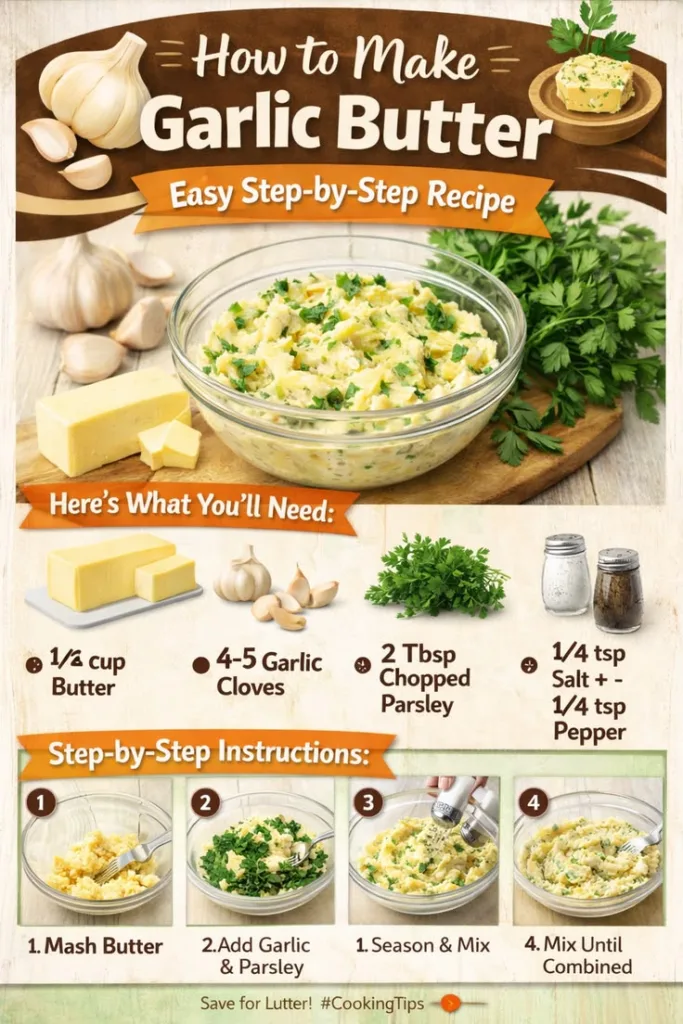
Easy Slow Cooker Garlic Butter Steak Bites & Potatoes
This slow cooker garlic butter steak bites and potatoes recipe delivers tender cubes of steak and perfectly cooked baby potatoes in a rich, buttery garlic sauce with minimal hands-on time. It’s an ideal weeknight dinner or a simple meal to feed friends without fuss. If you’re also planning family meals, you might find these 10 chicken baby food easy recipes useful for planning baby-friendly sides and snacks while the main cooks low and slow.
Table of Contents
Prep time: 15–20 minutes
Cook time: 3–4 hours on HIGH or 6–7 hours on LOW (see notes)
Yield: 4 servings
Ingredients
- 1.5–2 lb sirloin or flank steak, cut into 1-inch cubes
- 1.5 lb baby potatoes (red or Yukon gold), halved if large
- 4 tbsp unsalted butter, divided
- 5 cloves garlic, minced (more if you love garlic)
- 1/4 cup beef broth (or low-sodium broth)
- 2 tbsp Worcestershire sauce
- 1 tsp smoked paprika (optional)
- 1 tsp dried thyme or 1 tbsp fresh chopped thyme
- Salt and pepper to taste
- 1 tbsp olive oil (for optional searing)
- Fresh parsley, chopped, for garnish
Equipment
- 4–6 quart slow cooker
- Knife and cutting board
- Small skillet (optional, for searing)
Instructions
Prepare the steak and potatoes: Trim excess fat from the steak and cut into bite-sized cubes. Rinse and halve any larger baby potatoes so pieces are fairly uniform.
Optional sear (recommended for extra flavor): Heat 1 tbsp olive oil in a skillet over medium-high heat. Sear steak cubes in batches for 1 minute per side until browned (they will finish cooking in the slow cooker). Transfer to a plate.
Make the garlic butter mixture: In a small saucepan or microwave-safe bowl, melt 3 tbsp of the butter. Stir in minced garlic, beef broth, Worcestershire sauce, smoked paprika, thyme, salt, and pepper.
Layer the slow cooker: Place potatoes in the bottom of the slow cooker. Add the seared (or raw, if skipping sear) steak cubes on top. Pour the garlic butter mixture evenly over everything. Top with the remaining 1 tbsp butter cut into small pieces.
Cook: Cover and cook on HIGH for 3–4 hours or on LOW for 6–7 hours, until potatoes are fork-tender and steak is cooked to your preferred doneness (slow cookers tend to produce very tender, well-done meat). If you prefer your steak less well-done, check earlier.
Finish and serve: Taste and adjust seasoning with more salt and pepper if needed. Garnish with chopped parsley and serve immediately.
Tips and Variations
- Choice of beef: Sirloin or flank steak works well for bite-sized pieces. For fattier cuts, trim some fat to avoid greasy sauce.
- Potatoes: Small waxy potatoes (baby red or Yukon) hold their shape best. For a kid-friendly gluten-free side, try adapting textures and seasonings from this cute gluten-free kids potatoes guide when serving to little ones.
- Extra veggies: Add carrots, pearl onions, or quartered mushrooms around the potatoes for a one-pot meal; add these at the start so they can fully soften.
- Make it saucier: Stir in 1/4 cup heavy cream or a splash of white wine at the very end and heat on HIGH for 10–15 minutes with the lid off to thicken slightly.
- Slow cooker size: If using a large 6+ quart slow cooker and cooking a larger batch, increase liquids slightly to keep everything moist.
- Sear for depth: Searing adds caramelization and improved flavor, but you can skip it if you’re short on time.
Make-Ahead, Storage & Reheating
- Make-ahead: Assemble in the slow cooker insert and refrigerate (covered) up to 24 hours before cooking. Allow the insert to warm to room temperature before starting the slow cooker cycle.
- Storage: Refrigerate leftovers in an airtight container for up to 3–4 days.
- Reheating: Gently reheat in a skillet over medium-low heat with a splash of broth to loosen the sauce, or microwave in 30-second intervals until warmed through.
Serving Suggestions
- Serve over buttered rice, egg noodles, or creamy polenta to soak up the garlic butter sauce.
- Add a crisp green salad or roasted broccoli for contrast in texture and color.
- For a heartier family-style dinner, carve a crusty baguette for sopping up juices.
Notes on Timing and Doneness
Slow cookers vary; check doneness early if your slow cooker runs hot. If you prefer steak pieces more medium, check them around 2.5–3 hours on HIGH and remove early if needed. Potatoes cooked whole will take slightly longer than halved pieces.
Gentle & Safe Feeding Tools Parents Trust
These are popular, parent-approved items that make this easier and less stressful.
Grownsy Baby Food Maker
Makes smooth purees fast and saves cleanup time. Check Price on Amazon
Squeeze Station for Homemade Baby Food
Perfect for storing meals safely in the fridge or freezer. See on Amazon
Glass Baby Food Storage Jars
Gentle on gums and easy for first feeds. View on Amazon
Conclusion
For a classic, hands-off dinner that still tastes decadent, this slow cooker garlic butter steak bites and potatoes recipe is a winner — simple ingredients, minimal prep, and comforting results. If you want an alternate version of the recipe or another take on slow cooker steak bites, see the helpful recipe guide at Retro Recipe Box’s Slow Cooker Garlic Butter Steak Bites and Potatoes, and for a slightly different technique and tips, check out Slow Cooker Garlic Butter Steak Bites – The Country Cook.

Cheesy Pepperoni Pizza Roll Ups: The Ultimate Recipe Guide
Cheesy Pepperoni Pizza Roll Ups: The Ultimate Recipe Guide
Nothing beats the comfort of hot, cheesy pepperoni pizza — especially when it’s rolled into perfect bite-sized portions. This guide walks you through everything you need to make crispy, gooey pizza roll ups at home: ingredients, step-by-step instructions, tweaks for busy weeknights, and smart tips for freezing and reheating. If you’re planning family-friendly meals, also see this helpful ultimate guide to fun for children for ideas on pairing these roll ups with activities that kids will love.
Why these roll ups work
Pizza roll ups are portable, customizable, and quick to prepare. They combine familiar flavors — stretchy mozzarella, zesty marinara, and savory pepperoni — in a format that’s perfect for lunches, snacks, or party platters. You can make them with store-bought dough for speed or roll your own for a flakier crust.
Ingredients (makes about 12–16 roll ups)
- 1 pound pizza dough (store-bought or homemade) or one can refrigerated crescent dough
- 1 1/2 cups shredded mozzarella cheese
- 1/2 cup grated Parmesan (optional)
- 20–30 slices pepperoni (adjust to taste)
- 1/2 cup pizza or marinara sauce + extra for dipping
- 1 tbsp olive oil (for brushing)
- 1 tsp garlic powder
- 1 tsp dried oregano or Italian seasoning
- Optional fillings: cooked sausage, diced bell pepper, sliced olives, or a sprinkle of red pepper flakes
Equipment
- Baking sheet lined with parchment paper or silicone mat
- Rolling pin (if using pizza dough)
- Pastry brush (for egg wash or oil)
- Baking sheet or air fryer basket
Step-by-step instructions
- Preheat oven to 400°F (200°C). If air-frying, preheat to 370°F (190°C).
- On a lightly floured surface, roll the pizza dough into a roughly 12×10-inch rectangle. If using crescent dough, unroll and press seams together to form a sheet.
- Spread the 1/2 cup marinara sauce in a thin layer over the dough, leaving a 1-inch border along the long edge.
- Evenly sprinkle the shredded mozzarella and grated Parmesan, then arrange pepperoni slices in a single layer. Add any optional fillings.
- Starting from the long edge with fillings, tightly roll the dough into a log. Pinch the seam to seal.
- Slice the roll into 12–16 pieces (about 1-inch thick). Place each piece cut-side up on the prepared baking sheet, leaving small gaps.
- Brush tops with olive oil (or an egg wash for a glossy finish), then sprinkle with garlic powder and dried oregano.
- Bake for 12–18 minutes, until golden brown and cheese is bubbly. For an air fryer, cook 8–12 minutes, checking for even browning.
- Let cool 3–5 minutes before serving with warm marinara for dipping.
Baking vs. Air Fryer vs. Pan-Frying
- Oven baking yields even browning and is easiest for larger batches.
- Air fryer produces extra-crispy edges quickly — watch closely to avoid over-browning.
- Pan-frying cut roll-ups in a skillet (covered briefly) gives a golden bottom and gooey center but requires flipping and more hands-on attention.
Variations & flavor ideas
- Buffalo Chicken Roll Ups: Swap pepperoni for shredded cooked chicken mixed with buffalo sauce and a little ranch or blue cheese. For toddler-friendly chicken ideas, you can reference this collection of 10 easy chicken baby food recipes to adapt fillings for little ones.
- Veggie Supreme: Add sliced mushrooms, bell pepper, and spinach.
- Supreme Spice: Add Italian sausage, red pepper flakes, and extra oregano.
Make-ahead, freezing, and reheating
- To make ahead: Assemble and refrigerate on the baking sheet (covered) for up to 24 hours; bake as directed.
- To freeze: Assemble and slice, then flash-freeze single layer on a tray. Transfer to a freezer bag. Bake from frozen at 400°F for 18–22 minutes, adding a few extra minutes if needed.
- Reheat: Microwave for 20–30 seconds for a quick warm-up, or reheat in oven/air fryer for crispiness.
Serving suggestions
Serve warm with marinara, ranch, or garlic butter for dipping. Pair with a fresh green salad, cut fruit, or veggie sticks for a balanced plate perfect for lunchboxes or casual dinners.
Tips for perfect roll ups
- Don’t overload fillings; too much can prevent sealing and make rolling messy.
- Chill assembled rolls briefly before slicing to keep them neat.
- Brush with butter and garlic after baking for an extra indulgent finish.
- Use a serrated knife to slice without squishing the log.
Troubleshooting
- Dough too sticky: Dust lightly with flour and chill 10 minutes.
- Soggy bottom: Bake on a preheated baking sheet or use a convection setting to promote crisping.
- Cheese oozing out: Seal seams tightly and leave a small border unfilled to prevent spillover.
Nutrition (approximate per roll up)
Calories will vary with dough type and fillings; a standard roll up is roughly 180–260 kcal. To reduce calories, use part-skim mozzarella and whole-wheat dough.
Conclusion
These Cheesy Pepperoni Pizza Roll Ups are a crowd-pleaser that’s easy to customize, freeze, and serve for quick meals or party snacks. For a visual walk-through that makes assembly foolproof, watch this helpful Family-Favorite Pizza Roll Ups (Video) (Easy Dinner Idea), and for another tested recipe with tips and variations, see Homemade Pepperoni Pizza Rolls – Mel’s Kitchen Cafe.
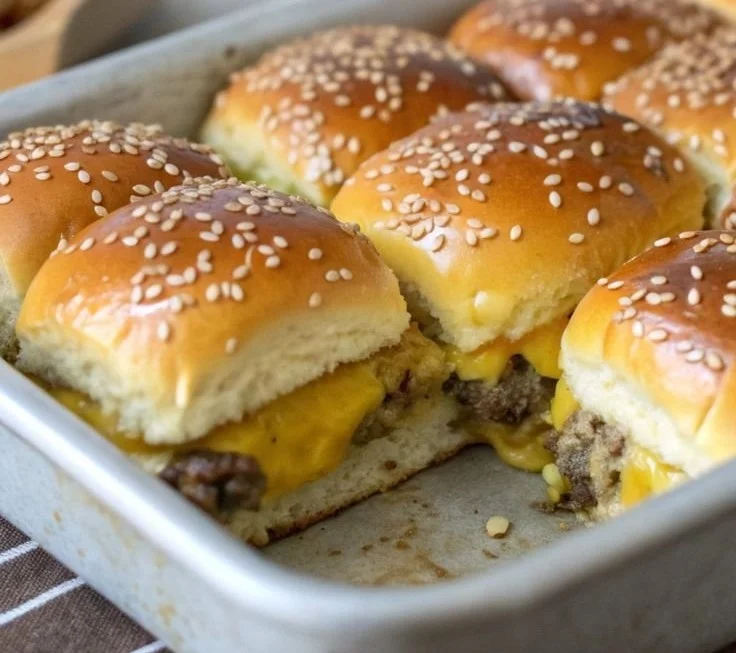
Kid-Friendly Cheeseburger Sliders (Easy Weeknight Meal)
Kid-Friendly Cheeseburger Sliders (Easy Weeknight Meal)
Cheeseburger sliders are a perfect weeknight solution: quick to assemble, easy to customize, and loved by kids and adults alike. Pair them with simple sides for a complete dinner — for ideas on sides and finger foods, check this roundup of kid-friendly appetizers that family members of all ages will enjoy.
These mini burgers cook fast, can be made ahead, and are forgiving if you want to swap cheeses, add veggies, or use turkey or chicken instead of beef.
Ingredients (makes about 12 sliders)
- 1 lb ground beef (80/20 for juiciness)
- 12 slider buns (potato or Hawaiian work great)
- 6 slices American or cheddar cheese, halved
- 1/2 small onion, finely chopped (optional)
- 1/4 cup ketchup
- 1 tbsp Worcestershire sauce
- 1 tsp mustard
- 1/2 tsp garlic powder
- Salt and pepper, to taste
- Butter or oil for the griddle
- Optional toppings: pickle slices, lettuce, tomato slices, extra ketchup or mustard
Directions
- Preheat a large skillet or griddle over medium-high heat. Lightly oil the surface or add a small pat of butter.
- In a bowl, combine ground beef, chopped onion (if using), ketchup, Worcestershire sauce, mustard, garlic powder, salt, and pepper. Mix gently—overworking can make patties tough.
- Divide the meat into 12 equal portions and form into small patties that are slightly larger than the buns (they’ll shrink while cooking).
- Cook the patties 2–3 minutes per side for medium, or until cooked through to your preference. Add a half slice of cheese on top of each patty during the last 30 seconds and cover the pan to melt the cheese.
- Lightly toast the slider buns on the griddle for about 20–30 seconds, cut-side down, until golden.
- Assemble sliders with patties and preferred toppings. Serve warm.
Time-saving tips
- Make larger patties and freeze extras between parchment sheets for up to 3 months; thaw and reheat quickly on a skillet.
- If you prefer poultry, use a turkey or chicken blend and season the same way — you can find other family-tested poultry ideas among our kid-friendly chicken recipes.
- For faster prep, use pre-sliced onions and pre-shredded cheese; mini patties also cook more uniformly if they’re the same thickness.
Kid-friendly variations
- Mini sliders with hidden veggies: grate carrot or zucchini into the meat mixture (squeeze out excess moisture) to boost nutrition without changing flavor.
- BBQ sliders: swap ketchup and Worcestershire for your favorite BBQ sauce and top with a slice of cheddar and a pickle.
- Breakfast sliders: top with a tiny fried egg and swap ketchup for a smear of mayo and a touch of hot sauce for grown-ups.
Make-ahead & storage
- Store cooked patties in an airtight container in the refrigerator for up to 3 days. Reheat gently in a skillet or oven to keep buns from getting soggy.
- Assemble just before serving if you want crisp buns; for quicker service, keep toppings prepped in small bowls.
Serving suggestions
- Serve sliders with carrot sticks, apple slices, or a simple salad for a balanced plate.
- Offer a small ketchup/mustard station so children can customize their own sliders — this often increases willingness to try new toppings.
Conclusion
For another quick, tested version of this favorite, try the Easy Cheeseburger Sliders – Weelicious for additional kid-focused tips and variations. If you like the sweeter, softer bun approach, the Hawaiian Roll Cheeseburger Sliders – Cheftini recipe shows a delicious way to use Hawaiian rolls for a sticky-sweet twist.
