

Simple Spring First Birthday Party Ideas
Simple Spring First Birthday Party Ideas
Spring is the perfect season to celebrate your baby’s first birthday: fresh colors, mild weather, and seasonal blooms make decorating and planning easy. If you’re looking for straightforward ways to arrange a memorable day without stress, these simple spring-themed ideas will help you host a sweet, low-fuss celebration. For focused themes geared toward little ones, see these unique first birthday party ideas for boys for further inspiration you can adapt to a spring palette.
Pick a Gentle Theme and Color Palette
- Go with soft pastels (mint, blush, buttercup yellow, sky blue) or nature-inspired palettes (leafy green and soft brown).
- Simple themes that pair well with spring: garden party, baby animals (bunnies, chicks), picnic, or floral tea.
- Use one main accent color plus neutrals to keep decorations cohesive and calm.
Venue and Timing
- Host outdoors if weather allows: backyard, local park pavilion, or community garden.
- If indoors, choose a bright room with natural light and space for a safe play area.
- Aim for a late-morning or early-afternoon timeframe that fits a baby’s nap schedule — around 10:30–12:30 or 2:00–4:00 works well.
Invitations and Guest List
- Keep the guest list small to reduce noise and overstimulation (close family and a few friends).
- Send simple digital invitations with a photo or soft illustration of your theme.
- Include a short note about comfort items: strollers, baby carriers, and labeled changing areas.
Easy Decorations That Look Charming
- Use fresh or faux greenery and potted flowers as dual-purpose décor and take-home favors.
- Create a simple photo backdrop with a fabric drop, garland, and a few balloons in your palette.
- Add a "first-year" photo string: hang monthly photos of your baby along a ribbon for guests to enjoy.
Activities & Entertainment
- Sensory play station: a shaded area with safe textures (soft scarves, board books, stacking toys).
- Bubble time: a gentle bubble machine or adult-blown bubbles delights toddlers and looks great in photos.
- Short group activities: a sing-along or storytime (5–10 minutes) so little guests stay engaged but not overwhelmed.
Food & Cake — Simple and Safe
- Finger-food-friendly snacks: soft fruit slices, mini sandwiches, yogurt melts, and cheese cubes.
- Offer adult-sized options on a separate table so babies have safe, bite-sized portions.
- For the cake, consider a small smash cake for the birthday child and a larger sheet cake or cupcakes for guests to keep serving minimal.
Favors and Keepsakes
- Give potted succulents or seed packets as spring-appropriate favors that guests can plant later.
- Provide a small keepsake for the birthday child, such as a guest-signed board or a framed handprint station.
Photo Tips
- Schedule a few dedicated photo moments: family photos, cake smash, and toddler playtime.
- Use natural light when possible and avoid direct midday sun; shaded areas produce softer, more flattering images.
Practical Considerations
- Have a weather backup plan if hosting outside (pop-up canopy or move indoors).
- Prepare a diaper and first-aid station, and keep extra sunscreen and bug spray handy but out of toddler reach.
- Keep cleaning supplies accessible for quick spills and sticky fingers.
Variations for Different Budgets
- Low budget: DIY decorations, potluck-style snacks, and a neighborhood park permit if required.
- Mid budget: rented tables and chairs, a simple balloon garland, and a local baker for cupcakes.
- Higher budget: event stylist for setup, rented photo booth, or musician for live sing-alongs.
Extras and Adaptations
- If you want ideas that scale for different ages or sibling celebrations, you can adapt motifs and activities; for example, older-kid elements can be drawn from broader birthday resources like tasteful 10th birthday party ideas that emphasize theme cohesion and guest experience.
Conclusion
For a collection of playful, age-appropriate themes you can adapt to spring, check out the helpful roundup of first birthday party themes from Happiest Baby, which offers dozens of creative starting points. If you want spring-specific styling and step-by-step décor ideas, review the practical suggestions in this Spring-Themed First Birthday Ideas guide from Candidly Crafted for more visuals and DIY tips.

Unique First Birthday Party Themes
Unique First Birthday Party Themes
Planning a first birthday is about celebrating a milestone while keeping things simple, memorable, and photographed for years to come. Whether you want a low-key family gathering or a playful bash with friends, these fresh theme ideas and practical tips will help you create a celebration as unique as your little one. If you need gender-focused inspiration to start, this roundup of unique first birthday ideas for boys offers clever twists on classic themes.
Start with what matters
Before picking a theme, decide on the atmosphere you want: cozy and intimate, bright and playful, or elegant and photo-ready. Base choices around your child’s current interests (colors, textures, toys) and the venue. For small indoor gatherings, sensory stations and soft play work well; for outdoor parties, plan shade, safe flooring, and easy-clean activities.
Creative theme ideas (with easy variations)
- Woodland Picnic: Think soft ferns, animal plushies, and gingham blankets. Use neutral colors so the décor grows with your child.
- One-derful Circus: Not overly loud—opt for pastel circus stripes, simple popcorn cones, and a puppet corner.
- Vintage Storybook: Use classic children’s book covers as décor, create a reading nook, and offer storytime.
- Little Scientist: Simple “experiments” like safe color-mixing stations and bubble tables fascinate babies and toddlers.
- Garden Tea (Kid-Friendly): Mini teacups for sensory play, butterfly crafts, and floral crowns made of paper.
- Balloon Arch Gallery: Focus on a single striking balloon installation and coordinate simple props for photos.
- Nautical Nook: Anchors, sailor stripes, and a fish sensory bin — clean, blue-themed accents keep it chic.
- Rainbow Sensory Station: Color-blocked play areas with matching toys and textured fabric.
- Farmyard Fun: Hay-bale photo spot (covered for comfort), animal headbands, and a farm sing-along.
- Space Cadet Starter: Soft star projectors, planet mobiles, and glow-in-the-dark stickers for evening snaps.
Each theme can be toned up or down depending on your budget and the number of guests.
Decorations, food, and keepsakes
- Decorations: Prioritize one focal installation (backdrop, balloon arch, or a themed table). Keep other décor minimal so cleanup is easier.
- Food: Finger foods, a smash cake for the birthday baby, and allergy-aware snacks are perfect. If you want a showstopper dessert without fuss, a themed cupcake tower saves time.
- Keepsakes: Guest-message boards, fabric handprint banners, or a simple time-capsule box with notes and small mementos make the day sentimental.
Activities that actually work with one-year-olds
Games for toddlers should be sensory and short. Ideas include:
- Bubble stations (always a hit)
- Soft-block towers
- Sensory bins with rice, scarves, or water-safe toys
- A simple crawl race or obstacle path for the most mobile infants
For older siblings, set up a supervised craft table so parents can relax.
Budget-friendly tips
- Rent one standout item (a bounce house or a themed backdrop) instead of buying multiple decorations.
- Use natural elements like flowers or fruit as décor to cut costs.
- DIY photo props and printable invitations can save both money and time.
If your celebration leans feminine or you’re collecting more themed inspiration, explore curated lists like the baby girl first birthday themes resource for whimsical and classic ideas tailored to girls.
Safety and timing
Keep the party short—90 minutes to 2 hours is typically ideal for first birthdays. Have a quiet room for naps or diaper changes, and choose toys and décor without small parts for safety.
Conclusion
For more curated options and stylish visuals to help finalize a theme, check out Minted’s first birthday themes and ideas, which offer coordinated paper goods and décor inspiration. If you want a variety of creative, easy-to-execute concepts and invitation ideas, review the roundup of first birthday party themes and ideas at Paperless Post.
13 Awesome + Easy Activities for Toddlers Who Like to DESTROY Things
13 Awesome + Easy Activities for Toddlers Who Like to DESTROY Things
Toddlers who love to smash, pull apart, and generally "test the limits" are not being naughty — they’re exploring cause and effect, building motor skills, and learning about their world. If you want ideas that let them release that destructive energy safely and constructively, this list has 13 fun, low-fuss activities. For more general indoor play inspiration that adapts to small spaces, check out this guide to indoor activities for toddlers.
Each activity below includes a simple setup, what your child learns, and a quick safety tip. Most can be done with household items or minimal prep.
- Crumple-and-Rescue Paper Pile
- Set up: Give your toddler a stack of scrap paper to crumple into balls, then toss into a laundry basket or "rescue" them with tongs.
- Skills: Fine motor strength, hand-eye coordination, imaginative play.
- Tip: Use recycled paper and supervise small pieces for choking hazards.
- Box Demolition Zone
- Set up: Collect cardboard boxes and tape them into a mini "fort" for them to knock down or pull apart.
- Skills: Spatial reasoning, gross motor skills.
- Tip: Flatten boxes beforehand to avoid sharp staples and large heavy pieces.
- Water Pouring Station (Indoors or Out)
- Set up: Fill shallow bins with water and provide cups, funnels, and scoops for pouring and dumping.
- Skills: Cause-and-effect, sensory exploration.
- Tip: Non-slip mats and close supervision prevent slips and swallowing.
- Sensory "Dig" Bin with Safe Fillers
- Set up: Use dry rice, pasta, or foam packing peanuts and hide objects to find and destroy (open containers, unwrap safe items).
- Skills: Tactile exploration, object permanence.
- Tip: Keep small objects out if your child mouths things.
- Tape and Unwrap Presents
- Set up: Wrap old containers in paper and let your toddler rip the paper and remove tape (use painter’s tape or paper-friendly tape).
- Skills: Problem solving, pincer grasp.
- Tip: Avoid strong adhesives and supervise scissors or sharp edges.
- Bubble Popping Blast
- Set up: Blow bubbles and encourage your toddler to pop them with hands, feet, or a bubble wand.
- Skills: Visual tracking, timing.
- Tip: Use non-toxic bubble solution and keep the floor dry to prevent falls.
- Safe Tool Bench
- Set up: Offer large plastic tools, wooden blocks, and soft nails they can hammer into a foam block repeatedly.
- Skills: Hand strength, focus.
- Tip: Choose toys designed for toddlers and supervise hammering to prevent hitting fingers.
- Paper Plate Shredding Art
- Set up: Give paper plates, safe scissors (or pre-cut slits), and glue to make collages from torn pieces.
- Skills: Creativity, fine motor control.
- Tip: Pre-cut or supervise scissors use; collect scraps to avoid slips.
- Build-and-Crash Block Towers
- Set up: Encourage building towers with soft blocks or stacking cups, then let them knock them down.
- Skills: Engineering basics, gross motor release.
- Tip: Use lightweight materials to prevent injury.
- Stew Pot Play — Stir, Smash, Strain
- Set up: Fill a pot with safe items (foam, fabric scraps, rubber toys) and provide wooden spoons for stirring and smashing.
- Skills: Pretend play, tactile exploration.
- Tip: Keep small kitchen items out and use unbreakable containers.
- Torn Paper Snowball Fight
- Set up: Tear old newspaper into strips and plug them together into large “snowballs” for throwing and stomping.
- Skills: Gross motor development, social play.
- Tip: Avoid tiny shreds that could be inhaled; do this in a contained area.
- Crate of Crunch — Recyclables Sorting
- Set up: Offer an assortment of clean, safe recyclables (plastic bottles with lids off, cardboard tubes) to crush, sort, and stack.
- Skills: Categorization, strength.
- Tip: Remove sharp edges and lids; supervise crushing.
- Food-Safe Smash: Fruit and Veggie Studio
- Set up: Let your toddler squish soft fruits (bananas, avocados) or steamed vegetables in a bowl — great for sensory play and snack prep.
- Skills: Sensory exploration, early cooking participation.
- Tip: Always supervise with food and watch for choking risks. For more guidance on offering healthy snacks and the benefits of specific fruits, see this short piece on the benefits of apples for toddlers.
Practical safety checklist
- Clear the area of small choking hazards.
- Use soft, lightweight materials for knocking and throwing.
- Keep a bin or sheet for easy cleanup.
- Stay at arm’s length for children who mouth objects or have shorter attention spans.
How to make "destructive" play positive
- Narrate what they do: “You smashed the tower — wow, it fell!” This supports language growth and emotional naming.
- Offer choices: Let them choose between knocking down or building up to practice self-regulation.
- Rotate activities weekly to keep novelty high while using familiar materials.
Adaptations for sensory or developmental differences
- Provide quieter, less chaotic versions (e.g., slow-motion demolition with soft blocks).
- Use predictable routines with clear start/end cues for children who need structure.
- Offer alternative outlets like heavy work (pushing a weighted cart) to provide proprioceptive input.
Conclusion
If you want more low-prep ideas specifically aimed at active or “destructive” toddlers, this roundup of 13 low-prep activities for destructive toddlers is a great companion. For families navigating more intense behaviors linked to developmental differences, this article on when autistic kids destroy things offers thoughtful insights and practical strategies.

42 Simple Indoor Activities for Toddlers and Preschoolers | Every Day Above Dirt is a Good Day
42 Fresh Indoor Ideas for Toddlers and Preschoolers: Keep Playtime Fun and Simple
Rainy days, long winters, or a fussy nap schedule don’t have to mean bored toddlers. With a little creativity, everyday items and a handful of minutes can turn your living room into a learning lab, an art studio, or an active playground. Below you’ll find approachable, low-prep activities that support motor skills, language, creativity, and calm focus—organized so you can pick something that fits the mood and energy level.
If you want a ready-made list to print or pin, this indoor activities for toddlers collection is a great companion to the ideas here.
How to choose an activity
- Energy level: pick high-movement games when your child is restless, and quieter sensory or art projects when they need to wind down.
- Prep time: many ideas require zero prep; others take 5–10 minutes.
- Learning focus: choose activities that emphasize gross motor, fine motor, language, sensory exploration, or creativity based on what you want to encourage today.
- Safety: always supervise small parts, messy play with food, and climbing or jumping activities.
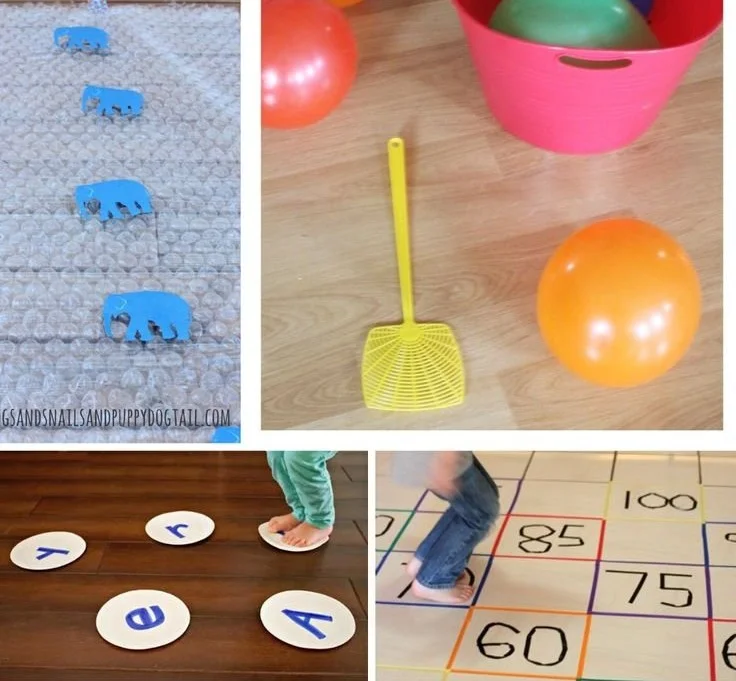
Active & Gross Motor Play
- Obstacle course: cushions, chairs, and tape lines create tunnels, balance beams, and jumping spots.
- Balloon volleyball: keep a balloon off the floor and count hits.
- Dance freeze: upbeat songs, then freeze when the music stops.
- Tunnel crawl: use couch cushions or a blanket draped over chairs.
- Sock skating: wear socks on a wood or tile floor for a “skating” race.
- Pillow mountain climb: stack soft pillows to climb and descend carefully.
Fine Motor & Manipulative Play
- Sticker collage: peel-and-stick fun on paper or cardboard.
- Pom-pom sorting: use tongs or tweezers to sort by color into muffin tins.
- Clothespin drop: clip clothespins onto cardboard for pinching practice.
- Threading pasta necklaces: use large pasta shapes on yarn (supervise).
- Button art: glue buttons onto paper to make faces or patterns.
- Playdough sculptures: roll, pinch, and cut with safe tools.
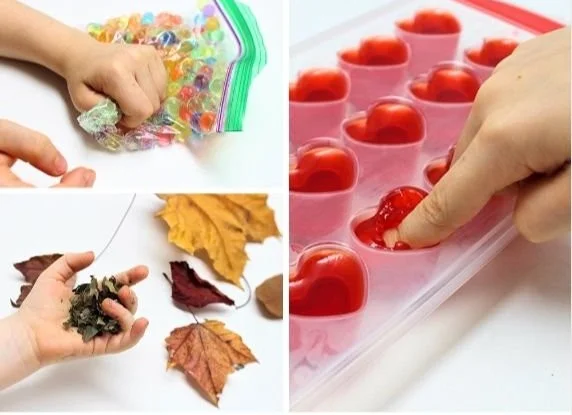
Sensory Activities
- Sensory bin: rice, beans, or water beads with scoops and cups.
- Edible finger paint: yogurt mixed with natural food color (taste-safe).
- Ice cube treasure hunt: freeze small toys in ice and let kids melt them out.
- Cloud dough: flour and oil mixed to a moldable, sandy texture.
- Bubble wrap stomping: toss on the floor for tactile popping.
- Nature-feel tray: shells, leaves, and pinecones for touch exploration.
Quiet, Calm, and Focus
- Story stones: paint simple pictures on stones and tell a story together.
- Felt board scenes: make characters and shapes from felt sheets.
- Matching card games: pairs of animals, colors, or shapes.
- Simple puzzles: large-piece puzzles to build concentration.
- Sensory bottle: glitter and water in a sealed bottle to watch settle.
- Lacing cards: punch holes around a shape and let children sew with laces.
Creative & Artistic
- Tape resist painting: apply tape to paper, paint over it, then peel off.
- Shadow drawing: trace shadows of toys with a lamp.
- Nature collage: glue pressed leaves, petals, and sticks to paper.
- Homemade instruments: rice in sealed containers for shakers, pots for drums.
- Sticker story: place stickers and have the child tell a short story about them.
- Handprint art: turn handprints into animals or trees with a marker.
Early Learning Activities
- Color scavenger hunt: call out colors and have kids find matching objects.
- Shape hunt: search for circles, squares, and triangles around the room.
- Letter-lotto with foam letters: match foam letters to a letter board.
- Counting with blocks: stack and count towers together.
- Pattern play: create simple patterns with colored beads or blocks.
- Sorting everyday objects: socks, spoons, or small toys sorted by category.
Food-Based Activities (educational and sensory)
- Fruit kabob patterns: alternate fruit pieces to teach sequences (supervise choking hazards).
- Apple stamping: slice apples to stamp shapes in paint and discuss textures. For more ideas on using apples in toddler-friendly ways, see this article about the benefits of apples for toddlers.
- Yogurt parfait station: layer yogurt, fruit, and cereal for a taste-and-build lesson.
- Smoothie-making lesson: let kids help add ingredients and press the blender button with supervision.
Imaginative Play & Role-Play
- Mini market: set up a pretend grocery store with play food and play money.
- Dress-up theater: simple costumes and a cardboard stage for short performances.
Tips to keep things manageable
- Rotate: keep three go-to bins of toys or activities and rotate them to maintain novelty.
- Involve kids in set-up and clean-up to build responsibility.
- Keep a “no-screen” timer for set blocks of interactive play to maintain balance.
- Scale activities down: use 2–3 items for a toddler and more complex steps for preschoolers.
Conclusion
If you want to add toys and supplies that support these indoor ideas, you can shop indoor toys for 3-year-olds to fill your activity boxes. For more inspiration and a full list of 42 easy-to-follow projects, check the original roundup of 42 Simple Indoor Activities for Toddlers and Preschoolers.

High-Protein Toddler Egg Bites
High-Protein Toddler Egg Bites
Egg bites are a simple, nutrient-dense option that toddlers usually love. Compact, easy to hold, and customizable, they’re perfect for breakfast, snacks, or packed lunches. If you want more egg-based ideas for little ones, try the gentle twist offered in this avocado egg salad recipe for babies to expand flavors and textures.
Why egg bites work for toddlers
- High in protein and healthy fats, supporting growth and sustained energy.
- Soft, spoonable versions are safe for early feeders; firmer mini muffins are good for practiced pincer grasp.
- Easy to hide extra veggies or cheese for picky eaters.
Ingredients (makes ~12 mini bites)
- 6 large eggs
- 1/2 cup milk or whole-milk yogurt (for creaminess)
- 1/2 cup shredded cheese (cheddar or mild jack)
- 1/2 cup finely chopped cooked veggies (spinach, bell pepper, or carrot)
- 2 tablespoons finely chopped cooked bacon or ham (optional)
- Pinch of salt (optional; skip or keep tiny for under-1s)
- Nonstick spray or a little butter for greasing
Quick method
- Preheat oven to 350°F (175°C). Lightly grease a 12-cup muffin tin or silicone mold.
- Whisk eggs and milk until blended; stir in cheese, veggies, and meat if using.
- Spoon mixture into cups about 3/4 full. For smoother bites, strain the mixture through a sieve before pouring.
- Bake 15–18 minutes until set and lightly golden. Let cool slightly before removing.
- Store in an airtight container for up to 4 days in the fridge, or freeze for longer.
Texture and portion tips
- For infants moving to solids, blend the baked egg bites briefly into a mash for spoon-feeding.
- For toddlers learning to feed themselves, make smaller, firmer bites that fit their grasp.
- Reduce or omit added salt and smoked meats for very young kids.
Flavor ideas and pairings
- Mild cheddar + steamed spinach + a pinch of nutmeg
- Feta + chopped tomatoes + basil (great for a Mediterranean twist)
- Tiny apple slices or applesauce on the side balance savory bites; read about the benefits of apples for toddlers when planning snacks.
Safety notes
- Cut egg bites into manageable pieces for children under 4 to reduce choking risk.
- Avoid whole nuts, large chunks of raw veggies, or hard add-ins inside the bites.
Conclusion
For a gooey, cheese-forward spin inspired by café favorites, try the Starbucks-style cheesy egg bites recipe linked here: Starbucks-style cheesy egg bites recipe. If you want another easy method for mini egg bites with different flavor combos, check this approachable guide: mini egg bites recipe.

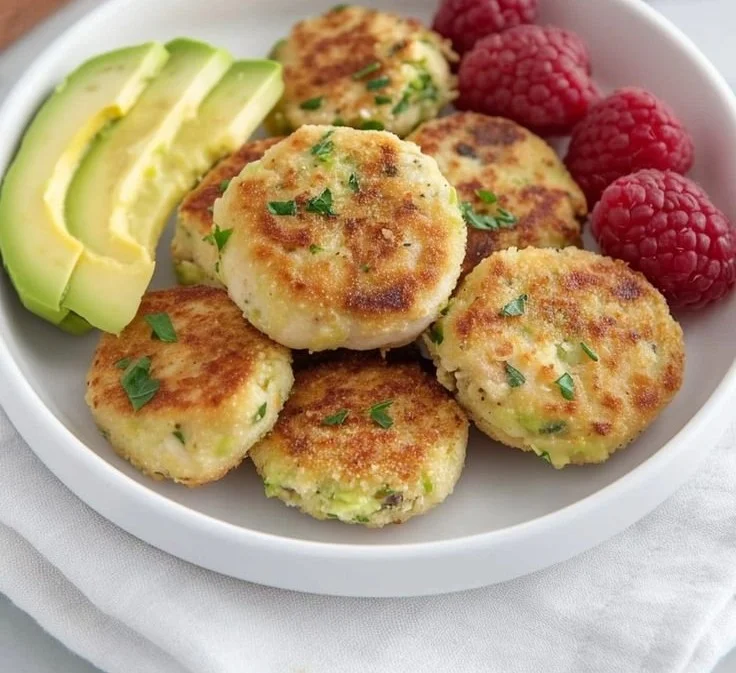
Cheesy Broccoli Quinoa Bites (Perfect for Babies, Toddlers & Kids!)
Cheesy Broccoli Quinoa Bites (Perfect for Babies, Toddlers & Kids!)
These little bites are an easy, nutrient-packed finger food that travels well, freezes perfectly, and sneaks veggies into picky mouths. While they’re soft enough for older babies and toddlers when made small and gentle, they’re also satisfying for preschoolers. If you like pairing baked bites with fruit, you might also be interested in the nutritional benefits of apples for toddlers to round out a balanced snack plate.
Why kids love them (and parents approve)
- Mild, cheesy flavor with familiar textures.
- Bite-sized and easy for small hands to pick up.
- Quinoa adds protein and a different grain option than wheat.
- Broccoli provides fiber, vitamin C, and iron-supporting nutrients when combined with vitamin-C-rich sides.
Ingredients (makes ~18 small bites)
- 1 cup cooked quinoa (cooled)
- 1 cup finely chopped steamed broccoli (well-drained)
- 1 large egg (or flax egg for egg-free families)
- 1/2 cup shredded mild cheddar cheese (or dairy-free alternative)
- 1/4 cup finely grated carrot (optional, for color + sweetness)
- 2–3 tbsp whole wheat or gluten-free flour (to bind)
- 1/4 tsp mild garlic powder (optional)
- Pinch of salt (omit or reduce for babies under 12 months)
- Olive oil or nonstick spray for baking
Instructions
- Preheat the oven to 375°F (190°C) and line a mini muffin tin with liners or grease lightly.
- In a bowl, combine cooked quinoa, steamed broccoli, shredded cheese, grated carrot, and seasonings.
- Stir in the egg and then sprinkle in the flour a tablespoon at a time until the mixture holds together when pressed (you want a slightly sticky but moldable texture).
- Press the mixture into the prepared mini muffin cups, filling each cup and packing gently so they hold shape.
- Bake for 12–15 minutes, until edges are set and tops are lightly golden.
- Let cool thoroughly before serving to little ones; remove from tin and place on a cooling rack.
Serving & safety tips for babies and toddlers
- For babies under 12 months, cut bites into very small pieces and check texture—ensure no large broccoli stems remain.
- Offer with a vitamin-C-containing fruit or puree to support iron absorption.
- Always supervise young children while eating and introduce new foods one at a time if allergies are a concern.
Storage, reheating & freezing
- Refrigerate in an airtight container for up to 3 days.
- Reheat gently in a low oven or microwave until warm throughout.
- Freeze cooled bites on a baking sheet, then transfer to a freezer-safe bag for up to 2 months. Thaw in the fridge or reheat from frozen, adding a minute or two to heating time.
Variations & swaps
- Swap cheddar for mozzarella or a mild goat cheese for different flavor profiles.
- Add finely chopped spinach or mashed sweet potato for extra nutrients.
- Make them egg-free by using a flax egg (1 tbsp ground flax + 3 tbsp water, let sit 5 minutes).
Incorporating simple, family-friendly recipes keeps mealtime stress low and nutrition high — if you’d like more ideas for little eaters, check out this collection of healthy recipes for toddlers that are easy to adapt.
Conclusion
For a tested version and tips on serving sizes, see this helpful roundup: Broccoli Cheddar Quinoa Bites: A Healthy Kid Snack!
If you want a slightly different take or alternate method, this recipe write-up is a great reference: Cheesy Broccoli Quinoa Bites – Eat Yourself Skinny
20+ Indoor Energy Burners for Kids
20+ Indoor Energy Burners for Kids
When outdoor play isn’t possible, keeping kids active indoors is essential for their physical health, mood, and sleep. Below are 25 creative, space-friendly activities that help kids burn off energy, build coordination, and have fun. For moments when emotions run high and you need a light laugh to reset the mood, consider the best joke about anger for kids to break the tension.
Quick tips before you start:
- Clear breakable items from the play area.
- Use non-slip socks or bare feet on smooth floors.
- Keep activities age-appropriate and supervise high-energy play.
Indoor Activities (25 ideas)
Living Room Obstacle Course
Set up cushions, chairs, and tape “tunnels” on the floor. Time each run and let kids try to beat their best.Dance Party Freeze
Play upbeat music and pause it randomly — kids must freeze in place until the music resumes.Balloon Volleyball
Use a balloon and a string or a couch back as the “net.” Balloons slow the action for safety.Animal Relay Races
Kids hop like frogs, waddle like penguins, or slither like snakes between markers.Pillow Fort Crawls
Turn pillow forts into obstacle mazes where kids crawl, find treasures, and return.Staircase Sprints (if safe)
Carefully timed trips up and down stairs for energy release — one-at-a-time and supervised.Indoor Bowling
Use plastic bottles as pins and a soft ball for rolling strikes.Hula Hoop Challenges
Count spins, walk while hooping, or create hoop targets on the floor for jumping.Simon Says with Movement
Ask for jumping jacks, high knees, or bear crawls to keep things active.Yoga Adventure Stories
Blend gentle yoga poses into a story to stretch and strengthen while engaging the imagination.Freeze Dance with Props
Add scarves or beanbags to balance while dancing and freezing to increase difficulty.Scavenger Hunt with Movement Tasks
Each clue includes a movement challenge (10 toe touches, 5 spins, etc.) before getting the next hint.Indoor Scarf Toss
Kids toss lightweight scarves and try to catch them at the peak or keep them afloat as long as possible.Scooter or Balance Board Circuits
Use a small scooter or balance board indoors on non-carpeted surfaces for controlled movement.Pillow Jumping Target
Place pillows on the floor as “islands” and have kids leap from one to another without touching the ground.Cardboard Box Ball Pit
Fill a sturdy box with soft balls or crumpled paper for a safe, sensory-rich play zone.Sock Skating
On hardwood floors, kids slide in socks to simulate skating — include a race or figure-eight course.Balloon Tap Challenge
How many taps until it hits the ground? Set teams and a timer for cooperative play.Marching Band Parade
Hand out simple instruments or pots and pans and march around the house to favorite tunes.Target Toss with Soft Balls
Use laundry baskets as targets at varying distances and assign points.Popcorn Jump (for younger kids)
Play music and each time it stops, kids must “pop” a certain number of jumps like popcorn.Indoor Hopscotch with Tape
Create a hopscotch grid with masking tape—add balance or one-foot challenges.Chalk Carpet Track
Use washable sidewalk chalk on a mat or paper taped to the floor to create a racetrack for toy cars and marching.Balloon Relay with a Spoon
Balance a balloon on a spoon and race — teams pass the balloon without using hands.Interactive Video Movement Games
Choose age-appropriate motion-control or dance games. For toddler-friendly screen options, you might like the best kids games for under 4 on Steam to find gentle, active digital experiences.
Safety reminders
- Rotate activities to avoid overuse injuries.
- Keep hydrated and take quiet breaks if kids get overheated or overstimulated.
- Adapt activities to accommodate different ages and abilities.
Conclusion
For more ideas and ready-made lists, see this helpful roundup of 20+ Indoor Energy Burning Activities for Kids – Taming Little Monsters, which offers variations and printable ideas, and browse a selection of recommended products in this collection of 32+ indoor energy burning toys – Explore More Clean Less to equip your home for active play.
Nutritious Chicken and Broccoli Nuggets for Baby
Nutritious Chicken and Broccoli Nuggets for Baby
These tender chicken and broccoli nuggets are designed for little mouths learning solids — soft enough to gum or chew, mild in flavor, and packed with protein, iron, and vitamins. They’re a great way to introduce vegetables in a familiar nugget form. If you’d like more chicken-based baby meal ideas, check out 10 chicken baby food recipes for inspiration.
Why this recipe works for babies
- Balanced nutrition: lean protein from chicken plus fiber, vitamin C, and vitamin K from broccoli.
- Gentle seasoning: no salt or strong spices, so it’s baby-friendly.
- Easy texture control: you can puree, mash, or leave slightly chunky depending on your baby’s chewing stage.
Ingredients (makes ~18 small nuggets)
- 1 cup cooked boneless skinless chicken, finely chopped or shredded
- 1/2 cup cooked broccoli florets, well-drained and finely chopped or mashed
- 1 small potato or 1/4 cup cooked sweet potato, mashed (binder and mild flavor)
- 1 egg (or 2 TBSP ground flaxseed mixed with 6 TBSP warm water for egg-free)
- 2–3 TBSP plain breadcrumbs or finely ground oats (use gluten-free if needed)
- 1–2 tsp olive oil or melted butter (optional, for moisture)
- A pinch of mild herbs like finely chopped parsley (optional)
Note: Do not add salt for babies under 1 year. If introducing eggs for the first time, follow your pediatrician’s guidance.
Equipment
- Food processor or blender (optional)
- Baking tray lined with parchment
- Small bowl for mixing
Method
- Prepare the chicken: Poach, roast, or steam a small chicken breast until fully cooked, then finely chop or pulse in a food processor.
- Cook the broccoli and potato: Steam broccoli until very tender. Boil or steam the potato/sweet potato until soft. Drain thoroughly to avoid excess moisture.
- Combine: In a bowl, mix chicken, broccoli, mashed potato, and egg (or flax mixture). Add breadcrumbs/oats a little at a time until the mixture holds together but remains soft. Add olive oil if needed.
- Shape: Scoop teaspoon-sized portions and form into small nugget shapes appropriate for your baby’s hand size and chewing ability. Press gently so they stay together.
- Cook: Bake at 375°F (190°C) for 10–12 minutes until set and lightly golden. For crispier outside, turn and bake another 3–4 minutes. Alternatively, pan-fry in a nonstick skillet with a small amount of oil over medium heat, about 3 minutes per side, then finish in the oven if needed to ensure thorough cooking.
- Cool and test: Cool completely and test texture by pressing between fingers — they should be soft and crumble slightly for easy gumming. Serve warm (not hot).
Texture & safety adjustments
- For 6–8 months: Make the mixture smoother by pureeing the chicken and broccoli, then spoon small amounts for semi-solid feeding. For guidance on age-appropriate recipes, see baby food recipes for 6–8 months.
- For 8–12 months: Leave a bit more texture and shape into small patties for self-feeding.
- For toddlers: Make slightly larger nuggets and allow light crisping for a familiar texture.
Food safety: Ensure chicken is cooked to an internal temperature of 165°F (74°C). Cool before serving and discard leftovers kept at room temperature for more than 2 hours.
Storage and freezing
- Refrigerator: Keep in an airtight container for up to 48 hours.
- Freezer: Arrange on a tray to flash-freeze, then transfer to a freezer bag for up to 2 months. Reheat thoroughly and cool to a safe serving temperature before giving to baby.
Variations and additions
- Dairy-free: Omit any butter and use olive oil.
- Gluten-free: Use ground oats or gluten-free panko instead of regular breadcrumbs.
- Extra veggies: Add finely grated carrot or zucchini (squeeze out moisture first).
- Cheese: For babies who have tried dairy, a small amount of mild cheese can add flavor and calcium.
Tips for success
- Keep nugget size appropriate to your child’s self-feeding skills — smaller for younger babies.
- Test texture by squashing: it should break apart under gentle pressure from your finger.
- Introduce one new ingredient at a time to watch for any allergic reactions.
Conclusion
For another tested version of this idea, you can compare techniques with Ashleigh Cooks’ chicken and broccoli nuggets, which offers a slightly different binder and seasoning approach. If you’re looking for a toddler-friendly take that hides more broccoli in every bite, see Rachael’s toddler chicken nuggets with hidden broccoli for inspiration.

Broccoli Cheddar Tots
Broccoli Cheddar Tots: A Crispy, Cheesy Way to Love Your Greens
Broccoli cheddar tots turn humble broccoli into a crunchy, cheesy bite that appeals to kids and adults alike. They’re perfect as a snack, a side dish, or party finger food. This article gives you a straightforward, make-at-home recipe plus tips for texture, flavor variations, and storage so you can get perfect tots every time.
Why these tots work
- Broccoli provides nutrition and a fresh flavor that pairs beautifully with sharp cheddar.
- A starchy binder (potato, rice, or breadcrumbs) ensures the tots hold together and develop a crisp exterior.
- Baking or air-frying gives a golden crust without deep-frying, making this a lighter option.
Ingredients (makes about 24 tots)
- 12 oz (about 340 g) broccoli florets, steamed until tender and finely chopped or pulsed
- 1 cup sharp cheddar, grated
- 1/2 cup plain mashed potato (leftover or instant prepared)
- 1 large egg, lightly beaten
- 1/2 cup panko or fine breadcrumbs, plus extra for coating
- 1/4 tsp garlic powder
- 1/4 tsp onion powder
- Salt and pepper to taste
- 1–2 tbsp olive oil (for brushing) or cooking spray
Optional additions: a pinch of red pepper flakes, 1–2 tbsp grated Parmesan, or 1–2 tbsp finely chopped green onion.
Method
- Preheat your oven to 425°F (220°C). Line a baking sheet with parchment paper or lightly grease it.
- If you haven’t already, steam the broccoli until very tender and let any excess moisture drain. Chop or pulse in a food processor until finely textured but not mushy.
- In a large bowl, combine the chopped broccoli, grated cheddar, mashed potato, beaten egg, breadcrumbs, garlic powder, onion powder, salt, and pepper. Mix until the mixture holds together when pressed. If too wet, add a tablespoon more breadcrumbs; if too dry, add a splash of milk or an extra egg white.
- Scoop tablespoon-sized portions and roll into small cylinders or balls. Roll each tot in extra breadcrumbs for a crunchier exterior.
- Arrange on the prepared baking sheet, spacing them slightly apart. Lightly brush or spray the tops with olive oil.
- Bake 14–18 minutes, turning once halfway through, until golden brown and crisp. For softer interiors, bake closer to 14 minutes; for crisper tots, bake a bit longer.
- Alternatively, air-fry at 400°F (200°C) for 10–12 minutes, shaking the basket halfway, for extra crispiness.
Serving suggestions
- Serve with ketchup, ranch, honey mustard, or a tangy yogurt-dill dip.
- Pair with grilled chicken or a simple salad for a light meal.
- Make them part of a brunch spread alongside eggs and roasted tomatoes.
Variations and swaps
- Vegan: replace egg with a flax or aquafaba binder and use vegan cheddar and breadcrumbs.
- Gluten-free: use gluten-free breadcrumbs or crushed GF crackers.
- Cheesy mix: swap half the cheddar for Gruyère or Monterey Jack for a different flavor profile.
- Add-ins: cooked bacon bits, diced sun-dried tomatoes, or chopped herbs (thyme, parsley) for extra interest.
Make-ahead and storage
- Prep: Form tots and arrange them on a tray to freeze solid, then transfer to a labeled freezer bag for up to 3 months. Bake from frozen at 425°F (220°C) adding a few extra minutes.
- Refrigerate: Store cooked tots in an airtight container for 3–4 days and reheat in the oven or air fryer to restore crispness.
- Reheat: 375°F (190°C) oven for 8–10 minutes or air-fry for 3–5 minutes.
Troubleshooting
- Tots fall apart: mixture was too wet—add more breadcrumbs or mashed potato, or chill the mixture 20–30 minutes before shaping.
- Soggy exterior: make sure broccoli is well-drained; roll in extra breadcrumbs and bake at a higher temperature for a shorter time.
- Not cheesy enough: increase the cheddar by 1/4 cup or add a small amount of cream cheese to the mixture for richness.
Conclusion
For a family-friendly broccoli recipe that turns vegetables into addictive little bites, these broccoli cheddar tots are a winner — and you can find more detailed variations and kid-focused tips like the ones used here in a helpful recipe for Broccoli Tots from Feeding Tiny Bellies: Feeding Tiny Bellies’ Broccoli Tots guide. If you want another tested take with step-by-step photos and an air-fryer option, check out this Healthy Broccoli Cheddar Tots recipe by Tasty: Tasty’s Healthy Broccoli Cheddar Tots.
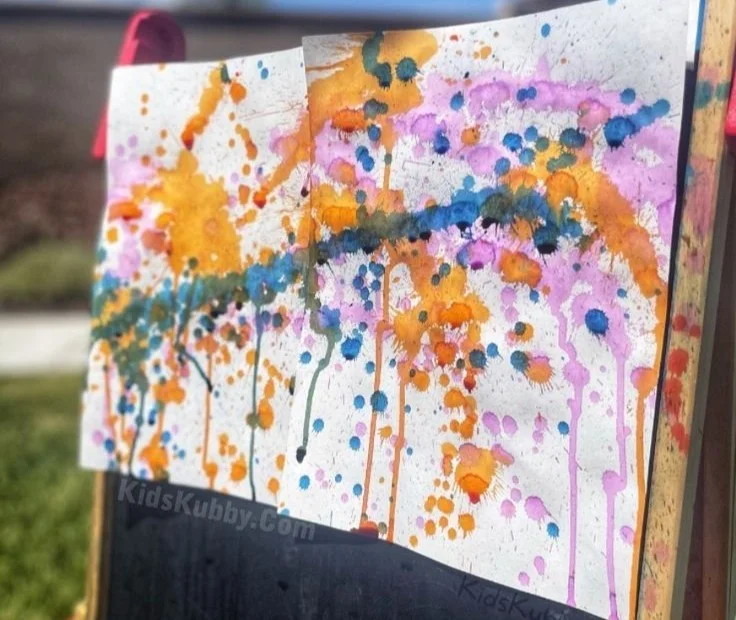
Fun Outdoor Activity For Kids: Water Gun Painting!
Fun Outdoor Activity For Kids: Water Gun Painting!
Get kids outside, moving, and creating with a splashy, sensory-rich project: water gun painting. This playful mashup of art and play turns ordinary squirt guns into colorful paint sprayers and transforms driveways, sidewalks, or large sheets of paper into giant canvases. For other simple creative projects to pair with this activity, check out fun and easy crafts for kids for inspiration.
Why kids love it
- It’s active: running, aiming, and spraying add a physical element that many children crave.
- It’s surprising: colors explode across surfaces in unpredictable ways.
- It’s low-pressure art: there’s no “right” way to spray, so kids feel free to experiment.
What you need
- Plastic squirt guns or water blasters (one per child).
- Tempera or washable liquid paints diluted with water (test consistency—should be sprayable).
- Large paper roll, old bedsheet, cardboard, or a paved surface.
- Protective clothing and towels.
- Optional: painter’s tape to create shapes or borders on the canvas.
Safety and setup
- Choose a warm, outdoor day and a space that can get messy.
- Use only washable, non-toxic paints formulated for children.
- Put kids in play clothes or smocks; consider sun protection.
- Keep a bucket of clean water and towels nearby for quick rinses.
Step-by-step: how to do water gun painting
- Prepare paint: Mix washable tempera paint with water until it flows easily through the squirt gun. Strain if needed to avoid clogging.
- Fill guns: Use cups or small bottles to fill each squirt gun (supervise this step).
- Mark boundaries: Lay out your canvas (paper, sheet, or pavement) and use tape to create designs or keep paint off unwanted areas.
- Demonstrate: Show how to aim, how to pulse the trigger for splatters, and how distance changes spray patterns.
- Let them paint: Set a time limit if you want to manage how long paints are used. Encourage collaboration and layering colors.
- Dry and admire: If on paper or fabric, allow colors to dry fully before moving. For pavement art, photos capture the moment.
Creative variations
- Target practice: Tape shapes that kids try to paint from a distance for points.
- Collaborative mural: Assign sections to each child that come together as a large scene.
- Stencil scene: Place simple cardboard stencils on the canvas and spray around them to create silhouettes.
- Nature addition: Add leaves, sticks, or flowers pressed into paint-splattered paper for texture.
Tips for success
- Test your paint mix on a small area first to ensure good spray and clean-up.
- Rotate paint colors in the guns so each child gets an equal chance with favorite shades.
- Use clear rules about where painting is allowed to avoid painted shoes or faces.
Cleanup
- Rinse squirt guns immediately after use to prevent clogs.
- Use garden hoses or buckets of water to wash paint from pavement—washable tempera makes this easy.
- For fabric canvases, follow the paint manufacturer’s washing instructions.
Extend the fun
Turn a single session into a full outdoor art party by combining other activities and crafts; you might consult an ultimate guide to kids’ outdoor fun for ideas on snacks, games, and extra crafts to fill the day.
Conclusion
Water gun painting is an inexpensive, high-energy activity that builds creativity, coordination, and cooperative play. For a step-by-step example and photos showing kids in action, see this detailed write-up on Thrill Your Kids with Colorful Squirt Gun Painting. If you want an alternate guide with tips on paint ratios and game ideas, check out the practical suggestions at Water Gun Painting (Fun Creative Art For Kids).
