

Best Baby Shower Ideas Roundup to Plan a Joyful Celebration
Imagine you’re knee-deep in balloons, streamers, and the endless chatter of excited friends. You get that warm feeling—this baby shower is all about celebrating a new life that’s about to enter the world. It’s a joyous occasion, and you want everything to be perfect. But here’s the thing: planning all the nuances, especially food, games, and that show-stopping cake, can feel overwhelming. Trust me, we’ve all been there.
So let’s dive into some fantastic baby shower ideas that will help you create a memorable experience for the mom-to-be, guests, and, of course, those adorable little diapers that everyone seems to love gifting!
Food Ideas That Wow Everyone
When it comes to food, you’ll want a delightful spread that suits various tastes. Here are some ideas that can make your baby shower deliciously unforgettable:
Appetizers
- Mini Caprese Skewers: Fresh mozzarella, basil, and cherry tomatoes drizzled with balsamic glaze—easy to grab and packed with flavor.
- Stuffed Mushrooms: These bite-sized treats can be filled with everything from cream cheese to sausage. Who doesn’t love finger foods?
- Veggie Cups with Hummus: Individual glasses with an assortment of colorful veggies and a generous dollop of hummus are not only healthy but also super easy to serve.
Main Dishes
- Taco Bar: Set up a make-your-own-taco station. This allows your guests to customize their meals. You could include various toppings like avocado, salsa, and cheeses.
- Mini Sandwiches: Whether you go with classic ham and cheese or caprese, mini sandwiches are always a hit. They’re easy to handle while mingling.
- Quiche: Slice up different flavors to please everyone. Quiche can be made ahead of time, freeing you up for last-minute preparations.
Sweet Treats
Let’s not forget about cake—the centerpiece of any memorable celebration!
Cakes That Steal the Show
Choosing a cake is more than just picking a flavor; it’s about creating a statement. Think of these ideas:
- Naked Cake: These rustic-styled cakes are gaining popularity. They look beautiful and can be tiered with various flavors layered in between.
- Cupcake Tower: A combination of flavors, along with some adorable toppers. This makes it easy for guests to try a bit of everything without being tied to a single piece of cake.
- Themed Cake: If the parents-to-be have a theme (like nautical or teddy bears), you can have a cake designed to match. This is not only fun but makes for great pictures.
Drinks That Refresh
What’s a party without refreshing drinks? Here are a couple of ideas that are sure to please:
- Mocktail Bar: Set up a table with ingredients for non-alcoholic cocktails. You could have fresh juices, sodas, and fruits for garnish. It’s interactive and fun!
- Fancy Lemonade: Consider offering flavored lemonades—think raspberry, lavender, or even cucumber-mint. They’re light and refreshing.
Games to Engage and Entertain
Now, let’s talk games. These can be the cherry on top of your baby shower planning. A few well-chosen games can get everyone mingling and laughing. Here’s a list to consider:
Classic Baby Shower Games
- Baby Bingo: As guests arrive, give them Bingo cards filled with common baby items. As gifts are opened, they can mark off items they see. The first to get five in a row wins!
- Guess the Baby Food: This can get messy but is also hilarious! Have a selection of baby food jars with the labels removed. Guests taste test and guess the flavors.
- Diaper Raffle: For every pack of diapers a guest brings, they get a raffle ticket. This is not only great for the parents-to-be but adds a festive touch to the event.
Creative Interactive Games
- Photo Booth: Set up a corner with props related to babies and parenting. Everyone can take silly pictures; it’s a fun keepsake for the parents-to-be.
- Wishes for Baby: Guests can write down their wishes or advice for the baby on cards. It’s a heartwarming touch and creates a keepsake treasure for the parents.
Bonus Ideas
What if you want to take it a notch higher? Here are a few additional activities to consider:
- Customized Onesie Decorating: Provide plain white onesies and fabric markers. Guests can create personalized outfits that the baby will soon wear—how cute is that?
- Time Capsule: Have guests contribute something to a time capsule for the baby. It could be a letter, a toy, or anything meaningful. Open it on a significant milestone in the child’s life!
Quick Tips for Planning
- Delegate Tasks: Don’t hesitate to ask a few friends for help. Maybe they can bring food or assist with decorations. It’s completely normal to need assistance with planning.
- Keep it Simple: Sometimes, less is more. Focus on creating a comfortable atmosphere rather than stressing over every tiny detail.
- Consider Dietary Restrictions: Not everyone may be able to indulge in cake or may have allergies. Having a range of food options can ensure everyone enjoys the festivities.
Conclusion
Planning a baby shower, whether it’s your first or your fifth, can feel daunting. However, focusing on a few key areas, like delicious food, engaging games, and a stunning cake, can turn a simple gathering into an event to remember. Enjoy the moment, as it’s all about celebrating new beginnings and cherishing connections with friends and family.
For more inspiration, check out DIY baby shower gift ideas that are sure to delight, or explore this ultimate baby shower ideas roundup. If you’re specifically searching for food-focused ideas, don’t miss out on budget-friendly baby shower food ideas.
Celebrate well, and remember: creating memories is what it’s all about!

Best Soft Blonde Bob Haircuts for 10-Year-Old Girls to Shine
Soft Blonde Bob: A Parenting Perspective on a Trendy Hairstyle
Imagine this: You’re at the park, your little one is playing on the swings, and you strike up a conversation with another parent. Suddenly, the topic shifts to haircuts, and the vibrant image of a soft blonde bob comes to mind. You can’t help but picture how such a delicate and dreamy hairstyle would look on your child. It’s bright, cheerful, and oh-so-adorable—just like kids should be! But let’s be honest, finding the right hairstyle for our little ones can feel overwhelming. We want something that highlights their personalities while being easy to manage.
Here’s the thing about the soft blonde bob—it’s not just a haircut; it’s an expression of joy. This chin-length style is both clean and classic, providing a timeless look. The subtle side part adds a touch of grace that perfectly frames the face. It draws attention to those bright eyes and sweet smiles we so dearly cherish.
The Soft Blonde Bob for Children
Let’s dive a little deeper into why this is such a lovely haircut for kids, especially those aged 0 to 5.
Why Choose a Chin-Length Bob?
When you’re a parent, you quickly learn that kids are constantly growing and changing. Their hair often requires adjustments to keep up with their energetic lifestyles. A chin-length bob, with its manageable length, allows for playful activities without the hassle of long hair getting in the way.
- Easy Maintenance: As busy parents, we know the value of a low-maintenance hairstyle. A soft blonde bob is easy to wash and dry, which means fewer battles over hair care.
- Versatile Styling Options: This haircut can be styled differently for special occasions or left natural for everyday fun. You can add cute clips or bows without much fuss.
- Summer Ready: The chin-length cut is perfect for summer months, giving kids a playful, breezy look while keeping them cool.
This hairstyle suits a range of hair textures as well. Whether your little one has fine hair or thicker locks, a soft blonde bob can work beautifully with some adjustments made by a skilled stylist.
Embracing the Color
Now, you might be wondering about the soft blonde color itself. It’s important to consider how hair color can brighten your child’s overall appearance. Blonde hair, particularly the softer hues, often reflects light beautifully, adding a sunny vibe to their look.
- Creating a Happy Aesthetic: Kids naturally have joyful energy. A soft blonde bob enhances that brightness, making them seem even more cheerful.
- Good for All Seasons: Light colors are versatile and can transition from season to season. Think of how lovely it looks during spring, with blooming flowers serving as the perfect backdrop.
Of course, it’s worth mentioning that maintaining a specific hair color can require some commitment, depending on the process. That said, you can always consult with your stylist to choose a shade that suits not only your child’s skin tone but also your lifestyle and upkeep preferences.
Styling Tips
Let’s touch base on some practical styling tips for this delightful cut.
Quick and Easy Styles
- Loose Waves: Give a bouncy, fun look by using a soft curling wand on a low heat setting. Be sure to use a heat protectant to keep those precious strands safe!
- Half-Up Ponytail: This is a super cute style for playdates! Just gather half of the hair at the crown of the head and secure with a fun scrunchie or clip.
- Cute Accessories: Hair clips, headbands, and barrettes can turn a simple bob into a showstopper. Choose accessories that match your child’s personality, adding character to their look.
Before you head to the salon, consider sitting your little one down and helping them choose clips or accessories they might want to wear. Making them part of the decision process adds excitement!
Mistakes to Avoid
We’ve all been there, rushing to get ready or trying to maintain a clean hairstyle only to face challenges. Here are some common mistakes that we can easily sidestep with a bit of forethought:
- Overlooking Hair Care: Remember that even short hair requires proper shampooing and conditioning. Find products that are suitable for children’s hair to ensure it’s nourishing and not damaging.
- Skipping Regular Cuts: Kids’ hair grows fast! Be sure to plan for regular trims to keep that fresh look, as well as to prevent split ends, which can be more noticeable in shorter styles.
FAQs About the Soft Blonde Bob
How often should I cut my child’s hair to maintain the bob?
On average, every 6 to 8 weeks is ideal for keeping the style neat.
Can I dye my child’s hair?
If you’re considering coloring your child’s hair, it’s significantly better to wait until they’re older, especially for more permanent dyes. Temporary, child-safe color sprays for special occasions can be a fun way to change things up without a commitment.
What products should I use for styling?
Look for lightweight products designed for children. A simple leave-in conditioner can help manage tangles, while a child-safe gel can add some hold without being too stiff.
Conclusion
So, there you have it! The soft blonde bob is not just a haircut; it’s a canvas showcasing your child’s vibrant personality. As parents, we all appreciate styles that are not only cute but functional and delightful. Remember, the journey of discovering the perfect hairstyle can be a fun bonding experience with your little one. If you’re looking for more inspiration, you can check out various styles on curated lists like 50 Cute Haircuts for Girls. For more styling tips and inspiration, visit Hair & Beauty Archives 51 and Hair & Beauty Archives 50.
Embrace the cut, enjoy the sunny vibes, and remember—every hairstyle tells a story.

Easy No Bake Recipes For Kids To Celebrate And Have Fun At Home
Imagine this: it’s a rainy afternoon, and your little ones are bouncing off the walls while you’re running low on ideas to keep them entertained. Sound familiar? We’ve all been there, frantically flipping through recipe books that seem to require a PhD in baking. But here’s the thing—sometimes, you just don’t want to turn your kitchen into a bakery, especially when you’re managing little helpers who can create chaos faster than you can say "cookie dough."
If you’re looking for fun and easy no-bake recipes for kids, look no further. Whether you want a delicious dessert to satisfy their sweet tooth or a healthy snack that you can feel good about, I’ve got you covered. Here are some of my favorite no-bake cookies, treats, and snacks. They’re easy, quick, and can be whipped up with minimal mess. Plus, they’re absolutely delicious, so you might find yourself indulging alongside your kids!
No-Bake Cookie Recipes
Classic No-Bake Chocolate Oatmeal Cookies
These cookies are a staple in my house. It’s amazing how just a few ingredients can create something so delicious!
Ingredients:
- 1 cup sugar
- ½ cup milk
- ½ cup butter
- 2 cups oats
- ¼ cup cocoa powder
- 1 tsp vanilla extract
Instructions:
- In a saucepan, combine sugar, milk, and butter. Bring to a boil and let boil for about 1 minute.
- Remove from heat and stir in oats, cocoa powder, and vanilla until well combined.
- Drop spoonfuls onto wax paper and let cool until set.
Peanut Butter Rice Krispie Treats
Who doesn’t love a crunchy, chewy snack? This one’s a hit with my kids every time.
Ingredients:
- 4 cups Rice Krispies
- 1 cup peanut butter
- 1 cup mini marshmallows
- ½ cup honey
Instructions:
- In a large bowl, mix Rice Krispies and peanut butter until evenly coated.
- Melt honey and marshmallows together in a separate bowl in the microwave until gooey.
- Combine everything, press into a greased 9×13 pan, and let cool before slicing.
No-Bake Chocolate Chip Cookie Dough Bites
These little bites are perfect for when your kiddos crave cookie dough (and let’s be honest, we all do!).
Ingredients:
- 1 cup almond flour
- ½ cup peanut butter
- ¼ cup honey
- ½ cup mini chocolate chips
Instructions:
- Mix almond flour, peanut butter, and honey in a bowl until well combined.
- Fold in chocolate chips.
- Roll into bite-sized balls and refrigerate for about 30 minutes to firm up.
Indulgent No-Bake Desserts
Easy No-Bake Cheesecake
Cheesecake without the oven? Count me in! This is a great way to treat your family after dinner.
Ingredients:
- 1 ½ cups cream cheese (softened)
- ½ cup sugar
- 1 tsp vanilla extract
- 1 cup whipped cream
- 1 pre-made graham cracker crust
Instructions:
- In a bowl, mix cream cheese, sugar, and vanilla until smooth.
- Gently fold in whipped cream until fully incorporated.
- Spread the mixture into the graham cracker crust and refrigerate for at least 4 hours before serving.
No-Bake Nutella Mousse
If you have a Nutella lover in the house, this one will disappear in no time.
Ingredients:
- 1 cup Nutella
- 1 cup whipped cream
- 1 tsp vanilla extract
Instructions:
- In a bowl, combine Nutella and vanilla extract.
- Gently fold in whipped cream until mixed.
- Spoon into serving dishes and refrigerate for about 30 minutes.
Healthy No-Bake Snacks
Banana Oat Energy Bites
These energy bites are perfect for those mid-afternoon slumps—plus, they’re kid-approved!
Ingredients:
- 2 ripe bananas
- 1 cup rolled oats
- ¼ cup honey
- ⅓ cup chocolate chips (optional)
Instructions:
- Mash bananas in a bowl, then mix in oats and honey.
- Stir in chocolate chips if desired.
- Roll into balls and refrigerate for an hour before serving.
Yogurt Parfaits
Parfaits are not only delicious but also colorful! You can mix and match ingredients based on your kids’ preferences.
Ingredients:
- 2 cups yogurt (any flavor)
- 1 cup granola
- 1 cup mixed berries
Instructions:
- Layer yogurt, granola, and berries in cups or bowls.
- Repeat layers until you reach the top.
- Serve immediately as a nutritious snack or breakfast option.
Fun Treats for Special Occasions
Chocolate-Dipped Pretzels
These are so simple yet perfect for parties or just as a movie night treat.
Ingredients:
- 1 cup pretzel rods
- 1 cup chocolate chips
- Sprinkles (optional)
Instructions:
- Melt chocolate in the microwave or a double boiler.
- Dip pretzel rods halfway in the chocolate and then in sprinkles, if using.
- Place on wax paper and let set.
No-Bake Easter Nest Treats
As Easter rolls around, these little nests are fantastic for a themed treat, and they’re so easy to make!
Ingredients:
- 3 cups chow mein noodles
- 1 cup chocolate chips
- 1 cup mini eggs (for decorating)
Instructions:
- Melt chocolate and mix in chow mein noodles until coated.
- Spoon small mounds onto wax paper and create a nest shape.
- Top with mini eggs and let set before serving.
Conclusion
These easy no-bake recipes serve not only as delightful treats but also create memorable moments in your kitchen. Cooking together can be such a fun bonding experience for you and your kids. Plus, you can adjust these recipes based on your family’s tastes and dietary needs—there’s a world of possibilities!
If you’re craving even more amazing ideas, you might enjoy these resources: fun treats to make with bored kids, scrumptious gluten-free desserts, or for seasonal excitement, check out these cute Easter nest recipe ideas. And if you’re ever in need of more no-bake ideas, don’t forget to visit this list of no-bake treats kids love. Happy baking (or, should I say, no-baking) with your little chefs!
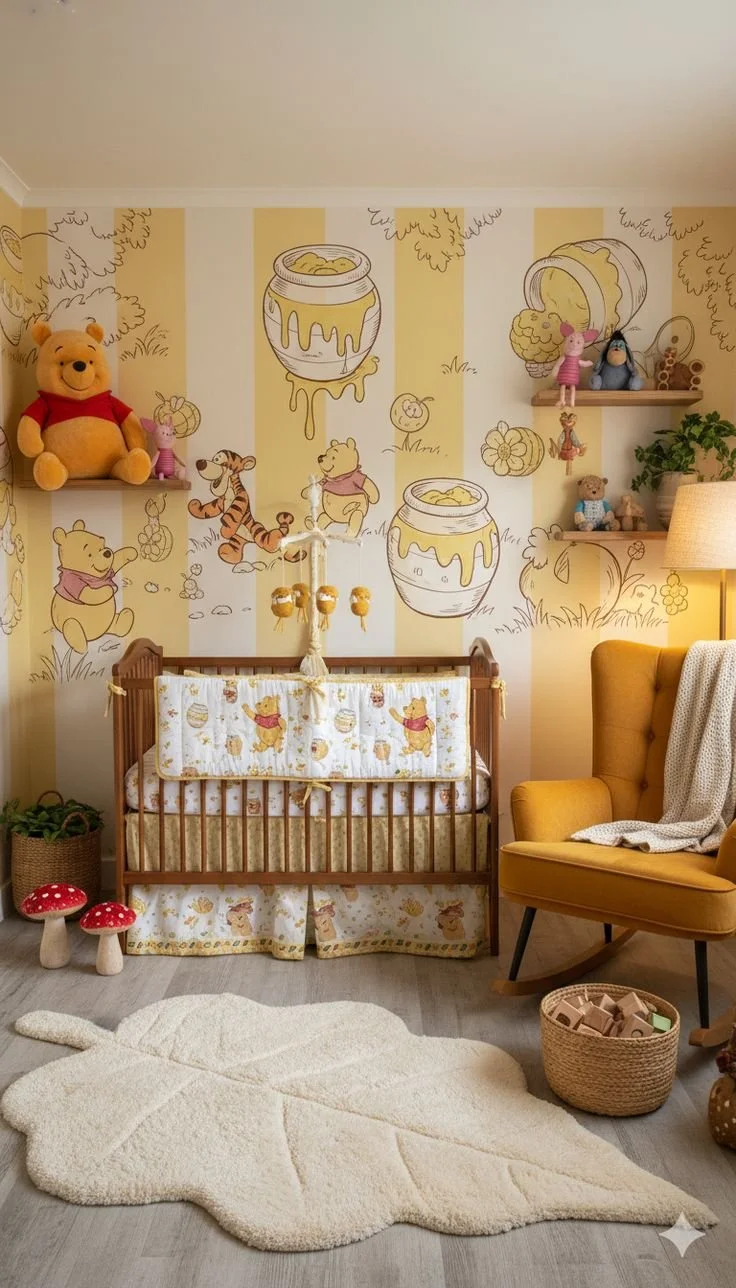
Cozy Winnie the Pooh Baby Nursery Decor Ideas for a Calm Room
Classic Winnie the Pooh nursery ideas with warm colors and timeless cartoon charm
Imagine waking up in a nursery that feels like stepping right into the Hundred Acre Wood. As you peer over the crib railing, you see soft, warm colors wrapping around you like a cozy blanket. Sound familiar? If you’re a parent who dreams of creating the perfect Winnie the Pooh nursery, you’re not alone. Let’s explore how to bring that timeless cartoon charm into your little one’s space, ensuring it’s both comforting for them and enchanting for you.
Selecting Warm Color Palettes
When designing a nursery inspired by Winnie the Pooh, warm colors are a must. Think soft yellows like Pooh himself, gentle browns reminiscent of the forest, and pastel greens to represent all the adventures of Eeyore and friends. Here’s the thing: these colors not only create a cozy atmosphere but also promote a sense of calm in your child’s space.
You might find yourself torn between so many options. Consider painting one wall a soft honey yellow while keeping the others a delicate cream. This color scheme is inviting and stimulates a sense of happiness—perfect for cuddles at all hours.
Wall Decor Ideas
Now, let’s be honest—walls can often feel bare, and that’s where you can bring in the charm.
Wall Murals: A mural of the Hundred Acre Wood could serve as the focal point of the room. Imagine your child falling asleep beneath a sky painted with stars and adorned with Pooh’s silhouette.
Gallery Wall: Create a gallery wall featuring frames of classic Pooh illustrations, mixed with your little one’s own art. After all, every masterpiece deserves a spot on the wall!
Vinyl Decals: Easily removable and perfect for a growing child, decals of your favorite characters can be fun. Picture Tigger ready to bounce or Piglet peeking out from a corner.
Bedding and Textiles
The textures in a nursery can help make it warm and inviting. Soft, cozy bedding featuring beloved characters will not only make your baby feel safe but also bring that cartoon charm to life. Look for:
Quilt Sets: Choose a quilt set that showcases Pooh, Tigger, and friends engaging in playful antics. The warm colors can tie together your color theme while providing comfort.
Throw Pillows and Blankets: A few plush pillows featuring Pooh’s face or those whimsical honey pots can make your nursery a snug haven. Imagine snuggling with your little one during story time, surrounded by plush, happy decor.
Window Treatments: Soft drapes in a light yellow or pastel blue can filter sunlight beautifully, allowing for a serene atmosphere during naptime.
Play Area Highlights
Every nursery needs a play area that sparks joy. Area rugs can significantly influence the feel of the space.
Rug Selection: Consider a plush rug with a Pooh-themed design to form a soft landing spot for your little explorer. A round shape can add interest, guiding play in a natural way.
Activity Mat: An activity mat with various textures and colors featuring Poohisms is fantastic for tummy time. It’s a spot where your baby can enjoy vibrant illustrations while safely exploring their new world.
Bookshelves: A small, colorful bookshelf can be easily accessible for story time. Stock it with classic Winnie the Pooh tales alongside other beloved reads—perfect for nurturing a love of literature early on!
Creative Lighting Solutions
Lighting can transform the entire mood of a room. Soft, warm light is the goal in a Winnie the Pooh nursery:
Nightlights: Choose a whimsical nightlight shaped like a honey pot or a friendly character. It’s comforting and provides just enough light for midnight feedings and diaper changes.
Overhead Fixtures: A ceiling fixture featuring dangling characters or designs can add delightful charm. Just imagine a gentle glow dispersing throughout the room while your little one dreams away.
Personalized Touches
A nursery is a personal space, so adding meaningful touches is a great way to make it unique:
Name Sign: A wooden sign with your baby’s name in playful lettering gives a warm, inviting feel. You could even add illustrations of Pooh and friends alongside it!
Family Photos: Hang pictures of family adventures framed in warm wood tones, along with memories of your own childhood. It creates a fuller experience for your child, as they’ll learn about who loves them right from the start.
Parent-Child Quotes: Frame quotes from the stories, such as "You’re braver than you believe, stronger than you seem, and smarter than you think." These encouraging words instill a sense of reassurance for both you and your little one.
Tips for Creating Lasting Charm
Here are a few last-minute tips to ensure your nursery resonates with timeless charm:
Keep it Functional: Make sure everything is easily accessible, especially items like books and toys. Functionality will save your sanity during the hectic early years.
Choose Quality Materials: Invest in quality items that can withstand the test of time and many adventures, especially in bedding and furnishings.
Involve Your Child: As your baby grows, include them in the decorating process. Let them choose their favorite character or color—ownership encourages creativity!
Mistakes to Avoid
While it’s easy to get excited, you might want to steer clear of these common pitfalls:
Overcrowding the Space: It can be tempting to fill every inch with adorable decor, but too much can be overwhelming. Less is more.
Neglecting Practicality: Ensure that toys and necessities can be put away easily. You’ll thank yourself later when it comes time to clean up.
Forgetting to Plan for Transition: Kids grow quickly, so consider how the decor can evolve with them. Opt for items that can easily transition into a different theme if needed.
FAQs About Creating a Winnie the Pooh Nursery
What age is a Winnie the Pooh nursery suitable for?
Generally, a Winnie the Pooh nursery can be designed for infants and can last until your child transitions into a toddler room.Are there eco-friendly options for Pooh-themed decor?
Absolutely! Look for brands that offer eco-friendly or organic materials in their designs.Where can I find inspiration beyond this article?
Browse curated collections or design boards on platforms like Pinterest or check out more tips directly related to your nursery dreams at Parenting Gems.
Conclusion
Creating a warm, inviting Winnie the Pooh nursery can be such a joyful experience, bringing the charm of the beloved bear and his friends right into your home. It’s all about balancing comfort, aesthetics, and functionality, so take your time to find what feels right for your family. As you snuggle up with your little one surrounded by this timeless warmth, don’t forget to check out more adorable options for Winnie the Pooh nursery decor at Walmart, the delightful collection available on Pottery Barn Kids, or even more inspiring nursery ideas at Target or Amazon. The Hundred Acre Wood awaits you and your baby—happy decorating!

Easy Dinner Ideas for Toddlers That Are Healthy and Family Friendly
Imagine this: it’s Tuesday evening, you’re juggling a million things, and it’s almost dinner time. You’re staring at your kitchen shelves, trying to think of something healthy that won’t send your toddler into a fit of “I don’t want that!” Sound familiar? Trust me, you’re not alone in this. As both a mom and a dietitian, I’ve been in those shoes more times than I can count. The good news? I’ve collected a treasure trove of toddler dinner ideas that also work for the whole family, and I can’t wait to share them with you!
Why Dinner Time Can Be Tough
Dinner can often be a battlefield. Between busy work schedules, toddler tantrums, and picky eating habits, it can feel impossible to put a nutritious meal on the table that everyone will enjoy. But here’s the thing; it doesn’t have to be this way! With a little creativity and planning, you can whip up meals that liven up your evening while keeping everyone happy.
Easy Toddler Dinner Ideas
Let’s dive right into the good stuff! Here are 20+ easy and healthy toddler dinner ideas that you can feel good about serving your little ones. These include deconstructed meals, no-cook options, and even some freezer-friendly recipes — perfect for those busy weeknights!
1. Deconstructed Tacos
Who says tacos have to be assembled? Serve the elements separately! Consider giving your toddler seasoned ground turkey or beef, shredded cheese, diced tomatoes, and small tortillas. They can mix and match as they like, making it both fun and customizable.
2. Veggie and Cheese Quesadillas
Simply brush some whole wheat tortillas with oil, sprinkle in cheese and finely chopped veggies, then grill until crispy. Cut them into triangles for easy handling. You can serve with salsa on the side for some extra flavor.
3. Pasta with Hidden Veggie Sauce
Blend carrots, spinach, or bell peppers into your spaghetti sauce for a veggie boost. Serve it over their favorite pasta shape and watch them happily dig in without even realizing they’re eating their greens!
4. Breakfast for Dinner
Why not switch things up? Scrambled eggs with toast and a side of fruit make a nutritious meal that little ones often adore. You can even add cheese or finely chopped veggies to the eggs for some added taste.
5. Mini Pita Pizzas
Let your toddler create their own mini pizzas using small pitas as the base. Provide various toppings like tomato sauce, cheese, olives, and pepperoni. It can be a fun little project to build their dream pizza!
6. Rainbow Buddha Bowl
Fill a bowl with base grains like quinoa or brown rice, and add colorful toppings like roasted sweet potatoes, chickpeas, avocado, and shredded carrots. Kids love the vibrant colors and it’s so nutritious too!
7. One-Pan Chicken and Veggies
Toss chicken pieces and a medley of seasonal veggies into a baking dish, drizzle with olive oil, and sprinkle with your favorite herbs. Roast until golden brown for a hearty meal with minimal cleanup.
8. No-Cook Cold Noodles
Use precooked soba or rice noodles and toss them with shredded veggies, edamame, and a light soy or peanut dressing. Serve it chilled for a refreshing option, especially on warmer days.
9. Freezer-Friendly Meatballs
Batch-make meatballs using ground turkey or beef mixed with breadcrumbs and finely grated carrots. You can freeze them and thaw as needed. Pair with spaghetti or turn them into a meatball sub!
10. Sweet Potato Skins
Bake sweet potatoes until tender, scoop out a bit of the flesh (saving it for another dish), and fill the skins with cheese, beans, and veggies. Pop them back into the oven until the cheese melts. Kids love these adorable little boats!
11. Veggie-Loaded Fried Rice
Keep it simple with a base of leftover rice, adding in veggies like peas, carrots, and corn, and scramble in some eggs. Flavor with low-sodium soy sauce (or a sprinkle of sesame oil), and you have a quick meal that feels satisfying.
12. Turkey and Spinach Sliders
Cook turkey patties with chopped spinach and serve them on mini buns. You might find your toddler surprising you by gobbling them down without fuss.
13. Grilled Cheese with a Twist
Make grilled cheese more exciting by adding slices of apples or tomatoes inside. Serve with a side of tomato soup for dipping.
14. Soft Tacos with Fish
Use flaky fish like tilapia or cod, serve in soft taco shells with avocado and diced cucumber. This light meal is refreshing and offers plenty of flavors.
15. Peanut Butter Banana Roll-Ups
Spread peanut butter on whole wheat tortillas, layer with banana slices, and roll them up. Cut into bite-sized pieces for a fun yet nutritious dinner.
16. Easy Veggie Stir-Fry
Sauté any veggies you have on hand (like broccoli, bell peppers, and carrots) and serve over rice or quinoa with a splash of soy sauce.
17. Instant Pot Chili
A fantastic one-pot meal! Toss in lean ground meat, kidney beans, black beans, tomatoes, and seasoning. Let it simmer and serve with some cornbread or tortilla chips.
18. Mini Pancake Dippers
Make mini pancakes and serve them with yogurt or fruit puree for dipping. Your child will love the interactive experience!
19. Stuffed Bell Peppers
Hollow out bell peppers and fill them with a mix of quinoa, beans, corn, and spices. Bake until the peppers are tender for a delightful meal.
20. Grilled Veggie Roll-Ups
Layer grilled veggies and a soft cheese like mozzarella inside a tortilla, roll up tightly, and slice into pinwheels. This is great as finger food!
21. Homemade “Lunchables”
Create your own healthy lunchables with whole grain crackers, cheese slices, turkey roll-ups, and baby carrots. You might feel like you’re crafting a lunch, but trust me, kids will love the variety.
Tips for Picky Eaters
Now, I get it—some kids can be notoriously picky. Here are some helpful strategies to get them to try new foods:
- Involve Them: Let them help with meal prep. When kids are part of the cooking process, they’re often more willing to try what they’ve made!
- Presentation Matters: Use fun plates, or arrange foods in a way that makes them look appealing. You can even try making silly faces with their food!
- Stick with Favorites But Introduce New Ones: Pair a familiar favorite with a new food. For example, if they love chicken, try serving it with a side of roasted carrots they might not be familiar with, but in a color they usually enjoy.
- Keep It Calm: Avoid pressure during mealtime. Kids are more likely to try new foods when they don’t feel stressed about it.
- Small Portions: Serve tiny portions of new foods next to a familiar item. A little goes a long way when it comes to initial tries!
Conclusion
So, there you have it! A collection of easy, healthy toddler dinner ideas that can make family meal time a little brighter. Remember, you’re not alone in navigating the colorful world of toddlers and picky eaters. By being creative, involving your little ones, and showing them the joy of good food, dinner time can become a joyful experience rather than a chore.
If you’re interested in more family-friendly meal ideas, you might want to check out this fantastic list of 25 family meals for toddlers. For a week of easy, toddler-friendly dinners that the whole family will enjoy, explore this meal plan. And don’t forget to look into this master list of healthy family meals that kids love. Lastly, you’ll enjoy trying out kid-friendly healthy recipes that are perfect for picky eaters!
So let’s put on those aprons and get cooking—your family dinners will be fun, healthy, and delicious before you know it!
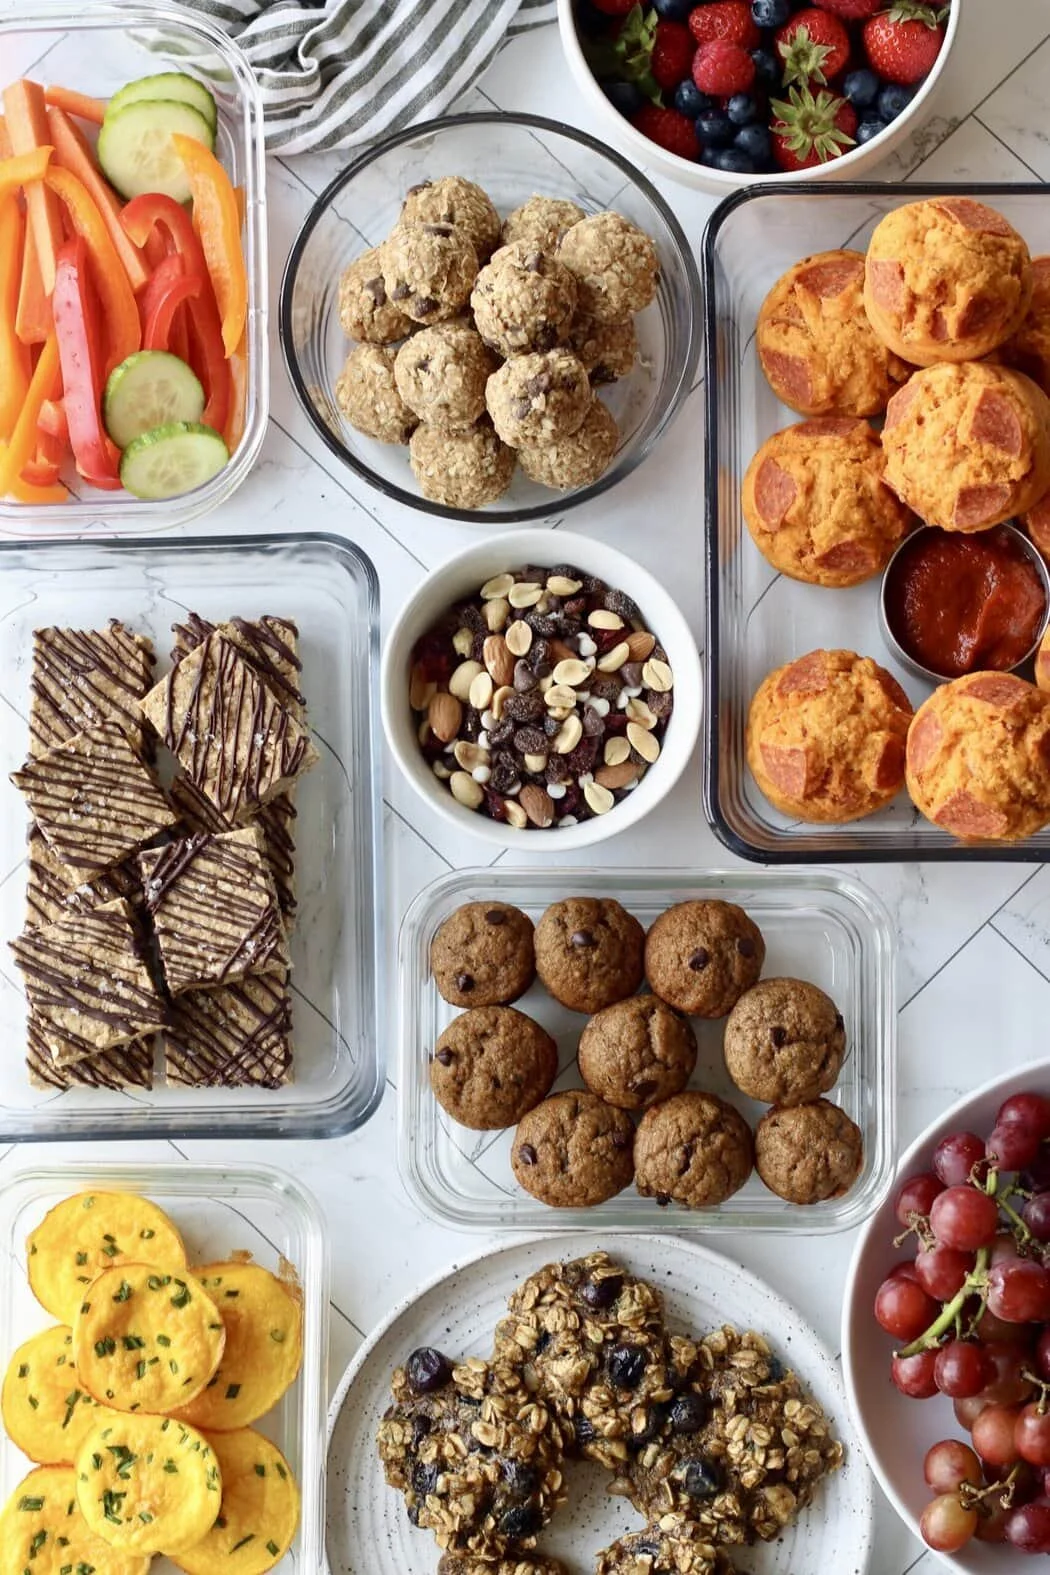
No Junk! Healthy Snack Ideas for Kids After School for Busy Parents
Imagine this: it’s 3 PM, the kids are home from school, and their energy levels are skyrocketing. They’re darting around the house, and you’re about to pull your hair out trying to figure out what to feed them to satisfy that after-school hunger. Sound familiar? We’ve all been there. Finding healthy snacks for kids that are both nutritious and delicious can sometimes feel like an uphill battle, especially when it seems their favorite foods are often the not-so-healthy ones. But fear not! I’ve rounded up some simple, kid-friendly snack ideas that even the pickiest eaters will approve of, making them perfect for school, lunchboxes, or just a tasty treat after a long day.
Quick and Easy Fruit Snacks
Let’s start with the easiest solution ever—fruit! It’s naturally sweet, packed with vitamins, and always a hit with kids. Here are some fun ways to serve it:
Fruit Kabobs
Just take a skewer (or a straw—safer for the little ones) and alternate between chunks of favorite fruits like strawberries, bananas, and grapes. Not only do they look festive, but they’re also super fun to eat! You can even throw in some cubes of cheese for extra protein.
Apple Nachos
Cut an apple into wedges and spread a thin layer of natural peanut butter (or almond butter) on top. Drizzle some honey or maple syrup, and sprinkle with granola or mini chocolate chips. It’s like dessert, but way healthier. Plus, who doesn’t love a fun twist on classic snacks?
Freeze-Dried Fruits
Sound exotic? Trust me, these little bites are delightful. Freeze-dried strawberries, bananas, and blueberries are crunchy, sweet snacks that pack real fruity flavor without the mess. They’re great for filling up lunchboxes and perfect for those car rides when kids start to express their hunger.
Protein-Packed Snacks
Protein snacks can be a lifesaver when the kids need a little extra energy. Here’s what I suggest:
Yogurt Parfaits
Layer some Greek yogurt with granola and fresh fruit in a cup. It’s a tasty, customizable snack that ticks all the boxes—healthy, filling, and delicious. You can set up a yogurt bar with various toppings to let your kiddos create their own parfaits!
Hard-Boiled Eggs
Packed with protein, hard-boiled eggs are easy to prepare ahead of time. You can slice them up and sprinkle a bit of salt or paprika for an added twist. They’re great for lunchboxes too!
Nutrient-Dense Energy Balls
These no-bake energy balls are super easy to whip up. Mix oats, nut butter, honey, and a few chocolate chips in a bowl. Roll them into small balls, refrigerate, and you have delightful snacks ready for those afternoons when energy levels dip down.
No-Bake Treats
Let’s be honest—sometimes we’re just too busy to bake. But that shouldn’t stop us from providing tasty snacks. Here are some no-bake treats that the kids will love:
Banana Oat Cookies
Mash up some ripe bananas and mix them with oats and a handful of chocolate chips. Spoon onto a baking sheet and freeze them for a quick, healthy treat. Your kids will gobble these up, and you’ll love the simplicity!
Nut Butter Rice Cakes
Spread your choice of nut butter on a rice cake, then top it with banana slices or drizzle of honey. It’s crunchy, creamy, and oh-so satisfying. Plus, it’s super quick to prepare.
Low Sugar Options
If you’re trying to cut down on sugars, here are a couple of snack options that still taste great:
Avocado Toast
Spread mashed avocado over whole-grain toast, and top it with a sprinkle of salt or even some cherry tomatoes. It’s creamy, filling, and oh-so-healthy. Children often enjoy the unique taste and texture!
Veggie Dippers
Cut up some colorful veggies like cucumbers, carrots, and bell peppers. Pair them with a homemade yogurt dip for a crunchy, flavorful snack that provides nutrients without loads of sugar. You could mix some herbs into the yogurt for added flavor, perhaps a sprinkle of ranch seasoning that kids find appealing.
Quick Homemade Snacks
Sometimes, the simplest options can be the most enjoyable. Here are a few more ideas that take almost no time at all:
Peanut Butter and Banana Roll-ups
Spread peanut butter on a whole wheat tortilla, add a banana, roll it up, and slice it into bite-sized pieces. Not only is this a fun way to get them involved in the kitchen, but it also tastes divine.
Cheese and Whole Grain Crackers
A handful of cheese cubes and whole grain crackers can actually be quite nutritious and satisfying. It’s a great finger food that even toddlers can handle.
Popcorn
Believe it or not, air-popped popcorn is actually a healthy snack! Just skip the butter and sprinkle some nutritional yeast on top for a cheesy flavor without the calories. You can even mix in some nuts or dried fruits for extra crunch and flavor!
Making Healthy Snacks Fun
Now, before we wrap it up, let’s talk about the importance of getting creative in the kitchen. Sometimes all it takes is a little fun to convince kids to snack healthier. Think about themed snack days (like “Taco Tuesday” for some healthy taco bowls made with beans and guacamole). What if you set up a mini picnic in the living room with fun finger foods?
Now, you might be wondering—how do you get kids involved when they can be so picky? One strategy is to let them help with preparation. We’ve all been there, trying to get a toddler to taste something new, and the resistance can be real. Remember, you’re not alone in this. Giving kids some ownership in the kitchen can sometimes make all the difference in their willingness to try new things.
Conclusion
Finding healthy snacks for kids is definitely a journey, but it’s one that can be fun and rewarding. With a few simple ideas up your sleeve, you can turn snack time into a delightful experience without the guilt. As you try these delicious recipes, don’t forget to embrace creativity and involvement each step of the way.
For more inspiration on healthy eating for your family, check out resources such as Stop Feeding My Kids Junk Food At School, or dive deeper into the importance of clean eating with No Junk, Inc. If you’re curious about the long-term effects of treating kids with junk food, take a look at this article. Lastly, for those moments when you need to broaden your child’s palate, getting your kids to eat everything can sometimes require a bit more strategy and creativity. Get ready for some delicious snack times ahead!

Essential Third Trimester Tips for Breastfeeding Success for Moms
Imagine this: you’re in your third trimester, the anticipation is building, and thoughts of breastfeeding are swirling around in your mind like leaves in the autumn breeze. You’re excited, maybe a bit overwhelmed, and you want to ensure everything goes smoothly when your little one arrives. Sound familiar? You’re not alone in this, and I’m here to share some heartfelt advice that can help set the stage for breastfeeding success.
The third trimester can feel like a whirlwind of appointments, preparations, and nesting. With everything going on, it’s easy to forget that this period is crucial for laying the groundwork for breastfeeding. Here’s the thing: your journey into breastfeeding officially starts even before you hold your baby in your arms. Let’s dive into five important things you can do in those last few weeks to help make your breastfeeding experience a joyful and smooth one.
Educate Yourself About Breastfeeding
Knowledge is power, especially when it comes to parenting. You might be thinking, "Do I really need to read more about breastfeeding? Isn’t it as easy as it seems?" Well, here’s the truth: while breastfeeding is natural, it doesn’t always come naturally, especially in the early days.
Consider attending a breastfeeding class, where you can learn the basics, proper latch techniques, and common challenges. You’ll likely meet other expecting parents who are in the same boat as you. Sharing experiences can be incredibly reassuring.
If you’re a visual learner, there are fantastic resources online that provide videos and tutorials. Look for trustworthy sites that offer tips on positioning, feeding cues, and troubleshooting common problems. Familiarizing yourself with these concepts can significantly ease your mind.
Prepare Your Body and Mind
Alright, let’s talk about the physical and mental preparations you can make during this critical time. Have you thought about how important it is to take care of yourself?
Here’s the reality: stress can impact breastfeeding. Engaging in self-care routines might feel like a luxury you can’t afford, but it’s essential. Whether it’s soaking in a warm bath, practicing prenatal yoga, or indulging in those mom-to-be treats you’ve been craving, make sure to carve out time for you.
If you’ve got some worries bubbling up about feeding or postpartum recovery, reaching out to friends who’ve been there can be immensely helpful. We’ve all been there with doubts, and it’s okay to talk about them. Balancing the excitement of your new arrival with your own mental health is super important.
Gather Your Support Team
Now, I want you to picture your ideal support system—the people who will be there when you need a helping hand, or just someone to cheer you on. Are your friends and family ready to step in?
Asking for support can feel daunting, especially if you’re the type to take everything on yourself, but it’s key to recognize that you don’t have to do this alone. Talk with your partner about sharing the responsibility when your baby arrives. You might also want to consider enlisting the help of a lactation consultant, either before or shortly after birth. They can provide valuable advice tailored to your unique situation.
In addition, having a few friends on speed dial who have experience with breastfeeding can be a game changer. They can provide insight, let you vent, or even bring you ice cream during those late-night sessions (because we all know those can turn into mini marathons).
Stock Up on Your Nursing Supplies
We’re getting into the fun stuff now: gearing up for the practical side of breastfeeding. Have you thought about all the items you might need to make this journey easier?
Here are a few essentials to consider gathering before your baby arrives:
- Nursing bras: Comfort is crucial, and having a few supportive bras can make a world of difference.
- Breast pads: Leaks happen, and having these on hand can help keep you feeling dry and comfortable.
- A breast pump: Even if you’re not planning to pump right away, having one ready can be useful later on.
- Bottles: If you’ll be pumping, consider bottles that are easy to clean and that your baby can easily switch between.
Also, don’t forget a cozy nursing pillow to help support you during those long feedings. Trust me, your arms will thank you!
Practice Skin-to-Skin Contact
Let’s be honest—one of the most beautiful parts of having a newborn is that instant connection. Have you heard about the benefits of skin-to-skin contact? It’s not just for bonding; it can significantly help with breastfeeding, too.
Right after birth, try to have your little one placed on your chest. This encourages natural breastfeeding instincts in both you and your baby. They’ll be more likely to latch effectively, and you’ll both enjoy that warm, cozy connection.
If you have a partner, they can benefit too! Skin-to-skin contact isn’t just for moms; it’s a wonderful way to bond for dads and other caregivers, promoting attachment and bonding.
Conclusion
As you settle into your third trimester, remember that preparing for breastfeeding is about more than just physical supplies. It’s about creating a nurturing environment for both you and your baby. By educating yourself, preparing your mind and body, gathering support, stocking essentials, and practicing skin-to-skin contact, you’re setting yourself up for a more successful breastfeeding journey.
You’re about to embark on one of life’s most incredible adventures. If you need more information about healthy pregnancy, don’t hesitate to check out this guide to a healthy pregnancy. If you’re curious about medications and breastfeeding, here’s essential information on antidepressant use while breastfeeding. It’s also worth reading up on substance use while pregnant and breastfeeding to educate yourself properly. Finally, for any concerns regarding mental health, the resource on perinatal depression is valuable.
You’re not alone in this journey; we’ve got your back. Here’s to a smooth transition into motherhood!
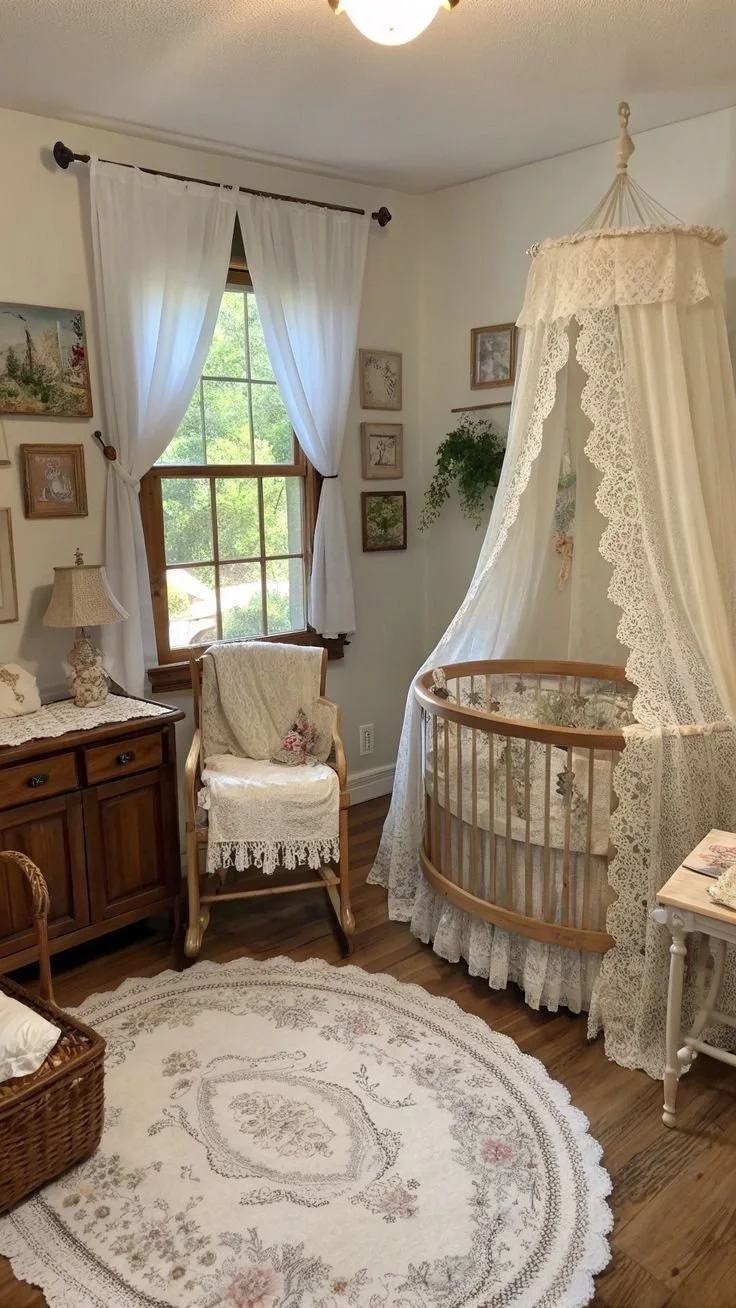
Fresh baby room inspiration ideas to create a cozy nursery
Imagine this: It’s 4 PM, and you’ve just finished cleaning up the lunch mess when your toddler proudly announces they need to go to the potty. You rush to the bathroom, fighting a mini war with their stubborn will as they insist on doing everything themselves. Sound familiar? We’ve all been there, haven’t we? Navigating the world of parenting young children is like a roller coaster ride—full of ups, downs, and unexpected surprise twists.
During those early years, from newborns to five-year-olds, parents are often faced with a myriad of decisions, challenges, and moments of joy. Whether you’re dealing with baby blues or the toddler tantrums, knowing how to hit the ground running with effective parenting strategies can make a world of difference. So, let’s dive into some practical tips and personal insights to help you manage this wild journey with grace and love.
Understanding Your Baby’s Development
Let’s start with the basics. Understanding your baby’s development is crucial. From birth to age five, your child undergoes incredible changes—physically, emotionally, and socially. As parents, we want to ensure we’re supporting them properly during these critical stages.
Milestones Matter
You might be wondering, What specific milestones should I keep an eye on? Well, each stage has its own set of developmental milestones. For example, most babies begin to crawl between six to ten months and take their first steps around one year. By two, they can start to form simple sentences.
Recognizing these milestones can help us celebrate achievements (oh, those cute little dances when they learn to walk!) and also identify any areas where your little one might need extra support. Always trust your instincts—if something feels off, don’t hesitate to speak to your pediatrician. It’s completely normal to worry as a parent, and you’re not alone in feeling this way.
Vital Nutrition for Your Growing Child
Now that we’re clear on developmental milestones, let’s chat about nutrition. After all, good nutrition helps underpin all those wonderful growth spurts.
Healthy Eating Habits
From the moment that tiny human arrives in your life, establishing healthy eating habits is key. You’ve probably heard it before, but it bears repeating: nobody said feeding toddlers is easy! They can be the pickiest eaters, and some days it feels like a monumental task just to get them to eat a vegetable. (If only we could bottle the allure of mac and cheese!)
Here are a few practical tips that might help:
- Lead by example: Eat a variety of healthy foods yourself. Kids are natural mimickers, after all.
- Make it fun: Use cookie cutters to create fun shapes with sandwiches or fruits. It makes the food less intimidating.
- Be patient with new foods: It often takes several exposures for a child to accept a new taste. Don’t give up after one try!
- Let them help: Involve your child in meal prep, whether it’s washing vegetables or picking out fruits at the store. It makes them more invested and curious about what they’re eating.
Stay Hydrated
Remember to keep your little ones hydrated, especially if they’re active. Sometimes, kids can forget to drink enough, so keeping a fun, colorful cup handy might help remind them to sip throughout the day.
Engaging Activities for Your Toddlers
Ah, activities—those delightful diversions that can make you feel like a superhero or completely drained at the end of the day! Engaging your toddlers in meaningful and fun activities can foster creativity and cognitive skills.
Crafty Playtime
Crafting can be a magical time for you and your toddler. It’s messy, it’s loud, and it’s often chaotic, but wow, is it rewarding! Consider trying simple projects like:
- Homemade playdough: You can even include a sensory element with different scents.
- Nature crafts: Go outside, collect leaves, stones, or flowers, and create beautiful art pieces together.
And here’s a pro tip: save those toddler masterpieces! You’ll look back and remember their artistic journey with a smile.
Outdoor Adventures
We all know that toddlers have a lot of energy. Harness that into outdoor adventures. Whether it’s a simple trip to the park or a nature walk, getting outside is essential. Here are some ideas to get you started:
- Treasure hunts: Create a treasure map and encourage your little ones to explore.
- Park picnics: Pack some simple snacks and make it a family outing.
- Gardening together: Even small tasks like watering plants can boost their appreciation for nature.
Navigating Tantrums and Emotional Development
Let’s be honest: tantrums can feel like they pop up out of nowhere. One moment your toddler is happily playing; the next, they’re throwing themselves on the floor in tears. It can be overwhelming, can’t it?
Understanding Emotions
Here’s the thing—emotional development is just as important as physical milestones. Toddler tantrums are part of this process as they learn to express their feelings. When your child feels frustrated, it can result in big emotions that seem larger than life. Your response matters!
- Acknowledge their feelings: Ensure they know it’s okay to feel upset. You might say, “I see you’re really frustrated. Want to talk about it?”
- Teach calming techniques: Simple exercises like taking deep breaths can help them learn to self-soothe. You might even practice together as a fun game!
Conclusion
Navigating the early years of parenting can be like trying to put together a jigsaw puzzle with a few missing pieces. But believe me, together we can figure it out. Remember, you’re doing an amazing job just by being present and caring for your child.
If you’re looking for inspiration for decorating a nursery, consider checking out this blog on home decor. For those needing ideas for creating a vintage-inspired nursery, you might find this guide helpful. Don’t forget that sharing experiences can lighten the load of parenting; creating activities like pin cushion jars with your child or exploring a neighbor’s creative nursery reveal can spark new ideas (like this inspiring nursery journey).
At the end of the day, trust your instincts and embrace the beautiful chaos of parenting. You’ve got this!
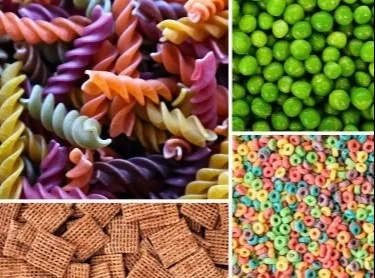
60+ Taste-Safe Sensory Bin Fillers for Kids for Safe, Mess-Free Fun
Taste-Safe Sensory Bin Filler Ideas for Kids
Imagine this: it’s a sunny afternoon, and you’re trying to enjoy a quiet moment when suddenly you hear the crinkling of a snack bag from the playroom. You rush in, only to see your little one gleefully exploring textures, filling their mouth with what you hope is, at least, something safe. Sound familiar? If you’ve got a curious toddler or baby at home who still insists on tasting everything, you’re not alone in this.
We’ve all been there—watching our little ones gravitate towards anything that resembles food, whether it be toys, dirt, or the occasional rogue sock. But what if I told you there’s a way to turn that exploratory behavior into a fun, sensory-rich experience? Enter taste-safe sensory bins! These bins full of edible fillers not only satisfy your child’s curiosity but also allow for imaginative play that stimulates their senses. So, let’s dive right into some amazing ideas for taste-safe sensory bin fillers that are perfect for babies, toddlers, and even preschoolers!
Why Use Taste-Safe Sensory Fillers?
Now, you might be wondering why it’s essential to offer a taste-safe option rather than simply stopping your child from putting everything in their mouth. Here’s the thing: exploration is a natural part of child development. It’s how they learn about the world around them. Providing them with taste-safe options can help satisfy their urge to investigate without the worry of harmful substances. Not only do these fillers allow safe exploration of textures, but they can also be a fun, engaging activity for you both. So, let’s get creative!
60+ Taste-Safe Sensory Bin Filler Ideas
Here’s a handy collection of taste-safe fillers that are not only edible but also offer a range of textures for your child to explore.
1. Cooked Pasta
There’s something satisfying about wiggly, gooey noodles! Whether you use spaghetti or penne, cooked pasta is a win. Kids can squish, stretch, and even stack these.
2. Oats
Rolled oats are soft, and they can also be used for a variety of themed sensory bins! Mixed with small toys, they can create an outdoor exploration vibe—or even a winter wonderland.
3. Rice
Who doesn’t love a good, tactile experience? You can dye white rice with food coloring for added fun. Just make sure it’s fragrant and visually appealing!
4. Popcorn
Air-popped popcorn is light and fluffy, perfect for little hands to explore. The kernels have a unique texture that’s fun to squish and crunch.
5. Applesauce
Texture play doesn’t have to be dry! Applesauce can be a unique sensory experience. You can even add some spices like cinnamon for sensory whimsy.
6. Yogurt
For a creamy experience, yogurt is fantastic! You can mix in small toys for a plunge-worthy sensory delight.
7. Edible Play Dough
You can easily DIY some edible play dough that’s safe for little mouths. Think peanut butter and powdered sugar!
8. Coconut Flakes
Fluffy and sweet, shredded coconut can make for an exotic sensory adventure. You could even combine it with some green food coloring to create a tropical paradise.
9. Jell-O Cubes
Wobbly and jiggly, Jell-O cubes can be a blast! Just ensure you supervise your child as they explore this slippery sensory treat.
10. Cereal
Cheerios or any other crunchy cereal can be used creatively. They can be poured, sorted, or just enjoyed munching on while playing.
11. Cranberry Juice
Setting up a bin with cranberry juice can create a fun, sensory-rich liquid experience. Toss in some DIY ice cubes for added texture!
12. Frozen Veggies
Safe for munching and fun for squishing, frozen peas and corn are great to explore! Plus, they’ll melt as they play, adding a sensory twist.
13. Dried Beans
Kid-safe and fun to play with, dried beans come with a variety of shapes and colors. They can also teach sorting skills!
14. Marshmallows
Soft, squishy marshmallows can make a delightful bin! Kids will enjoy squishing them and can even practice some fine motor skills.
15. Scented Epsom Salt
Believe it or not, Epsom salt can be tasted in minimal amounts. It’s great for creating various textures and can be lightly scented for an added fun twist.
16. Fresh Fruits
Chopped apples, bananas, or berries provide both taste and texture. Just be mindful of choking hazards with younger children.
17. Grains
Things like quinoa or barley are lovely alternatives and come with unique textures. Plus, they’re super educational as your little one feels them!
18. Clean Sand
If you want to take your sensory bin outdoors, clean sand is a fantastic option. It’s gritty and fun to explore—and kids love it!
19. Non-Dairy Milk
You can fill a bin with some non-dairy milk for a unique sensory experience! Toss in muffin tins or other kitchen items for extra exploration.
20. Gelatin Sensory Bag
Make your own gelatin sensory bag that kids can squish with their hands! It’s both safe and super squishy.
21. Collapsed Cake
Give your littles a taste-safe cake to dig into! They can dive into the textures and flavors. This can actually double as snack time.
22. Pasta Sauce
Mix spaghetti sauce with some dry pasta for a squishy, messy experience! Just be prepared for clean-up afterward.
This is just a taste of the creative ways you can make sensory play safe for your little explorers. And let’s be honest: the opportunities for hands-on learning are endless!
Quick Tips for Sensory Bin Success
- Supervision is Key: Always watch your child during sensory play. Keep an eye out for any choking hazards.
- Make It Themed: Create themes based on seasons, animals, or favorite colors. It keeps things interesting!
- Incorporate Simple Tools: Use scoops, spoons, and cups to develop fine motor skills while your child plays.
- Limit the Mess: Designate a specific area for messy play and keep the clean-up tools handy.
Mistakes to Avoid
- Better Safe Than Sorry: Always make sure all fillers are truly taste-safe. Avoid items with allergens unless you’re completely sure.
- Don’t Overdo It: Sometimes, less is more. Too many options can overwhelm a small child, so choose a few key fillers at a time.
- Skip the Scented Fillers: Unless they’re edible, avoid unnecessary scented fillers that could confuse your young child.
Conclusion
Encouraging your child to engage with their environment in safe, edible ways can be a rewarding experience for you both. Taste-safe sensory bins present fantastic opportunities for exploration and learning! By using simple ingredients from your pantry, you can foster a world of discovery right at home.
To discover even more creative ideas for safe sensory bin fillers, check out this amazing resource on taste-safe sensory bin fillers. If you’re looking for even more inspiration, this guide on 50+ taste-safe sensory bin fillers might be just what you need! Don’t forget to look into unique gift ideas for your little ones from Etsy when planning their sensory adventures or any occasion. And for those interesting culinary projects with your kids, you may find fun tips on building carbonation rigs quite engaging!
Let your imagination soar and watch your little one delight in a world of taste-safe sensory exploration. Happy playing!
Low-Prep Activities for Destructive Toddlers That Tame Messes
Imagine this: you’re enjoying a moment of peace, possibly sipping your coffee while your toddler plays nearby. But then, you hear it—that unmistakable crashing sound followed by your little one giggling maniacally. You rush over just in time to see them gleefully tearing apart your carefully organized stack of magazines or sending blocks flying across the room. Sound familiar? If so, you’re definitely not alone in this wild ride we call parenting.
Toddlers are known for their curiosity and exploratory nature, which often morphs into a penchant for destruction. As parents, we often feel the urge to control that chaos, but what if we could channel that energy into something both fun and constructive? Fortunately, it’s entirely possible! Here are 13 simple activities that can be set up in minutes, allowing your toddler to unleash their destructive impulses in creative and engaging ways. And the best part? You probably already have everything you need at home!
Sensory Bins for Messy Play
1. Sensory Gel Bin
Grab an old plastic bin and fill it with an inexpensive sensory gel or a mixture of water and cornstarch. Add in kitchen utensils like measuring cups and spoons for scooping and pouring. Your toddler will love squishing and playing with it while you enjoy some much-needed quiet time. Just be prepared for a little mess; that’s the beauty of it!
2. DIY Snow Bin
If you’ve got some shredded paper or old white fabric, toss it into a bin and let your toddler "create snow." They can throw it, bury their toys in it, or even make snow angels. It’s simple, low-prep, and gives them that full freedom to destroy without the consequences.
Art for Destruction
3. Shredding Papers
This one is as simple as it gets. Give your toddler old papers, magazines, or cardboard. Provide them with a pair of safety scissors (if they’re ready for it) or let them tear the paper by hand. It’s so satisfying to watch them enjoy tearing things apart, and it’s great for their fine motor skills.
4. Finger Painting Fun
Set up a painting station with washable paints. Instead of typical canvas, how about using butcher paper spread on the floor? Let them knead, smear, and mix colors to their heart’s content. Just remember to use clothes that can get messy!
Building and Destruction
5. Block Bonanza
If you have wooden or foam blocks, encourage your toddler to build towers. Then, let them go wild knocking them over! This activity nurtures their spatial skills and helps them understand cause and effect.
6. Create a Fort and Destroy It Later
Use cushions, blankets, and chairs to build a fort together. Once it’s built, let them play in it—but give them the green light to pull it down afterward. It’s the perfect way to merge creativity and destruction!
Water Play
7. Water Balloon Station
Fill up some water balloons and let your toddler practice tossing them into a bucket. If they break, great! That’s even more fun. Just make sure to supervise them closely so no one slips on the wet ground.
8. Kitchen Sink Splash
Let them play in a sink filled with water. Add some plastic cups, spoons, and a few toys. Toddlers love splashing and pouring water, and it’s totally entertaining to watch!
Nature-Based Destruction
9. "Garden" Digging
Fill a tub with dirt (or sand) and let your toddler dig away. Add in small garden tools or plastic dinosaurs—and let the excavation begin! They’ll have a blast without ruining your garden.
10. Rock Painting
Collect some smooth rocks, and let your toddler paint them. Once they’ve finished, they can toss them into a container. It’s a dual-purpose activity: art and a bit of destructive fun knowing they can always toss their finished pieces.
Creative Chaos
11. Homemade Shakers
Get empty bottles, rice, and beans. Let your toddler fill the bottles and shake them—but here’s the twist: after they’re done, let them take them apart and see what interesting sounds each ingredient makes. It’s music and a creative exercise all wrapped into one.
12. Bubble Wrap Stomp
If you happen to have some bubble wrap lying around, lay it out and let your toddler stomp away! They’ll love the satisfying pops, and it provides some physical energy release without too much chaos.
13. Nature Collage
Go on a little scavenger hunt in your yard or at a nearby park to collect leaves, sticks, and flowers. At home, let your toddler “destroy” these items by tearing them apart and creating collages—art that evolves through destruction.
Wrapping It Up
Now, you might be thinking, "Can I really let my toddler go wild with all this messy play?" Absolutely! It’s completely normal for little ones to explore their world through destruction, and by providing them with controlled activities, you can both encourage their emotional development and channel their energies in a positive, engaging way.
As parents, we’re tasked with the challenge of guiding our toddlers while also embracing their wild sides. By incorporating these activities into your daily routine, you can quell the chaos while nurturing creativity and curiosity. Let’s be honest, some days are tougher than others, but activities like these can turn a potential mess into memorable moments.
Keep in mind, you’re not alone in this chaotic parenting journey. If you’d like more ideas to add to your toolkit, consider checking out some resources like 15 Fun Activities for Toddlers or 40 Fun Bargain Activities for Toddlers. And don’t forget about the beauty of nature—it’s the perfect backdrop for your toddler’s next adventure, which you can facilitate with activities like gardening, explored in more detail at 42 Simple Indoor Activities.
No matter how chaotic things get, remember that this phase won’t last forever, and one day, you’ll look back and smile at the memories you created amidst the mess. Cherish those moments, and don’t hesitate to pull out some of these activities the next time your toddler’s instinct kicks in to destroy!
Conclusion
In conclusion, there’s no need to fear the chaos when you can embrace it with these engaging activities. From messy play with sensory bins to art projects with a twist, there are endless ways to channel your toddler’s destructive energy into something productive and fun. If you’re looking for more ideas, the guide on low-prep activities for destructive toddlers can be a wonderful resource, as can the favorite therapeutic activities for children. For a sensory experience, try the "Wash the Muddy Farm Animals" sensory bin that can also help engage their destructiveness. If you’re navigating the developmental stages of toddlers, consider this informative piece on developmental milestones that can guide you through their journey. Embrace the beautiful messiness of parenting, and enjoy all the delightful memories created along the way!
