How to Make Salt Dough Dinosaur Fossils
Turn a rainy afternoon into an archaeology adventure with this easy salt dough dinosaur fossil activity. It’s a hands-on way to teach kids about paleontology, textures, and cause-and-effect while using materials you probably already have in the kitchen. If your child gets frustrated when projects don’t go perfectly, remember to use gentle strategies like those suggested in how to make an angry child happy to keep the experience positive and fun.
What you’ll get from this activity:

- A sensory, creative craft that doubles as a learning tool
- Homemade “fossils” you can paint and preserve
- Opportunities to practice vocabulary (fossil, imprint, extinct) and fine motor skills
Materials
- 2 cups all-purpose flour
- 1 cup salt
- 1 cup water (add a little at a time)
- Rolling pin or a sturdy bottle
- Toy dinosaur feet, claws, or small plastic skeletons (or household items like shells and keys)
- Parchment paper or a nonstick baking sheet
- Acrylic paints, brushes, and a thin black wash or antiquing glaze (optional)
- Clear sealer (optional)
Preparation
- Mix the flour and salt in a large bowl.
- Gradually add water and stir until a stiff dough forms. Knead it briefly on a floured surface until smooth. If the dough is too sticky, add a little more flour; if it’s too dry, add a splash of water.
- Preheat your oven to 250°F (120°C) — a low and slow bake prevents cracking.
Making the Fossils
- Roll or press the dough into a flat slab roughly 1/2 inch (1–1.5 cm) thick. Larger fossils will take longer to dry.
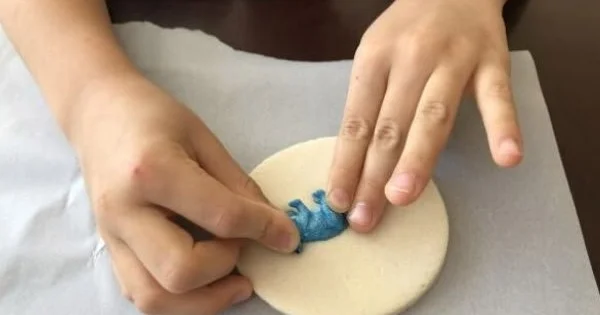
- Choose how you want to create imprints:
- Press toy dinosaur feet or claws into the dough firmly to leave clear tracks.
- Use small plastic bones or model dinosaurs to create skeletal impressions.
- Let children experiment with household items to see what textures look like as fossils.
- For plaque-style fossils, cut the dough into shapes (circles, rectangles) around the imprint to make display pieces.
- Use a toothpick or skewer to write the “species” name, date, or the child’s name into the edge of the dough for a museum-label effect.
- Carefully transfer pieces to a parchment-lined baking sheet.
Baking and Drying
- Bake at 250°F (120°C) for 2–3 hours depending on thickness. Thinner pieces may dry in 1–2 hours; thicker pieces can take up to 4 hours. Turn pieces halfway through to ensure even drying.
- Alternatively, air-dry thinner pieces for several days, turning occasionally.
Finishing Touches
- Once completely dry and cooled, lightly sand any rough edges if desired.
- Paint fossils with acrylics. A dry-brush technique with darker paint can highlight crevices and mimic aged bone.
- Apply a thin black wash or antiquing glaze to bring out details, wiping excess away with a paper towel.
- Seal with a clear spray or brush-on sealer to protect the surface.
Learning Extensions and Play Ideas
- Create a “dig site” by burying the dried fossils in a sandbox or large tray of rice and let kids excavate with brushes and small tools.
- Pair the fossils with a short read-aloud about dinosaurs or fossils to build context.
- Turn it into a science journal project: have children record their “discoveries” and sketch the fossils.
Troubleshooting and Tips
- Cracking: If small cracks appear, they can be filled with watered-down glue and re-baked briefly. To reduce cracking, avoid making pieces too thick.
- Too soft: Bake longer at the low temperature until the center is fully dry. Thicker pieces may feel firm on the outside but still be soft inside.
- Texture variations: Press different materials at varying pressures to show how deeper imprints create more detailed fossils.
Safety and Cleanup
- Supervise young children with small toys and baking.
- Salt dough is not edible — keep a bowl of snack-safe items separate.
- Dough can be stored for a few days wrapped in plastic in the refrigerator if you want to make multiple batches.
Activity Variations
- Make life-size footprint tracks across a long strip of dough to create a trail.
- Color the dough with food coloring before shaping for vibrant fossils.
- Use a mixture of flour and cornstarch (1:1) for a smoother clay-like texture if you want finer detail.
If sibling dynamics or attention challenges emerge during the project, consider strategies for sharing tools and turn-taking; practical tips can be found in resources like how to deal with a self-centered toddler to keep the activity harmonious and enjoyable for everyone.
Conclusion
For a detailed, photographed walk-through of a similar step-by-step process, check this helpful guide on How to Make Dinosaur Fossils for Kids {From Salt Dough!}. If you want creative alternatives for shaping and aging your pretend bones, this blog post offers fun ideas and variations in Homemade Dinosaur Bones – Kitchen Floor Crafts. For another beginner-friendly tutorial with tips on painting and preserving your fossils, see Salt Dough Dinosaur Fossils | DIY for Beginners – KiwiCo.

Click to get the full bundle — instant download
![13+ Cool Baby Shower Activities That Are Not Games [Your Guests Will Love]](https://parentinggems.com/wp-content/uploads/2026/02/13-cool-baby-shower-activities-that-are-not-games-2026-02-17-153412.webp)