Your Kids Will Love This Easy Summer Sensory Activity Using Cereal
Picture this: it’s a scorching summer day, the kind that makes you want to dive headfirst into a pool, but the kiddie pool in your backyard doesn’t seem to excite your little ones anymore. Sound familiar? We’ve all been there, right? Kids can get restless when they can’t run around outside due to the heat, leaving many parents scratching their heads on how to keep the fun alive indoors. Well, let me share a delightful solution that can turn your ordinary day into an extraordinary sensory experience using something you probably have in your pantry—cereal!
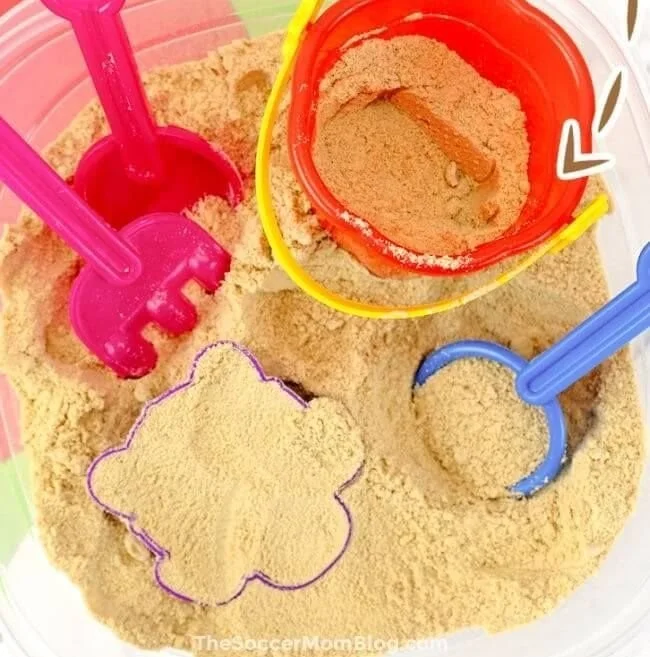
Imagine creating a soft, delightful, and safe sensory play sand that kids can explore, dig in, and even taste. Yes, I said taste! With just a couple of simple ingredients, you can transform regular cereal into a play sand that sparks their imagination and keeps them engaged for hours.
What Makes This Homemade Play Sand So Amazing?
Hands-on activities are essential for kids. When they engage with different textures, they’re not just having fun; they’re also learning! This homemade cereal play sand offers a fantastic sensory experience that encourages creativity and exploration. Plus, it’s an activity that promotes bonding and laughter without the need for screens—something we all crave in our busy, tech-driven lives.
Benefits of Homemade Cereal Play Sand
- Taste-Safe: This is a game-changer! Using cereal means it’s completely safe if your little ones decide to take a taste. No worries about harmful materials found in traditional play sand.
- Quick and Easy: All you need is a blender and a few ingredients, making this a go-to activity on a whim.
- Encourages Creativity: Kids can use their imaginations to build sand castles, dig tunnels, or create entire worlds with their toys.
- Budget-Friendly: No need to make a trip to the store. You likely have everything you need right in your kitchen.
- Screen-Free Fun: A refreshing break from tablets and TVs, leading to more quality family time.
How to Make Your Own Taste-Safe Play Sand
Now, let’s get down to the nitty-gritty of making this sensory play sand! Trust me; it’s as simple as it gets.
Ingredients
- 2 cups of cereal (Cheerios, Rice Krispies, or any similar cereal)
- 1 cup of flour (optional, for added texture)
Instructions
Gather Your Supplies: Get a bowl, a blender, and your two ingredients ready. You might even want to set up your play area with some mats to catch any flying cereal bits.
Blend the Cereal: Toss the cereal into the blender and pulse until it resembles a fine powder. Think of how sand feels between your fingers—aim for that texture! This usually takes about 30 seconds.
Optional: If you’re looking for a coarser texture, gradually mix in the flour until it gets to the feel you want. It’s like crafting your unique blend of sand!
Sensory Play Time: Pour your homemade play sand into a sensory bin or a large tray. Add scoops, small toys, or molds to elevate the fun factor! Watch as your kids dive into the world of creativity and sensory exploration.
Clean Up: Don’t overlook this part! Have a plan for easy clean-up. Doing this activity on a mat or outside will save you time later.
Quick Tips for Successful Play Time
- Supervision is Key: Keep an eye on younger kids during their sensory adventure—safety first!
- Choose Brightly Colored Cereal: Not only does this make the sand visually appealing, but it also enhances the sensory experience with vibrant colors.
- Use Molds and Tools: Providing cups, shovels, and cookie cutters can help fuel creative play and keep them engaged longer.
Bonus Ideas to Enhance Play
Now, how can we make this activity even more exciting? Here are a few ideas:
- Add a Theme: Get creative! Incorporate toy animals or beach-themed items for a day at the beach vibe.
- Use Coloring: Want to amp up the fun? Add safe powdered food coloring or natural colors to the cereal before blending. Watch your kids react to the vibrant sand!
- Interactive Storytime: While your kids play, read a story that complements their sensory experience. It’s a great way to tie in learning with play.
Mistakes to Avoid
Even the best plans can have hiccups. Here’s what to watch out for:
- Using Too Much Liquid: Remember, we’re aiming for sand here! Keep liquids to a minimum so the texture remains just right.
- Not Blending Enough: Ensure the cereal is finely blended; otherwise, you’ll end up with chunky play sand, which could be less enjoyable.
- Skipping Supervision: Always keep an eye on younger children to ensure they stay safe while having fun.
Conclusion
Creating your homemade play sand is a simple yet magical way to engage your children in tactile, sensory play. It opens up worlds of creativity while promoting fine motor skills and imaginative thinking—all without screens. So why wait? This summer, take a moment to whip up a batch of cereal play sand. You’ll laugh, create, and maybe even sit back and watch your little ones dive deep into their imaginations, asking for “just five more minutes” of playtime.
And remember, you can always adapt and customize the activity to your family’s style. Feel free to share your own variations and ideas with friends or on social media. It’s all about making joyful, playful memories that your children will cherish for years to come. Happy playing!