Create an Easy DIY Robotic Hand for Kids
Are you looking for a fun and educational project to spark your child’s creativity? Building a DIY robotic hand is a fantastic way to explore engineering concepts right at home! This engaging activity combines creativity and learning, providing a hands-on experience that kids will love.
Why Build a Robotic Hand?
Creating a robotic hand can help instill a sense of accomplishment in children while teaching them about robotics and mechanics. Plus, it’s an excellent way to bond and have fun together. You don’t need to be an expert; just a few materials and enthusiasm will do the trick!
What You’ll Need
Before starting the project, gather the following materials:
- Cardboard or sturdy paper
- Straws (plastic or flexible)
- String or yarn
- Tape and glue
- Scissors
- Markers or paint (for decoration)
- A ruler (optional)
Step-by-Step Guide to Making a Robotic Hand
Follow these simple steps to create your very own robotic hand:
1. Create the Hand Template
- Draw the outline of a hand on cardboard. Make sure it’s larger than your child’s hand, as it should fit comfortably.
- Cut out the shape, leaving spaces for finger joints.
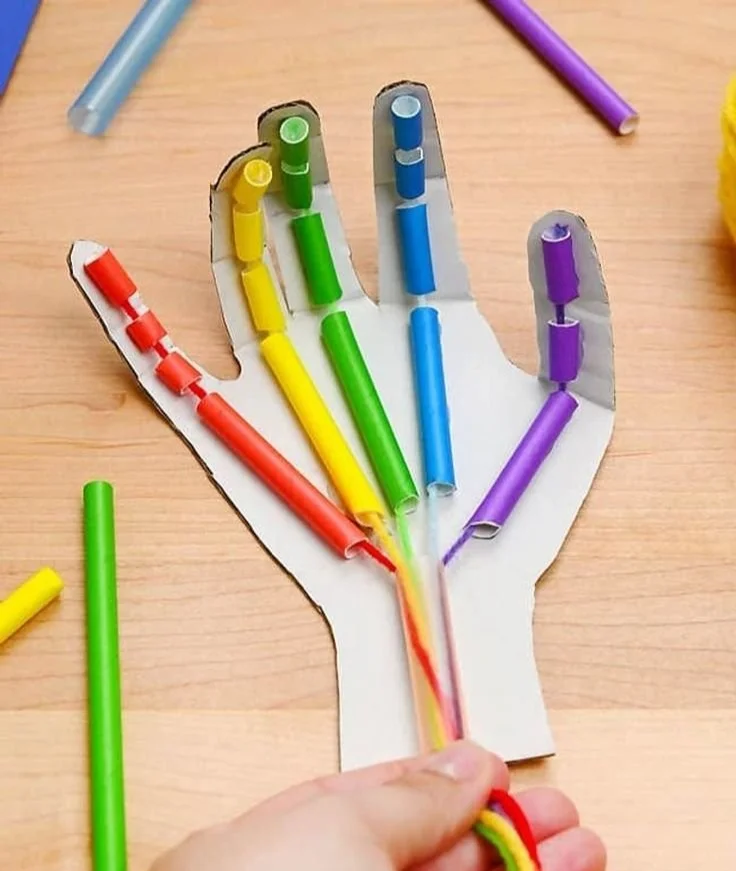
2. Add Fingers
- Cut the straws into lengths that correspond to the segments of fingers.
- Attach each straw piece to the fingers on your cardboard hand with tape or glue. These will act as the finger bones.
3. Make Joints with String
- Use the string to connect the finger segments. Tie a knot at the end of each segment so that they can bend.
- Thread the string through the straws to allow the fingers to curl when pulled.
4. Attach the Control Mechanism
- Create a system to pull the string and make the fingers move. You can attach the other ends of the strings to a wooden dowel or stick.
- You can also use a piece of cardboard as a base for the control mechanism.
5. Test Your Creation
- Once everything is put together, gently pull the strings to see your robotic hand in action!
- Make adjustments as necessary to ensure it moves smoothly.
6. Decorate Your Robotic Hand
- Let your child unleash their creativity by painting or decorating the robotic hand.
- Add stickers, colors, or even googly eyes to give it personality.
Quick Tips for a Successful Project
- Pre-cut materials: If your child is too young to handle scissors, consider pre-cutting the materials for a smoother experience.
- Experiment with designs: Encourage your child to try different designs or add unique features.
- Safety first: Always supervise when using scissors or glue.
Common Mistakes to Avoid
- Not securing the strings tightly enough could lead to a floppy hand.
- Skipping the testing phase might make you miss important adjustments.
FAQs
How long will this project take?
This DIY project typically takes about 1-2 hours, depending on how many creative touches you add!
What age is this project suitable for?
It’s recommended for kids ages 7 and up, but younger children can definitely participate with adult supervision.
Can we use different materials?
Absolutely! You can experiment with various materials like plastic cups, fabric, or recycled items.
Bonus Ideas for More Fun
- Create a contest: Challenge your child to make a robotic hand that can stack blocks or grasp small objects.
- Make it a learning experience: Discuss the basics of robotics and how our fingers work!
- Record a video: Film your child showcasing their robotic hand and share it with friends or family.
Creating a DIY robotic hand can be an incredibly rewarding experience for both parents and children. It nurtures creativity, problem-solving, and, most importantly, quality time together! So gather your materials, unleash your creativity, and enjoy this hands-on adventure. Happy crafting!