
Healthy Southern Corn Fritters with Hidden Veggies for Kids (Great for Lunch, Snacks, and Sides!)
Healthy Southern Corn Fritters with Hidden Veggies for Kids (Great for Lunch, Snacks, and Sides!)
Corn fritters are a Southern classic—crispy on the outside, soft and slightly sweet inside. This family-friendly version sneaks in extra vegetables so picky eaters get more nutrients without noticing. They’re quick to whip up, portable for lunchboxes, and versatile as a snack or side. After cooking, keep little hands busy with a craft; here’s a link to some fun and easy crafts for kids you can use while the fritters cool.
Why kids love them (and parents do, too)
- Bright, sweet corn flavor that masks mild veggies.
- Crunchy texture that appeals to small mouths.
- Easy to dip—ketchup, yogurt-based ranch, or applesauce all work.
- Make-ahead and reheat well for busy days.
Ingredients (makes about 12 fritters)
- 1 cup corn kernels (fresh, frozen and thawed, or canned, drained)
- 1 medium zucchini, grated and squeezed dry
- 1 small carrot, grated and squeezed dry
- 2 green onions, thinly sliced
- 2 large eggs
- 1/2 cup whole wheat flour (or all-purpose flour)
- 1/4 cup cornmeal (for texture)
- 1/2 tsp baking powder
- 1/2 tsp salt (adjust to taste)
- 1/4 tsp black pepper
- 1/2 tsp smoked paprika or a pinch of cayenne (optional)
- 2 tbsp milk (dairy or plant-based)
- 2–3 tbsp olive oil or vegetable oil, for frying
Optional add-ins:
- 1/2 cup shredded cheddar cheese
- 2 tbsp chopped fresh parsley or cilantro
Equipment
- Large mixing bowl
- Grater
- Nonstick skillet or cast-iron pan
- Spatula
- Paper towels for draining
Method
- Prep the veggies: Grate the zucchini and carrot, then press them in a clean towel or paper towels to remove excess moisture. This prevents soggy fritters.
- In a large bowl, whisk eggs and milk. Stir in corn, grated veggies, green onions, and optional cheese or herbs.
- In a separate small bowl, combine flour, cornmeal, baking powder, salt, pepper, and smoked paprika. Add dry mix to wet ingredients and fold until just combined. The batter should be thick but scoopable; add a tablespoon of milk if too dry.
- Heat 1 tbsp oil in a skillet over medium heat. Scoop 2–3 tablespoon-sized mounds of batter into the pan and flatten slightly with the back of the spoon.
- Fry until golden and crisp, about 3–4 minutes per side. Work in batches, adding more oil as needed.
- Transfer cooked fritters to a plate lined with paper towels to drain briefly. Keep warm on a baking sheet in a low oven (about 200°F / 95°C) if cooking in batches.
Tips for hiding veggies successfully
- Grate vegetables very finely so they blend into the batter.
- Use naturally sweet vegetables (carrots, sweet corn, mild zucchini) so the overall flavor stays familiar.
- Add a small amount of cheese—melty texture and salty taste help mask new flavors.
- Serve with a favorite dip to entice hesitant eaters to try a bite.
Serving ideas and pairings
These fritters pair well with fresh fruit, a simple salad, or a dipping sauce. For a quick breakfast combo, they work alongside cereals and milk—consider pairing with healthy cereals for kids to round out the meal. They’re also great crumbled into wraps, served on mini sliders, or placed on top of a bowl of chili for texture.
Make-ahead, storage & reheating
- Refrigerate cooked fritters in an airtight container for up to 3 days.
- Freeze in a single layer on a tray, then transfer to a freezer bag for up to 3 months. Reheat from frozen in a 375°F oven for 10–12 minutes or in a toaster oven until heated through.
- Re-crisp in a skillet over medium heat with a splash of oil for the best texture.
Variations
- Gluten-free: Substitute a 1:1 gluten-free flour blend and make sure cornmeal is certified gluten-free.
- Deeper veggie boost: Add finely chopped spinach or cooked, mashed sweet potato.
- Mini fritters: Make them smaller for toddler-sized portions or party appetizers.
- Air-fryer version: Lightly spray fritters with oil and air fry at 375°F for 8–10 minutes, flipping halfway.
Kid-friendly cooking ideas
- Let children help mix batter or press grated veggies to dry (supervised).
- Shape mini fritters together—kids love making their own “pancakes.”
- Create a dipping station with small bowls of different sauces to make tasting fun.
Nutrition snapshot (approximate, per fritter)
- Calories: ~80–110, depending on size and add-ins
- Protein: 3–5 g
- Fiber: 1–2 g
- Vegetables: Each fritter contains a small serving of vegetables, making them a simple way to increase daily veggie intake.
Conclusion
These corn fritters are an easy, adaptable way to get more vegetables into kids’ meals while keeping texture and taste they’ll enjoy. For extra recipe inspiration on veggie-packed fritters, check out a classic vegetable fritters recipe that offers additional ideas for mixing vegetables into batter. If you want a cheesier twist, try the Cheesy 10-Minute Zucchini & Corn Fritters for a quick variation that’s delicious and kid-approved.
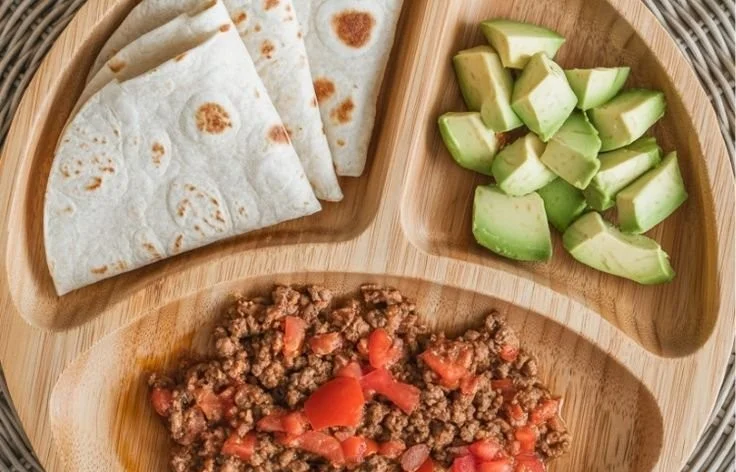
Easy Toddler Dinners: Deconstructed Tacos + Cheesy Rice
Easy Toddler Dinners: Deconstructed Tacos + Cheesy Rice
Little ones love familiar flavors and hands-on eating. Deconstructed tacos paired with creamy cheesy rice turns a classic dinner into a toddler-friendly plate: soft textures, separate components for picky eaters, and plenty of opportunities to introduce new tastes. If you need ideas for swapping proteins, these chicken baby-food recipes and adaptations can help you create kid-approved fillings with minimal fuss.
Why this meal works for toddlers
- Separate components let toddlers explore one item at a time, which reduces mealtime battles.
- Soft, bite-sized pieces are easy to chew and self-feed.
- The combination of protein, carbs, and veggies keeps meals balanced while staying simple to prepare.
Ingredients (serves 2 toddlers + 2 adults)
Deconstructed tacos
- 1/2 lb ground turkey, chicken, or mild ground beef (cook and season lightly)
- 1/2 cup black beans, rinsed and warmed
- 4 small soft corn or flour tortillas (or mini tortilla wedges)
- 1 ripe avocado, diced or mashed
- 1/2 cup mild shredded cheddar or Monterey Jack
- 1/2 cup mild salsa or plain yogurt for dipping
- 1/2 cup finely diced tomatoes or bell pepper
Cheesy rice
- 1 cup cooked short-grain rice (slightly sticky is best for little hands)
- 1/3–1/2 cup shredded cheese (mild cheddar or Colby)
- 1–2 tbsp milk or breastmilk/formula to loosen
- Pinch of mild spices (optional: a light dusting of paprika or cumin)
Optional sides and garnishes
- Soft-cooked corn kernels, peas, or sweet potato cubes
- Thin apple slices or apple sticks (see more on the benefits of apples for toddlers)
- Lime wedges for adults
Quick prep and assembly
- Cook the protein: Brown ground meat in a skillet with a touch of olive oil. Season simply with a pinch of salt and a mild sprinkle of cumin or paprika if desired. For an extra-quick route, use shredded rotisserie chicken or a mashed bean mix.
- Make the cheesy rice: Warm cooked rice in a saucepan over low heat, add cheese and a splash of milk, stirring until creamy. Keep warm.
- Prep toppings: Dice avocado and tomatoes; warm beans.
- Serve deconstructed: On a divided plate or small bowls, place a few tortilla wedges, a spoonful of meat, a scoop of beans, avocado, and cheesy rice. Offer a small dish of mild salsa or yogurt for dipping.
Tips for toddler success
- Texture matters: Make sure pieces are soft and small enough to prevent choking. Mash or finely chop any tougher bits.
- Let them help: Toddlers often eat more when they assemble their own bites—give them a tortilla wedge and a couple of toppings to place.
- Keep seasonings gentle: Start with mild flavors and gradually introduce spices over several meals.
- Reuse components: Leftover meat and rice can be frozen in small portions for fast weeknight dinners.
Meal prep and batch-cooking
- Cook a double batch of seasoned ground meat and freeze in 1-cup portions. Thaw in the fridge the night before.
- Make a large pot of rice at the weekend. Cheese it up fresh when serving.
- Pre-cut veggies and store in airtight containers for 3–4 days to speed assembly.
Variations and adaptations
- Dairy-free: Omit cheese in the rice and use mashed avocado and plain dairy-free yogurt for creaminess.
- Vegetarian: Replace meat with crumbled tofu or a spiced lentil mash.
- Finger-food focus: Cut tortillas into small strips and serve meat and beans in bite-sized piles for easy picking.
Safety note
Always sit with your child while they eat. For children under four, follow recommended choking-prevention practices: cut food into small pieces, avoid hard whole grapes and large chunks, and encourage slow, seated eating.
Kid-tested flavor combos
- Mild taco meat + mashed avocado + corn kernels
- Black beans + cheesy rice + tiny tomato cubes
- Shredded chicken + plain yogurt + soft apple sticks (for dipping)
Conclusion
If you want a faster cooked protein option to adapt for family nights, try the 15-minute soft tacos with ground chicken for inspiration on speedy, toddler-friendly taco filling. For ideas on serving taco-style bowls that the whole family can enjoy, this easy taco bowl recipe shows how to build a simple, crowd-pleasing plate that you can deconstruct for little ones.

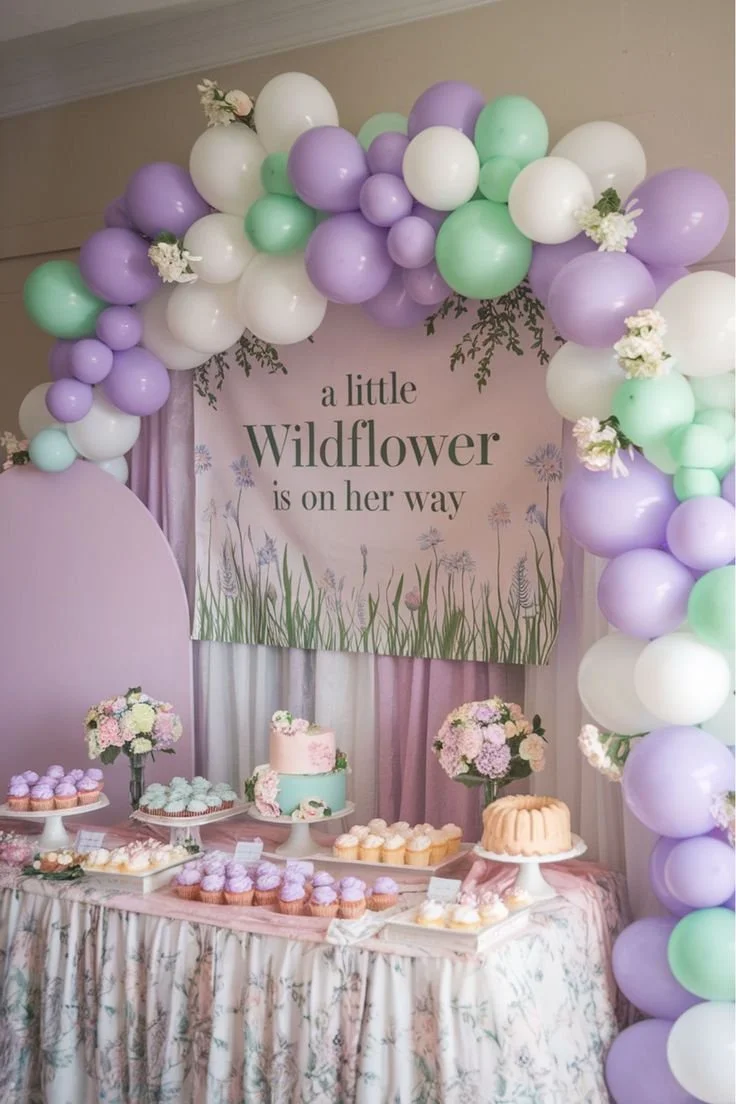
Girl Baby Shower Food
Girl Baby Shower Food: Easy, Pretty, and Crowd-Friendly Ideas
Celebrating a baby girl often means soft colors, pretty presentation, and food that’s easy to eat while mingling. If you need inspiration to build a menu that delights guests without keeping you in the kitchen all day, start with this collection of baby shower food ideas for a girl to set the tone and pace for planning.
Planning the Menu
Think about timing, guest count, and whether the shower is brunch, lunch, or afternoon tea. A balanced menu typically includes:
- A few finger-friendly appetizers
- One or two hearty mains or substantial salads
- A sweet selection of desserts
- A signature beverage plus coffee/tea
Set quantities by estimating 6–8 bites per person for appetizers, one main portion per person, and 2–3 small desserts per guest if offerings are varied.
Appetizers & Small Bites
Choose small items that can be served at room temperature so hosts aren’t stuck reheating:
- Cucumber rounds with herbed cream cheese
- Mini crostini with ricotta and roasted strawberries (pretty and pink-toned)
- Deviled eggs topped with smoked paprika and chives
- Caprese skewers with basil and balsamic glaze
Label allergen-prone items (nuts, dairy, gluten) so guests can choose freely.
Mains & Substantial Salads
For a midday shower, offer one warm main and one cold option:
- Baked chicken bites with a honey-mustard dip
- Quiche Lorraine or a veggie quiche cut into small squares
- Grain bowls (farro or quinoa) with roasted vegetables and feta
- A large, composed salad with seasonal fruit, toasted nuts, and a citrus vinaigrette
Serve self-serve stations for build-your-own sandwiches or bowls to reduce serving stress.
Sweets & Dessert Display
Desserts are a highlight—decorate them to match the theme:
- Mini cupcakes with pink buttercream and edible pearls
- Macarons in blush tones arranged on tiered trays
- Strawberry shortcake shooters or trifles in small glasses
- A decorated showpiece cake for photo moments
Mix textures (creamy, cakey, crunchy) and keep bite-sized portions so guests can sample multiple items.
Drinks & Signature Beverages
Offer one non-alcoholic signature drink and optional cocktails:
- Pink lemonade with fresh berries and mint
- Sparkling punch with fruit slices
- A light rosé or a prosecco bar with garnishes for those who drink
Provide pitchers of water and a coffee/tea station for variety.
Dietary Considerations & Presentation Tips
Include at least one vegetarian and one gluten-free option, clearly marked. Use pretty platters, consistent servingware, and small signs to name dishes and note allergens. Edible flowers, fresh herbs, and coordinated napkins add polish without much cost.
Pair your menu with one of these baby girl baby shower themes to create a cohesive look that ties food, décor, and invitations together.
Timeline & Day-Of Checklist
- 3–4 days before: finalize menu and shopping list
- 1–2 days before: make desserts that keep well and prep cold components
- Morning of: assemble appetizers and salads; set up drink station
- 30–45 minutes before guests arrive: bake or reheat warm items; arrange platters
Keep serving utensils, napkins, and trash/recycling bins accessible.
Conclusion
For more plated ideas and inspiration on snacks and sweets that fit a feminine, pastel-themed shower, check out this curated roundup at Cooks Well With Others’ Girl Baby Shower Food. If you want a larger collection of tested recipes, explore the collection of 44 Recipes for a Pretty in Pink Baby Shower from Taste of Home for specific recipes and serving suggestions.
Easy Baby Shower Food Ideas On a Budget
Easy Baby Shower Food Ideas on a Budget
Planning a baby shower doesn’t mean you need to overspend to impress your guests. With a few smart choices and simple recipes, you can put together a delicious spread that feels special without breaking the bank. If you’re planning a themed celebration, there are plenty of affordable ways to tailor the menu — for example, explore tailored options for a girl with this list of baby shower food ideas for a girl that keep cost and style in mind.
Below are practical, budget-friendly ideas and tips for building a tasty, stress-free baby shower menu.
Budget-Friendly Menu Framework
Keep the menu focused and balanced so guests have choices without you needing to prepare a huge variety.
- Appetizers: 2–3 options (one veggie, one cheese/cracker option, one warm bite)
- Main bites: 2–3 hearty items (sandwiches, wraps, or a simple pasta salad)
- Sides and salads: 1–2 crowd-pleasers (green salad, fruit platter)
- Desserts: 2 choices (a signature cake or cupcakes + a tray of cookies or bars)
- Drinks: 2 nonalcoholic choices (infused water, iced tea/lemonade) and optional simple mocktails
Inexpensive Food Ideas (and how to make them feel elevated)
- DIY Sandwich Platter: Use rotisserie chicken or deli meats, a few bread varieties (sliced baguette + slider rolls), and a platter of condiments and toppings. Arrange sliced veggies and pickles for color.
- Pasta Salad: Make big batches using budget pasta, fresh seasonal vegetables, a light vinaigrette, and a sprinkle of cheese. It’s cheap, filling, and served cold.
- Veggie Tray with Hummus: Buy produce in season or on sale, cut into attractive pieces, and serve with store-bought or homemade hummus.
- Mini Quiches or Frittata Squares: Eggs are affordable and protein-rich — make a large pan and cut into squares for easy serving.
- Stuffed Crescent Rolls: Use canned crescent dough to wrap fillings like ham and cheese or spinach and feta; bake and serve warm.
- Fruit Skewers or a Fruit Platter: Use a mix of seasonal fruit; skewers make them easy to eat and look festive.
- Cheese and Cracker Board: Choose one soft and one hard cheese, add grapes or jam, and include a few types of crackers for variety.
- Sweet Bars and Cookies: Brownies, lemon bars, and cut-out sugar cookies are economical and simple to scale up.
For easy protein-focused additions that are simple to prepare and gentle on the budget, consider prepared ideas like these 10 easy chicken baby food recipes that can inspire crowd-friendly chicken bites or salad mixes.
Presentation Tricks That Don’t Cost Much
- Use seasonal flowers or simple greenery as centerpieces instead of expensive floral arrangements.
- Serve on platters you or friends already own rather than renting fancy dishware.
- Label dishes with small cards or chalkboard tags — it looks intentional and helps guests with dietary preferences.
- Portion bites in cupcake liners, mini cups, or on skewers to reduce the need for utensils and speed up serving.
Shopping and Prep Tips to Save Money
- Make a list and buy in bulk where possible — staples like pasta, rice, and canned goods are cheaper that way.
- Choose store-brand basics for items like crackers, condiments, and baking ingredients.
- Shop seasonal produce and compare prices across stores or markets.
- Prep in advance: many salads, desserts, and cold dishes can be made a day or two ahead, cutting day-of stress and allowing bulk prep time.
- Delegate: ask a few close friends to bring one dish each — even small contributions like bread or a dessert help.
Simple Timeline for a Small Shower (10–20 guests)
- 7–10 days ahead: Finalize guest list, menu, and shopping list.
- 3–5 days ahead: Buy nonperishable items and any decor. Prepare and freeze baked goods if needed.
- 1 day ahead: Make salads, desserts, and anything that benefits from chilling. Set up serving areas and decorate.
- Day of: Warm hot dishes, assemble platters, and arrange food 30–60 minutes before guests arrive.
Dietary Considerations
Include at least one vegetarian and one gluten-free option if you know guests have restrictions, and label dishes clearly. Simple swaps — like using gluten-free crackers or a quinoa salad — make your menu more inclusive without adding much cost.
Conclusion
For more budget-conscious inspiration and a long list of affordable recipes, see the helpful roundup of Instacart’s budget baby shower food ideas. If you want tried-and-true crowd-pleasers to adapt for your shower, check out these popular Allrecipes baby shower dishes guests will love.
17+ Sweet Winter ONEderland Cakes to Try
17+ Sweet Winter ONEderland Cakes to Try
Winter ONEderland cakes are the perfect centerpiece for a first birthday, winter-themed party, or any celebration that calls for a frosty, whimsical touch. These cakes combine snowy decoration, cozy flavors, and playful details like tiny mittens, snowflakes, and woodland friends. If you want kid-friendly options and alternatives to sugar-heavy decorations, check out healthy sweet treats for toddlers for ideas you can adapt into cake-friendly elements.
Below you’ll find more than 17 creative cake ideas, flavor pairings, decorating tips, and serving suggestions to help you build a memorable Winter ONEderland spread.
Top 17+ ONEderland Cake Ideas
Classic Snow-Capped Vanilla Layer Cake
- Light vanilla sponge, vanilla buttercream, and shredded coconut “snow.” Top with edible silver dragées.
Peppermint Mocha Cake
- Chocolate cake with espresso-infused frosting and crushed candy cane accents for a festive bite.
Hot Cocoa Mug Cake Tower
- Mini bundt cakes stacked like a hot cocoa mug, with marshmallow-topped ganache “foam.”
Winter Citrus Almond Cake
- Orange or blood orange curd layered with almond cake and a thin lemon buttercream for brightness.
Carrot Cake with Maple Cream Cheese Frosting
- Earthy cake with cozy maple notes; decorate with fondant carrot toppers wearing tiny scarves.
Snowman Smash Cake
- A small smash cake decorated as a snowman using fondant features and a mini knit-hat topper.
Frozen Forest Chocolate Cake
- Dark chocolate sponge, chestnut cream, and chocolate bark trees dusted with powdered sugar.
Vanilla Bean and White Chocolate Ruffle Cake
- Elegant ruffles of white chocolate buttercream with pearl accents.
Gingerbread ONEderland Cake
- Spiced gingerbread layers, cinnamon buttercream, and gingerbread cookie houses around the base.
Salted Caramel Apple Cake
- Apple-studded cake layers with caramel buttercream and a drizzle of salted caramel.
- Blueberry Lavender Snow Cake
- Light blueberry sponge with lavender-infused frosting and sugared blueberries as snow-covered berries.
- Coconut Lime Snowball Cake
- Tropical twist: coconut cake rolled in shredded coconut with zesty lime curd between layers.
- Vanilla-Chamomile Baby-Friendly Cake
- Mild-flavored cake using chamomile infusion and naturally sweetened frosting for gentle palates.
- Red Velvet ONEderland
- Classic red velvet with cream cheese frosting and snowflake cake toppers.
- Lemon Poppy Seed Icy Delight
- Bright lemon poppy cake with silky lemon buttercream, perfect for balancing sweet wintery decor.
- Black Forest Snowglobe Cake
- Chocolate layers with cherry filling, finished with a clear gelatin “snowglobe” dome (for display only).
- Caramelized Pear and Mascarpone Cake
- Pear slices poached in winter spices layered with light mascarpone frosting.
- DIY Cupcake-Cake Hybrid
- Arrange decorated cupcakes into a cake shape for easy serving and varied flavors.
Decorating and Theme Tips
- Color palette: Stick to two or three coordinating colors (icy blue, silver, white; or warm neutrals like cream, taupe, and gold) to keep the design cohesive.
- Texture play: Combine smooth fondant elements with textured buttercream piping and edible glitter for depth.
- Simple toppers: Use wooden or fondant toppers shaped like mittens, snowflakes, animals, or number “1.”
- Natural accents: Twigs, pinecones, and dried orange slices (non-edible for display) can frame the cake on a serving platter.
- Kid-friendly alternatives: Replace hard candies and small decorations with soft fruit, cake-safe sprinkles, or frosting shapes. For baby-shower or maternity-centered celebrations, pair your cake styling with visual themes found in 32 maternity photoshoot ideas to create a cohesive look for photos and invitations.
Flavors, Fillings, and Frosting Pairings
- Chocolate + Salted Caramel: Rich and crowd-pleasing.
- Vanilla + Raspberry: Light, bright, and visually pretty when you add a thin layer of raspberry gel.
- Spice Cake + Brown Butter Frosting: Comforting winter spices with a nutty butter flavor.
- Citrus + Mascarpone: Keeps richness from feeling heavy; great for holiday brunch celebrations.
- Dairy-free/Vegan: Use coconut or almond-based frostings and plant-based milks for allergy-friendly options.
Baking, Assembly, and Serving Tips
- Bake even layers by chilling batter and using baking strips.
- Level cakes and apply a thin crumb coat before final frosting to achieve clean edges.
- For multi-tier cakes, use dowels for support and assemble on-site if transporting.
- Keep perishable fillings refrigerated and bring the cake to room temperature 30–60 minutes before serving for the best texture.
- Make ahead: Many cakes can be assembled a day in advance and decorated the morning of the event to preserve fresher frosting details.
Kid-Safe and Allergy-Friendly Considerations
- Offer a small smash or cut cake that avoids common allergens if guests include infants or toddlers.
- Consider natural colorings (fruit purees, beet or spinach powders) instead of artificial dyes.
- Label cakes clearly if they contain nuts, alcohol, or other common allergens so parents and guests can make informed choices.
Styling a Winter ONEderland Dessert Table
- Mix sizes: Combine a main cake with cupcakes, cake pops, and cookies in the same theme.
- Coordinate signage and platters: Use frosted glass, silver trays, and textured linens to reinforce the winter look.
- Lighting: Soft fairy lights and candles (battery-operated around food) enhance the snowy atmosphere.
- Drinks pairing: Offer warm cocoa, spiced cider, or an adult cocktail option to complement cake flavors.
Conclusion
Pair your Winter ONEderland desserts with a festive cocktail like the Cranberry Vodka Spritzer – A Holiday Cocktail Recipe for grown-up guests who want a seasonal sip. And if you’re planning a destination-themed winter celebration or looking for local inspiration, check out these 50 ways to celebrate winter in Oklahoma for ideas that can help shape your party activities and backdrop.
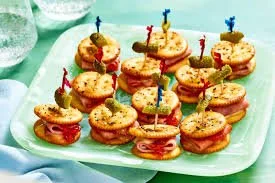
25 Crowd Pleasing Easy Party Appetizers to Use All Year
25 Crowd-Pleasing Easy Party Appetizers to Use All Year
Throwing a party any time of year is easier when you have a repertoire of simple, delicious appetizers that travel well, are easy to scale, and please a variety of tastes. Whether you’re hosting a backyard barbecue, a cozy winter gathering, or a casual baby shower, these 25 ideas will make planning faster and your guests happier. If you’re wondering what to bring and how to balance food with gifts at milestone events, consider guidance on bringing a gift to a gender reveal party to help decide how food fits into the occasion.
Below are grouped ideas, each with a quick how-to or tip so you can pick what suits your menu and schedule.
Cold and Make-Ahead Favorites
- Caprese Skewers — Cherry tomato, mini mozzarella, and basil threaded on toothpicks with a drizzle of balsamic glaze. Make ahead and keep chilled.
- Deviled Eggs — Classic filling with mayo, mustard, and paprika; try adding avocado or sriracha for a twist.
- Smoked Salmon Cucumber Bites — Sliced cucumber rounds topped with cream cheese, smoked salmon, and dill.
- Marinated Olives and Feta — Toss mixed olives with citrus zest, herbs, and olive oil; serve in a bowl with cubed feta.
- Cold Noodle Salad Cups — Asian-style soba or rice noodles tossed with sesame dressing, served in individual cups for easy grazing.
Warm Crowd-Winners
- Mini Meatballs with Dipping Sauce — Bake or simmer in sauce; keep warm in a slow cooker.
- Bacon-Wrapped Dates — Sweet dates stuffed with almonds or cheddar and wrapped in bacon; bake until crisp.
- Spinach and Artichoke Dip — Creamy, cheesy dip served hot with bread or chips; prepare ahead and reheat.
- Pigs in a Blanket — Ready-made dough wrapped around cocktail sausages and baked; offer mustard and ketchup.
- Queso Fundido with Chorizo — Melted cheese and spicy chorizo served with tortilla chips.
Vegetarian and Vegan Options
- Stuffed Mini Peppers — Fill with herbed goat cheese or a quinoa-vegetable mix for a vegan version.
- Hummus Trio with Veggies — Classic, roasted red pepper, and beet hummus served with pita and crudités.
- Mushroom Crostini — Sautéed mushrooms with garlic and thyme on toasted baguette slices.
- Falafel Bites with Tahini — Crisp falafel served with a lemony tahini dipping sauce.
- Sweet Potato Rounds with Black Beans — Roasted rounds topped with seasoned black beans and avocado.
Finger Foods & Handhelds
- Chicken Satay Skewers — Marinated chicken grilled and served with peanut sauce.
- Mini Grilled Cheese Sandwiches — Use a mix of cheeses and add caramelized onions for extra flavor.
- Shrimp Cocktail Shooters — Individual portions of chilled shrimp and cocktail sauce in shot glasses.
- Empanada Bites — Small hand pies filled with seasoned beef, chicken, or vegetables; freeze ahead.
- Bruschetta Bar — Offer several toppings (tomato-basil, white bean mash, tapenade) so guests can customize.
Dips, Boards, and Easy Assembly
- Charcuterie Board — A balanced board with cured meats, cheeses, fruit, nuts, and crackers; vary textures and colors.
- Seven-Layer Dip — Layer refried beans, guacamole, salsa, sour cream, cheese, olives, and green onions.
- Greek Yogurt Herb Dip with Pita Chips — A lighter dip option that still feels indulgent.
- Peanut Butter Banana Bites — Sliced banana topped with peanut butter and a chocolate drizzle; great for kid-friendly events. Pair these with tested preschool snack ideas when little guests are attending.
- Seasonal Fruit Platter with Honey-Yogurt Dip — Fresh fruit presented on a large tray with a simple sweet dip for a refreshing finish.
Quick Tips for Stress-Free Entertaining
- Pick 3–5 appetizer types to cover savory, sweet, warm, and cold options.
- Choose at least one make-ahead and one grab-and-go item.
- Label dishes that are vegetarian, vegan, gluten-free, or nut-containing to help guests with dietary needs.
- Use slow cookers, warming trays, or insulated carriers to keep warm items at the right temperature.
- Presentation matters: same bites look more enticing when grouped, garnished, or served in individual portions.
Conclusion
For more inspiration and recipe ideas to expand your appetizer rotation, check out this curated list of 25 Crowd-Pleasing Party Food Ideas by Love and Lemons. If you want recommendations on trendy, tried-and-true starters to bring to gatherings in the coming year, see the helpful roundup of The 25 Best Appetizers to Bring to a Party in 2025 by PureWow.
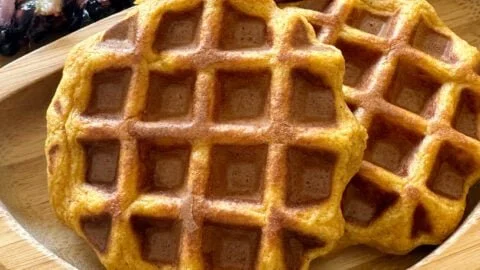
Sweet Potato Waffles
Sweet Potato Waffles: A Cozy, Nutritious Twist on Breakfast
Sweet potato waffles turn a familiar weekend favorite into something heartier and more nutritious. Roasted or mashed sweet potatoes add natural sweetness, moisture, and a dose of beta‑carotene, making these waffles great for family breakfasts, meal-prep, or portable snacks. For ideas on adapting potato-based recipes for little ones, check out this collection of gluten-free potato recipes for kids which can inspire child-friendly variations.
Why sweet potatoes work in waffles
Sweet potatoes:
- Add moisture without needing a lot of oil or butter.
- Contribute natural sweetness so you can cut back on added sugar.
- Provide vitamins and fiber that boost a typical waffle’s nutrition profile.
They’re versatile — you can use canned puree, leftover mash, or freshly roasted sweet potatoes.
Ingredients (makes about 6 waffles)
- 1 cup cooked and mashed sweet potato (about 1 medium potato)
- 1 3/4 cups all-purpose flour (or 1:1 gluten-free blend)
- 2 tablespoons brown sugar or maple syrup (optional)
- 2 teaspoons baking powder
- 1/2 teaspoon baking soda
- 1/2 teaspoon salt
- 1 teaspoon ground cinnamon (optional)
- 1 1/2 cups milk (dairy or plant-based)
- 2 large eggs
- 3 tablespoons melted butter or neutral oil
- 1 teaspoon vanilla extract
Method
- Preheat your waffle iron according to the manufacturer’s instructions.
- In a large bowl, whisk together flour, baking powder, baking soda, salt, and cinnamon.
- In another bowl, combine mashed sweet potato, milk, eggs, melted butter, vanilla, and brown sugar or maple syrup until smooth.
- Gently fold the wet ingredients into the dry ingredients until just combined; a few lumps are okay. If the batter seems too thick, add a splash more milk.
- Lightly grease the waffle iron and cook according to the appliance directions until golden and crisp on the outside.
- Keep waffles warm on a baking sheet in a 200°F (95°C) oven while you finish the batch.
Variations and tips
- For extra protein, replace 1/4 cup of flour with almond flour or add a scoop of neutral-flavored protein powder.
- Make them dairy-free by using almond or oat milk and coconut oil.
- Add mix-ins like chopped pecans, raisins, or a handful of oats for texture.
- To serve waffles to toddlers or pack them for school lunches, explore how other parents make small sweets healthier by browsing ideas for healthy sweet treats for toddlers.
- Waffles freeze well: cool completely, then stack with parchment between each piece and freeze in a zip-top bag. Reheat in a toaster or oven.
Serving suggestions
- Classic: butter and maple syrup.
- Savory-sweet: top with Greek yogurt, chopped herbs, and smoked salmon or a fried egg.
- Dessert: spread with ricotta and honey, or warm apple compote and a dollop of whipped cream.
- Make a sandwich: use two waffles with nut butter and banana or turkey and cranberry sauce.
Conclusion
For a tested recipe and additional techniques for making crisp, flavorful sweet potato waffles, see this detailed Sweet Potato Waffles Recipe from The Kitchn’s guide to sweet potato waffles, which includes tips for using leftover mash. If you prefer a version that specifically incorporates mashed sweet potatoes into the batter, this Sweet Potato Waffle Recipe with Mashed Sweet Potatoes offers step-by-step photos and serving ideas.
36 Cute & Creative 2nd Birthday Party for Girl Ideas
36 Cute & Creative 2nd Birthday Party Ideas for Girls
Turning two is a big moment — full of giggles, toddling steps, and tiny tastes of independence. This list of 36 cute and creative party ideas will help you plan a celebration that’s age-appropriate, memorable, and easy to pull off. For a different angle on early birthday celebrations, you might also enjoy these unique first birthday party ideas for boys for inspiration you can adapt.
Quick planning tips before you start
- Keep the guest list small: toddlers do best in short, quiet gatherings.
- Schedule around naps: mid-morning or late afternoon often works well.
- Simple activities + lots of free play keep little ones happy.
- Use disposable or washable decor to minimize cleanup.
36 Cute & Creative Ideas
- Princess Picnic — Spread blankets, pillows and a pile of soft toys for a royal tea.
- Tutu Dance Party — Ask guests to wear tutus; hire a music playlist of playful songs.
- Garden Tea — Child-sized tea set, floral decorations, and finger sandwiches.
- Floral Crown Workshop — Soft, faux flowers to make easy, comfy crowns.
- Butterfly Bash — Pastel butterflies on the walls and a simple butterfly wing craft.
- Teddy Bear Picnic — Each child brings a teddy for storytime and snack time.
- Rainbow Playdate — Bright balloons, colored snacks, and a rainbow finger-paint station.
- Storybook Soiree — Read a favorite picture book and have themed props.
- Farmyard Fun — Stuffed animals, hay-bale seating (or cushions), and animal masks.
- Toddler Olympics — Gentle races: crawl, push-toy relay, and bubble-chasing.
- Mermaid Splash — Pool play (supervised), shell decorations, and mermaid crowns.
- Unicorn Dreams — Pastel decor, glitter-safe face stickers, and a unicorn cake.
- Garden Safari — Magnifying glasses, plush bugs, and a nature scavenger hunt.
- Ball Pit Bonanza — Rent or build a small ball pit for sensory play.
- Bubbles & Balloons — Multiple bubble wands and helium balloons at varying heights.
- Farm-to-Table Snack Party — Simple veggies, fruit kabobs, and mini sandwiches.
- Ice Cream Social — Mini cones, a toppings bar, and pre-scooped flavors.
- Music & Movement — Shakers, scarves, and a short guided dance session.
- Painting Party — Washable paints, big paper rolls, and aprons for mini Picassos.
- Tea Party for Two-Year-Olds — Soft pastries, warm cocoa, and plush guest chairs.
- Vintage Carousel Theme — Soft stripes, carnival music, and carousel horse cutouts.
- Garden Fairy Gathering — Tiny wings, sparkly wands, and a fairy story circle.
- Picnic in the Park — Simple blanket seating and classic outdoor games.
- Wheels & Choo-Choo — Ride-on toys, cardboard trains, and conductor hats.
- Cupcake Decorating — Pre-baked cupcakes, child-safe frosting, and sprinkles.
- Dinosaur Dig — Sensory sand box with toy bones and safe digging tools.
- Rainbow Fruit Party — Color-themed foods and a fruit skewer station.
- Little Artist Studio — Easels, washable brushes, and stamp pads.
- Farm-to-Table Snack Party — A repeat-worthy idea: let kids assemble simple snacks.
- Soft Play Zone — Rent soft blocks and tunnels for safe exploration.
- Balloon Pop Surprises — Soft prizes inside unpopped balloons (supervised).
- Puppet Theater — Simple sock puppets and a short puppet show.
- Pajama Brunch — Cozy PJs, storytime, and soft breakfast foods.
- Garden Birdwatch — Make easy bird feeders and do a short spotting walk.
- Little Chef Party — No-heat “cooking” (decorate mini pizzas or assemble parfaits).
- Color-By-Number Mural — Large, washable mural with big numbered color sections.
Note: several ideas overlap by theme — pick two or three that fit your toddler’s temperament and combine for a cohesive celebration.
Decorations, food, and activities — practical tips
- Decorations: choose soft colors and avoid tiny pieces that could be swallowed. Paper lanterns, tissue pom-poms, and fabric bunting create a warm look without hazards.
- Food: favor simple, bite-sized, low-sugar options — mini sandwiches, fruit, cheese cubes, and soft muffins. Clearly label any allergens.
- Cake: consider a smash cake for the birthday child plus a larger sheet cake for guests to make serving easier.
- Activities: keep organized activities to 10–15 minutes; toddlers lose focus quickly. Rotate stations (craft, sensory bin, story corner).
- Favors: practical favors like bubbles, board books, or a small plush toy are appreciated by parents.
If you want to see how a themed celebration can be built around a single idea, check these creative 10th birthday party ideas for approaches that scale down well for younger children.
Safety checklist
- Supervision: always have enough adults to watch little ones — a ratio of at least one adult per 3–4 toddlers is wise.
- Choking hazards: remove small decorations and avoid food like whole grapes or popcorn unless cut or age-appropriate.
- Allergies: ask parents ahead of time about allergies and provide a nut-free table if needed.
Conclusion
For themed paper goods and invitations to match your party vision, consider options like Tutu Cute Birthday Invitations & Birthday Party Invites. And if a playful puppy theme appeals, this real-party example offers concrete ideas you can adapt: Pepper’s Puppy Pawty: Creative 2nd Birthday Party Ideas!.
Have fun planning — the best parties are the ones that leave room for laughter, hugs, and a little bit of toddler chaos.
11 *Adorable* March Baby Shower Ideas for Spring!
11 Adorable March Baby Shower Ideas for Spring!
March is the perfect month to celebrate new life: crocuses and daffodils are poking through the soil, the air finally feels fresher, and guests are ready to trade winter coats for light layers. Whether you’re planning a cozy indoor shower or a breezy backyard brunch, these 11 spring-forward ideas will make the day feel bright, cheerful, and utterly adorable. If you want inspo for menus as sweet as the season, check out these baby shower food ideas for a girl to get started.
- Daffodil Delight
- Theme: Sunlit yellow and crisp white with bunches of daffodils as centerpieces.
- Decor: Use mason jars wrapped in twine and filled with daffodil stems, soft yellow linens, and botanical place cards.
- Tip: Offer a simple lemon or elderflower beverage to echo the fresh citrus vibe.
- Lucky Clover (St. Patrick’s Day Friendly)
- Theme: Subtle greens, soft gold accents, and small clover motifs.
- Decor: Scatter clover confetti, hang gold string lights, and place tiny potted clovers as favors.
- Game idea: A baby-name scramble with “lucky” prizes like green-scented soaps or tea packets.
- Garden Picnic Brunch
- Theme: Pastel gingham blankets, picnic baskets, and delicate florals.
- Decor: Set up low tables or picnic rugs with cushions, floral garlands, and a brunch-style buffet.
- Tip: If you’re moving the party outdoors, these outside baby shower ideas for girls include creative layout and comfort tips for guests.
- Rainy-Day Cozy Cloud
- Theme: Soft grays, sky-blue accents, and cloud or raindrop motifs — perfect for an end-of-winter vibe.
- Decor: Hang paper cloud garlands, use umbrella props as photo backdrops, and offer warm drinks like spiced cocoa or chai.
- Favor idea: Tiny jars of “stormy day” tea blends or custom umbrellas.
- Bunny & Chick Spring Fête
- Theme: Playful baby animals in warm pastels — ideal for a family-friendly gathering.
- Decor: Plush bunnies as table mascots, chick-themed cupcakes, and carrot-shaped place cards.
- Activity: Have a onesie-decorating station with washable fabric markers and iron-on patches.
- Butterfly Garden
- Theme: Ethereal butterflies, soft pinks, lavenders, and lots of greenery.
- Decor: Butterfly cutouts on branches, edible butterfly-topped cakes, and a fluttering photo wall.
- Craft: Pressed-flower bookmarks guests can make and take home.
- Seed-Planting Favor Bar
- Theme: Celebrate growth with seed packets, mini planters, and gardening-inspired decor.
- Station idea: A DIY favor bar where guests assemble a little pot with soil and seeds labeled with planting tips — a living memento of the shower.
- Floral High Tea
- Theme: Elegant teacups, tiered pastry stands, and vintage florals.
- Menu: Finger sandwiches, scones, petit fours, and an assortment of teas — light and refined for a daytime shower.
- Decor: Lace table runners, mismatched china, and soft pastel napkins.
- Equinox-Inspired Neutral Shower
- Theme: Earthy neutrals and natural textures to honor the balance of day and night in March.
- Decor: Wooden accents, potted succulents, and amber glass vases for a modern, minimalist spring look.
- Sunny Brunch with Mimosa Bar
- Theme: Bright citrus colors and bubbly cheer.
- Food pairing: Fresh fruit platters, quiche, and mini waffles.
- Tip: Provide juice options (orange, peach, mango) and nonalcoholic sparkling alternatives for all guests.
- Storybook Spring
- Theme: Imagine classic children’s books brought to life — think Beatrix Potter or Peter Rabbit.
- Decor: Illustrated pages framed as table art, storytime corner for mixed-age guests, and literary quote banners.
- Activity: A baby-book wish tree where guests write wishes and book recommendations for the baby.
Planning tips to tie everything together
- Color palette: Pick two main colors and one accent for a cohesive look.
- Keepsakes: Ask guests to bring a book instead of a card; create a signing area where they can write a message inside the cover.
- Comfort: If the shower is outdoors, provide blankets, shade umbrellas, or a warming station depending on the weather.
- Games: Favor short, sweet games that keep the energy up without taking too much time — diaper raffle, baby-prediction cards, or a gentle trivia about parenthood.
Conclusion
For more themed inspiration and ideas that capture the spirit of the season, consult the curated list of spring baby shower themes from The Bump to expand on any of the concepts above. If you need help wording your invites to match your chosen theme, these baby shower invitation wording ideas from Paperless Post offer polished phrasing for every style of shower.
Simple Spring First Birthday Party Ideas
Simple Spring First Birthday Party Ideas
Spring is the perfect season to celebrate your baby’s first birthday: fresh colors, mild weather, and seasonal blooms make decorating and planning easy. If you’re looking for straightforward ways to arrange a memorable day without stress, these simple spring-themed ideas will help you host a sweet, low-fuss celebration. For focused themes geared toward little ones, see these unique first birthday party ideas for boys for further inspiration you can adapt to a spring palette.
Pick a Gentle Theme and Color Palette
- Go with soft pastels (mint, blush, buttercup yellow, sky blue) or nature-inspired palettes (leafy green and soft brown).
- Simple themes that pair well with spring: garden party, baby animals (bunnies, chicks), picnic, or floral tea.
- Use one main accent color plus neutrals to keep decorations cohesive and calm.
Venue and Timing
- Host outdoors if weather allows: backyard, local park pavilion, or community garden.
- If indoors, choose a bright room with natural light and space for a safe play area.
- Aim for a late-morning or early-afternoon timeframe that fits a baby’s nap schedule — around 10:30–12:30 or 2:00–4:00 works well.
Invitations and Guest List
- Keep the guest list small to reduce noise and overstimulation (close family and a few friends).
- Send simple digital invitations with a photo or soft illustration of your theme.
- Include a short note about comfort items: strollers, baby carriers, and labeled changing areas.
Easy Decorations That Look Charming
- Use fresh or faux greenery and potted flowers as dual-purpose décor and take-home favors.
- Create a simple photo backdrop with a fabric drop, garland, and a few balloons in your palette.
- Add a "first-year" photo string: hang monthly photos of your baby along a ribbon for guests to enjoy.
Activities & Entertainment
- Sensory play station: a shaded area with safe textures (soft scarves, board books, stacking toys).
- Bubble time: a gentle bubble machine or adult-blown bubbles delights toddlers and looks great in photos.
- Short group activities: a sing-along or storytime (5–10 minutes) so little guests stay engaged but not overwhelmed.
Food & Cake — Simple and Safe
- Finger-food-friendly snacks: soft fruit slices, mini sandwiches, yogurt melts, and cheese cubes.
- Offer adult-sized options on a separate table so babies have safe, bite-sized portions.
- For the cake, consider a small smash cake for the birthday child and a larger sheet cake or cupcakes for guests to keep serving minimal.
Favors and Keepsakes
- Give potted succulents or seed packets as spring-appropriate favors that guests can plant later.
- Provide a small keepsake for the birthday child, such as a guest-signed board or a framed handprint station.
Photo Tips
- Schedule a few dedicated photo moments: family photos, cake smash, and toddler playtime.
- Use natural light when possible and avoid direct midday sun; shaded areas produce softer, more flattering images.
Practical Considerations
- Have a weather backup plan if hosting outside (pop-up canopy or move indoors).
- Prepare a diaper and first-aid station, and keep extra sunscreen and bug spray handy but out of toddler reach.
- Keep cleaning supplies accessible for quick spills and sticky fingers.
Variations for Different Budgets
- Low budget: DIY decorations, potluck-style snacks, and a neighborhood park permit if required.
- Mid budget: rented tables and chairs, a simple balloon garland, and a local baker for cupcakes.
- Higher budget: event stylist for setup, rented photo booth, or musician for live sing-alongs.
Extras and Adaptations
- If you want ideas that scale for different ages or sibling celebrations, you can adapt motifs and activities; for example, older-kid elements can be drawn from broader birthday resources like tasteful 10th birthday party ideas that emphasize theme cohesion and guest experience.
Conclusion
For a collection of playful, age-appropriate themes you can adapt to spring, check out the helpful roundup of first birthday party themes from Happiest Baby, which offers dozens of creative starting points. If you want spring-specific styling and step-by-step décor ideas, review the practical suggestions in this Spring-Themed First Birthday Ideas guide from Candidly Crafted for more visuals and DIY tips.
