
Imagine this: It’s a busy day, and you’ve got a million things to juggle. The kids are hungry, and you need to whip up something that not only satisfies but also feels good to eat. Sound familiar? We’ve all been there. That’s where my go-to pretzel recipe comes in to save the day—a recipe that’s as easy as it is delicious. This pretzel minutes recipe delivers the flavor you want with a lighter, feel-good twist. It’s perfect for quick lunches, snack boards, family dinners, or just those moments when comfort food is calling your name. Let’s dive in!
Finding the Right Balance
As parents, we often find ourselves torn between convenience and nutrition. We’ve got to keep our little ones happy while also making sure they’re eating something that fuels their growth and keeps them energized for play. This pretzel recipe hits that sweet spot!
It’s light, satisfying, and oh-so-delicious—how can you pass that up? You might think "homemade pretzels" sounds complicated, but I promise you, this recipe is simple enough for a weeknight dinner. Plus, it’s versatile. Depending on what your kids like, you can customize each batch!
The Magic of Pretzels
Before we get to the recipe, let’s chat about why pretzels are such a fantastic choice for kids (and parents!). They’re chewy, fun to shape, and come with endless dipping options. Seriously, what kid doesn’t love a good dip? The satisfaction of pulling apart a warm pretzel and dunking it into mustard, melted cheese, or even a sweet cinnamon sugar mix is a treat beyond compare.
This recipe allows your kids to get involved in the kitchen, too. Picture this: dough flying, laughter echoing—what a great way to spend time together! You can even teach them a bit about the science of baking, like what happens when you make the dough rise or how the baking soda bath creates that iconic pretzel crust.
So, are you ready to learn how to make these delightful snacks? Grab your apron, and let’s get started!
Ingredients You’ll Need
Here’s everything you’ll need for this easy pretzel recipe:
- 1 ½ cups warm water
- 1 packet instant yeast
- 2 tablespoons sugar
- 4 cups all-purpose flour (or whole wheat for a healthier touch)
- 1 teaspoon salt
- ⅓ cup baking soda
- Coarse sea salt, for topping
- Optional: melted butter or an egg wash for that golden finish
Quick Tips for Perfect Pretzels
- Warm Water: Make sure your water is warm, not hot—about 110°F is perfect. This helps activate the yeast!
- Fresh Yeast: Always check the expiration date on your yeast. Fresh yeast means better rise and texture.
- Dough Consistency: The dough should be soft but not too sticky. Adjust with a little extra flour if necessary.
Making the Pretzels
Now, let’s break down the steps. It’s easier than you think!
Step 1: Mixing the Dough
In a large mixing bowl, combine the warm water, sugar, and yeast. Stir gently and let it sit for about 5 minutes. You should see some bubbles forming—that’s the yeast springing to life!
Next, add in the flour and salt and mix until combined. The dough should start pulling away from the sides of the bowl. If it’s too sticky, sprinkle in a little more flour as you mix.
Step 2: Kneading the Dough
Flour a clean surface and turn the dough out of the bowl. Knead it for about 5-7 minutes until it becomes smooth and elastic. This is a great opportunity to involve your toddlers. Let them take turns kneading; it’s a fantastic way to build their motor skills!
Step 3: Letting it Rise
Once your dough is kneaded, place it in a greased bowl and cover it with a towel. Let it rise in a warm place for about 1 hour until it has doubled in size. Here’s a little pro tip—if you want to speed things up, you can turn your oven on low for a few minutes, then turn it off and place the dough inside.
Step 4: Shaping Pretzels
Once the dough has risen, it’s time for the fun part—shaping! Preheat your oven to 425°F. You’ll want to divide the dough into small balls, about the size of a golf ball. Roll each ball into a long snake shape, about 20 inches long. Then, twist it into a pretzel shape.
Set your shaped pretzels on parchment-lined baking sheets. They can be close together since they won’t spread much.
Step 5: The Baking Soda Bath
In a large pot, bring about 8 cups of water to a boil and carefully stir in the baking soda (it will bubble up!). Drop your pretzels into the boiling bath for about 30 seconds each. This step is crucial for getting that signature chewy pretzel crust.
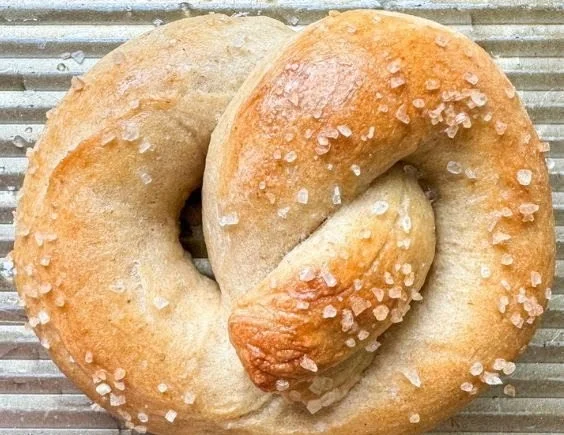
After boiling, place them back on the baking sheet. Brush them with melted butter or an egg wash (which gives them that beautiful golden-brown color) and sprinkle with coarse sea salt.
Step 6: Baking
Bake them for 12-15 minutes until they are golden brown. Your kitchen will smell amazing, and I promise them finishing off quickly will be a matter of minutes. Kids and parents alike will be hovering around, waiting for that first bite.
Bonus Ideas for Serving
Now, before we wrap things up, let’s brainstorm some fun ways to enjoy your pretzels:
- Dipping Stations: Set up a little station with different dips—cheese sauce, mustard, or even hummus!
- Add Flavors: Want to mix it up? Try adding garlic powder or rosemary into the dough for flavored pretzels.
- Sweet Treats: After baking, dip them in melted chocolate or sprinkle them with cinnamon sugar for a dessert twist.
Mistakes to Avoid
- Skipping the Baking Soda Bath: Don’t skip this step! It’s what gives the pretzels that delightful crust.
- Too Much Flour: Be mindful of how much flour you add. Too much will make your pretzels dense and dry.
- Not Letting Dough Rise Enough: If you rush this step, your pretzels won’t be as fluffy and delicious.
Conclusion
There you have it—a delightful, feel-good pretzel recipe that’s bound to become a family favorite! It’s simple enough to make whenever you’re in the mood for something comforting, yet impressive enough to serve at a family gathering. Whether you’re preparing a quick lunch or a fun dinner, these pretzels are versatile and irresistible. So, why not save the recipe for your next baking adventure?
If you’re interested in exploring gluten-free options, you can check out these gluten-free soft pretzel twists. And for a different take on homemade pretzels, Sally’s Baking Addiction has a wonderful easy homemade soft pretzel recipe that’s worth trying out. Happy baking!
